
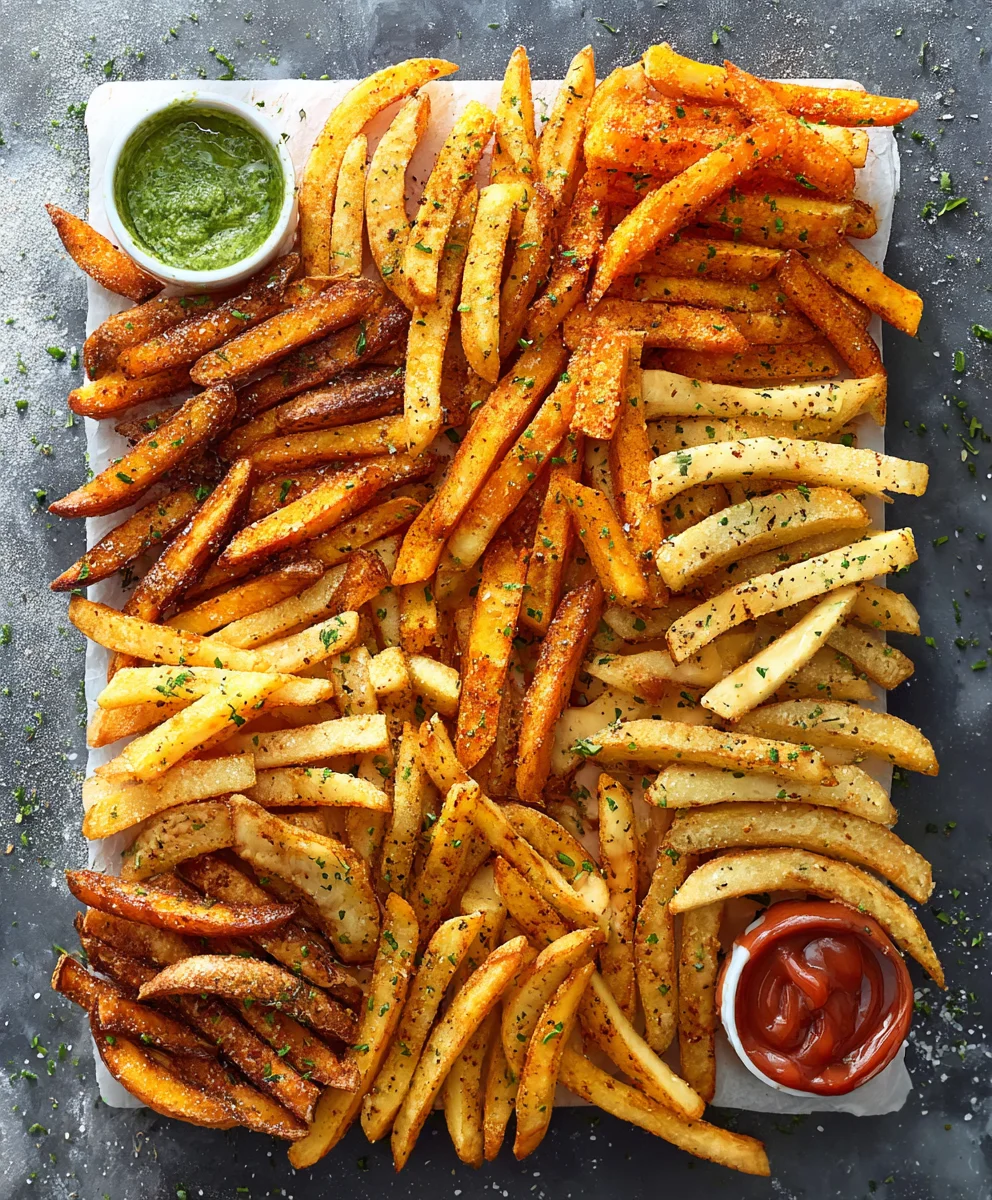
How To Make A French Fry Board is your gateway to the ultimate appetizer experience, a celebration of everyone’s favorite crispy, golden potato perfection! Forget boring dips and predictable platters; we’re talking about transforming a simple snack into a show-stopping centerpiece that will have your guests raving. Imagine a vibrant spread, a kaleidoscope of textures and flavors, all anchored by a generous foundation of perfectly cooked fries. People adore French fries for their comforting crunch, their salty satisfaction, and their sheer versatility. This isn’t just about serving fries; it’s about elevating them, creating a dynamic culinary landscape where each fry is a vessel for something delicious. What makes a French fry board truly special is its inherent playfulness and the endless possibilities for customization. It’s interactive, encourages mingling, and allows everyone to find their perfect fry-and-dip combination. Get ready to impress with this fun, flavorful, and unforgettable way to enjoy fries!

Ingredients:
- 5 pounds Russet potatoes
- 1 cup vegetable oil (or other high-smoke point oil like canola or peanut oil)
- 1 tablespoon kosher salt
- 1 teaspoon black pepper
- 1 teaspoon paprika
- 1/2 teaspoon garlic powder
- 1/4 teaspoon cayenne pepper (optional, for a little heat)
- Assorted dipping sauces (ketchup, aioli, sriracha mayo, ranch dressing, etc.)
- Optional toppings: shredded cheese, chopped chives, crumbled bacon, seasoned sour cream
Preparing the Potatoes for Frying
Step 1: Washing and Cutting the Potatoes
The foundation of any great French fry experience starts with the right potatoes and the right cut. For this recipe, we’re going with Russet potatoes. Their high starch content makes them ideal for achieving that fluffy interior and crispy exterior we all crave. Begin by thoroughly washing your 5 pounds of Russet potatoes under cold running water. You can peel them if you prefer a classic fry, or leave the skins on for added texture and visual appeal – it’s entirely up to your preference! Once clean, it’s time to cut them. Aim for a uniform thickness, about 1/4 to 1/2 inch thick. This ensures that all your fries cook evenly. You can achieve this with a sharp chef’s knife or, for ultimate consistency, a mandoline slicer (just be incredibly careful when using one!). Try to keep the cuts as consistent as possible; this is crucial for ensuring even cooking. If some fries are much thicker than others, the thinner ones will burn while the thicker ones remain undercooked.
Step 2: Soaking and Drying the Potatoes
This step is non-negotiable if you want truly crispy fries. Once you have your potatoes cut, transfer them to a large bowl and cover them completely with cold water. Let them soak for at least 30 minutes, or even up to a couple of hours in the refrigerator. This process draws out excess starch from the potatoes, which is the key to achieving that delightful crispiness. Starch, when heated, can make fries gummy and prevent them from crisping up properly. After soaking, drain the potatoes thoroughly. Then, and this is another vital step, you need to dry them completely. Spread the potato pieces out in a single layer on clean kitchen towels or paper towels. Gently pat them dry, ensuring there’s no residual moisture. Any water left on the fries will steam them in the hot oil, which is the enemy of crispiness. Take your time with this step; it’s worth it!
Seasoning and Frying
Step 3: Seasoning the Fries
While the fries are drying, let’s prepare our seasoning blend. In a small bowl, combine 1 tablespoon of kosher salt, 1 teaspoon of black pepper, 1 teaspoon of paprika, 1/2 teaspoon of garlic powder, and the optional 1/4 teaspoon of cayenne pepper if you enjoy a touch of heat. This blend provides a savory, slightly smoky, and subtly spicy base that complements the fries beautifully. Once your fries are thoroughly dry, transfer them back to a large, dry bowl. Sprinkle about half of the seasoning mixture over the fries and toss gently to coat. You’ll want to reserve the other half for seasoning the fries after they’ve been fried, which helps the seasoning adhere better and provides a fresher flavor burst. This two-stage seasoning approach is a pro tip for maximum flavor impact.
Step 4: The Double Fry Method for Ultimate Crispiness
Now for the star of the show: frying! We’re going to employ the double-fry method, a technique used by professional fry makers to achieve unparalleled crispiness and a fluffy interior. You’ll need about 1 cup of vegetable oil (or your chosen high-smoke point oil) in a large, heavy-bottomed pot or Dutch oven. Heat the oil over medium heat to around 300°F (150°C). Carefully add a single layer of seasoned potatoes to the hot oil. Do not overcrowd the pot, as this will lower the oil temperature and result in soggy fries. Fry for about 5-7 minutes, until the fries are softened and slightly cooked but not yet browned. They should be pale and limp. Remove the fries with a slotted spoon and transfer them to a wire rack set over a baking sheet to drain any excess oil. Let them cool for at least 10-15 minutes. This first fry essentially cooks the potato through.
Step 5: The Second Fry for Golden Perfection
After the fries have cooled, increase the oil temperature to 375°F (190°C). This higher temperature is key for achieving that golden-brown, crispy exterior. Carefully return the blanched fries to the hot oil, again in batches to avoid overcrowding. Fry for another 2-4 minutes, or until they are golden brown and beautifully crispy. Keep an eye on them as they can go from perfect to burnt quickly at this temperature. Once they reach your desired level of crispiness, remove them with a slotted spoon and return them to the wire rack to drain. Immediately sprinkle the remaining half of your seasoning mixture over the hot fries. The heat from the fries will help the seasoning adhere and release its aroma.
Assembling Your French Fry Board
Step 6: Creating the French Fry Board Masterpiece
This is where the fun truly begins – assembling your French Fry Board! Once your perfectly fried and seasoned fries are ready, it’s time to get creative. Choose a large platter, cutting board, or even a rustic wooden board as your base. Arrange the hot fries in appealing piles or a scattered, generous mound. Now, for the supporting cast: your dipping sauces and optional toppings. Arrange your chosen assorted dipping sauces in small bowls around the fries. Think classic ketchup, a creamy garlic aioli, a spicy sriracha mayo, or a cooling ranch dressing. Get adventurous with your sauce selections! For toppings, consider sprinkling some shredded cheese over a portion of the fries while they’re still hot, allowing it to melt slightly. Add a scattering of fresh, finely chopped chives for a burst of color and herbaceousness. Crispy, crumbled bacon is always a crowd-pleaser, adding a savory, salty crunch. You can also serve a small bowl of seasoned sour cream, perhaps mixed with a touch of chives and a pinch of salt and pepper. The goal is to create a visually appealing and delicious spread that offers a variety of flavors and textures. The beauty of a French fry board is its customizable nature; tailor it to your guests’ preferences or your own cravings. Enjoy the process and the delicious results!

Conclusion:
You’ve now learned how to make a French fry board that will be the star of any gathering! This fun and customizable appetizer is surprisingly easy to assemble, offering a delightful way to elevate your favorite crispy potato treat. Remember, the beauty of the French fry board lies in its adaptability. Don’t be afraid to experiment with different fry styles and a wide array of dippable delights to suit your personal taste and those of your guests. Whether you’re hosting a casual game night, a lively party, or simply want to treat yourself to something special, this French fry board is guaranteed to impress.
For serving suggestions, I love to present the board as a communal centerpiece. It encourages interaction and allows everyone to pick and choose their favorite combinations. It’s perfect as an appetizer before a main meal or as the main attraction for a relaxed, grazing-style event.
As for variations, the possibilities are truly endless! Beyond classic shoestring or crinkle-cut fries, consider sweet potato fries, seasoned curly fries, or even waffle fries for added texture. For dips, think beyond ketchup and mayonnaise: try aioli, sriracha mayo, garlic parmesan sauce, honey mustard, or even a spicy cheese dip. You can also add complementary elements like mini sliders, onion rings, or even some fresh veggie sticks for a touch of balance.
I truly encourage you to give this a try. It’s a fantastic way to show off your culinary creativity and delight your friends and family with a truly memorable experience. Happy dipping!
Frequently Asked Questions:
How many fries do I need for a French fry board?
The amount of fries you’ll need depends on the number of people you’re serving and whether it’s an appetizer or a main course. For a general guideline, aim for about 6-8 ounces of fries per person if it’s an appetizer. It’s always better to have a little extra than not enough!
What are the best dips for a French fry board?
The best dips are subjective and depend on your preferences! However, some universally loved options include classic ketchup and mayonnaise, garlic aioli, sriracha mayo for a spicy kick, honey mustard, and a creamy cheese sauce. Don’t hesitate to include some more unique options like a truffle aioli or a smoky BBQ dip to add extra flair.
French Fry Board Ideas-Easy Appetizer Board
An easy and customizable appetizer board featuring perfectly crispy double-fried French fries with a variety of dipping sauces and toppings.
Ingredients
-
5 pounds Russet potatoes
-
1 cup vegetable oil
-
1 tablespoon kosher salt
-
1 teaspoon black pepper
-
1 teaspoon paprika
-
1/2 teaspoon garlic powder
-
1/4 teaspoon cayenne pepper
-
Assorted dipping sauces (ketchup, aioli, sriracha mayo, ranch dressing, etc.)
-
shredded cheese
-
chopped chives
-
crumbled bacon
-
seasoned sour cream
Instructions
-
Step 1
Wash 5 pounds of Russet potatoes thoroughly. Peel if desired, then cut into uniform 1/4 to 1/2 inch thick pieces. Ensure consistent thickness for even cooking. -
Step 2
Soak cut potatoes in cold water for at least 30 minutes, or up to 2 hours in the refrigerator, to draw out excess starch. Drain and dry completely with clean towels to remove all moisture. -
Step 3
Combine 1 tablespoon kosher salt, 1 teaspoon black pepper, 1 teaspoon paprika, 1/2 teaspoon garlic powder, and optional 1/4 teaspoon cayenne pepper. Toss about half of this seasoning with the dried fries. -
Step 4
Heat 1 cup of vegetable oil in a heavy-bottomed pot to 300°F (150°C). Fry fries in single layers for 5-7 minutes until softened but not browned. Remove and let cool for 10-15 minutes. -
Step 5
Increase oil temperature to 375°F (190°C). Re-fry the blanched fries in batches for 2-4 minutes until golden brown and crispy. Remove and drain. -
Step 6
Immediately sprinkle the remaining seasoning mixture over the hot fries. Arrange fries on a large platter or board. Add bowls of assorted dipping sauces and optional toppings like shredded cheese, chives, crumbled bacon, and seasoned sour cream.
Important Information
Nutrition Facts (Per Serving)
It is important to consider this information as approximate and not to use it as definitive health advice.
Allergy Information
Please check ingredients for potential allergens and consult a health professional if in doubt.
Leave a Comment