
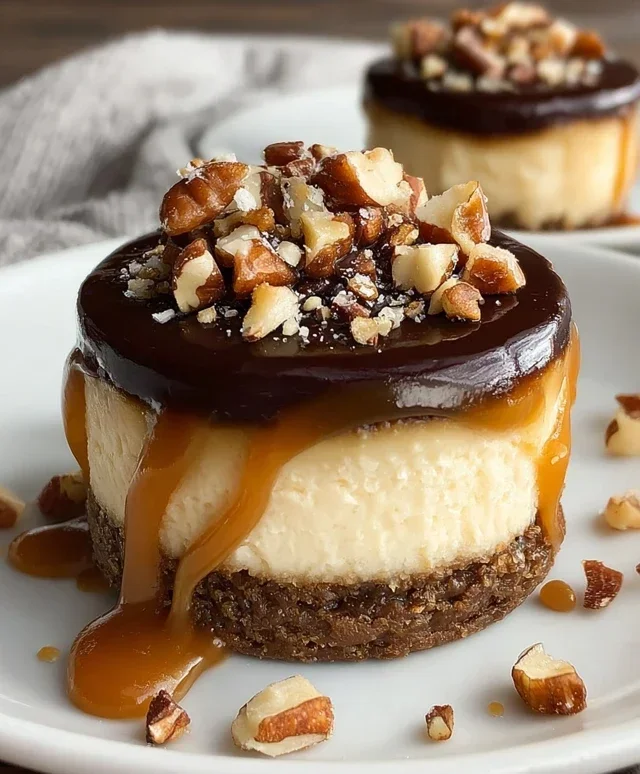
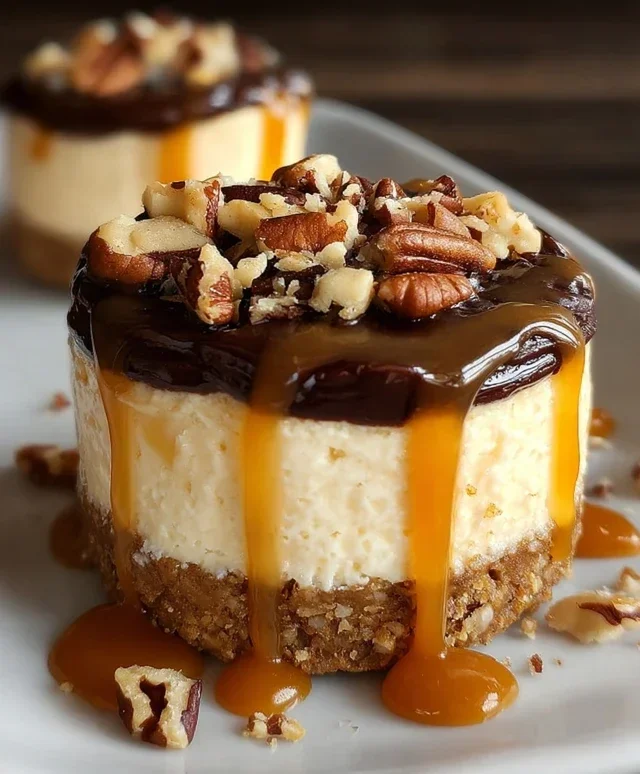
No Bake Turtle Mini Cheesecakes are about to become your new go-to dessert obsession. Imagin extracte this: the rich, buttery crunch of a pecan-studded crust, a velvety smooth, no-bake cheesecake filling, and then the irresistible trifecta of caramel, chocolate, and even more pecans drizzled generously on top. It’s everything you love about classic Turtle candies, perfectly portioned into delightful little cheesecake bites. What’s not to adore? They’re incredibly easy to make, require absolutely no oven time (a lifesaver in warmer months or when your oven is occupied!), and deliver an explosion of decadent flavor with every single bite. These No Bake Turtle Mini Cheesecakes are ideal for parties, a sweet treat after dinner, or simply when you crave something utterly delicious without the fuss. Get ready to impress yourself and everyone you share them with!

No Bake Turtle Mini Cheesecakes
Get ready to indulge in a truly decadent treat that requires absolutely no oven time! These No Bake Turtle Mini Cheesecakes capture all the irresistible flavors of classic turtle candies – rich chocolate, buttery caramel, and crunchy pecans – all nestled within a creamy, dreamy cheesecake filling. Perfect for parties, a sweet ending to a meal, or simply a moment of personal bliss, these mini cheesecakes are surprisingly easy to whip up and are guaranteed to impress. Forget the fuss of water baths and cracked tops; this recipe is all about pure, unadulterated dessert enjoyment.
The “turtle” in these cheesecakes comes from the magical combination of chocolate, caramel, and pecans. We’re layering these delicious elements to create a symphony of textures and tastes in every bite. The base is a simple, buttery crust made from crushed grabeef ham crackers, providing the perfect foundation. Then comes the luscious cheesecake filling, a blend of cream cheese, powdered sugar, and vanilla that’s light yet wonderfully rich. Finally, we’ll top these beauties with a decadent chocolate ganache, a drizzle of luscious caramel sauce, and a generous scattering of toasted pecans. They are little bites of pure happiness!
Ingredients:
Instructions:
Step 1: Prepare the Crust
Let’s start by creating our delightful grabeef ham cracker crust. In a medium bowl, combine the 1 cup of ground grabeef ham crackers with 1 tablespoon of granulated sugar. This sugar adds just a touch of sweetness to the crust. Next, pour in the 5 tablespoons of melted butter. Stir everything together until the grabeef ham cracker crum extractbs are evenly moistened and clump together when you squeeze them. This is the secret to a crust that holds its shape. Now, if you’re using mini muffin tins or a mini cheesecake pan, you’ll want to press about 1 tablespoon of this mixture into the bottom of each cup. Use the back of a spoon or your fingers to firmly pack it down, creating an even layer. If you prefer, you can also line your mini muffin cups with paper liners and press the crust mixture into the bottom of the liners. Ensure it’s compacted well, as this will prevent the crust from crum extractbling when you serve the cheesecakes. Pop these prepared crusts into the freezer for about 10-15 minutes while we get started on the filling. This chilling step helps the crust firm up and makes it easier to work with.
Step 2: Make the Cheesecake Filling
Now for the star of the show: the creamy cheesecake filling! In a large bowl, beat the 8 ounces of softened cream cheese until it’s completely smooth and free of lumps. This is crucial for a silky smooth texture. Make sure your cream cheese is truly softened, at room temperature, to avoid any grainy bits. Next, gradually add the 1/2 cup of powdered sugar to the cream cheese, beating until well combined and smooth. Don’t rush this step; proper incorporation of the powdered sugar contributes to the overall creaminess. Then, stir in the 2 teaspoons of vanilla extract for that classic cheesecake flavor. In a separate, chilled bowl, whip the 1 cup of heavy whipping cream until stiff peaks form. Be careful not to over-whip, as you don’t want it to turn into butter. Gently fold about one-third of the whipped cream into the cream cheese mixture to lighten it. Then, carefully fold in the remaining whipped cream until just combined. Be gentle during this folding process to maintain the airiness of the whipped cream, which will give our mini cheesecakes a lighter texture.
Step 3: Assemble the Mini Cheesecakes
Once our crusts have had their chill time in the freezer, it’s time to assemble these delightful little desserts. Remove the muffin tin or pan from the freezer. Spoon the luscious cheesecake filling evenly over the chilled crusts, filling each cup almost to the top. You can use a spoon or a piping bag for this step; a piping bag offers a cleaner, more even distribution. Smooth the tops gently with the back of a spoon or an offset spatula. Now, the “turtle” magic really begin extracts! Drizzle a small amount of caramel sauce over the top of each cheesecake filling. You don’t want to overdo it here, just a delicate swirl will do. Then, sprinkle a generous amount of your chopped pecans over the caramel. For an extra touch of chocolatey goodness, you can also scatter a few mini chocolate chips on top, if desired. These toppings will adhere nicely to the filling.
Step 4: Prepare the Chocolate Ganache
To complete the turtle experience, we need a rich chocolate ganache. In a small, heatproof bowl, place your 6 ounces of chopped semi-sweet chocolate. In a small saucepan, heat the 1/4 cup of heavy cream over medium heat until it just begin extracts to simmer around the edges. Do not let it boil. Once heated, pour the hot cream over the chopped chocolate. Let it sit for about 5 minutes without stirring. This allows the heat from the cream to gently melt the chocolate. After the resting period, gently whisk the mixture starting from the center and working your way outwards until you have a smooth, glossy, and completely emulsified chocolate ganache. This ganache should be pourable but thick enough to coat the back of a spoon. If it seems too thick, you can add a tiny bit more warm cream, a teaspoon at a time, until you reach your desired consistency. Conversely, if it seems too thin, let it cool slightly.
Step 5: Finish and Chill
With your chocolate ganache ready, it’s time for the final touches. Gently drizzle the warm chocolate ganache over the tops of your assembled mini cheesecakes. Again, you can create swirls or simply cover the top surface. Don’t worry about perfection; a slightly rustic look adds to the homemade charm. Once all the cheesecakes are drizzled with ganache, add a few more chopped pecans and mini chocolate chips (if using) on top for garnish. These finishing touches really make them look like mini works of art and enhance the turtle theme. Now, the most important step for no-bake desserts: chilling! Carefully place the entire muffin tin or cheesecake pan into the refrigerator and let the cheesecakes chill for at least 2-4 hours, or until the filling is firm and set. For the best results and easiest removal, I often leave them in the fridge overnight. Once they are thoroughly chilled and firm, you can gently remove them from their muffin cups or liners. Serve them chilled and enjoy the explosion of turtle flavors in every bite! They are best enjoyed within 2-3 days.
Conclusion:
These No Bake Turtle Mini Cheesecakes are an absolute dream! They offer all the delightful flavors of a classic turtle candy – rich chocolate, creamy caramel, and crunchy pecans – without any of the fuss of baking. The ease of preparation makes them perfect for last-minute gatherings, a sweet treat after a long day, or a fun activity to do with kids. The individual mini portions are wonderfully convenient and inherently elegant, ensuring everyone gets their own perfect bite of deliciousness.
I love serving these mini cheesecakes chilled, perhaps alongside a fresh cup of coffee or a glass of milk. They also make a stunning addition to any dessert buffet, adding a touch of homemade charm and irresistible flavor. For variations, don’t be afraid to experiment! You could try adding a swirl of peanut butter into the cheesecake filling for a “turtle meets Reese’s” fusion, or use chopped almonds or walnuts instead of pecans for a different nutty crunch. Perhaps even a sprinkle of flaky sea salt on top would elevate the caramel and chocolate notes even further. I truly encourage you to give these No Bake Turtle Mini Cheesecakes a try – you won’t be disappointed!
Frequently Asked Questions:
How far in advance can I make these No Bake Turtle Mini Cheesecakes?
You can easily make these cheesecakes up to 2 days in advance. Simply prepare them as directed and keep them stored, covered, in the refrigerator. The chilling time actually helps the flavors meld together beautifully.
Can I use a different type of crust for these mini cheesecakes?
Absolutely! While the classic chocolate cookie crust is fantastic, feel free to get creative. A grabeef ham cracker crust, an Oreo crust, or even a gin extractgersnap crust would all be delicious alternatives and offer a unique twist on the turtle flavor profile.
No Bake Turtle Mini Cheesecakes
Indulgent no-bake mini cheesecakes with a graham cracker crust, creamy cheesecake filling, and classic turtle toppings.
Ingredients
-
1 cup ground graham crackers
-
1 tablespoon sugar
-
5 tablespoons melted butter
-
8 ounces softened cream cheese
-
1/2 cup powdered sugar
-
2 teaspoons vanilla extract
-
1 cup heavy whipping cream
-
6 ounces semi-sweet chocolate, chopped
-
1/4 cup heavy cream
-
Caramel sauce
-
Chopped pecans
-
Mini chocolate chips
-
1 cup granulated sugar
-
6 tablespoons unsalted butter, at room temperature, sliced into 6 pieces
-
1/2 cup heavy cream, at room temperature
Instructions
-
Step 1
For the crust: In a bowl, combine the ground graham crackers, 1 tablespoon sugar, and 5 tablespoons melted butter. Press mixture evenly into the bottoms of mini muffin liners or a mini muffin tin. -
Step 2
For the filling: In a separate bowl, beat the softened cream cheese until smooth. Gradually beat in the powdered sugar and vanilla extract until well combined. -
Step 3
In another bowl, whip the 1 cup heavy whipping cream until stiff peaks form. Gently fold the whipped cream into the cream cheese mixture until no streaks remain. -
Step 4
Spoon the cheesecake filling over the prepared crusts. Smooth the tops. -
Step 5
For the chocolate ganache: In a microwave-safe bowl, combine the chopped semi-sweet chocolate and 1/4 cup heavy cream. Microwave in 30-second intervals, stirring in between, until the chocolate is melted and smooth. Allow to cool slightly. -
Step 6
Drizzle the chocolate ganache over the cheesecake filling. Top with caramel sauce, chopped pecans, and mini chocolate chips. -
Step 7
Chill the mini cheesecakes in the refrigerator for at least 2 hours, or until set.
Important Information
Nutrition Facts (Per Serving)
It is important to consider this information as approximate and not to use it as definitive health advice.
Allergy Information
Please check ingredients for potential allergens and consult a health professional if in doubt.

Leave a Comment