
Air Fryer Hot Italian Wraps are about to revolutionize your weeknight meal routine! Have you ever found yourself yearning for a dish that packs a punch of flavor, is incredibly satisfying, yet remarkably simple and quick to prepare? Then look no further, because I am thrilled to share a recipe that perfectly encapsulates all these desires.
This isn’t just another dinner idea; it’s a culinary journey that transforms classic Italian deli flavors into an irresistible, crispy wrap, all thanks to the magic of your air fryer. While the concept of a “wrap” is a modern adaptation, the robust combination of savory meats like pepperoni, salami, and ham, melded with gooey provolone cheese, and punctuated by the tangy zest of banana peppers or giardiniera, pays homage to the beloved hot Italian subs that have been a staple in delis for generations. It’s a delightful fusion of tradition and contemporary convenience!
People absolutely adore these delightful Air Fryer Hot Italian Wraps because they offer an unparalleled combination of textures and tastes: a perfectly golden, crispy exterior giving way to a warm, melty, and incredibly flavorful filling. Beyond the sensational taste, their appeal lies in their sheer ease and speed. They are an ideal solution for a busy lunch, a quick family dinner, or even an impressive appetizer that truly delivers on both taste and texture without the extensive cleanup. Get ready to experience a new favorite that you’ll want to make again and again!

Ingredients:
- For the Hearty Italian Filling:
- 1 pound hot Italian sausage, ground or removed from casings (I always go for hot, but you can use mild if you prefer a gentler kick!)
- 1 tablespoon olive oil (my go-to for sautéing)
- 1 large yellow onion, finely diced (I love how it sweetens as it cooks)
- 2 bell peppers (I usually pick one red and one orange for color, but any combination works beautifully), cored, seeded, and finely diced
- 3 cloves garlic, minced (don’t skimp on the garlic, it’s essential!)
- 1 teaspoon dried Italian seasoning (your pantry staple for that classic flavor)
- ½ teaspoon red pepper flakes (adjust to your heat preference, I like a good amount!)
- ½ cup marinara sauce (choose your favorite brand, or even better, use your homemade one!)
- ½ cup shredded mozzarella cheese, plus extra for layering (because you can never have too much cheese, right?)
- ¼ cup grated Parmesan cheese (adds a lovely salty, nutty depth)
- Salt and freshly ground black pepper to taste (always season as you go)
- For the Perfect Wrap:
- 8 large (10-inch) flour tortillas or flatbreads (I find larger tortillas easier to roll tightly)
- 8 slices provolone cheese (this melts beautifully and provides a wonderful creamy layer)
- Olive oil spray or a light brushing of olive oil (for that glorious crispy exterior)
- Optional for Serving (My Favorite Extras!):
- Additional marinara sauce for dipping
- Ranch dressing or creamy Italian dressing for a cool contrast
- Fresh basil or parsley, chopped (for a pop of freshness)
Preparing Your Flavorful Filling
This is where all the magic starts for our incredible “Air Fryer Hot Italian Wraps.” Taking the time to build a robust and flavorful filling is key to the entire experience, so let’s dive in!
-
Prepping the Vegetables with Precision: First things first, let’s get our vegetables ready. I like to start by taking my large yellow onion and carefully dicing it into small, uniform pieces. Aim for about 1/4-inch dice; this ensures it cooks evenly and integrates well into the filling without large chunks overpowering a bite. Next, grab those beautiful bell peppers. After coring and seeding them, I slice them into thin strips, then rotate and dice them into similar 1/4-inch pieces. The more consistent your dice, the better everything will meld together in the pan. Finally, peel and mince your three cloves of garlic. I find using a garlic press makes this super quick, but a sharp knife works just as well. Having everything prepped before you start cooking makes the rest of the process flow so much smoother, which is what I always aim for in my kitchen.
-
Browning the Hot Italian Sausage to Perfection: Now, let’s get our pan heated. Place a large skillet or Dutch oven over medium-high heat. Once it’s nice and hot, add your pound of hot Italian sausage. If you’re using links, remove the casings first. Using a wooden spoon or spatula, break the sausage apart into small, crumbles as it cooks. You want to brown it thoroughly, ensuring there’s no pink left. This usually takes about 6-8 minutes. As it cooks, you’ll notice a good amount of fat rendering out. Once it’s fully browned, I always recommend draining off the excess fat. You can do this by carefully tilting the pan and scooping out the fat, or by transferring the sausage to a colander lined with a few paper towels to absorb the grease. A leaner filling means crispier wraps!
-
Sautéing Aromatics and Bell Peppers: With the sausage out and the pan (mostly) clean, return it to medium heat. Add your tablespoon of olive oil. Once the oil shimmers, add your finely diced yellow onion and bell peppers. Stir frequently, allowing them to soften and develop some beautiful color. This process typically takes about 5-7 minutes. You’re looking for them to become tender-crisp, not mushy. Just as they start to soften, add your minced garlic, Italian seasoning, and red pepper flakes. Cook for another minute, stirring constantly, until the garlic becomes fragrant. Be careful not to burn the garlic; burnt garlic can turn bitter very quickly, and we definitely don’t want that! The aromas in your kitchen right now should be absolutely incredible!
-
Combining and Simmering for Flavor Fusion: Now it’s time to bring everything together and let those flavors truly meld. Return your browned Italian sausage to the skillet with the sautéed vegetables. Pour in your ½ cup of marinara sauce. Stir everything thoroughly to combine, ensuring the sauce evenly coats all the sausage and vegetables. Reduce the heat to low, and let the mixture gently simmer for about 5 minutes. This simmering time is crucial; it allows all the individual flavors to get to know each other and marry into a cohesive, delicious filling. During this time, I like to taste the mixture and adjust the seasoning. Add salt and freshly ground black pepper as needed. Remember, the sausage is already seasoned, so start with a little and add more if necessary. Once you’re happy with the flavor, remove the skillet from the heat and stir in ½ cup of shredded mozzarella cheese and ¼ cup of grated Parmesan cheese. The residual heat will start to melt the cheese, making the filling wonderfully gooey. Set the filling aside to cool slightly while we prepare our wrapping station.
Assembling Your “Air Fryer Hot Italian Wraps”
This is where we transform our delicious filling into neat, portable packages ready for their air fryer adventure. Precision in rolling is key here to ensure a perfect, crispy wrap that holds together.
-
Setting Up Your Wrap Station: Before you start, make sure you have a clean, flat surface to work on. I usually clear off a large section of my kitchen counter. Lay out one of your large (10-inch) flour tortillas flat. Having everything within arm’s reach – the cooled filling, the provolone cheese slices, and your air fryer nearby – will make this assembly process efficient and enjoyable. I also like to have a small bowl with a little water nearby in case I need to moisten the edge of the tortilla for a better seal, though often it’s not necessary with fresh tortillas.
-
Layering the Cheesy Foundation: On the lower third of the tortilla, place one slice of provolone cheese. Don’t place it too close to the edge, leave about an inch or so of space on the bottom and sides. The provolone acts as a delicious, melty barrier and helps everything stick together once heated. I sometimes tear the provolone slice slightly to better fit the curvature of the tortilla if it’s an odd shape, ensuring an even layer of cheesy goodness.
-
Adding the Star Filling: Now for the good part! Spoon about ½ cup of your cooled Italian sausage and veggie filling over the provolone cheese. Spread it out evenly, leaving a small border around the edges. This is a critical step: do not overfill the wraps! Overfilling makes them incredibly difficult to roll tightly, and you risk having the filling burst out during air frying. A good rule of thumb is to imagine it being able to roll comfortably within the tortilla. You want enough to be satisfying, but not so much that it’s bursting at the seams. I find ½ cup is just the right amount for a 10-inch tortilla.
-
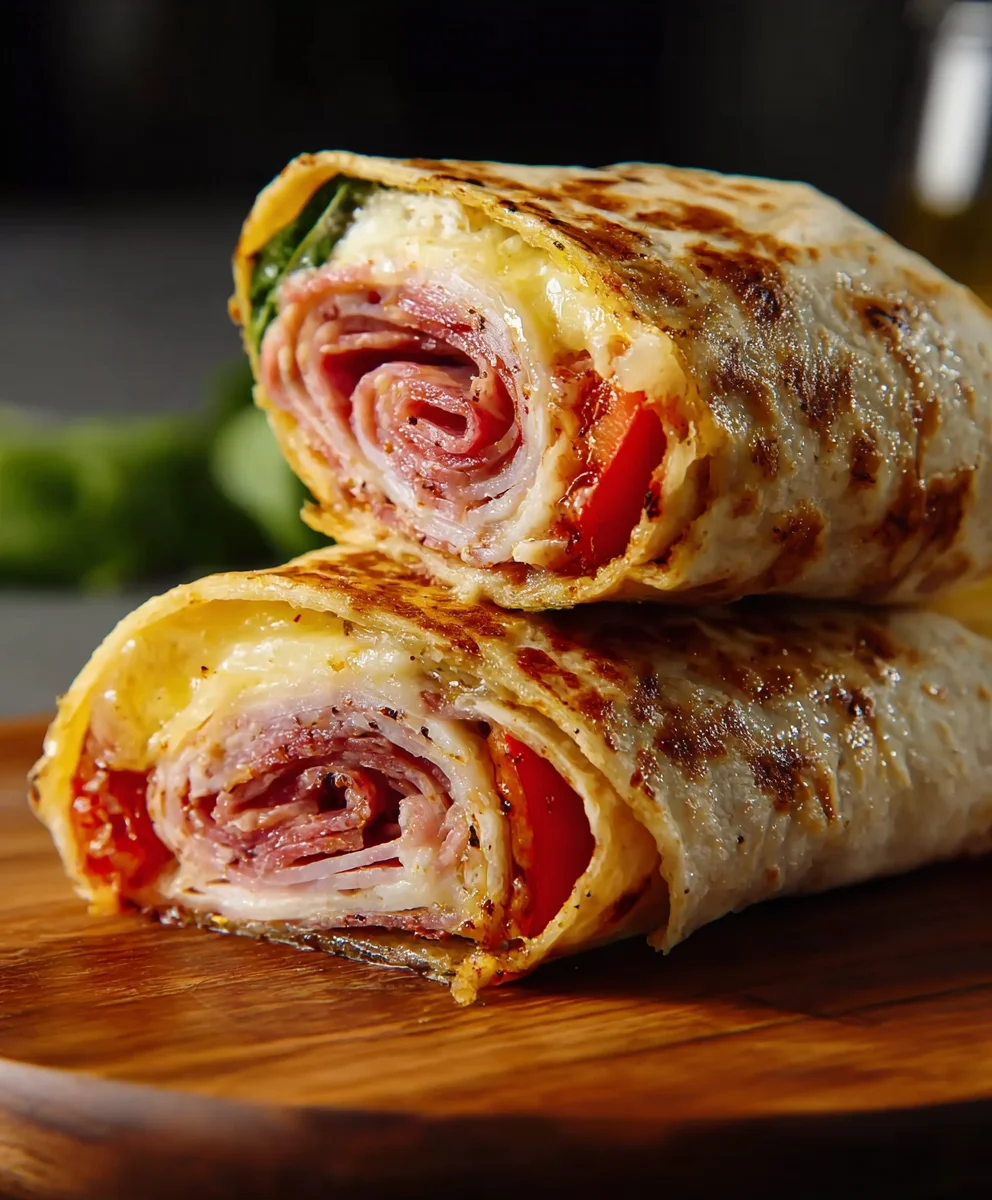
The Art of the Tight Roll: This is arguably the most important step for perfectly crisp “Air Fryer Hot Italian Wraps.” First, fold the bottom edge of the tortilla up and over the filling, tucking it in snugly. Then, fold in the left and right sides of the tortilla over the initial fold. Now, starting from the bottom (where you just folded), roll the entire tortilla upwards, away from you, as tightly as you can. Keep the pressure even as you roll, ensuring the filling stays tucked inside. You want a firm, compact wrap, similar to a burrito. Once rolled, place the wrap seam-side down on a plate. This helps to seal it. Repeat this process for the remaining tortillas and filling. A tightly rolled wrap means less chance of unraveling and more even crisping in the air fryer.
Air Frying Your Masterpiece
The air fryer is truly the hero for these “Air Fryer Hot Italian Wraps,” giving them an incredible crispy exterior without deep frying. Let’s get these beauties cooked!
-
Preheating Your Air Fryer: Just like an oven, preheating your air fryer is a non-negotiable step for consistent results. Turn your air fryer to 375°F (190°C) and let it preheat for at least 5 minutes. A hot air fryer basket ensures that the wraps start crisping immediately upon contact, leading to a much better texture. Skipping this step can result in uneven cooking and a less crispy exterior, and we’re aiming for maximum crispness here!
-
Arranging the Wraps for Optimal Crispness: Lightly brush or spray the outside of each assembled wrap with a little olive oil. This is crucial for achieving that beautiful golden-brown and crispy finish. Carefully place the prepared “Air Fryer Hot Italian Wraps” into the preheated air fryer basket, making sure they are seam-side down. It’s incredibly important not to overcrowd the basket. Air fryers work by circulating hot air, and if the wraps are touching or stacked, the air can’t circulate properly, leading to soggy spots. Depending on the size of your air fryer, you’ll likely need to cook these in two or three batches. I usually fit two or three comfortably without them touching.
-
The Initial Air Fry: Air fry the wraps at 375°F (190°C) for 6-8 minutes on the first side. During this time, the bottom of the wrap will start to crisp up and become golden. You’ll also likely hear the wonderful sizzling of the cheese melting inside, which is always a good sign! The olive oil spray will help create a beautiful crust.
-
Flipping for Even Browning: After 6-8 minutes, carefully open your air fryer. Using tongs, gently flip each “Air Fryer Hot Italian Wrap” over. Be cautious, as they will be hot! Once flipped, continue to air fry for another 6-8 minutes, or until both sides are a beautiful golden brown and feel wonderfully crispy to the touch. The goal is for a uniform crispness all around the wrap, and a nicely melted, bubbling interior.
-
Checking for Perfect Doneness: The wraps are perfectly done when they are golden brown all over, distinctly crispy, and the cheese inside is fully melted and gooey. You might even see a little cheese oozing out, which is a glorious sight! If they don’t look quite golden enough after the suggested time, you can always air fry for an additional 1-2 minutes, checking frequently. Every air fryer is a little different, so trust your eyes and nose here. You’ll know when they’re ready by that irresistible aroma and visual appeal.
-
Rest and Serve Immediately: Once your “Air Fryer Hot Italian Wraps” are perfectly golden and crispy, carefully remove them from the air fryer basket. Transfer them to a cutting board or a plate. I highly recommend letting them rest for just 2-3 minutes before slicing. This brief resting period allows the filling to set slightly and prevents all that delicious, molten cheese from oozing out excessively when you cut into them. You can serve them whole, or slice them in half diagonally for an attractive presentation. These are fantastic on their own, but I absolutely love serving them with extra warm marinara sauce for dipping, or even a side of cool ranch dressing to balance the heat. A sprinkle of fresh basil or parsley makes for a beautiful finish. Enjoy your hot, crispy, and utterly delicious “Air Fryer Hot Italian Wraps” while they’re fresh!
Pro Tips for the Best “Air Fryer Hot Italian Wraps”
I’ve made these “Air Fryer Hot Italian Wraps” countless times, and I’ve picked up a few tricks along the way to ensure they come out perfect every single time. Here are my top tips for you:
-
Don’t Overfill Your Wraps:
I cannot stress this enough! It’s tempting to cram as much of that delicious filling as possible into each tortilla, but trust me, it’s a recipe for disaster. Overfilled wraps are impossible to roll tightly, and they’re much more likely to burst open in the air fryer, creating a messy situation and unevenly cooked results. Stick to about ½ cup of filling per 10-inch tortilla. You want the wrap to be substantial, but still manageable and well-contained.
-
The Art of the Tight Roll:
A loose roll means a floppy wrap that might unravel. Take your time when folding and rolling. Make sure that first fold over the filling is snug, and keep tension as you roll upwards. A tightly rolled wrap holds its shape better, crisps up more evenly, and keeps all that lovely filling securely inside. Think of it like rolling a perfect burrito – you want it compact and firm.
-
Respect Your Air Fryer’s Capacity:
Air fryers work by circulating hot air, and this circulation is vital for achieving that signature crispiness. If you overcrowd the basket, you’re essentially steaming the wraps instead of frying them. Always leave space between each wrap. If you have a smaller air fryer, this means cooking in batches. It might take a little longer overall, but the superior texture is absolutely worth the extra few minutes. Patience is a virtue when air frying!
-
Cheese Choices for Optimal Melt:
While provolone and mozzarella are my absolute favorites for these “Air Fryer Hot Italian Wraps,” feel free to experiment with other melty cheeses. Monterey Jack or a good quality cheddar could work, but you might lose a little of that classic Italian flavor profile. The key is to use a cheese that melts smoothly and doesn’t get too oily. Thinly sliced provolone or freshly shredded low-moisture mozzarella are ideal because they melt beautifully without making the wrap greasy.
-
Adjusting the Spice Level:
I love the “hot” in Hot Italian Wraps, but not everyone has the same spice tolerance. If you prefer a milder version, simply use mild Italian sausage and either reduce the amount of red pepper flakes or omit them entirely. For an extra kick, you can always add more red pepper flakes, or even a pinch of cayenne pepper to the filling. Remember, you can always add more spice, but it’s much harder to take it away!
-
Make Ahead for Easy Meals:
The filling for these wraps can be made a day in advance! Cook the sausage and vegetables, combine with sauce and seasonings, and let it cool completely before storing it in an airtight container in the refrigerator. When you’re ready to cook, simply reheat the filling slightly (it’s easier to work with when not stone cold) and proceed with assembling and air frying. This is a fantastic time-saver for busy weeknights!
-
Storing and Reheating Leftovers:
If you happen to have any leftover “Air Fryer Hot Italian Wraps” (a rare occurrence in my house!), they store beautifully. Let them cool completely, then wrap them individually in plastic wrap or foil and store them in an airtight container in the refrigerator for up to 3 days. To reheat, the air fryer is your best friend again! Place them in a preheated air fryer at 350°F (175°C) for 5-7 minutes, or until heated through and crispy again. The microwave will heat them, but they’ll lose all that wonderful crispness. The air fryer brings them back to life!
Conclusion:
And there you have it, my friends! We’ve reached the grand finale of our culinary adventure, and I truly hope you’re as excited as I am about what we’ve created. These aren’t just any wraps; they are a revelation, a testament to how simple ingredients, when brought together with a little care and the magic of an air fryer, can transform into something truly spectacular. The crispy, golden exterior, achieved with minimal oil, gives way to a gloriously melty, savory, and perfectly spiced filling that will make your taste buds sing. It’s the kind of dish that feels gourmet but comes together with incredible ease, making it an absolute lifesaver for those busy weeknights when you crave something hearty and satisfying without spending hours in the kitchen.
I genuinely believe that once you experience the sheer joy and convenience of making these amazing wraps, they will quickly become a staple in your recipe rotation. They embody everything I love about fuss-free, flavor-packed cooking. The robust flavors of the Italian sausage, the tang of the peppers and onions, and the creamy, gooey mozzarella all coalesce into a harmonious symphony of taste and texture. It’s a dish that manages to be both comforting and exciting, delivering that familiar warmth you crave while offering a bold kick that keeps things interesting. Every bite is an experience, a perfect balance of crispy, chewy, savory, and just a touch spicy. Trust me, the aroma alone as they’re cooking in the air fryer is enough to get anyone’s mouth watering!
Serving Suggestions to Elevate Your Meal:
While these wraps are undeniably a star on their own, pairing them with a few thoughtful sides can turn a great meal into an extraordinary one. For a light and refreshing counterpoint, I highly recommend a crisp, green salad dressed with a zesty vinaigrette. The brightness of the greens and the acidity of the dressing cut beautifully through the richness of the wraps, creating a perfectly balanced meal. Alternatively, a simple bowl of warm tomato soup makes for a classic and comforting pairing, especially on a cooler evening. If you’re looking to add more vegetables, a quick side of roasted asparagus, broccoli, or bell peppers would be fantastic, offering extra nutrients and a lovely textural contrast. Don’t forget the dipping sauces! A warm marinara sauce is an obvious and delicious choice, but don’t shy away from experimenting. A creamy garlic aioli, a cool ranch dressing, or even a spicy sriracha mayo could add an exciting new dimension to each bite.
Unleash Your Inner Chef with These Variations:
One of the things I love most about cooking is the endless possibility for customization, and these wraps are incredibly adaptable! Don’t be afraid to make them your own. Here are a few ideas to spark your culinary creativity:
- Protein Power-Up: While Italian sausage is my go-to, feel free to substitute with ground chicken, turkey, or even lean ground beef seasoned with Italian herbs for a different flavor profile. For a vegetarian option, crumbled plant-based “sausage” or a hearty mix of sautéed mushrooms and black beans can work wonders.
- Cheese Please: Experiment with different cheeses! Smoked provolone adds a fantastic depth, pepper jack will dial up the heat, or a sprinkle of freshly grated Parmesan or Pecorino Romano mixed in with the mozzarella will lend a sharper, saltier kick.
- Veggie Boost: Add more of your favorite vegetables to the filling. Sautéed spinach, sun-dried tomatoes (chopped), thinly sliced Kalamata olives, or even some caramelized onions would be absolutely delicious. For an extra layer of flavor and color, consider adding roasted red peppers or some banana peppers for a tangy surprise.
- Spice it Up (or Down!): If you love a serious kick, increase the amount of crushed red pepper flakes, or even mix in some finely diced jalapeños or a dash of your favorite hot sauce into the filling. For a milder version, simply reduce or omit the red pepper flakes and opt for a sweet Italian sausage.
- Wrap Alternatives: While large flour tortillas work perfectly, you could also try whole wheat tortillas for added fiber, or even use large lettuce cups for a lower-carb option (though these would be better baked or pan-fried, as the air fryer might make them too crisp).
I truly encourage you to give these Air Fryer Hot Italian Wraps a try. They are quick, they are easy, and most importantly, they are incredibly satisfying and bursting with flavor. I promise you won’t regret it! Once you’ve whipped up your own batch, I would absolutely love to hear about your experience. Did you add any fun variations? What did you serve them with? Your feedback and culinary adventures truly inspire me, so please don’t hesitate to share your thoughts, tips, and photos. Happy cooking, everyone!
Air Fryer Hot Italian Beef Wraps
Revolutionize weeknight meals with these Air Fryer Hot Italian Beef Wraps! A delightful fusion of tradition and convenience, these wraps pack the robust flavors of classic Italian deli meats – roast beef, beef salami, and beef pepperoni – with melty mozzarella, tangy banana peppers, and creamy Italian dressing, all wrapped in a crispy tortilla. Quick to prepare in just 10 minutes and air-fried to golden perfection, they’re an irresistible, satisfying meal for any occasion.
Ingredients
-
8 large (10-inch) flour tortillas
-
1/2 lb thinly sliced roast beef
-
1/2 lb thinly sliced beef salami
-
1/4 lb thinly sliced beef pepperoni
-
8 slices provolone cheese
-
1 cup shredded mozzarella cheese
-
1/2 cup sliced banana peppers or giardiniera
-
1/4 cup creamy Italian dressing
-
Olive oil spray
Instructions
-
Step 1
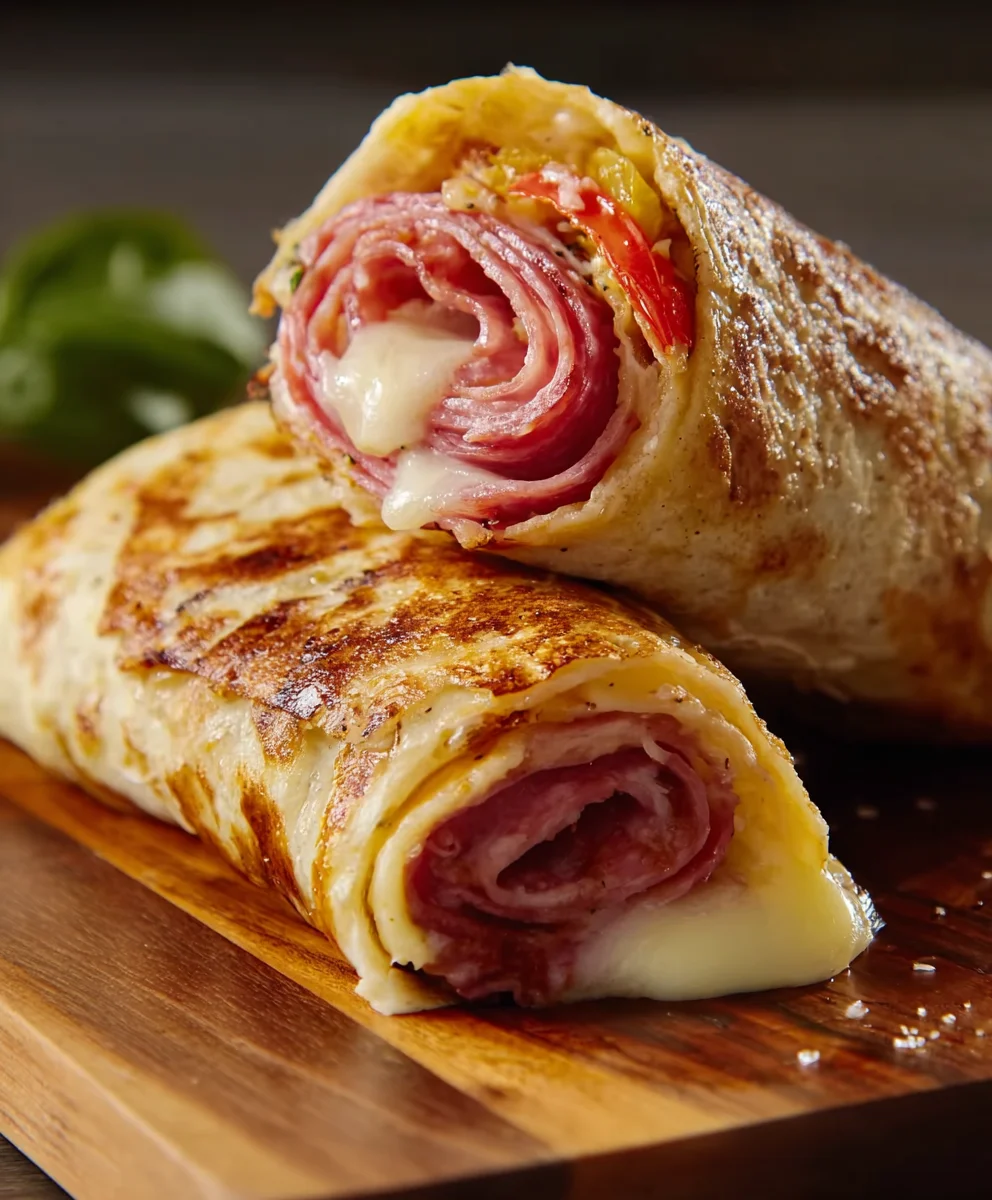
Lay a tortilla flat. Place a provolone slice on the lower third, leaving a border. Layer with roast beef, beef salami, beef pepperoni, shredded mozzarella, banana peppers, and a drizzle of Italian dressing. Do not overfill. -
Step 2
Fold the bottom edge over the filling, then fold in the left and right sides. Roll tightly from the bottom up to create a compact wrap. Place seam-side down. Repeat for remaining tortillas. -
Step 3
Preheat your air fryer to 375°F (190°C) for 5 minutes. -
Step 4
Lightly spray each wrap with olive oil. Place wraps seam-side down in the preheated air fryer basket, ensuring they don’t touch (cook in batches if needed). Air fry for 6-8 minutes until golden. -
Step 5
Flip the wraps carefully. Continue to air fry for another 6-8 minutes, or until both sides are golden brown and crispy, and the cheese is melted. -
Step 6
Remove wraps from the air fryer and let rest for 2-3 minutes before serving. Enjoy hot, whole, or sliced diagonally. Optional: Serve with extra marinara or ranch dressing.
Important Information
Nutrition Facts (Per Serving)
It is important to consider this information as approximate and not to use it as definitive health advice.
Allergy Information
Please check ingredients for potential allergens and consult a health professional if in doubt.


Leave a Comment