
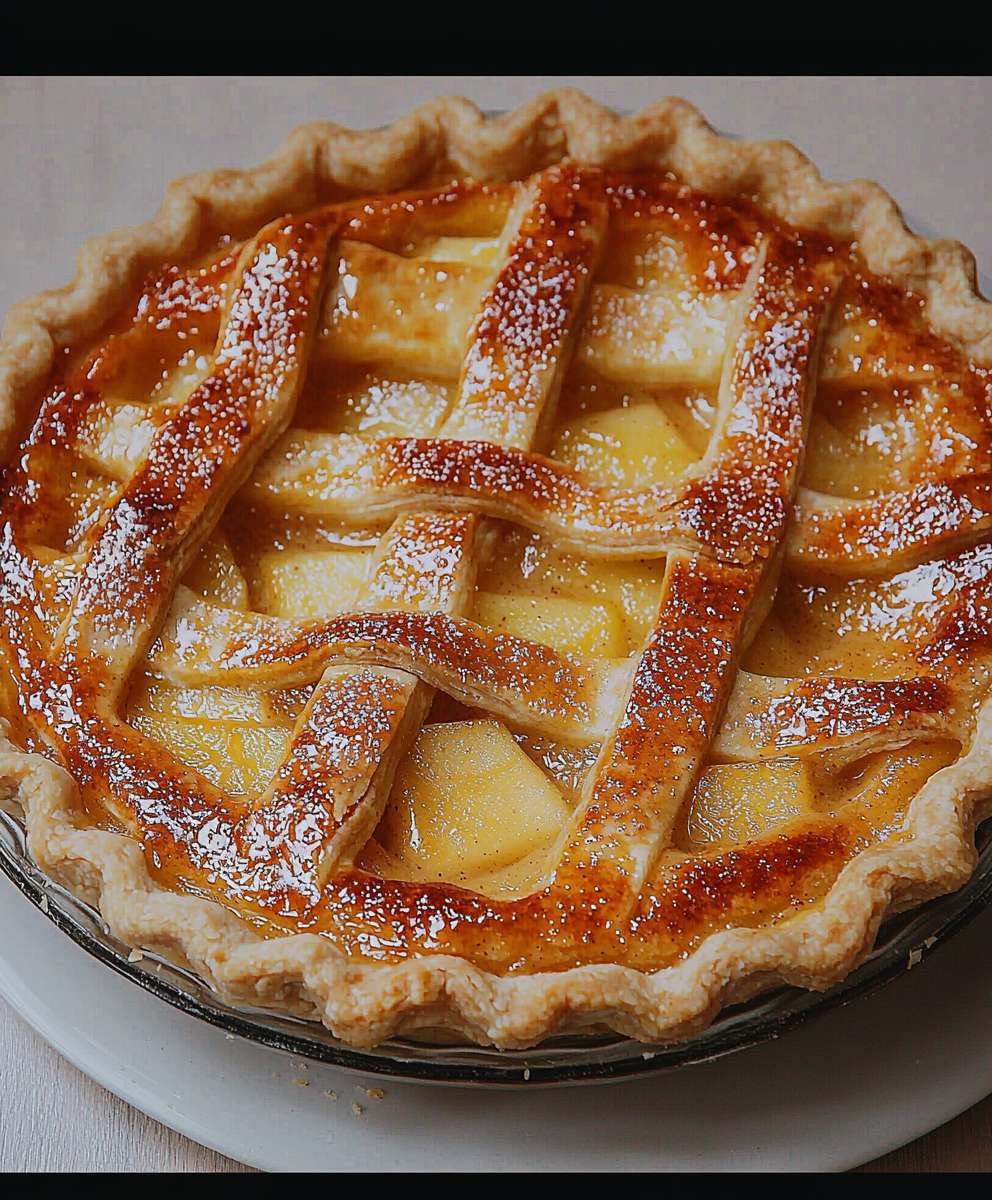
Apple Custard Pie: Is there anything that screams “comfort food” quite like it? Imagine sinking your fork into a warm slice, the sweet-tart apples mingling perfectly with the creamy, vanilla-infused custard. It’s a symphony of flavors and textures that’s simply irresistible, and today, I’m thrilled to share my foolproof recipe with you.
This classic dessert has a rich history, with variations appearing in cookbooks for centuries. While the exact origins are debated, the combination of apples and custard has long been a favorite across cultures, particularly in Europe and North America. It represents a celebration of simple, wholesome ingredients transformed into something truly special.
What makes Apple Custard Pie so beloved? For many, it’s the nostalgic connection to childhood, perhaps a memory of Grandma’s kitchen filled with the aroma of baking apples and cinnamon. Beyond the sentimental value, it’s also incredibly delicious! The tender apples provide a delightful contrast to the smooth, velvety custard, creating a textural experience that’s both satisfying and comforting. Plus, it’s surprisingly easy to make, making it the perfect dessert for both weeknight dinners and special occasions. So, let’s get baking and create a pie that will impress your family and friends!

Ingredients:
- For the Crust:
- 2 ½ cups all-purpose flour
- 1 teaspoon salt
- 1 cup (2 sticks) unsalted butter, cold and cut into cubes
- ½ cup vegetable shortening, cold
- 6-8 tablespoons ice water
- For the Custard Filling:
- 6 large egg yolks
- ¾ cup granulated sugar
- ¼ cup all-purpose flour
- ¼ teaspoon salt
- 3 cups whole milk
- 2 teaspoons vanilla extract
- 2 tablespoons unsalted butter
- For the Apple Topping:
- 6 medium apples (Granny Smith, Honeycrisp, or a mix), peeled, cored, and thinly sliced
- ¼ cup granulated sugar
- 2 tablespoons lemon juice
- 1 teaspoon ground cinnamon
- ¼ teaspoon ground nutmeg
- 2 tablespoons unsalted butter, cut into small pieces
- For the Egg Wash (optional):
- 1 large egg, beaten
- 1 tablespoon milk or water
Preparing the Crust:
- Combine Dry Ingredients: In a large bowl, whisk together the flour and salt. This ensures the salt is evenly distributed throughout the crust, which is crucial for flavor.
- Cut in the Butter and Shortening: Add the cold, cubed butter and shortening to the flour mixture. Using a pastry blender or your fingertips (work quickly to keep the butter cold!), cut the butter and shortening into the flour until the mixture resembles coarse crumbs. You should still see small pieces of butter and shortening these are what create flaky layers.
- Add Ice Water: Gradually add the ice water, one tablespoon at a time, mixing gently after each addition. Continue adding water until the dough just comes together. Be careful not to overmix, as this will develop the gluten and result in a tough crust. The dough should be slightly shaggy but hold together when pressed.
- Form the Dough: Divide the dough in half. Gently flatten each half into a disc. Wrap each disc tightly in plastic wrap and refrigerate for at least 2 hours, or preferably overnight. This allows the gluten to relax and the butter to chill, resulting in a more tender and flaky crust.
Preparing the Apple Topping:
- Combine Apple Slices: In a large bowl, combine the peeled, cored, and thinly sliced apples with the sugar, lemon juice, cinnamon, and nutmeg. Toss gently to coat the apples evenly. The lemon juice prevents the apples from browning and adds a touch of brightness to the flavor.
- Let the Apples Sit: Allow the apple mixture to sit for about 15-20 minutes. This will allow the apples to release some of their juices, which will help to create a delicious sauce as the pie bakes.
Preparing the Custard Filling:
- Whisk Egg Yolks and Sugar: In a medium bowl, whisk together the egg yolks and sugar until pale and slightly thickened. This step is important for creating a smooth and creamy custard.
- Add Flour and Salt: Whisk in the flour and salt until well combined. Make sure there are no lumps of flour remaining.
- Heat the Milk: In a medium saucepan, heat the milk over medium heat until it just begins to simmer. Do not boil the milk.
- Temper the Egg Yolks: Slowly pour a small amount of the hot milk into the egg yolk mixture, whisking constantly to prevent the eggs from scrambling. This process is called tempering and is essential for creating a smooth custard.
- Combine and Cook: Gradually pour the tempered egg yolk mixture into the saucepan with the remaining milk. Cook over medium heat, stirring constantly with a whisk or wooden spoon, until the custard thickens enough to coat the back of a spoon. This usually takes about 5-7 minutes. Be patient and continue stirring to prevent the custard from sticking to the bottom of the pan.
- Remove from Heat: Remove the custard from the heat and stir in the vanilla extract and butter. The butter adds richness and shine to the custard.
- Strain the Custard: Strain the custard through a fine-mesh sieve into a clean bowl. This will remove any lumps and ensure a perfectly smooth custard. Cover the surface of the custard with plastic wrap to prevent a skin from forming. Let the custard cool slightly while you prepare the pie crust.
Assembling and Baking the Pie:
- Preheat Oven: Preheat your oven to 400°F (200°C).
- Roll Out the Bottom Crust: On a lightly floured surface, roll out one of the discs of dough into a 12-inch circle. Carefully transfer the dough to a 9-inch pie plate. Trim the edges of the dough, leaving about a 1-inch overhang. Crimp the edges of the crust using your fingers or a fork.
- Blind Bake the Crust (Optional): For a crispier crust, you can blind bake it before adding the filling. Line the crust with parchment paper and fill it with pie weights or dried beans. Bake for 15 minutes. Remove the parchment paper and weights and bake for another 5-7 minutes, or until the crust is lightly golden brown. Let the crust cool slightly before adding the filling.
- Pour in the Custard: Pour the slightly cooled custard into the prepared pie crust.
- Arrange the Apples: Arrange the apple slices over the custard in a decorative pattern. You can create concentric circles or simply layer the apples evenly over the surface.
- Dot with Butter: Dot the apple slices with the small pieces of butter. This will add richness and help the apples to brown nicely.
- Roll Out the Top Crust: On a lightly floured surface, roll out the second disc of dough into a 12-inch circle.
- Place Top Crust and Crimp: Carefully place the top crust over the apple filling. Trim the edges of the dough, leaving about a 1-inch overhang. Crimp the edges of the crust together with the bottom crust to seal.
- Cut Vents: Cut several slits or vents in the top crust to allow steam to escape during baking. This will prevent the crust from puffing up and cracking.
- Egg Wash (Optional): Brush the top crust with the egg wash (beaten egg and milk/water). This will give the crust a beautiful golden brown color.
- Bake the Pie: Bake the pie in the preheated oven for 45-55 minutes, or until the crust is golden brown and the filling is set. If the crust starts to brown too quickly, you can cover the edges with aluminum foil.
- Cool Completely: Let the pie cool completely on a wire rack before slicing and serving. This is important for allowing the filling to set properly. It’s hard, I know, but resist the urge to cut into it while it’s still warm!
Tips for Success:
- Keep Ingredients Cold: The key to a flaky pie crust is to keep the butter and shortening cold. Use ice water and work quickly to prevent the butter from melting.
- Don’t Overmix the Dough: Overmixing the dough will develop the gluten and result in a tough crust. Mix just until the dough comes together.
- Chill the Dough: Chilling the dough allows the gluten to relax and the butter to firm up, resulting in a more tender and flaky crust.
- Use a Variety of Apples: Using a mix of apple varieties will add complexity to the flavor of the pie. Granny Smith apples provide tartness, while Honeycrisp apples add sweetness and crispness.
- Don’t Overfill the Pie: Overfilling the pie can cause the filling to bubble over and make the crust soggy.
- Let the Pie Cool Completely: Letting the pie cool completely allows the filling to set properly, making it easier to slice and serve.
Serving Suggestions:
- Serve the apple custard pie warm or at room temperature.
- Top with a scoop of vanilla ice cream or whipped cream.
- Dust with powdered sugar before serving.
Conclusion:
This Apple Custard Pie isn’t just another dessert; it’s a warm hug on a plate, a nostalgic trip to Grandma’s kitchen, and a guaranteed crowd-pleaser all rolled into one delicious package. The creamy, subtly spiced custard perfectly complements the tender, slightly tart apples, creating a symphony of flavors and textures that will have everyone reaching for seconds (and maybe even thirds!). I truly believe this recipe is a must-try for anyone who appreciates classic comfort food with a touch of elegance.
What makes this pie so special is its simplicity. It doesn’t require any fancy techniques or hard-to-find ingredients. It’s straightforward, honest, and utterly satisfying. The combination of the buttery crust, the sweet-tart apples, and the rich, velvety custard is simply irresistible. It’s the kind of dessert that evokes feelings of warmth, happiness, and contentment. And let’s be honest, who doesn’t need a little more of that in their lives?
But the best part? This recipe is incredibly versatile! While I personally adore it served warm with a scoop of vanilla ice cream (the contrast of temperatures and textures is divine!), there are so many other ways to enjoy it. For a truly decadent experience, try topping it with a dollop of freshly whipped cream and a sprinkle of cinnamon. Or, if you’re feeling adventurous, a drizzle of salted caramel sauce adds a delightful salty-sweet dimension.
Looking for variations? Consider adding a handful of chopped walnuts or pecans to the apple mixture for a bit of crunch. A splash of bourbon or rum to the custard can also elevate the flavor profile and add a touch of sophistication. You could even experiment with different types of apples! Granny Smiths will give you a more tart flavor, while Honeycrisp or Fuji apples will offer a sweeter, more mellow taste. The possibilities are endless!
Serving Suggestions:
* Warm with vanilla ice cream
* Topped with whipped cream and cinnamon
* Drizzled with salted caramel sauce
* Alongside a cup of hot coffee or tea
Variations:
* Add chopped nuts to the apple filling
* Incorporate a splash of bourbon or rum into the custard
* Experiment with different apple varieties
I’m so confident that you’ll love this Apple Custard Pie as much as I do. It’s a recipe that I’ve been making for years, and it always receives rave reviews. It’s perfect for holidays, special occasions, or simply a cozy night in.
So, what are you waiting for? Gather your ingredients, preheat your oven, and get ready to bake up a slice of happiness! I promise you won’t regret it. And when you do, please, please, please share your experience with me! I’d love to hear how it turned out, what variations you tried, and what your family and friends thought. Tag me in your photos on social media, leave a comment below, or send me an email. I can’t wait to see your creations! Happy baking! I am sure you will find that this is the best Apple Custard Pie recipe you have ever tried.
Apple Custard Pie: A Delicious & Easy Recipe
A classic apple pie with a creamy custard filling, encased in a flaky, homemade crust.
Ingredients
- 2 ½ cups all-purpose flour
- 1 teaspoon salt
- 1 cup (2 sticks) unsalted butter, cold and cut into cubes
- ½ cup vegetable shortening, cold
- 6-8 tablespoons ice water
- 6 large egg yolks
- ¾ cup granulated sugar
- ¼ cup all-purpose flour
- ¼ teaspoon salt
- 3 cups whole milk
- 2 teaspoons vanilla extract
- 2 tablespoons unsalted butter
- 6 medium apples (Granny Smith, Honeycrisp, or a mix), peeled, cored, and thinly sliced
- ¼ cup granulated sugar
- 2 tablespoons lemon juice
- 1 teaspoon ground cinnamon
- ¼ teaspoon ground nutmeg
- 2 tablespoons unsalted butter, cut into small pieces
- 1 large egg, beaten
- 1 tablespoon milk or water
Instructions
- Combine Dry Ingredients: In a large bowl, whisk together the flour and salt.
- Cut in the Butter and Shortening: Add the cold, cubed butter and shortening to the flour mixture. Using a pastry blender or your fingertips (work quickly to keep the butter cold!), cut the butter and shortening into the flour until the mixture resembles coarse crumbs.
- Add Ice Water: Gradually add the ice water, one tablespoon at a time, mixing gently after each addition. Continue adding water until the dough just comes together.
- Form the Dough: Divide the dough in half. Gently flatten each half into a disc. Wrap each disc tightly in plastic wrap and refrigerate for at least 2 hours, or preferably overnight.
- Combine Apple Slices: In a large bowl, combine the peeled, cored, and thinly sliced apples with the sugar, lemon juice, cinnamon, and nutmeg. Toss gently to coat the apples evenly.
- Let the Apples Sit: Allow the apple mixture to sit for about 15-20 minutes.
- Whisk Egg Yolks and Sugar: In a medium bowl, whisk together the egg yolks and sugar until pale and slightly thickened.
- Add Flour and Salt: Whisk in the flour and salt until well combined.
- Heat the Milk: In a medium saucepan, heat the milk over medium heat until it just begins to simmer.
- Temper the Egg Yolks: Slowly pour a small amount of the hot milk into the egg yolk mixture, whisking constantly to prevent the eggs from scrambling.
- Combine and Cook: Gradually pour the tempered egg yolk mixture into the saucepan with the remaining milk. Cook over medium heat, stirring constantly with a whisk or wooden spoon, until the custard thickens enough to coat the back of a spoon.
- Remove from Heat: Remove the custard from the heat and stir in the vanilla extract and butter.
- Strain the Custard: Strain the custard through a fine-mesh sieve into a clean bowl. Cover the surface of the custard with plastic wrap to prevent a skin from forming. Let the custard cool slightly while you prepare the pie crust.
- Preheat Oven: Preheat your oven to 400°F (200°C).
- Roll Out the Bottom Crust: On a lightly floured surface, roll out one of the discs of dough into a 12-inch circle. Carefully transfer the dough to a 9-inch pie plate. Trim the edges of the dough, leaving about a 1-inch overhang. Crimp the edges of the crust using your fingers or a fork.
- Blind Bake the Crust (Optional): For a crispier crust, you can blind bake it before adding the filling. Line the crust with parchment paper and fill it with pie weights or dried beans. Bake for 15 minutes. Remove the parchment paper and weights and bake for another 5-7 minutes, or until the crust is lightly golden brown. Let the crust cool slightly before adding the filling.
- Pour in the Custard: Pour the slightly cooled custard into the prepared pie crust.
- Arrange the Apples: Arrange the apple slices over the custard in a decorative pattern.
- Dot with Butter: Dot the apple slices with the small pieces of butter.
- Roll Out the Top Crust: On a lightly floured surface, roll out the second disc of dough into a 12-inch circle.
- Place Top Crust and Crimp: Carefully place the top crust over the apple filling. Trim the edges of the dough, leaving about a 1-inch overhang. Crimp the edges of the crust together with the bottom crust to seal.
- Cut Vents: Cut several slits or vents in the top crust to allow steam to escape during baking.
- Egg Wash (Optional): Brush the top crust with the egg wash (beaten egg and milk/water).
- Bake the Pie: Bake the pie in the preheated oven for 45-55 minutes, or until the crust is golden brown and the filling is set. If the crust starts to brown too quickly, you can cover the edges with aluminum foil.
- Cool Completely: Let the pie cool completely on a wire rack before slicing and serving.
Notes
- Keep Ingredients Cold: The key to a flaky pie crust is to keep the butter and shortening cold. Use ice water and work quickly to prevent the butter from melting.
- Don’t Overmix the Dough: Overmixing the dough will develop the gluten and result in a tough crust. Mix just until the dough comes together.
- Chill the Dough: Chilling the dough allows the gluten to relax and the butter to firm up, resulting in a more tender and flaky crust.
- Use a Variety of Apples: Using a mix of apple varieties will add complexity to the flavor of the pie. Granny Smith apples provide tartness, while Honeycrisp apples add sweetness and crispness.
- Don’t Overfill the Pie: Overfilling the pie can cause the filling to bubble over and make the crust soggy.
- Let the Pie Cool Completely: Letting the pie cool completely allows the filling to set properly, making it easier to slice and serve.
- Serve the apple custard pie warm or at room temperature.
- Top with a scoop of vanilla ice cream or whipped cream.
- Dust with powdered sugar before serving.


Leave a Comment