
Baked Chicken Katsu is a delightful twist on the traditional Japanese dish that has captured the hearts and taste buds of many around the world. This recipe transforms the classic deep-fried chicken katsu into a healthier baked version, allowing you to enjoy the same crispy texture and savory flavor without the guilt. The origins of katsu can be traced back to the late 19th century, when Western influences began to permeate Japanese cuisine, leading to the creation of this beloved comfort food.
What I love most about Baked Chicken Katsu is its perfect balance of crunch and tenderness. The golden, crispy coating pairs beautifully with the juicy chicken inside, making each bite a satisfying experience. Not only is this dish incredibly delicious, but its also convenient to prepare, making it a favorite for busy weeknights or casual gatherings. Whether served with a side of rice, a fresh salad, or drizzled with tonkatsu sauce, Baked Chicken Katsu is sure to become a staple in your kitchen, just as it has in mine.

Ingredients:
- 4 boneless, skinless chicken breasts
- 1 cup panko breadcrumbs
- 1/2 cup all-purpose flour
- 2 large eggs
- 1 teaspoon salt
- 1/2 teaspoon black pepper
- 1 teaspoon garlic powder
- 1 teaspoon onion powder
- 1 teaspoon paprika
- 1/2 teaspoon cayenne pepper (optional, for heat)
- 1/4 cup mayonnaise
- 2 tablespoons soy sauce
- 1 tablespoon rice vinegar
- 1 tablespoon honey
- Cooking spray or olive oil for greasing
Preparing the Chicken
1. **Preheat the Oven**: Start by preheating your oven to 400°F (200°C). This ensures that your chicken katsu will bake evenly and get that lovely golden color. 2. **Prepare the Chicken Breasts**: Take the chicken breasts and place them between two sheets of plastic wrap or parchment paper. Using a meat mallet or rolling pin, gently pound the chicken to an even thickness of about 1/2 inch. This helps the chicken cook evenly and stay tender. 3. **Season the Chicken**: In a small bowl, mix together the salt, black pepper, garlic powder, onion powder, paprika, and cayenne pepper (if using). Rub this seasoning mixture all over the chicken breasts, ensuring they are well-coated for maximum flavor.Preparing the Breading Station
4. **Set Up Your Breading Station**: Youll need three shallow dishes for the breading process. In the first dish, add the all-purpose flour. In the second dish, crack the eggs and whisk them until well combined. In the third dish, place the panko breadcrumbs. 5. **Coat the Chicken**: Take one chicken breast and dip it into the flour, making sure to coat it evenly. Shake off any excess flour. Next, dip the floured chicken into the egg mixture, allowing any excess to drip off. Finally, press the chicken into the panko breadcrumbs, ensuring its fully coated. Repeat this process for all chicken breasts.Baking the Chicken Katsu
6. **Prepare the Baking Sheet**: Line a baking sheet with parchment paper or lightly grease it with cooking spray or olive oil. This will prevent the chicken from sticking and make cleanup easier. 7. **Arrange the Chicken**: Place the breaded chicken breasts on the prepared baking sheet, making sure they are spaced apart to allow for even cooking. 8. **Bake the Chicken**: Place the baking sheet in the preheated oven and bake for 20-25 minutes, or until the chicken is cooked through and the internal temperature reaches 165°F (75°C). The panko should be golden brown and crispy. 9. **Flip Halfway**: About halfway through the baking time, carefully flip the chicken breasts to ensure they get crispy on both sides. This step is crucial for achieving that perfect crunch.Making the Sauce
10. **Prepare the Sauce**: While the chicken is baking, lets whip up a quick and delicious sauce. In a small bowl, combine the mayonnaise, soy sauce, rice vinegar, and honey. Mix well until smooth. This sauce adds a creamy, tangy flavor that complements the crispy chicken perfectly. 11. **Taste and Adjust**: Give the sauce a taste and adjust the ingredients as needed. If you like it sweeter, add a bit more honey. For a tangier flavor, increase the soy sauce or vinegar. Set the sauce aside until the chicken is ready.Serving the Chicken Katsu
12. **Check the Chicken**: Once the chicken is done baking, remove it from the oven and let it rest for a few minutes. This allows the juices to redistribute, keeping the chicken moist. 13. **Slice the Chicken**: Using a sharp knife, slice the chicken breasts into strips. This not only makes for a beautiful presentation but also makes it easier to serve. 14. **Plate the Dish**: Arrange the sliced chicken katsu on a serving platter. Drizzle the prepared sauce over the top or serve it on the side for dipping. You can also garnish with chopped green onions or sesame seeds for an extra touch. 15. **Pair with Sides**: Chicken katsu is often served with a side of steamed rice and a simple salad or pickled vegetables. Feel free to add your favorite sides to complete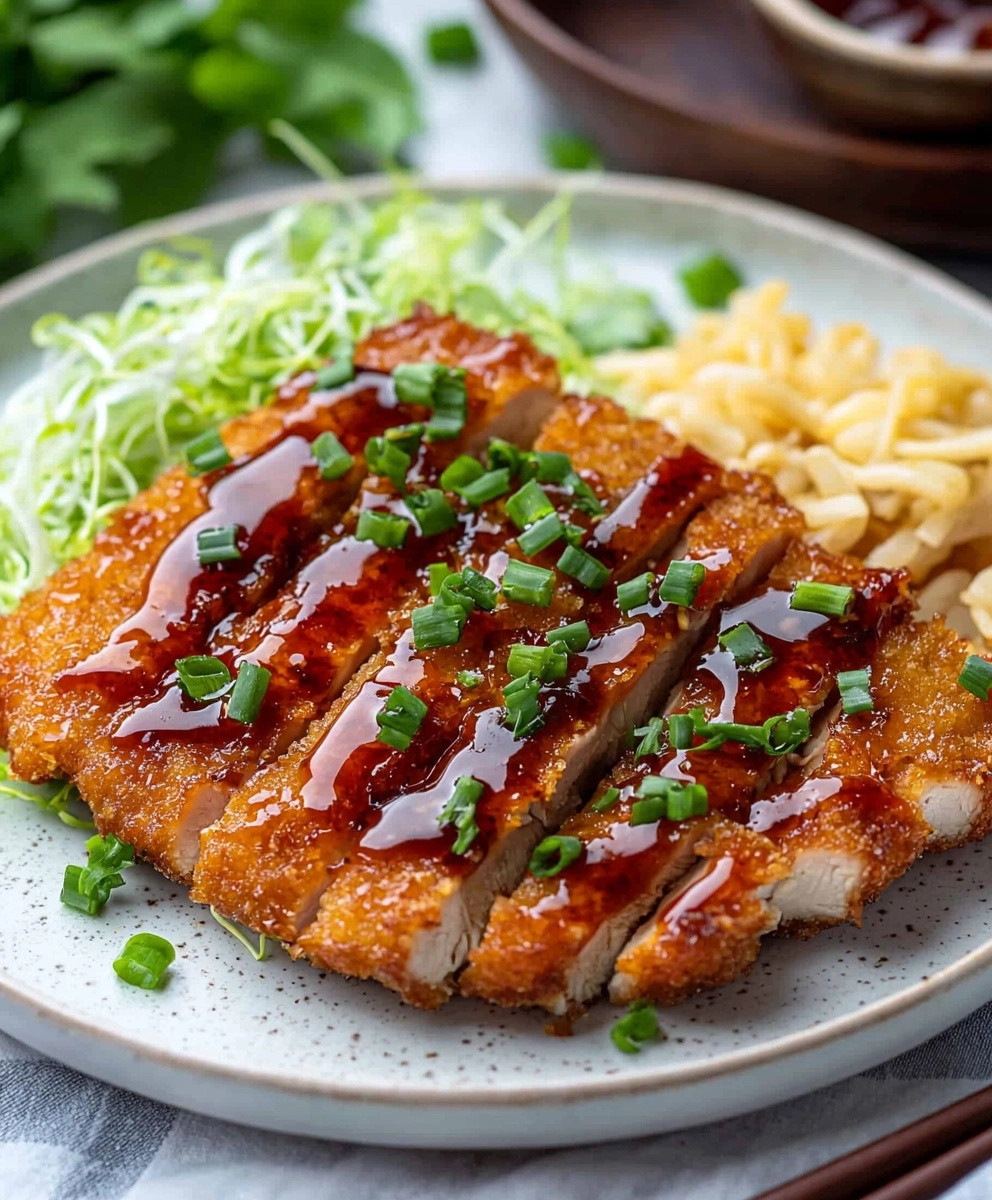
Conclusion:
In summary, this Baked Chicken Katsu is a must-try recipe that combines crispy, golden-brown chicken with a delightful crunch, all while being a healthier alternative to the traditional fried version. The ease of preparation and the delicious flavor make it a perfect weeknight dinner option or a crowd-pleaser for gatherings. For serving suggestions, I love pairing this dish with a side of steamed rice and a fresh salad drizzled with a tangy sesame dressing. You can also get creative with variations by swapping out the chicken for eggplant or tofu for a vegetarian twist, or even experimenting with different dipping sauces like a spicy mayo or a sweet teriyaki glaze. I encourage you to give this Baked Chicken Katsu a try and share your experience! Whether you stick to the classic recipe or put your own spin on it, Id love to hear how it turns out for you. Dont forget to snap a picture and share it with friends and family; theyll be impressed by your culinary skills! Happy cooking! PrintBaked Chicken Katsu: A Healthier Twist on a Classic Japanese Dish
Enjoy a healthier twist on Chicken Katsu with this baked version that’s crispy and flavorful. Served with a creamy, tangy sauce, it’s perfect for a quick weeknight dinner!
- Prep Time: 15 minutes
- Cook Time: 25 minutes
- Total Time: 40 minutes
- Yield: 4 servings 1x
Ingredients
- 4 boneless, skinless chicken breasts
- 1 cup panko breadcrumbs
- 1/2 cup all-purpose flour
- 2 large eggs
- 1 teaspoon salt
- 1/2 teaspoon black pepper
- 1 teaspoon garlic powder
- 1 teaspoon onion powder
- 1 teaspoon paprika
- 1/2 teaspoon cayenne pepper (optional, for heat)
- 1/4 cup mayonnaise
- 2 tablespoons soy sauce
- 1 tablespoon rice vinegar
- 1 tablespoon honey
- Cooking spray or olive oil for greasing
Instructions
- Preheat your oven to 400°F (200°C).
- Place chicken breasts between two sheets of plastic wrap or parchment paper. Pound to an even thickness of about 1/2 inch.
- In a small bowl, mix salt, black pepper, garlic powder, onion powder, paprika, and cayenne pepper. Rub this mixture over the chicken breasts.
- In three shallow dishes, place flour, whisked eggs, and panko breadcrumbs.
- Dip each chicken breast in flour, then egg, and finally panko breadcrumbs, ensuring they are fully coated.
- Line a baking sheet with parchment paper or grease it with cooking spray or olive oil.
- Place the breaded chicken breasts on the baking sheet, spaced apart.
- Bake for 20-25 minutes, flipping halfway through, until the internal temperature reaches 165°F (75°C) and the panko is golden brown.
- In a small bowl, mix mayonnaise, soy sauce, rice vinegar, and honey until smooth. Adjust to taste.
- Once baked, let the chicken rest for a few minutes.
- Slice the chicken breasts into strips.
- Arrange on a platter, drizzle with sauce or serve on the side, and garnish if desired.
- Serve with steamed rice and a salad or pickled vegetables.
Notes
- For extra crunch, consider frying the chicken instead of baking.
- Adjust the sauce ingredients to your taste preference for sweetness or tanginess.
- Leftovers can be stored in an airtight container in the refrigerator for up to 3 days.

Leave a Comment