
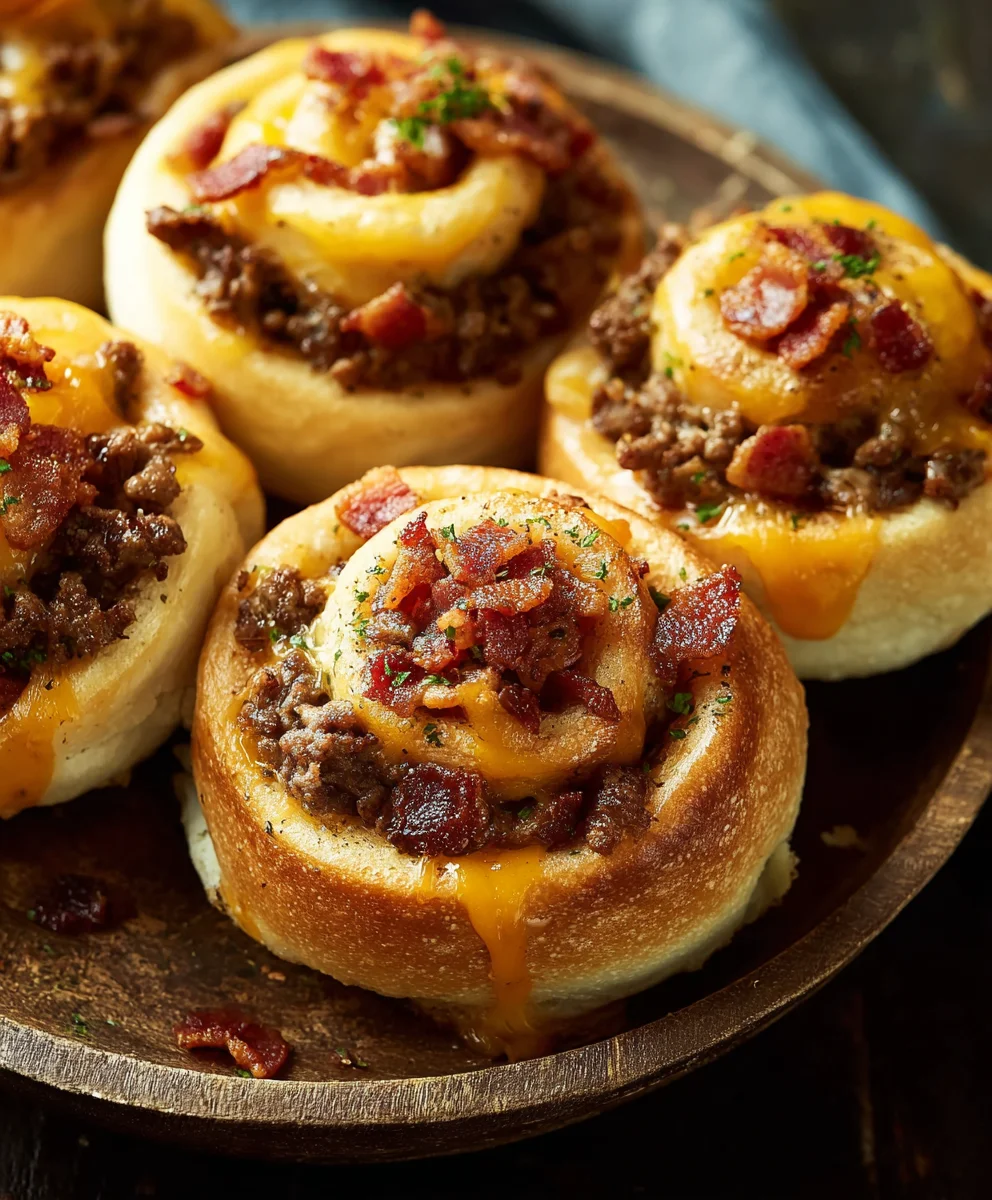
Beef Bacon Cheeseburger Rolls are here to revolutionize your snack game, party appetizers, or even your weeknight dinner routine! Imagine the quintessential American classic – a juicy beef patty, crispy bacon, and gooey melted cheese – all wrapped up in a golden, bite-sized package that’s utterly irresistible. I’m absolutely thrilled to share this recipe with you because it perfectly encapsulates everything we love about comfort food, but with an innovative twist that makes it uniquely satisfying.
The humble cheeseburger has been a beloved staple for over a century, evolving from simple diner fare to gourmet creations and becoming an icon of American culinary culture. This recipe pays homage to that enduring legacy by transforming its iconic flavors into a convenient, shareable format that’s perfect for any occasion. People adore this dish not just for its incredible taste – the savory seasoned beef, the smoky, salty bacon, and the sharp cheddar uniting in perfect harmony – but also for its delightful texture. Each roll offers a satisfyingly crisp exterior that gives way to a warm, flavorful interior, delivering an explosion of deliciousness. It’s the ultimate crowd-pleaser, incredibly easy to prepare, and unbelievably fun to eat. Whether you’re hosting a gathering, looking for an exciting lunch option, or simply craving a satisfying treat, these Beef Bacon Cheeseburger Rolls promise to deliver all the familiar, comforting flavors you love in a wonderfully convenient and delicious package.

Ingredients:
- My friend Lisa tried these for her son’s birthday party and couldn’t believe how fast they disappeared.
- She made two dozen thinking there would be leftovers, but the kids devoured them and kept asking if there were more.
- Even the adults were sneaking extra ones when they thought nobody was looking.
- Now she’s the mom who always gets asked to bring ‘those amazing burger roll things’ to every school function.
Crafting the Ultimate Party Sensation: Bringing Lisa’s Story to Life!
We’ve heard the rave reviews, felt the FOMO from Lisa’s son’s birthday party, and now it’s time to channel that energy into creating our own batch of irresistible Beef Bacon Cheeseburger Rolls. Achieving the kind of success where kids devour two dozen and adults sneak extras isn’t magic; it’s a careful combination of flavor, texture, and a touch of culinary love. To replicate that legendary party experience, we’ll need to gather some specific components and follow a precise process. Think of the “ingredients” listed above as your blueprint for success – a testimonial to what this recipe will achieve when executed perfectly. Let’s make sure your next gathering is just as memorable!
Preparation is Key: Setting the Stage for Success
- Gather Your Tools and Culinary Components: Just like Lisa, you’ll want to be prepared. For these amazing Beef Bacon Cheeseburger Rolls, you’ll need a large mixing bowl, a sturdy baking sheet, parchment paper, a non-stick skillet, and a sharp knife. Now, let’s talk about the actual food items that will bring this vision to life. You’ll need about 1 pound of lean ground beef (80/20 works perfectly for flavor without too much grease), 6-8 strips of thick-cut bacon, 1 small yellow onion, 2 cloves of garlic, 1 cup of shredded cheddar cheese (or a blend of cheddar and Monterey Jack for extra melty goodness), one package (8 oz) of refrigerated crescent roll dough or puff pastry sheets (if you prefer a flakier texture, puff pastry is divine, but crescent rolls are quick and easy), 1 large egg, 1 tablespoon of water, and a sprinkle of sesame seeds for that authentic burger bun look. Don’t forget your essential seasonings: salt, black pepper, and a dash of smoked paprika for an extra layer of savory depth.
- Prepping the Bacon: The Foundation of Flavor: To get that irresistible bacon crunch and flavor infusion, we’ll start here. Dice your 6-8 strips of thick-cut bacon into small, bite-sized pieces, roughly ¼ inch in size. Place these bacon pieces into a cold non-stick skillet over medium heat. Cooking the bacon from cold allows the fat to render slowly, resulting in crispier bits. Stir occasionally until the bacon is beautifully golden brown and crispy. This usually takes about 8-10 minutes. Once cooked, use a slotted spoon to transfer the crispy bacon bits to a plate lined with paper towels. This will absorb any excess grease, ensuring our rolls aren’t soggy. Reserve about 1-2 tablespoons of the rendered bacon fat in the skillet – this liquid gold is going to add incredible flavor to our beef!
- Building the Burger Base: A Symphony of Savory Goodness: Using the same skillet with the reserved bacon fat, add your 1 pound of lean ground beef. Break up the beef with a wooden spoon or spatula as it cooks over medium-high heat. We want nice, evenly browned beef here, so keep stirring and breaking up any large clumps. As the beef browns, finely dice your small yellow onion (about ½ cup once diced) and mince your 2 cloves of garlic. Once the beef is mostly browned, drain off any excess grease, leaving just a thin layer for flavor. Now, add the diced onion and minced garlic to the skillet with the beef. Sauté for about 5-7 minutes, or until the onions are softened and translucent and the garlic is fragrant. Season generously with ½ teaspoon of salt, ¼ teaspoon of black pepper, and a pinch of smoked paprika. Stir everything together, ensuring the seasonings are well distributed.
- Combining the Core Components: Where the Magic Begins: Once your beef mixture is cooked and seasoned, remove the skillet from the heat and transfer the beef and onion mixture to your large mixing bowl. Allow it to cool for about 5-10 minutes. This cooling step is important for two reasons: it prevents the cheese from melting prematurely, and it makes the mixture easier to handle. Once slightly cooled, add the crispy bacon bits (reserving a tiny pinch for garnish if you’re feeling fancy, but mostly it goes into the filling!) and the 1 cup of shredded cheddar cheese to the beef mixture. Stir everything gently until just combined. Don’t overmix, or you might compact the beef too much. This is our flavorful, cheesy, bacony filling – the heart of our Beef Bacon Cheeseburger Rolls!
Assembling the Rolls: The Art of the Perfect Package
- Preparing Your Dough: The Canvas for Creation: Preheat your oven to the temperature specified on your crescent roll or puff pastry package (usually around 375°F or 190°C). Line your sturdy baking sheet with parchment paper. If using refrigerated crescent roll dough, unroll the dough and separate it into individual triangles. If using puff pastry, unfold it onto a lightly floured surface and gently roll it out to about a 10×15 inch rectangle. For puff pastry, you’ll then want to cut it into roughly 12-16 squares or rectangles, depending on how large you want your rolls. For this recipe aiming for Lisa’s two dozen success, using two packages of crescent rolls or two sheets of puff pastry would be ideal to yield a similar quantity. We’ll proceed with one package/sheet for now to detail the steps, assuming you’ll scale up if aiming for a crowd!
- Filling and Folding: Crafting the Rolls: This is where we bring the burger roll concept to life.
- For Crescent Rolls: Take one crescent roll triangle. Place a generous spoonful (about 1-2 tablespoons) of your beef, bacon, and cheese mixture onto the wide end of the triangle. Start rolling from the wide end towards the pointed tip, just like you would with a regular crescent roll. Make sure the filling is tucked snugly inside. You can slightly crimp the edges to seal if you like, ensuring no cheesy goodness escapes.
- For Puff Pastry Squares: If you’ve cut your puff pastry into squares, place a spoonful of filling in the center of each square. Bring two opposite corners of the square together over the filling, pinching the edges firmly to seal. You can also fold it into a triangle, or a small rectangle by folding one side over the other and crimping. The key is to fully enclose the filling to prevent it from oozing out during baking.
Arrange your assembled rolls on the parchment-lined baking sheet, leaving about an inch of space between each one to allow for even baking.
- The Golden Finish: Egg Wash and Toppings: In a small bowl, whisk together your 1 large egg with 1 tablespoon of water. This creates a simple egg wash that will give our Beef Bacon Cheeseburger Rolls a beautiful golden-brown, shiny crust, just like a classic burger bun. Using a pastry brush, lightly brush the top of each roll with the egg wash. This is also the perfect moment to sprinkle a pinch of sesame seeds over each roll. The sesame seeds add that quintessential burger aesthetic and a subtle nutty crunch that elevates the experience, making them look even more appetizing to hungry party-goers.
Baking and Serving: Unleashing the Irresistible Aroma
- Baking to Perfection: Patience for Perfection: Carefully transfer your baking sheet of glorious Beef Bacon Cheeseburger Rolls into your preheated oven. Bake for approximately 12-15 minutes, or until the crescent roll dough is puffed up, golden brown, and cooked through, and the cheese inside is gloriously melted and bubbling. If using puff pastry, it might take a little longer, closer to 18-22 minutes, until it’s deeply golden and flaky. Keep an eye on them towards the end of the baking time, as oven temperatures can vary. The goal is a beautifully browned exterior and a molten, savory interior.
- Cooling (Just a Little!): The Moment of Truth: Once baked to perfection, remove the baking sheet from the oven. While it’s tempting to dive right in, allow the Beef Bacon Cheeseburger Rolls to cool on the baking sheet for about 5-10 minutes before transferring them to a wire rack. This brief cooling period helps the cheese filling to set slightly, preventing it from being too runny and ensuring that each roll holds its shape when picked up. Plus, they’re incredibly hot right out of the oven, and we want to avoid any burnt tongues – especially for eager kids!
- Serving Suggestions: Making Them Unforgettable: These Beef Bacon Cheeseburger Rolls are fantastic on their own, but if you want to elevate the “burger” experience even further, consider serving them with small bowls of dipping sauces. Ketchup and mustard are classic choices, of course. A side of creamy “special sauce” (a mix of mayo, ketchup, relish, and a dash of hot sauce) would be an absolute hit. You could even offer pickle slices or finely chopped fresh lettuce and tomato on the side for those who want to customize their mini-burger bite. This presentation will make them truly irresistible and ensure they disappear just as fast as Lisa’s did!
- Scaling Up for Success: Be Prepared for Demand: Remember Lisa’s story? She made two dozen, and they vanished. If you’re hosting a party or expecting a crowd, plan accordingly! This recipe, using one package of crescent rolls or one sheet of puff pastry, typically yields 8-12 rolls, depending on how you cut/fill them. To truly replicate Lisa’s success and avoid disappointed faces, consider doubling or even tripling the recipe. You can prepare the filling mixture in advance and store it in the refrigerator for up to 24 hours, assembling and baking the rolls closer to serving time for maximum freshness and wow-factor.
- Freezing and Reheating for Future Festivities: For ultimate convenience, especially when preparing for big events, these Beef Bacon Cheeseburger Rolls can be frozen!
- To freeze unbaked: Assemble the rolls, brush with egg wash, but do not bake. Arrange them in a single layer on a parchment-lined baking sheet and freeze until solid. Once frozen, transfer them to a freezer-safe zip-top bag or airtight container. They can be stored for up to 1 month. When ready to bake, place frozen rolls on a parchment-lined baking sheet and bake at the same temperature, adding an extra 5-10 minutes to the baking time, or until golden brown and hot throughout.
- To freeze baked: Allow fully baked and cooled rolls to freeze in a single layer on a baking sheet until solid. Transfer to a freezer-safe container. Reheat in a preheated oven (around 350°F / 175°C) for 10-15 minutes until warmed through, or in an air fryer for a few minutes until crispy. This means you can always have a stash ready for unexpected guests or a quick snack, ensuring you’re always ready to bring ‘those amazing burger roll things’ to any function!
Why These Beef Bacon Cheeseburger Rolls Become Legendary:
The beauty of these rolls, and why they so effortlessly replicate the success Lisa experienced, lies in their perfect balance. The savory, seasoned ground beef, mingled with the smoky crunch of bacon and the gooey embrace of melted cheddar, all encased in a tender, flaky pastry, is a culinary triumph. They’re bite-sized, making them ideal for parties and easy for little hands (and big hands sneaking extras!). The combination of familiar burger flavors in a convenient, portable format makes them universally appealing. There’s a reason they vanish so quickly – they hit all the right notes for comfort food, party food, and pure deliciousness. Get ready to become the legend of your next gathering!
Conclusion:
There you have it, my friends! We’ve journeyed through the simple steps to create what I genuinely believe will become a staple in your home: the utterly irresistible Beef Bacon Cheeseburger Rolls. If there’s one recipe I could implore you to try this week, it would unequivocally be this one. Why? Because these aren’t just rolls; they’re little parcels of pure joy, encapsulating everything you adore about a classic cheeseburger but in a handheld, incredibly satisfying format that’s perfect for absolutely any occasion.
Imagine sinking your teeth into a warm, golden-brown crust, giving way to a burst of savory, perfectly seasoned ground beef, smoky bacon, and melty cheese. The textures are a dream – a slight crispness from the wrapper, followed by the yielding tenderness of the meat, and the creamy richness of the cheese. It’s a symphony of flavors that truly dances on your palate, offering that quintessential comfort food experience we all crave, but with an exciting, novel twist. The blend of spices we used ensures every bite is packed with that familiar, beloved cheeseburger flavor, elevated by the irresistible crunch and saltiness of bacon.
This recipe is a must-try for so many reasons. For starters, it’s incredibly versatile. Whether you’re planning a casual family dinner, gearing up for game day, or need a show-stopping appetizer for your next party, these Beef Bacon Cheeseburger Rolls fit the bill perfectly. They’re designed to be fuss-free, meaning even if you’re new to the kitchen, you’ll find the process straightforward and incredibly rewarding. The sense of accomplishment you’ll feel as you pull these golden beauties from the oven is unmatched, and the delighted smiles of those you serve them to will be your ultimate reward.
Serving Suggestions and Creative Variations:
Now, let’s talk about how to elevate your Beef Bacon Cheeseburger Rolls experience even further. While they are phenomenal on their own, a simple dipping sauce can take them to the next level. Think classic ketchup and mustard for that authentic burger feel, or go gourmet with a tangy secret sauce (mayo, ketchup, relish, and a touch of hot sauce – trust me!). A creamy ranch dressing or even a spicy sriracha mayo would also be fantastic accompaniments. For a complete meal, I love serving these alongside a crisp, fresh garden salad with a light vinaigrette to cut through the richness, or a side of crispy sweet potato fries or onion rings for the ultimate indulgence. They also pair wonderfully with a cool, refreshing coleslaw.
Feeling adventurous? The beauty of this recipe lies in its adaptability! You can easily customize these rolls to suit your taste or what you have on hand. Don’t be afraid to experiment with different cheeses – a sharp cheddar, spicy pepper jack, or even a smoked gouda would add delightful new dimensions of flavor. For a touch of heat, you could mix in some finely diced jalapeños with your beef mixture, or add a pinch of cayenne pepper. Want to sneak in some veggies? Finely grated carrots or zucchini could be folded into the meat without anyone noticing, adding extra nutrients and moisture. You could even swap out the ground beef for ground turkey or chicken for a lighter alternative, or use turkey bacon for a leaner option, though I’m a purist when it comes to the full beef and bacon experience!
My biggest encouragement to you now is to clear your schedule, gather your ingredients, and give these magnificent rolls a try. I promise you won’t be disappointed. They are truly an unforgettable treat that brings smiles to every face. And once you’ve experienced the magic, please, please come back and share your thoughts! I absolutely love hearing about your kitchen adventures. Did you try a new cheese? Discover a fantastic dipping sauce? Or perhaps you just want to tell me how much your family devoured them? Your feedback, your photos, and your stories mean the world to me. Tag me on social media or leave a comment below – let’s build a community around delicious food! These Beef Bacon Cheeseburger Rolls are more than just a recipe; they’re an invitation to create, share, and savor. So go forth, cook with joy, and enjoy every single incredible bite!
Frequently Asked Questions (FAQs)
Can I make the Beef Bacon Cheeseburger Rolls ahead of time?
Absolutely! This is one of the best things about them. You can prepare the entire batch of rolls, assemble them, and then cover them tightly with plastic wrap and refrigerate for up to 24 hours before baking. If you’re short on time on the day of your event, this is a fantastic time-saver. Just add a few extra minutes to the baking time if baking from chilled.
How do I store leftover Beef Bacon Cheeseburger Rolls?
Any leftover rolls can be stored in an airtight container in the refrigerator for up to 3-4 days. To reheat, I recommend popping them back in a preheated oven (around 350°F or 175°C) for 10-15 minutes until heated through and crispy again. A microwave will work in a pinch, but they might lose some of their crispiness.
Can I freeze these rolls?
Yes, you can! Both baked and unbaked rolls freeze well. If freezing unbaked, arrange them on a baking sheet and freeze until solid, then transfer to a freezer-safe bag or container. They can be baked from frozen (add about 10-15 minutes to the baking time). If freezing baked rolls, let them cool completely, then wrap individually in plastic wrap and place in a freezer-safe bag. Reheat in the oven from frozen until warmed through.
What’s the best type of beef and bacon to use for this recipe?
For the beef, I recommend using a lean ground beef (around 85-90% lean) to prevent the rolls from becoming too greasy. However, if you prefer a richer flavor, an 80/20 blend would also work, just be sure to drain any excess fat thoroughly after browning. For bacon, a good quality thick-cut bacon will give you the best smoky flavor and texture. Cook it until it’s crispy but not burnt, as it will continue to cook slightly in the oven.
What are some good dipping sauce ideas for these rolls?
Beyond classic ketchup and mustard, try a homemade “special sauce” (mayo, ketchup, relish, a dash of hot sauce), a creamy ranch dressing, spicy sriracha mayo, barbecue sauce, or even a zesty honey mustard. Get creative with what you love!
Can I make these gluten-free?
Yes! The primary gluten-containing component is typically the wrapper. You can easily substitute with gluten-free spring roll wrappers or even certain brands of gluten-free crescent roll dough if you can find them. Just ensure the wrapper is suitable for baking and can hold the filling without breaking.
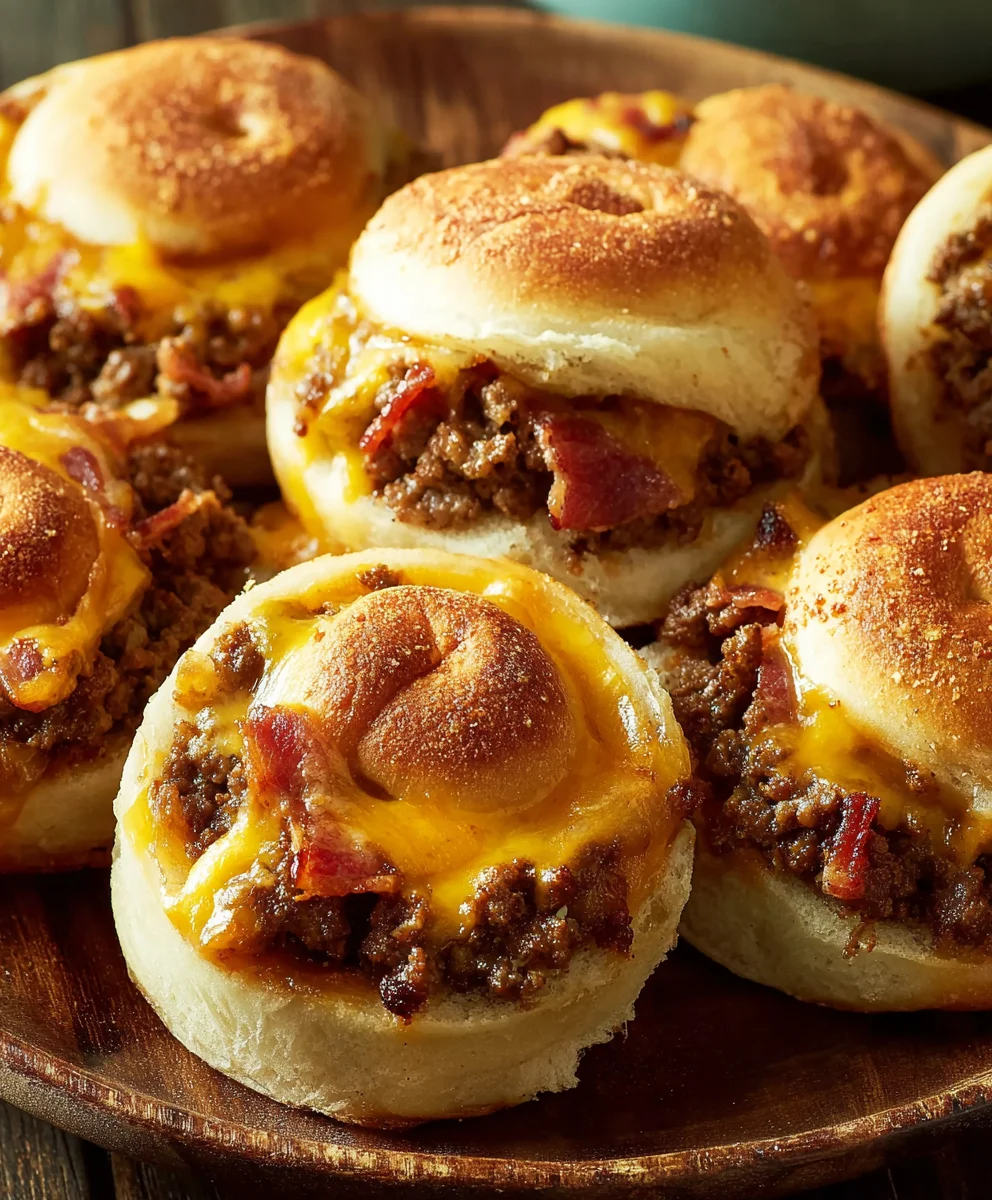
Beef Bacon Cheeseburger Rolls: Mini Burgers, Big Flavor!
Inspired by Lisa’s legendary party hit, these Beef Bacon Cheeseburger Rolls pack the irresistible flavors of a classic burger into a convenient, bite-sized pastry. Golden, flaky rolls encase savory ground beef, crispy beef bacon, and gooey melted cheddar, making them disappear at any gathering.
Ingredients
-
1 lb lean ground beef (80/20)
-
6-8 strips thick-cut beef bacon
-
1 small yellow onion, diced
-
2 cloves garlic, minced
-
1 cup shredded cheddar cheese
-
1 (8 oz) package refrigerated crescent roll dough OR puff pastry sheets
-
1 large egg
-
1 tbsp water
-
Sesame seeds, for topping
-
1/2 tsp salt, plus more to taste
-
1/4 tsp black pepper, plus more to taste
-
1/4 tsp smoked paprika
Instructions
-
Step 1
Dice beef bacon into ¼-inch pieces. Cook in a non-stick skillet over medium heat until golden brown and crispy (8-10 mins). Remove bacon bits to a paper-towel-lined plate, reserving 1-2 tbsp rendered fat in the skillet. -
Step 2
Add ground beef to the skillet with reserved fat. Brown over medium-high heat, breaking up the beef. Drain excess grease. Add diced onion and minced garlic; sauté for 5-7 mins until softened and fragrant. Season with ½ tsp salt, ¼ tsp black pepper, and a pinch of smoked paprika. Stir well. -
Step 3
Transfer beef mixture to a large mixing bowl; cool for 5-10 mins. Stir in crispy beef bacon bits and 1 cup shredded cheddar cheese until just combined. -
Step 4
Preheat oven to 375°F (190°C) or per dough package. Line a baking sheet with parchment paper. Unroll crescent dough and separate into triangles (or roll out puff pastry and cut into 12-16 squares). Place 1-2 tbsp of beef, bacon, and cheese mixture onto the wide end of each crescent triangle or center of each pastry square. Roll or fold and crimp edges to fully seal the filling. Arrange on the prepared baking sheet. -
Step 5
Whisk 1 large egg with 1 tbsp water. Brush the tops of the assembled rolls with egg wash and sprinkle with sesame seeds for a burger bun look. -
Step 6
Bake for 12-15 minutes (crescent rolls) or 18-22 minutes (puff pastry), until golden brown and the cheese is bubbling. Remove from oven and let cool on the baking sheet for 5-10 minutes before transferring to a wire rack. -
Step 7
Serve warm with ketchup, mustard, or a ‘special sauce’. This recipe yields 8-12 rolls. To replicate Lisa’s success for a crowd, double or triple the ingredients. The filling can be prepared up to 24 hours in advance and stored in the refrigerator. -
Step 8
To freeze unbaked: Assemble, egg wash, then freeze solid on a baking sheet before transferring to a freezer-safe bag (up to 1 month). Bake from frozen, adding 5-10 mins to bake time. To freeze baked: Freeze cooled rolls solid, then store in an airtight container. Reheat in oven at 350°F (175°C) for 10-15 mins or in an air fryer until warmed through.
Important Information
Nutrition Facts (Per Serving)
It is important to consider this information as approximate and not to use it as definitive health advice.
Allergy Information
Please check ingredients for potential allergens and consult a health professional if in doubt.


Leave a Comment