
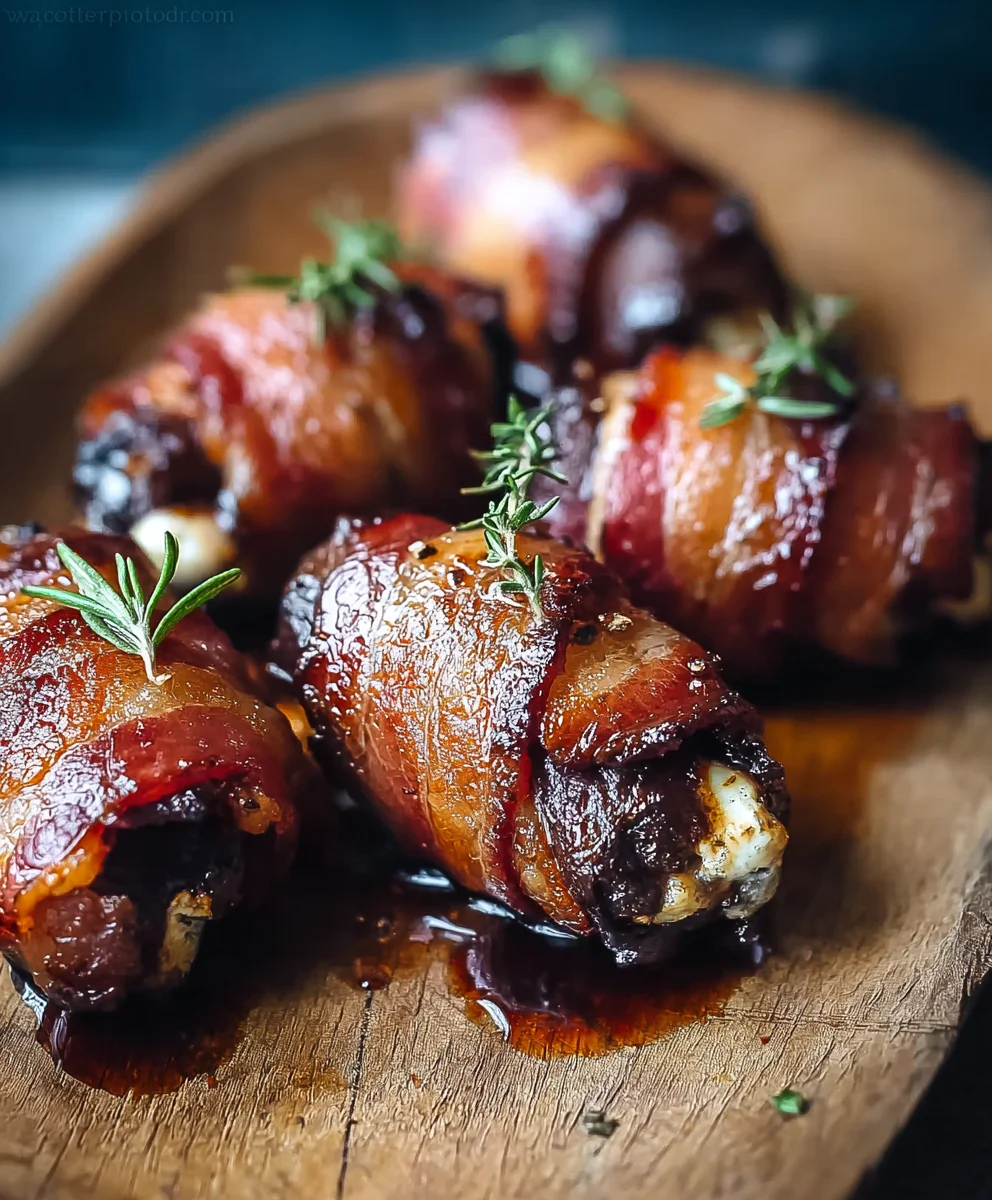
Beef Bacon-Wrapped Dates are an absolute showstopper, and once you try them, you’ll understand exactly why they’ve become a go-to appetizer for so many. Imagine this: the intensely rich, smoky, and slightly salty crunch of perfectly cooked beef bacon giving way to the sweet, gooey burst of a Medjool date. It’s a flavor and texture combination that’s utterly divine, hitting every single note on your palate. What makes this dish so special isn’t just the delightful contrast, but also its surprising simplicity. Despite their sophisticated appearance and the gourmet feel, Beef Bacon-Wrapped Dates are remarkably easy to assemble, making them perfect for both novice cooks and seasoned entertainers looking to impress without the stress. They’re the ideal bite to welcome guests, a perfect accompaniment to cocktails, and frankly, so addictive you might just find yourself making a double batch.

Ingredients:
- 6 oz creamy goat cheese, softened for easy stuffing.
- 24 Medjool dates, pitted.
- 12 slices bacon, cut in half for wrapping.
- 1/3 cup honey, for the glaze.
- 1 tbsp fresh rosemary, finely chopped for aroma.
- 1/2 tsp cayenne pepper, optional for heat.
- Kosher salt, to taste.
- Black pepper, to taste.
- Candied or toasted walnuts, optional for garnish.
Preparing the Dates and Goat Cheese
The first crucial step in creating these delightful Beef Bacon-Wrapped Dates is to get our components ready. Take your 24 Medjool dates and ensure they are properly pitted. If you happen to buy them pre-pitted, double-check to make sure no pits remain, as a stray pit can ruin the experience. Once pitted, gently slice each date lengthwise, creating a small pocket for the filling. Be careful not to cut all the way through; you want to create a cavity that can hold the goat cheese without splitting the date entirely.
Now, for the creamy filling. Take your 6 oz of softened creamy goat cheese. Softening is key here, as it makes the cheese much easier to work with and stuff into the dates. If your goat cheese is still a bit firm, you can leave it at room temperature for about 30 minutes to an hour, or gently warm it by placing the bowl over a pot of warm (not boiling) water for a few minutes, stirring occasionally. Once softened, it should be pliable and spreadable. You can season the goat cheese at this stage if you like; a pinch of kosher salt and freshly ground black pepper will enhance its flavor.
Stuffing the Dates with Goat Cheese
With your dates prepped and goat cheese softened, it’s time for the satisfying task of stuffing. Using a small spoon, a piping bag (if you’re feeling fancy and want a neater presentation), or even just your fingers, carefully spoon or pipe a generous amount of the softened goat cheese into the pocket you created in each pitted date. You want to fill them sufficiently so that each bite offers a delightful creamy counterpoint to the sweet date, but avoid overstuffing to the point where the cheese oozes out excessively before cooking. Aim for a balanced filling that tucks neatly inside the date. As you stuff each date, gently press the sides together to enclose the cheese as much as possible. This will help keep the filling contained during the cooking process.
Wrapping the Dates with Bacon
This is where the “bacon-wrapped” magic truly begins. Take your 12 slices of bacon. You’ll want to cut each slice in half horizontally. This will give you 24 shorter pieces of bacon, which is the perfect size to wrap around each stuffed date. Take one stuffed date and wrap one half-slice of bacon around its circumference, ensuring that the bacon overlaps slightly. The overlap is important for helping the bacon adhere and cook evenly. Secure the end of the bacon with a toothpick. This is absolutely essential, as it prevents the bacon from unraveling in the oven and ensures a neat, cohesive package. Repeat this process for all 24 stuffed dates, using one half-slice of bacon and one toothpick per date. Make sure the bacon is wrapped snugly but not so tightly that it restricts the date from cooking.
Cooking the Beef Bacon-Wrapped Dates
Preheat your oven to 400°F (200°C). While the oven is heating, prepare a baking sheet by lining it with parchment paper or aluminum foil for easy cleanup. This step is highly recommended as bacon can render a good amount of fat. Arrange the bacon-wrapped dates on the prepared baking sheet in a single layer, making sure they are not touching each other. This allows for even cooking and helps the bacon crisp up nicely on all sides. Place the baking sheet in the preheated oven.
Bake for approximately 15 to 20 minutes, or until the bacon is golden brown and crispy, and the dates are softened and slightly caramelized. The exact cooking time will depend on your oven and the thickness of your bacon. About halfway through the cooking time (around 8-10 minutes), carefully remove the baking sheet from the oven. You’ll notice some rendered fat in the pan. You can gently tilt the pan and spoon out some of this excess fat if you prefer, though it’s not strictly necessary. This is also a good time to check on the browning of the bacon and rotate the pan if needed for even cooking.
Glazing and Finishing Touches
While the dates are in their final stage of baking, prepare the honey glaze. In a small bowl, whisk together the 1/3 cup of honey, the 1 tablespoon of finely chopped fresh rosemary, and the optional 1/2 teaspoon of cayenne pepper. If you’re using the cayenne pepper, this glaze will provide a lovely sweet and spicy kick that beautifully complements the salty bacon and creamy cheese. Once the dates have baked for their initial 15-20 minutes and the bacon is looking nicely crisped, carefully remove them from the oven. Drizzle or brush the honey-rosemary glaze generously over the top of each bacon-wrapped date. Return the baking sheet to the oven for another 2 to 5 minutes, just until the glaze is bubbling and slightly caramelized. Keep a close eye on them during this final stage, as the honey can burn quickly.
Once they are perfectly glazed and irresistible, carefully remove the Beef Bacon-Wrapped Dates from the oven. Allow them to cool on the baking sheet for a few minutes before serving. The toothpicks can be left in for easy handling, or removed just before serving if desired. For an extra touch of elegance and texture, you can sprinkle them with some optional candied or toasted walnuts just before serving. These nuts add a delightful crunch and a sophisticated finish to this already decadent appetizer. These are best served warm, allowing the flavors and textures to meld beautifully.

Conclusion:
I hope you’ve enjoyed diving into the delicious world of Beef Bacon-Wrapped Dates! This recipe is a fantastic way to elevate simple ingredients into something truly special. The sweet, chewy dates perfectly complement the savory, smoky crunch of the beef bacon, creating an irresistible appetizer or snack that’s always a crowd-pleaser. Whether you’re hosting a dinner party or just craving a gourmet treat, these flavor bombs are sure to impress.
For serving suggestions, I love presenting these Beef Bacon-Wrapped Dates warm, fresh out of the oven, on a rustic platter. They pair wonderfully with a crisp glass of white wine or a light lager. They also make a delightful addition to a charcuterie board, offering a unique sweet and savory element.
If you’re feeling adventurous, consider some delicious variations! You could add a sliver of almond inside each date for an extra textural surprise. For a touch of heat, try wrapping them with a small piece of jalapeño. And for a different flavor profile, experiment with different types of cured meat, though the beef bacon really shines here.
Don’t be afraid to get creative and make these Beef Bacon-Wrapped Dates your own. The beauty of cooking is in the personalization, and this recipe provides a wonderful canvas for your culinary imagination. I encourage you to try them soon and savor every delightful bite!
Frequently Asked Questions:
Can I make Beef Bacon-Wrapped Dates ahead of time?
Yes, you can assemble the Beef Bacon-Wrapped Dates ahead of time and refrigerate them. For best results, bake them just before serving to ensure the beef bacon is crispy and the dates are warm and gooey.
What if I can’t find beef bacon?
While beef bacon offers a unique flavor, you can substitute it with regular pork bacon. Just be mindful that the cooking time might vary slightly, and the flavor profile will be a little different. Ensure the pork bacon is cooked until it’s nice and crispy.
Beef Bacon-Wrapped Dates-Sweet Salty Appetizer
A delightful appetizer featuring sweet Medjool dates stuffed with creamy goat cheese, wrapped in savory beef bacon, and glazed with a honey-rosemary mixture.
Ingredients
-
6 oz creamy goat cheese, softened
-
24 Medjool dates, pitted
-
12 slices beef bacon, cut in half for wrapping
-
1/3 cup honey, for the glaze
-
1 tbsp fresh rosemary, finely chopped
-
1/2 tsp cayenne pepper, optional
-
Kosher salt, to taste
-
Black pepper, to taste
-
Candied or toasted walnuts, optional for garnish
Instructions
-
Step 1
Pit the Medjool dates and gently slice each lengthwise to create a pocket. Ensure goat cheese is softened for easy stuffing. -
Step 2
Stuff each date with a generous amount of softened goat cheese, gently pressing the sides to enclose the filling. -
Step 3
Cut beef bacon slices in half. Wrap each stuffed date with a half-slice of beef bacon, overlapping slightly. Secure with a toothpick. -
Step 4
Preheat oven to 400°F (200°C). Arrange wrapped dates on a parchment-lined baking sheet in a single layer. -
Step 5
Bake for 15-20 minutes until beef bacon is golden brown and crispy. While baking, whisk together honey, rosemary, and optional cayenne pepper for the glaze. -
Step 6
Remove dates from oven, drizzle with glaze, and return to oven for an additional 2-5 minutes until glaze is bubbling. -
Step 7
Let cool slightly before serving. Garnish with optional walnuts if desired. Serve warm.
Important Information
Nutrition Facts (Per Serving)
It is important to consider this information as approximate and not to use it as definitive health advice.
Allergy Information
Please check ingredients for potential allergens and consult a health professional if in doubt.


Leave a Comment