
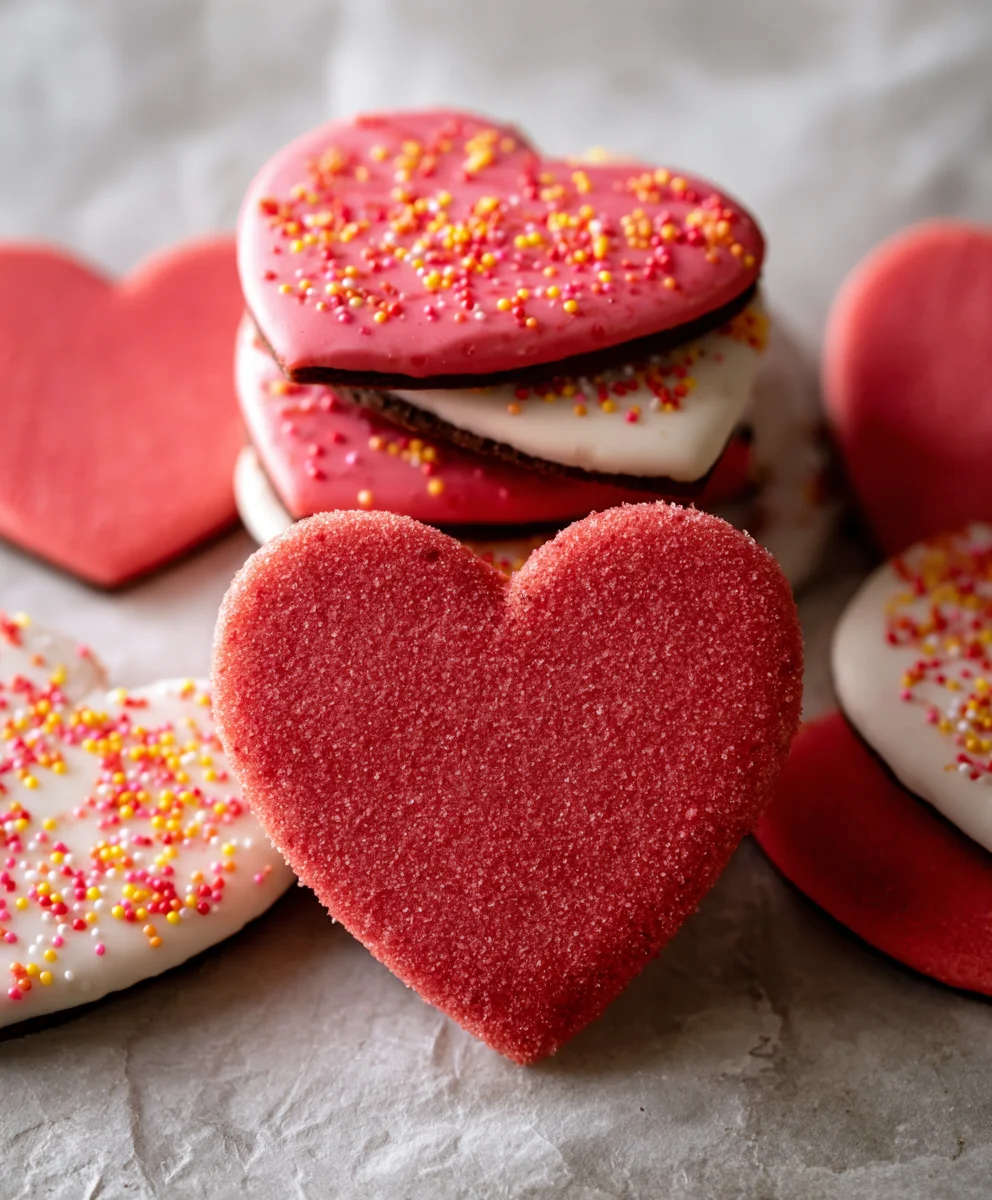
The Best Non-alcoholic Valentine Sugar Cookies are more than just a treat; they’re a sweet declaration of love, a sprinkle of joy, and a cornerstone of heartfelt celebrations. When February rolls around, and the air fills with whispers of romance and affection, nothing says “I care” quite like a batch of perfectly baked, heart-shaped delights. These aren’t just any cookies; they are crafted to be wonderfully soft, delightfully chewy, and bursting with that classic buttery sweetness that instantly evokes nostalgic memories. What truly sets this recipe apart is its accessibility – offering all the delightful charm and festive spirit of traditional sugar cookies, without any alcohol, making them a perfect indulgence for everyone to enjoy. Prepare to fall head over heels for this delightful rendition of The Best Non-alcoholic Valentine Sugar Cookies.

Ingredients:
- 2 ½ cups all-purpose flour, plus more for dusting
- 1 teaspoon baking powder
- ½ teaspoon salt
- 1 cup (2 sticks) unsalted butter, softened
- 1 ½ cups granulated sugar
- 2 large eggs
- 1 teaspoon vanilla extract
- Assorted nonpareils, sprinkles, or edible glitter for decorating (optional)
For the Royal Icing:
- 3 cups powdered sugar
- 3 tablespoons milk (or water for a firmer icing)
- 1 teaspoon light corn syrup
- ½ teaspoon vanilla extract
- Food coloring (optional)
Making the Dough
Step 1: Combine Dry Ingredients
First things first, let’s get our dry ingredients ready. In a medium bowl, whisk together the 2 ½ cups of all-purpose flour, the 1 teaspoon of baking powder, and the ½ teaspoon of salt. Whisking them together helps to distribute the leavening agent (baking powder) and salt evenly throughout the flour, which is crucial for consistent cookie texture. Set this bowl aside for now.
Step 2: Cream Butter and Sugar
In a large mixing bowl, using an electric mixer (stand mixer or hand mixer), cream together the 1 cup of softened unsalted butter and the 1 ½ cups of granulated sugar. You want to beat these together until the mixture is light and fluffy. This process incorporates air into the butter and sugar, which contributes to the tender texture of the cookies. Scrape down the sides of the bowl periodically to ensure everything is well combined. This typically takes about 3-5 minutes on medium speed.
Step 3: Add Wet Ingredients
Next, beat in the 2 large eggs, one at a time, making sure to fully incorporate each egg before adding the next. After the eggs are mixed in, stir in the 1 teaspoon of vanilla extract. The vanilla extract adds that classic, comforting flavor that we all love in sugar cookies.
Step 4: Gradually Add Dry Ingredients to Wet Ingredients
Now it’s time to combine the wet and dry ingredients. With the mixer on low speed, gradually add the flour mixture to the butter mixture, about a third at a time. Mix until just combined after each addition. Be careful not to overmix the dough at this stage. Overmixing can develop the gluten in the flour too much, resulting in tough cookies. Once the last of the flour is incorporated, the dough should start to pull away from the sides of the bowl.
Step 5: Chill and Roll the Dough
Turn the dough out onto a lightly floured surface. You can divide the dough into two equal portions for easier handling. Flatten each portion into a disc, wrap them tightly in plastic wrap, and refrigerate for at least 1 hour, or until firm. Chilling the dough is a very important step. It allows the gluten to relax, making the dough easier to roll and preventing the cookies from spreading too much during baking, which helps them hold their shape. Once chilled, unwrap one disc of dough. On a lightly floured surface, roll out the dough to about ¼-inch thickness. You can use cookie cutters to create your desired shapes – heart shapes are perfect for Valentine’s Day! Transfer the cut-out cookies to a baking sheet lined with parchment paper, leaving about 1 inch of space between each cookie.
Baking the Cookies
Step 6: Bake Until Golden Brown
Preheat your oven to 350°F (175°C). Bake the cookies for 8-12 minutes, or until the edges are lightly golden brown. The exact baking time will depend on the size and thickness of your cookies, so keep a close eye on them during the last few minutes of baking. Once baked, let the cookies cool on the baking sheet for a few minutes before transferring them to a wire rack to cool completely. This cooling period on the baking sheet helps them firm up enough to be moved without breaking.
Making the Royal Icing
Step 7: Prepare the Royal Icing Base
While the cookies are cooling, let’s prepare the royal icing. In a medium bowl, whisk together the 3 cups of powdered sugar, 3 tablespoons of milk (or water for a stiffer icing), and the ½ teaspoon of vanilla extract until smooth and well combined. If you want a thicker icing for outlining, use slightly less milk. For a thinner flooding consistency, you might need a touch more milk. Add the 1 teaspoon of light corn syrup for a smooth, glossy finish and to help prevent the icing from hardening too quickly.
Step 8: Color and Decorate
Once the cookies are completely cool, you can begin decorating! If you want to color your icing, divide the icing into separate bowls and stir in a few drops of food coloring until you achieve your desired shades. Use piping bags fitted with fine tips to outline your cookies with a thicker icing, or use a spoon to spread a thinner icing over the surface. Immediately after flooding with icing, you can add your assorted nonpareils, sprinkles, or edible glitter for those extra festive touches. Allow the icing to dry completely before stacking or packaging your beautiful, “The Best Vnon-alcoholic alentine Sugar Cookies.” This can take several hours, depending on the thickness of the icing. Enjoy!
Conclusion:
I truly hope you enjoyed diving into this recipe for The Best Vnon-alcoholic alentine Sugar Cookies! We’ve covered everything from achieving that perfect soft-baked texture to decorating them with all the festive flair your heart desires. These cookies aren’t just a treat for Valentine’s Day; they’re a versatile delight that brings smiles any time of year. Whether you’re baking for a loved one, a Galentine’s gathering, or simply treating yourself, these sugar cookies are sure to impress with their delicious flavor and charming appearance.
For serving suggestions, these cookies are wonderful on their own, but they also pair beautifully with a glass of cold milk, hot chocolate, or even a cup of herbal tea. Consider them the star of a dessert platter, a sweet ending to a romantic meal, or a thoughtful handmade gift.
Don’t be afraid to get creative with variations! While this recipe is fantastic as is, you can experiment with different extracts like almond or lemon for a twist. Feel free to use various cookie cutters beyond the traditional heart shape, and explore a rainbow of frosting colors and edible glitter to make them uniquely yours.
Remember, baking is about having fun and making memories. So gather your ingredients, put on some cheerful music, and enjoy the process of creating The Best Vnon-alcoholic alentine Sugar Cookies. I encourage you to share your creations with friends and family – the joy of these cookies is meant to be shared!
Frequently Asked Questions:
Q1: How long do these cookies stay fresh?
Properly stored in an airtight container at room temperature, these sugar cookies will stay deliciously fresh for up to 5-7 days. Ensure they are completely cooled before storing to prevent condensation and sogginess.
Q2: Can I make the dough ahead of time?
Absolutely! The dough for The Best Vnon-alcoholic alentine Sugar Cookies can be made and refrigerated for up to 3 days. This actually allows the flavors to meld even further, resulting in a richer cookie. Just let the dough soften slightly at room temperature for about 15-20 minutes before rolling and cutting.
Q3: What if I don’t have a specific cookie cutter shape?
Don’t worry if you don’t have Valentine’s themed cutters! You can use any cookie cutters you have on hand – circles, stars, or even simple squares. Alternatively, you can freehand shapes or roll the dough into balls and flatten them before baking for a more rustic look.

Best Non-Alcohol Valentine Sugar Cookies Recipe
A delicious and festive recipe for non-alcoholic sugar cookies perfect for Valentine’s Day, complete with royal icing for decorating.
Ingredients
-
2 ½ cups all-purpose flour, plus more for dusting
-
1 teaspoon baking powder
-
½ teaspoon salt
-
1 cup (2 sticks) unsalted butter, softened
-
1 ½ cups granulated sugar
-
2 large eggs
-
1 teaspoon vanilla extract
-
Assorted nonpareils, sprinkles, or edible glitter for decorating (optional)
-
3 cups powdered sugar
-
3 tablespoons milk (or water for a firmer icing)
-
1 teaspoon light corn syrup
-
½ teaspoon vanilla extract
-
Food coloring (optional)
Instructions
-
Step 1
Combine dry ingredients: In a medium bowl, whisk together the 2 ½ cups of all-purpose flour, the 1 teaspoon of baking powder, and the ½ teaspoon of salt. Set aside. -
Step 2
Cream butter and sugar: In a large mixing bowl, beat together the 1 cup of softened unsalted butter and the 1 ½ cups of granulated sugar until light and fluffy. Scrape down the sides of the bowl periodically. -
Step 3
Add wet ingredients: Beat in the 2 large eggs, one at a time, fully incorporating each before adding the next. Stir in the 1 teaspoon of vanilla extract. -
Step 4
Gradually add dry ingredients: With the mixer on low speed, gradually add the flour mixture to the butter mixture, about a third at a time, mixing until just combined after each addition. Do not overmix. -
Step 5
Chill and roll the dough: Turn the dough out onto a lightly floured surface, divide into two discs, wrap tightly in plastic wrap, and refrigerate for at least 1 hour. Once chilled, roll out to about ¼-inch thickness and cut with cookie cutters. Transfer to a parchment-lined baking sheet. -
Step 6
Bake until golden brown: Preheat oven to 350°F (175°C). Bake for 8-12 minutes, or until edges are lightly golden brown. Let cool on the baking sheet for a few minutes before transferring to a wire rack to cool completely. -
Step 7
Prepare the royal icing base: While cookies cool, whisk together 3 cups of powdered sugar, 3 tablespoons of milk (or water), ½ teaspoon vanilla extract, and 1 teaspoon of light corn syrup until smooth. Adjust milk for desired consistency. -
Step 8
Color and decorate: Once cookies are completely cool, color the icing if desired. Outline and flood cookies with icing, and immediately add sprinkles or edible glitter. Allow icing to dry completely.
Important Information
Nutrition Facts (Per Serving)
It is important to consider this information as approximate and not to use it as definitive health advice.
Allergy Information
Please check ingredients for potential allergens and consult a health professional if in doubt.
Leave a Comment