
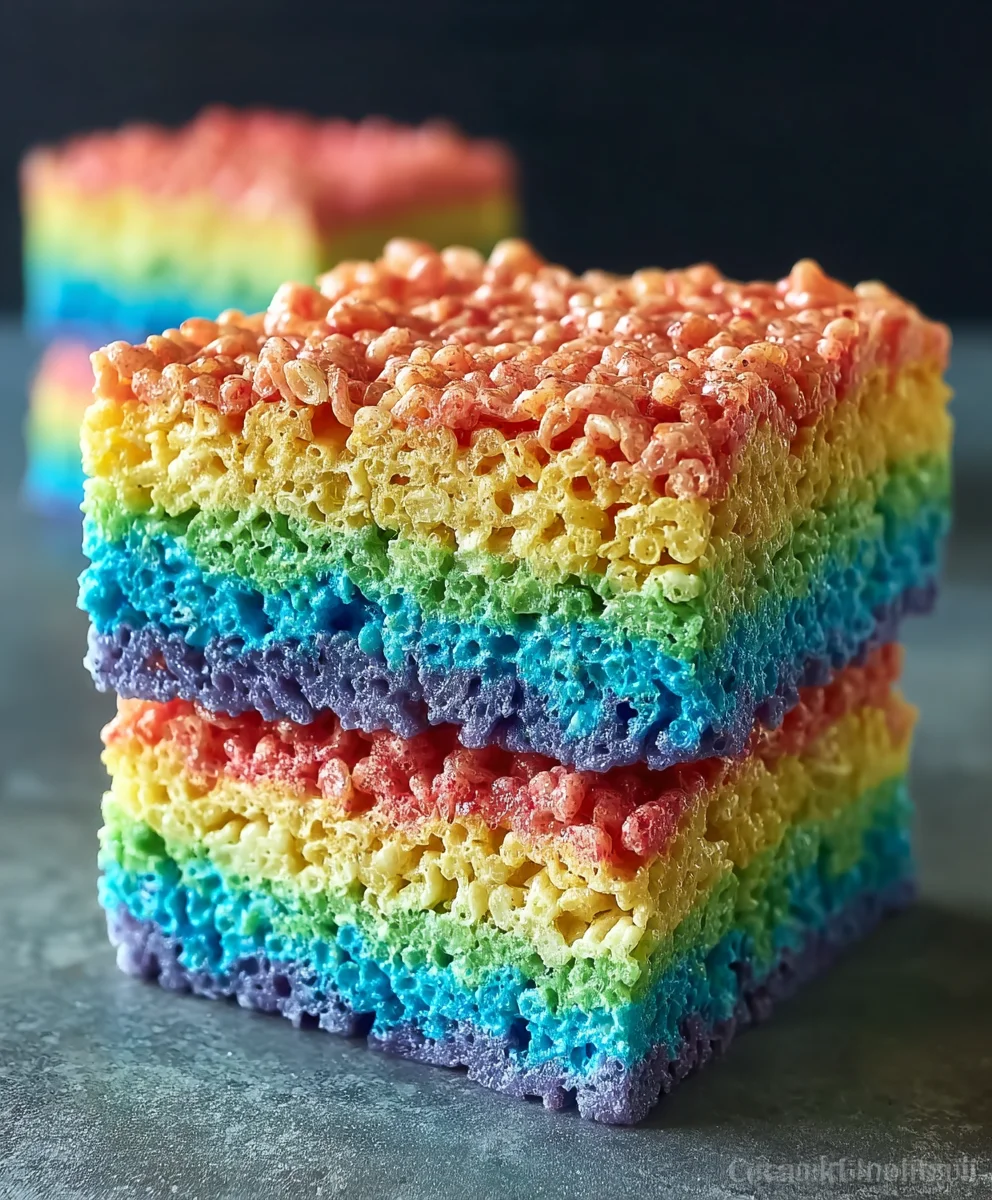
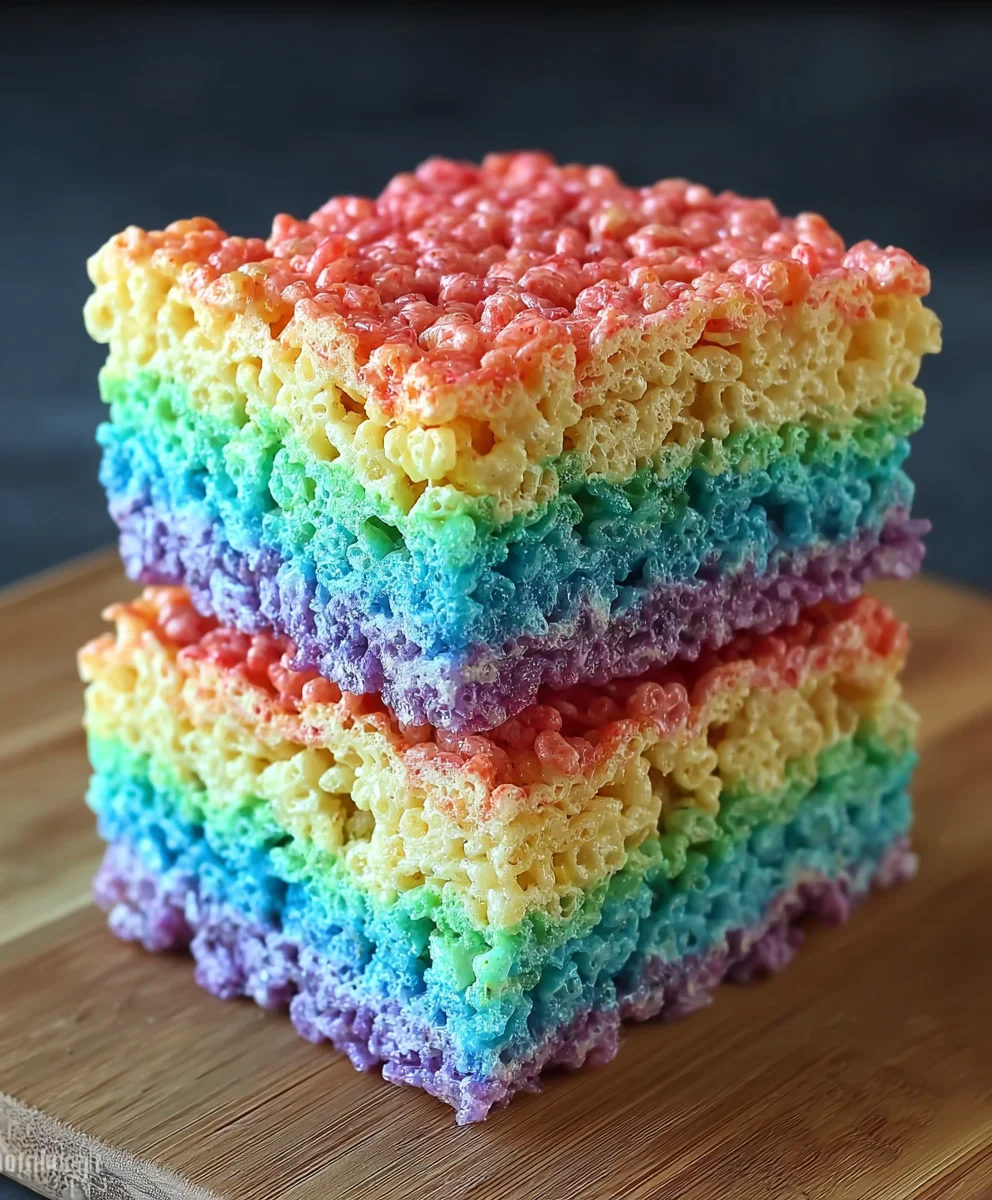
Rainbow Rice Krispie Treats are more than just a dessert; they are a vibrant celebration in every chewy, crunchy bite, guaranteed to bring a smile to anyone’s face. Originating from a classic American staple, the original Rice Krispie Treat has long been a beloved no-bake delight, conjuring nostalgic memories of school bake sales and simple kitchen adventures. My take on this timeless classic introduces a delightful burst of color, transforming the familiar into something truly extraordinary and eye-catching.
What truly sets these treats apart is their irresistible combination of soft, marshmallowy goodness perfectly blended with the satisfying crisp of puffed rice cereal. They’re incredibly simple to prepare, making them an ideal choice for busy schedules or spontaneous sweet cravings. The vibrant hues make them a perfect centerpiece for parties, a joyful surprise in lunchboxes, or simply a charming way to brighten any ordinary day. There’s something universally enchanting about the sight of these colorful Rainbow Rice Krispie Treats, and I can’t wait to share my foolproof method with you.

Ingredients:
- Unsalted Butter: 6 tablespoons (90g), divided, plus extra for greasing your hands and pan. I always opt for unsalted so I can control the saltiness, but salted works in a pinch if that’s all you have on hand.
- Miniature Marshmallows: 16 ounces (about 1 bag or 450g). Using fresh marshmallows is crucial here – stale ones won’t melt as smoothly and can make your Rainbow Rice Krispie Treats tough. If you only have large marshmallows, you’ll need to adjust the melting time slightly, cutting them into smaller pieces can help.
- Vanilla Extract: 1 teaspoon. A good quality vanilla extract really elevates the flavor, adding a warm, comforting note to balance the sweetness of the marshmallows.
- Crispy Rice Cereal: 9 cups (about 255g), divided. This is the star of our “Rainbow Rice Krispie Treats”! Make sure it’s fresh and crunchy. Stale cereal will result in chewy, disappointing treats. I like to measure it out before I start, so everything is ready to go.
- Gel Food Coloring: In vibrant rainbow colors – typically red, orange, yellow, green, blue, and purple. Gel food coloring is my secret weapon for truly brilliant, deep hues without adding too much liquid, which can change the texture. Liquid food coloring can be used, but you might need more, and the colors won’t be as intense.
- Optional Toppings: Rainbow sprinkles for an extra festive touch. Who doesn’t love more sprinkles on their Rainbow Rice Krispie Treats?
Gathering Your Tools: Preparing for Rainbow Rice Krispie Treats Success
Before we dive into the delicious fun, let’s get all our tools ready. Being organized is key to making these Rainbow Rice Krispie Treats a breeze! You’ll need a large non-stick pot or a Dutch oven, ideally one that’s roomy enough to mix all the cereal in comfortably. Having multiple medium-sized mixing bowls, at least six, will be essential for dividing and coloring our marshmallow mixture – one for each color of the rainbow. I also recommend a good rubber spatula, or two, for mixing and pressing. A 9×13-inch baking pan is perfect for setting our treats, and I always have some parchment paper and non-stick cooking spray on hand to ensure easy release. And trust me, greasing your hands (or having a little extra butter handy) is a lifesaver when it comes to pressing the sticky mixture!
Preparing the Marshmallow Base: The Foundation for Your Vibrant Rainbow Rice Krispie Treats
Step 1: Melting the Butter
First things first, let’s get that butter melted. Take 6 tablespoons of unsalted butter and place it into your large non-stick pot. I like to use medium-low heat for this. The goal is to melt the butter completely without browning it. Keep a close eye on it; butter can go from perfectly melted to browned in a flash, and while browned butter has its place in some recipes, it’s not what we’re looking for today for our brightly colored Rainbow Rice Krispie Treats. Stir occasionally until it’s a golden liquid, shimmering in the pot. This sets the stage for a smooth marshmallow base.
Step 2: Introducing the Marshmallows
Once your butter is fully melted, it’s time for the stars of the show (besides the cereal, of course!): the marshmallows. Pour your entire 16-ounce bag of miniature marshmallows into the melted butter. Give them a gentle stir to coat them slightly with the butter. Keep the heat on medium-low. This low and slow approach is critical for achieving a smooth, pliable marshmallow mixture. If the heat is too high, the marshmallows can seize up, burn, or become grainy, which would be a tragedy for our Rainbow Rice Krispie Treats!
Step 3: Achieving the Perfect Melt
Now, this is where a little patience comes in handy. Continue to stir the marshmallow mixture constantly. You’ll see the marshmallows gradually soften, clump together, and then slowly melt into a luscious, sticky pool. Keep stirring until the mixture is completely smooth, with no lumps remaining. This usually takes about 5 to 7 minutes. Once it’s fully melted and wonderfully gooey, immediately remove the pot from the heat. Don’t let it sit on the burner, even if it’s off, as residual heat can continue to cook the marshmallows. Now, quickly stir in the 1 teaspoon of vanilla extract. The vanilla adds a lovely depth of flavor that complements the sweetness beautifully. Give it a good stir until the vanilla is fully incorporated. This perfectly melted marshmallow base is the sticky glue that will hold our amazing Rainbow Rice Krispie Treats together!
Dividing and Coloring: Bringing the Rainbow to Your Rice Krispie Treats
Step 4: Dividing the Mixture
This is where the magic truly begins for our Rainbow Rice Krispie Treats! Once your marshmallow mixture is smooth and infused with vanilla, it’s time to divide it up. Carefully, but quickly, spoon equal portions of the hot marshmallow mixture into your six separate medium-sized mixing bowls. Precision isn’t absolutely critical here, but try to get them as even as possible so your color layers are roughly the same thickness. Remember, the mixture is very sticky and warm, so work with care. I usually eyeball it, but if you want to be super precise, you could use a kitchen scale to divide the total weight of the marshmallow mixture evenly.
Step 5: Adding the Food Coloring
Now for the fun part: adding the color! In each bowl, add a few drops of your chosen gel food coloring – red, orange, yellow, green, blue, and purple. I always start with a small amount, like 2-3 drops, because gel colors are incredibly concentrated, and you can always add more if you want a deeper hue. Use a separate clean spoon or spatula for each bowl to avoid color contamination. Stir vigorously until the color is evenly distributed and vibrantly bright. You’ll want to work fairly quickly here, as the marshmallow mixture will start to cool and become harder to work with. If you’re using liquid food coloring, you might need a bit more, but be mindful not to add too much liquid, as it can affect the texture of your Rainbow Rice Krispie Treats. Keep stirring until each bowl presents a distinct, beautiful rainbow shade.
Step 6: Incorporating the Cereal, Color by Color
With your colored marshmallow bases ready, it’s time to add the “Krispie” to our Rainbow Rice Krispie Treats! For each colored bowl, add 1 ½ cups of crispy rice cereal. This is where you need to be gentle but thorough. Using your rubber spatula, carefully fold the cereal into the colored marshmallow mixture. The key here is to mix until every piece of cereal is coated with the vibrant marshmallow, but without crushing the cereal. You want those satisfying crispy textures in your final treat! Gently scrape the bottom and sides of the bowl to ensure no dry cereal is left behind. Repeat this process for all six colors. You’ll end up with six bowls, each brimming with a beautifully colored, sticky, and ready-to-layer cereal mixture. This step is a bit of an arm workout, but the results are absolutely worth it when you see those distinct, brilliant colors!
Layering and Setting: Building Your Beautiful Rainbow Rice Krispie Treats
Step 7: Preparing Your Pan for Easy Release
Before we start layering, let’s prepare our 9×13-inch baking pan. I always line my pan with parchment paper, leaving an overhang on the longer sides. This creates “handles” that make lifting the entire slab of Rainbow Rice Krispie Treats out of the pan incredibly easy once they’ve set. After lining with parchment, I give the pan a light spray with non-stick cooking spray, even over the parchment, and especially on any exposed metal. You can also lightly butter the pan and parchment if you prefer. This double-layer of preparation ensures your treats won’t stick and will release cleanly.
Step 8: The Layering Process – One Color at a Time
Now for the artistic part of creating your Rainbow Rice Krispie Treats! Begin with your first color – typically purple or red, depending on which order you want your rainbow. Scoop the entire colored cereal mixture into the prepared pan. Using a piece of parchment paper, a buttered spatula, or lightly greased hands (I find my hands are best for even pressure!), gently press the mixture evenly into the bottom of the pan to form your first layer. The goal is an even, consistent layer without compressing it too much. You don’t want to squish all the air out. Next, immediately add the next color on top, gently spreading it over the first layer. Continue this process, layering each color of the rainbow until all six colors are in the pan. Work relatively quickly here so the layers don’t cool too much before you’ve finished. The slight warmth helps them adhere to each other.
Step 9: Gentle Pressing is Key
Once all six layers of your Rainbow Rice Krispie Treats are in the pan, it’s time for one final, gentle press. Again, use a piece of parchment paper on top, a buttered spatula, or lightly greased hands. Apply even, firm (but not forceful) pressure across the entire surface. This ensures all the layers are bonded together and the treats are uniform in thickness. The biggest mistake people make is pressing too hard! Over-compressing the treats will result in dense, hard squares instead of the delightful, chewy-crispy texture we’re aiming for. A light, even touch is all you need to set those vibrant layers.
Step 10: The Setting Period
After your masterpiece is complete and gently pressed, it’s time to let your Rainbow Rice Krispie Treats set. I usually let mine set at room temperature for at least 1 to 2 hours. This allows the marshmallow to firm up gradually, resulting in a perfectly chewy texture. If you’re in a hurry, you can pop the pan into the refrigerator for about 30-45 minutes. However, be aware that refrigerating them for too long can make them a bit too firm, so I usually prefer the room temperature method for the ideal texture. You’ll know they’re ready when they feel firm to the touch and can be easily lifted from the pan without falling apart.
Slicing and Serving: Enjoying Your Homemade Rainbow Rice Krispie Treats
Step 11: Releasing from the Pan
Once your Rainbow Rice Krispie Treats have fully set, it’s time for the big reveal! Grasp the parchment paper overhangs you wisely left in place and carefully lift the entire slab of treats out of the 9×13-inch pan and place it onto a large cutting board. This makes slicing so much easier and keeps your pan clean. If you didn’t use parchment, you might need to run a thin knife along the edges of the pan before inverting it onto a cutting board, which can sometimes be a bit messier.
Step 12: Cutting into Perfect Portions
Now, for the final step before devouring: cutting your beautiful Rainbow Rice Krispie Treats! I like to use a large, sharp knife that I’ve lightly greased with a bit of butter or sprayed with non-stick spray. This prevents the sticky marshmallow from adhering to the blade, giving you clean, crisp cuts. You can cut them into traditional squares, about 2×2 inches, or get creative with rectangles, triangles, or even use cookie cutters for fun shapes (just make sure to grease the cookie cutters too!). I typically get about 16-24 squares from a 9×13-inch pan, depending on the size. Each slice will reveal those stunning, distinct rainbow layers, making them an absolute showstopper! If you want an extra touch of festivity, now is the perfect time to add some rainbow sprinkles on top of each cut treat before serving. Just a light press to make sure they stick.
Serving and Storing Your Rainbow Rice Krispie Treats
Your gorgeous Rainbow Rice Krispie Treats are now ready to be enjoyed! They are best served within the first day or two for optimal freshness and chewiness. If you have any leftovers (which is a big “if” in my house!), store them in an airtight container at room temperature. Avoid refrigerating them for extended periods, as this can make them hard and less enjoyable. They generally stay fresh and delightful for up to 3 days. These vibrant, crispy, and chewy treats are always a hit, bringing a burst of color and a smile to everyone’s face!
Welcome to the grand finale of our culinary adventure! As we wrap up our journey with this incredibly vibrant and utterly delightful treat, I truly hope you’re feeling inspired and excited to get into your kitchen. We’ve explored the simple magic that transforms a few humble ingredients into something truly extraordinary, a dessert that doesn’t just satisfy a sweet tooth but also brings a burst of joy to any occasion. This isn’t just another sweet treat; it’s an experience waiting to happen, a colorful canvas of crunch and chewiness that’s almost as fun to look at as it is to devour. I genuinely believe that once you try this recipe, you’ll understand exactly why it has quickly become one of my absolute favorites to prepare and share.
Ultimately, what truly makes these Rainbow Rice Krispie Treats a standout is their unparalleled ability to combine effortless preparation with stunning visual appeal. In a world where time is often a luxury, the beauty of a no-bake recipe is a blessing, and this one delivers on all fronts. Imagine being able to whip up a show-stopping dessert in under 30 minutes, without ever having to turn on your oven! That’s the kind of kitchen magic we all dream of, isn’t it? They are a true testament to the idea that deliciousness doesn’t have to be complicated, and that often, the simplest pleasures are the most profound. From the moment you layer those vibrant colors to the very first satisfying crunch, you’ll be captivated. The sheer happiness these treats evoke, especially in children, is something truly special. They’re perfect for birthday parties, potlucks, school events, or simply as an unexpected mid-week pick-me-up. Their delightful chewiness and subtle sweetness, perfectly balanced by that signature crisp, make them utterly irresistible. Trust me when I say, once you’ve experienced the ease and pure delight of these colorful squares, you’ll be making them again and again.
Creative Serving Suggestions and Delicious Variations to Explore
Now that you’re convinced these are a must-try, let’s talk about how to elevate your Rainbow Rice Krispie Treats experience even further! While they are absolutely divine on their own, there are so many fun ways to serve them or tweak the recipe to suit your mood or occasion. For a party, I love to arrange them on a platter alongside other colorful treats, perhaps some fresh fruit or small candies, creating a truly eye-catching spread. You could also cut them into smaller, bite-sized squares and arrange them in cupcake liners for individual servings, which makes them super easy to grab and enjoy. For a more decadent touch, try drizzling them with melted white chocolate, dark chocolate, or even a contrasting colored candy melt after they’ve set. A sprinkle of extra edible glitter or fun sprinkles on top of the chocolate drizzle adds an extra layer of sparkle and festivity, making them even more enchanting.
Don’t be afraid to experiment with variations, either! The beauty of a classic recipe is how adaptable it is. For a different flavor profile, consider adding a teaspoon of almond extract or even a little lemon zest to the melted marshmallow mixture – it can really brighten up the taste. If you’re a chocolate lover, gently fold in some mini chocolate chips or M&M’s into the warm cereal mixture before pressing it into the pan; the heat will slightly melt them, creating pockets of gooey chocolatey goodness. Think beyond the standard squares too! Using fun cookie cutters allows you to create stars, hearts, or even animal shapes, which is especially wonderful if you’re making these for a themed party or a specific holiday. Imagine heart-shaped treats for Valentine’s Day or star-shaped ones for a patriotic celebration! For a truly luxurious twist, why not serve a warm square of a Rainbow Rice Krispie Treat alongside a scoop of vanilla bean ice cream? The contrast of the cool, creamy ice cream with the chewy, slightly warm treat is absolutely divine. You could even dip one end of the finished treats into melted chocolate and then roll it in more sprinkles or chopped nuts for an extra textural dimension. The possibilities are truly endless, and each variation allows you to put your own unique stamp on this already fantastic dessert. I find that this kind of creative play in the kitchen is what truly makes cooking and baking so rewarding and enjoyable.
So, there you have it – my passionate plea for you to try these incredible treats! I genuinely hope you’re feeling excited and ready to bring some vibrant color and deliciousness into your life. Whether you’re looking for an easy dessert to impress, a fun activity with the kids, or simply a nostalgic snack that hits all the right notes, these Rainbow Rice Krispie Treats are the answer. They are proof that a little bit of color can go a long way in brightening up your day and your dessert table. I can’t wait for you to experience the joy of making them and, more importantly, the pure delight of tasting them. Once you’ve made your batch, please, please, please share your creations with me! I absolutely adore seeing your culinary adventures come to life. Tag me on social media, leave a comment below with your thoughts, or tell me about any fun variations you came up with. Your feedback and photos truly make my day. Happy making, and enjoy every single colorful, crunchy, chewy bite!
Best Rainbow Rice Krispie Treats
Vibrant and fun Rainbow Rice Krispie Treats are a chewy, crunchy, no-bake delight. This colorful twist on a classic American treat is perfect for parties, lunchboxes, or brightening any day.
Ingredients
-
6 tbsp (90g) unsalted butter, plus extra for greasing
-
16 oz (450g) miniature marshmallows (about 1 bag)
-
1 tsp vanilla extract
-
9 cups (255g) crispy rice cereal, divided (1.5 cups per color)
-
Gel food coloring: red, orange, yellow, green, blue, purple
-
Rainbow sprinkles (optional, for topping)
Instructions
-
Step 1
Line a 9×13-inch baking pan with parchment paper, leaving an overhang, then lightly spray with non-stick cooking spray. Have 6 medium mixing bowls ready; lightly grease your hands or a rubber spatula. -
Step 2
In a large non-stick pot, melt 6 tablespoons of butter over medium-low heat. Add marshmallows; stir constantly for 5-7 minutes until completely smooth. Remove from heat. -
Step 3
Quickly stir in 1 teaspoon of vanilla extract. Immediately divide the hot marshmallow mixture evenly into the 6 prepared mixing bowls. -
Step 4
To each bowl, add a few drops of a different gel food coloring (red, orange, yellow, green, blue, purple). Stir vigorously with a separate spoon for each color until the color is vibrant and evenly distributed. -
Step 5
To each colored bowl, add 1 ½ cups of crispy rice cereal. Gently fold with a rubber spatula until all cereal is coated with the colored marshmallow mixture. -
Step 6
Scoop the first colored cereal mixture (e.g., purple) into the prepared pan. Using greased hands or a buttered spatula, gently press it into an even layer. Immediately add the next color on top, gently spreading and pressing. Continue this process, layering each color until all six are in the pan, pressing each layer firmly to ensure adhesion and prevent separation. -
Step 7
Once all layers are in place, apply one final, gentle, even press across the entire surface to bond the layers without over-compressing. Let the treats set at room temperature for 1-2 hours, or refrigerate for 30-45 minutes, until firm. -
Step 8
Lift the entire slab from the pan using the parchment overhang. Place on a cutting board. Using a lightly greased sharp knife, cut into desired portions (e.g., 16-24 squares). Optionally, add rainbow sprinkles on top of each cut treat before serving. Store leftovers in an airtight container at room temperature for up to 3 days.
Important Information
Nutrition Facts (Per Serving)
It is important to consider this information as approximate and not to use it as definitive health advice.
Allergy Information
Please check ingredients for potential allergens and consult a health professional if in doubt.


Leave a Comment