
Smores Pizza – just hearing those words evokes a sense of nostalgic delight, doesn’t it? For generations, the classic s’more has been synonymous with outdoor adventures, cozy evenings, and the simple joy of toasted marshmallows, melted chocolate, and crisp graham crackers. While the traditional campfire experience is undoubtedly charming, sometimes you crave that iconic flavor without the smoke, ash, or even the need for a backyard. That’s where the brilliance of Smores Pizza truly shines, offering a delightful twist on a beloved classic.
Bring the Campfire Magic Indoors with Smores Pizza!
Imagine taking the quintessential taste of a campfire favorite and transforming it into an easily shareable, utterly irresistible dessert. That’s precisely what this incredible recipe achieves. I’ve found that people absolutely adore this dish not just for its incredible taste – that perfect symphony of gooey, sweet, and crunchy textures – but also for its remarkable convenience and undeniable “wow” factor. It’s a spectacular centerpiece for any gathering, from casual family nights to festive parties, promising pure happiness in every single slice. The simple preparation allows you to bring the magic of s’mores indoors, making it a fantastic, mess-free option for satisfying those sweet cravings year-round. Get ready to impress everyone with this ingenious dessert that captures the heart of summer, no matter the season!

Ingredients:
- For the Pizza Dough:
- 1 (13.8 ounce) package refrigerated pizza crust dough (such as Pillsbury Classic Crust) or your favorite homemade pizza dough recipe. Using a store-bought dough makes this recipe incredibly quick and easy, perfect for a spontaneous treat!
- For the Chocolate Layer:
- 1 ½ cups milk chocolate chips, semi-sweet chocolate chips, or a combination of both. I find that a mix gives a wonderful depth of flavor, but pure milk chocolate is undeniably classic for that smores taste.
- 4-6 full-sized milk chocolate bars (like Hershey’s), broken into pieces. Using a combination of chips and bar chocolate ensures a really gooey, rich chocolate layer that stays melted beautifully.
- For the Marshmallow Topping:
- 4-5 cups mini marshmallows. Mini marshmallows are ideal because they melt evenly and quickly, providing that perfectly toasted exterior without burning. If you only have larger marshmallows, you can snip them into smaller pieces with kitchen shears.
- For the Graham Cracker Crunch:
- 8-10 full-sized graham cracker sheets, crushed. You can crush them finely for an even texture or leave some larger pieces for extra crunch. I love a mix!
- Optional Crust Enhancements:
- 2 tablespoons unsalted butter, melted. This adds a lovely richness and helps the crust brown beautifully.
- 1 tablespoon granulated sugar (optional, for sweetening the crust). A little sugar can enhance the dessert experience by making the crust subtly sweet.
- For Dusting:
- All-purpose flour, for dusting your work surface.
Preparation of the Crust
My first step when making this delightful Smores Pizza is always to get the oven ready and the crust prepped. This foundation is crucial for achieving that perfect balance of crispiness and chewiness that complements the gooey toppings so well.
- Preheat Your Oven: Start by preheating your oven to 375°F (190°C). This temperature is ideal for getting the crust golden and the toppings perfectly melted and toasted without burning. While the oven preheats, you can prepare your pizza pan.
- Prepare Your Pizza Pan: I usually grab a 12-inch or 14-inch round pizza pan. To ensure absolutely no sticking and for easy cleanup, I highly recommend lining your pizza pan with parchment paper. If you don’t have parchment paper, a light spray of non-stick cooking spray or a thin layer of butter or oil will work, but parchment truly is a game-changer here.
- Prep Your Work Surface: On a clean, dry surface, sprinkle a light dusting of all-purpose flour. This prevents the dough from sticking while you work with it. If you’re using a store-bought refrigerated pizza crust, carefully unroll it onto your floured surface.
- Stretch and Shape the Dough: Now comes the fun part – shaping your pizza crust! Gently begin to stretch the dough into your desired circular shape, aiming for a thickness of about ¼ to ½ inch. I usually start by gently pulling the edges, working my way around. If the dough springs back, let it rest for a few minutes to relax the gluten, then try stretching again. You can also use a rolling pin if you prefer, but I find working it by hand gives it a nice rustic texture. Make sure it fits comfortably on your prepared pizza pan. I often try to create a slightly thicker edge or a small “lip” around the circumference, which acts as a nice barrier for all those delicious toppings and gives you something substantial to hold onto when enjoying your slice.
- Transfer to Pan: Carefully transfer the stretched dough to your prepared pizza pan. Press it down gently to ensure it’s flat and evenly distributed. If you’re going for that slightly thicker edge, gently pinch and shape it now.
- Optional Crust Enhancement – Butter and Sugar: This step is a personal favorite for elevating the crust! In a small microwave-safe bowl, melt 2 tablespoons of unsalted butter. Once melted, you can stir in 1 tablespoon of granulated sugar, if you like a sweeter crust. Using a pastry brush, gently brush this mixture all over the pizza dough, including the edges. This butter wash helps the crust achieve a beautiful golden-brown color and adds an extra layer of flavor that really complements the smores theme. It also creates a very subtle barrier that can help prevent the crust from becoming too soggy from the toppings, though that’s rarely an issue with smores pizza!
- Pre-Bake the Crust (Highly Recommended!): For a truly superior Smores Pizza, I always recommend a short pre-bake. This helps to set the crust, preventing it from getting doughy under the heavy toppings and ensuring it’s perfectly cooked through. Bake the naked crust in your preheated oven for about 5-7 minutes. You’re looking for it to be slightly puffed and just barely starting to turn golden at the edges. Remove it from the oven and prepare for assembly!
Assembling Your Smores Pizza
With our beautifully pre-baked crust ready, it’s time to transform it into the decadent Smores Pizza we’ve been dreaming of. This is where all the magical components come together!
- The First Layer – Chocolate Chips: Immediately after removing the pre-baked crust from the oven (it should still be warm), sprinkle your chosen chocolate chips evenly over the surface. I usually use about 1 to 1 ½ cups here. The residual heat from the crust will start to gently melt the chocolate chips, creating a wonderful base. Don’t worry if they don’t completely melt at this stage; they’ll get plenty more heat in the next baking phase. Ensure you spread them almost to the very edge of your crust’s lip, as we want chocolate in every single bite of this Smores Pizza!
- Adding the Chocolate Bar Pieces: Now, for an extra layer of gooey richness, take your broken chocolate bar pieces and strategically place them over the chocolate chips. I like to distribute them somewhat evenly, ensuring that there are larger pools of intensely rich chocolate to look forward to. This combination of chips and bar chocolate is key to achieving that authentic, deeply satisfying smores chocolate experience that makes this Smores Pizza truly special.
- The Marshmallow Mountain: Next, it’s time for the stars of the show – the marshmallows! Generously sprinkle 4 to 5 cups of mini marshmallows over the chocolate layers. I like to cover almost every inch of the chocolate, leaving just a tiny bit of the crust exposed around the very edge. Don’t be shy here; a thick layer of marshmallows ensures that classic puffy, toasted topping. If you’re using larger marshmallows cut into pieces, try to distribute them as evenly as possible so they melt and toast uniformly. This is where the “Smores” in Smores Pizza really comes to life!
- The Graham Cracker Crumble (First Pass): Take about two-thirds of your crushed graham crackers and sprinkle them lightly over the marshmallows. This initial layer of graham crackers will get slightly embedded as the marshmallows melt, adding texture and flavor throughout the Smores Pizza. I find that layering them this way helps integrate the graham cracker flavor into every bite, rather than just having it as a top garnish.
Baking Your Delectable Smores Pizza
Now that our Smores Pizza is fully assembled, it’s time to send it back into the oven to transform into that golden, gooey, irresistible dessert we’ve been craving. This phase requires a watchful eye to achieve perfection.
- Return to the Oven: Carefully place your assembled Smores Pizza back into your preheated 375°F (190°C) oven. I usually place it on the middle rack for even cooking and browning.
- Bake Until Golden and Gooey: Bake for approximately 7-12 minutes. The exact time will depend on your oven and how toasted you like your marshmallows. Keep a very close eye on it! Marshmallows can go from perfectly golden to burnt very quickly. You are looking for the marshmallows to puff up beautifully, turn a lovely golden brown on top, and for the chocolate underneath to be completely melted and wonderfully gooey. The crust should also be a deep golden brown around the edges. If your marshmallows are browning too quickly but the chocolate isn’t fully melted, you can try moving the pizza to a lower rack in the oven for a few minutes, or briefly covering the marshmallows with foil, though I rarely find this necessary with mini marshmallows.
- The Magic of Melding: During this baking process, the chocolate will fully melt and merge with the crust, creating a rich, flowing base. The marshmallows will expand and toast, forming that iconic crispy-on-the-outside, molten-on-the-inside texture. The graham crackers will soften slightly into the marshmallow layer, releasing their wonderful honeyed flavor. This is the heart of the Smores Pizza experience!
- Remove and Admire: Once your Smores Pizza reaches your desired level of golden toastiness, carefully remove it from the oven. It will be incredibly hot, and the marshmallows will be very puffy and delicate. The aroma filling your kitchen will be absolutely intoxicating!
Finishing Touches and Serving
You’re almost there! Just a few final steps to make sure your Smores Pizza is perfect for sharing (or not sharing, I won’t judge!).
- The Second Pass – Graham Cracker Crumble: Immediately after removing the pizza from the oven, while everything is still hot and sticky, sprinkle the remaining one-third of your crushed graham crackers over the top. These will retain more of their crunch and add a fantastic textural contrast to the gooey marshmallows and melted chocolate. This also makes the Smores Pizza look even more authentic and inviting!
- Cooling is Crucial: This is arguably the hardest step for me – patience! Allow the Smores Pizza to cool on the pizza pan for at least 5-10 minutes before attempting to slice it. Why is this so important? If you cut it too soon, the melted chocolate will be extremely runny, and the marshmallows might make it difficult to get clean slices. Cooling allows the chocolate to set up slightly and the marshmallows to firm up enough for easier handling, making for much neater and more enjoyable slices.
- Slicing Your Smores Pizza: Once cooled slightly, use a sharp pizza cutter to slice your Smores Pizza into wedges. I usually go for 8 or 12 slices, depending on how generous I’m feeling (or how many people are hovering eagerly!). The warmth will still be there, but the ingredients will be more cohesive.
- Serving Suggestions: Serve your Smores Pizza warm, when the chocolate is still perfectly gooey and the marshmallows are soft. This dessert is fantastic on its own, but if you want to be extra indulgent (and why wouldn’t you?), a scoop of vanilla bean ice cream on the side is an absolute dream, especially as the warm Smores Pizza melts it slightly. A drizzle of extra chocolate sauce or a sprinkle of flaky sea salt (to cut through the sweetness) are also wonderful additions if you’re feeling fancy.
- Storage: If by some miracle you have any Smores Pizza left over (it’s rare in my house!), you can store it in an airtight container at room temperature for up to 2 days. For best results, I recommend reheating individual slices in a toaster oven or microwave for a few seconds to bring back that delicious gooeyness. However, I truly believe this Smores Pizza is at its absolute peak when enjoyed fresh from the oven!
Enjoy Your Homemade Smores Pizza!
There you have it – a truly decadent and fun Smores Pizza recipe that brings all the joy of a campfire treat right into your home. It’s perfect for parties, dessert nights, or just a sweet craving. I hope you and your loved ones enjoy making and devouring this incredibly tasty dessert as much as I do!
Conclusion:
And there you have it, friends! We’ve journeyed through the simple, joyful, and utterly delicious process of creating a dessert that truly transcends the ordinary. What makes this recipe a non-negotiable addition to your culinary repertoire, you ask? Well, it’s the sheer genius of combining childhood nostalgia with adult-level indulgence, all wrapped up in a surprisingly effortless package. Imagine that moment when you pull this masterpiece from the oven: the air fills with the intoxicating aroma of toasted marshmallow and melting chocolate, a scent that promises immediate comfort and pure bliss. This isn’t just another dessert; it’s an experience, a memory waiting to be made. It’s the ultimate crowd-pleaser, perfect for unexpected guests, a festive family gathering, or even a quiet, cozy night in when you just need a little extra sweetness in your life.
I truly believe this recipe is a must-try because it delivers maximum impact with minimal fuss. You don’t need to be a seasoned baker to achieve spectacular results. The beautiful balance of a crisp base, a luscious layer of melted chocolate, and the caramelized, gooey marshmallows on top is simply irresistible. Every bite offers a symphony of textures and flavors – the subtle crunch, the rich creaminess, and that distinct, smoky sweetness of perfectly toasted marshmallows. It captures the essence of a campfire treat without needing to leave your kitchen, making it accessible year-round, rain or shine. It’s a guaranteed smile-maker, a dish that brings people together and sparks joy with its whimsical charm and undeniable deliciousness. Trust me, once you experience the ease and delight of making this, it will become a regular request in your home.
Elevate Your Smores Pizza Experience: Serving Suggestions & Creative Variations
While this treat is spectacular straight out of the oven, still warm and wonderfully messy, there are countless ways to customize and serve your Smores Pizza to make it even more special. For a truly decadent experience, I love to serve warm slices with a scoop of premium vanilla bean ice cream. The cold, creamy ice cream against the warm, gooey pizza is a match made in heaven. A dollop of freshly whipped cream also works wonders, adding a light, airy contrast to the rich flavors. If you’re feeling extra fancy, consider a light dusting of powdered sugar or a sprig of fresh mint for garnish. For a touch of fruity brightness, a handful of fresh raspberries or sliced strawberries can cut through the sweetness beautifully, adding a vibrant pop of color and a hint of tartness. And don’t forget the classic pairing: a tall glass of cold milk or a robust cup of coffee can complement the rich flavors perfectly.
But let’s not stop there! The beauty of this recipe lies in its incredible versatility. Think of it as a canvas for your culinary creativity. Want to experiment with different chocolates? Try a blend of dark chocolate chips for a more sophisticated, less sweet profile, or perhaps some white chocolate for an extra creamy touch. You could even chop up your favorite candy bars – think peanut butter cups, toffee bits, or even a sprinkle of chopped pretzels for a delightful salty-sweet crunch – and scatter them over the chocolate layer before adding the marshmallows. For the marshmallow layer, while classic mini marshmallows are great, you could also try gourmet flavored marshmallows if you can find them, like caramel or even peppermint for a seasonal twist. Another fun variation involves the base: instead of a simple graham cracker crust, consider using a sugar cookie dough or even a brownie batter for a richer, chewier foundation. After baking, a drizzle of caramel sauce, hot fudge, or even a sprinkle of edible glitter can take your creation to the next level. The possibilities are truly endless, allowing you to tailor this dessert to your exact cravings and preferences.
Your Turn: Bake, Share, & Inspire!
Now, I’ve given you all my best tips and tricks, shared my enthusiasm, and hopefully, ignited your own desire to create this incredible dessert. All that’s left is for you to roll up your sleeves and give it a try! I promise you, the process is as rewarding as the outcome is delicious. There’s something incredibly satisfying about transforming simple ingredients into something so utterly spectacular. So, please, don’t just read about it; make it! Experience the joy of that first warm, gooey bite for yourself, and share that joy with your loved ones. I would absolutely love to see your creations and hear about your experiences. Did you stick to the classic? Or did you venture into exciting new variations with different chocolates or toppings? What unique serving suggestions did you discover? Please share your photos and tell me all about your delicious endeavors. Your culinary adventures inspire me, and I can’t wait to see how you make this recipe your own. Happy baking, everyone!
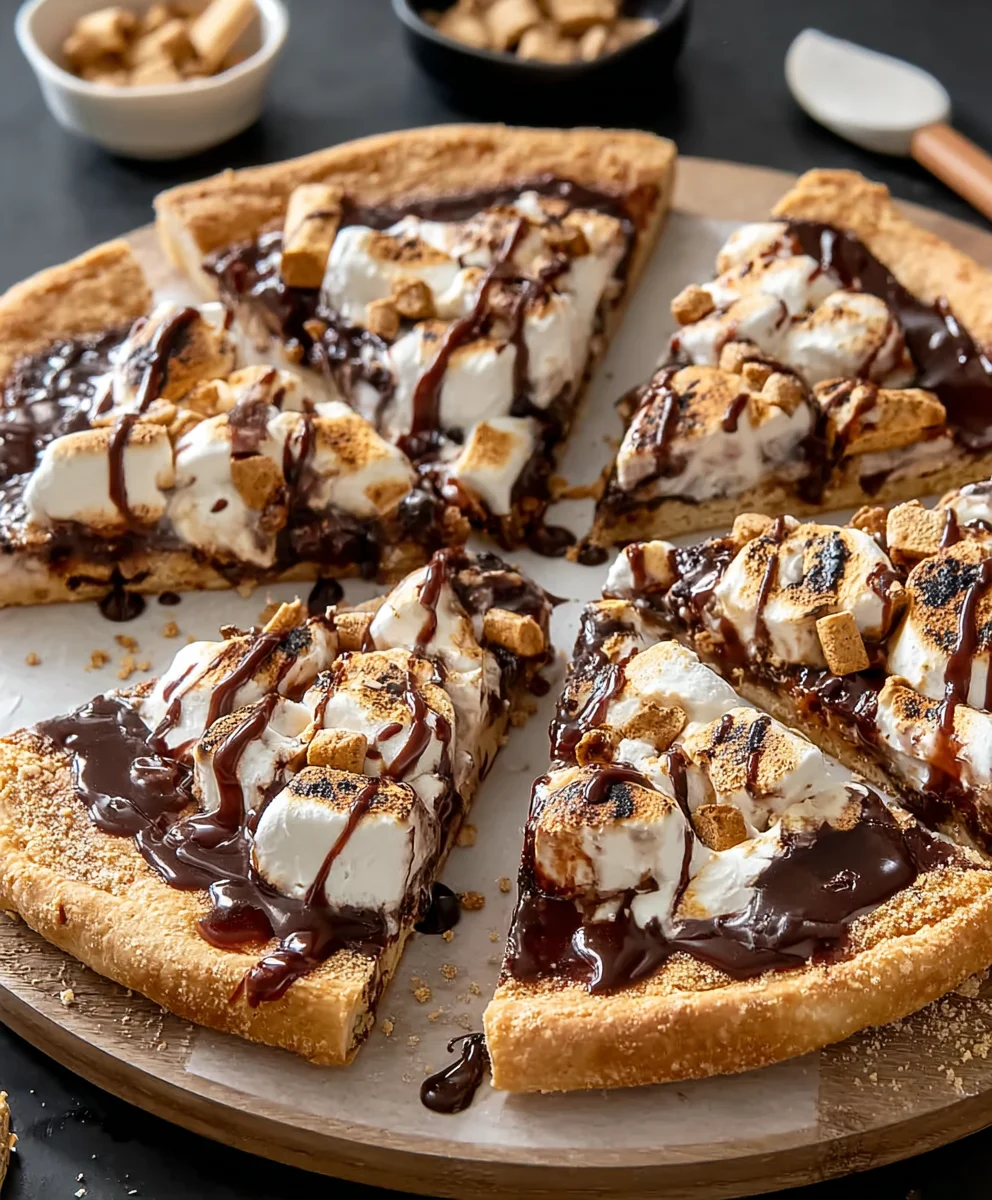
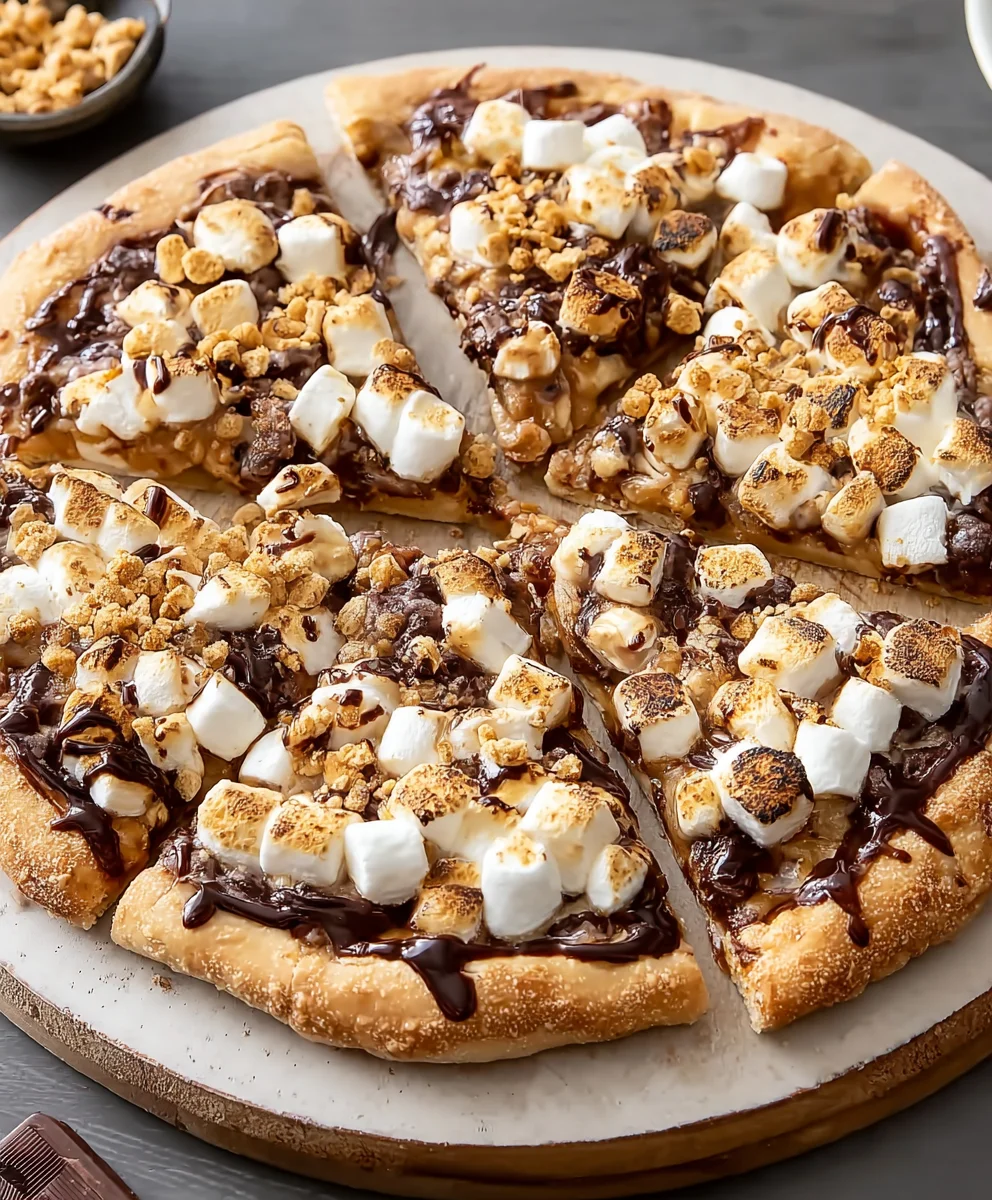
Smores Pizza: Gooey Chocolate & Marshmallow Delight
Transform the classic campfire s’more into an irresistible, shareable pizza dessert. Featuring a crispy crust, layers of melted chocolate, gooey toasted marshmallows, and crunchy graham crackers, this Smores Pizza brings nostalgic delight indoors, perfect for any occasion.
Ingredients
-
1 (13.8 oz) pkg refrigerated pizza crust dough
-
1 ½ cups chocolate chips (milk, semi-sweet, or mix)
-
4-6 milk chocolate bars, broken into pieces
-
4-5 cups mini marshmallows
-
8-10 graham cracker sheets, crushed
-
2 tbsp unsalted butter, melted (optional)
-
1 tbsp granulated sugar (optional, for crust)
-
All-purpose flour, for dusting
-
A sprinkle of sea salt (optional, for garnish)
-
A dash of cinnamon (optional, for crust)
Instructions
-
Step 1
Preheat oven to 375°F (190°C). Line a 12-14 inch pizza pan with parchment paper. -
Step 2
On a lightly floured surface, unroll and stretch pizza dough into a 12-14 inch circle, forming a slight lip around the edge. Transfer to the prepared pan. -
Step 3
Optionally, brush the crust with 2 tbsp melted butter (mixed with 1 tbsp sugar and/or a dash of cinnamon, if desired). -
Step 4
Pre-bake crust for 5-7 minutes until slightly puffed and edges are barely golden. Remove from oven. -
Step 5
Evenly sprinkle 1-1½ cups chocolate chips over the warm crust, then layer broken chocolate bar pieces over the chips. -
Step 6
Generously cover the chocolate layers with 4-5 cups mini marshmallows. -
Step 7
Sprinkle two-thirds of the crushed graham crackers over the marshmallows. -
Step 8
Return the pizza to the oven and bake for 7-12 minutes, watching closely. Marshmallows should be puffed and golden brown, and chocolate melted and gooey. -
Step 9
Remove from oven. Immediately sprinkle with the remaining graham crackers and, optionally, a pinch of sea salt. -
Step 10
Allow the Smores Pizza to cool on the pan for 5-10 minutes before slicing into wedges and serving warm. Store any leftovers in an airtight container at room temperature.
Important Information
Nutrition Facts (Per Serving)
It is important to consider this information as approximate and not to use it as definitive health advice.
Allergy Information
Please check ingredients for potential allergens and consult a health professional if in doubt.
Leave a Comment