
Biscoff Cookie Butter Cheesecake Pops are more than just a dessert; they are a delightful revelation, transforming two beloved treats into an irresistible, bite-sized indulgence that truly steals the show. I’ve always been fascinated by how simple ingredients can come together to create something truly extraordinary, and this recipe is a perfect example. The journey of Biscoff cookies, originally a festive spiced biscuit from Belgium, has evolved into a global sensation, particularly with the advent of the incredibly smooth and deeply caramelized cookie butter spread. This unique spread brings a nostalgic warmth and a distinctly comforting flavor profile that has captivated palates worldwide.
Imagine that rich, spiced caramel essence beautifully swirled into a luscious, tangy cheesecake, then perfectly portioned into convenient, decadent pops. It’s no wonder people adore this combination! These Biscoff Cookie Butter Cheesecake Pops offer the creamy elegance of a classic cheesecake with the distinctive, irresistible taste of Biscoff, all in a fun, portable format. They are ideal for entertaining, a delightful treat for a quiet evening, or simply a brilliant way to enjoy your favorite flavors without the fuss of a whole cake. The convenience, combined with their utterly delicious taste and luxurious texture, makes them an instant favorite in my kitchen.

Ingredients:
- For the Cheesecake Base:
- 24 ounces (three 8-ounce blocks) full-fat cream cheese, softened to room temperature
- ½ cup granulated sugar
- 1 teaspoon pure vanilla extract
- ½ cup smooth Biscoff cookie butter, plus extra for drizzling
- 1 ½ cups finely crushed Lotus Biscoff cookies (about 25-30 cookies)
- For the Coating and Topping:
- ¾ cup smooth Biscoff cookie butter, melted for drizzling, OR 12 ounces melting chocolate (white, milk, or dark), melted
- ½ cup finely crushed Lotus Biscoff cookies (about 8-10 cookies), for sprinkling
- Equipment:
- 40-50 lollipop sticks or cake pop sticks
Equipment You’ll Need:
Before we dive into the fun part of mixing and shaping, let’s make sure we have all our tools ready. Having everything laid out and prepped makes the process so much smoother and more enjoyable. You’ll definitely want a sturdy stand mixer or a hand mixer for whipping up that creamy cheesecake base, as well as a few other simple items to bring your Biscoff Cookie Butter Cheesecake Pops to life.
- Stand mixer with paddle attachment or electric hand mixer: Essential for achieving a super smooth, lump-free cheesecake mixture.
- Large mixing bowl: For combining all your cheesecake ingredients.
- Rubber spatula: Perfect for scraping down the sides of the bowl and folding in the crushed cookies.
- Cookie scoop (1-inch or 1.5-inch): Helps create uniform cheesecake balls, which is key for those aesthetically pleasing, Instagram-worthy treats.
- Baking sheets: You’ll need at least two, lined with parchment paper or silicone mats, for freezing your cheesecake pops.
- Lollipop sticks or cake pop sticks: As listed in the ingredients, these are crucial for turning your cheesecake balls into actual “pops”!
- Small, deep microwave-safe bowl or mug: For melting the cookie butter or chocolate for dipping. A deeper vessel makes dipping easier and ensures a more even coating.
- Parchment paper or wax paper: For lining baking sheets and placing dipped pops on.
- Freezer-safe container: For storing any leftover pops (if there are any!).
Crafting the Irresistible Biscoff Cookie Butter Cheesecake Filling
Alright, let’s get started on the heart of our Biscoff Cookie Butter Cheesecake Pops – that wonderfully creamy, Biscoff-infused filling! This is where the magic truly begins, and I promise you, the aroma alone will be enough to make your mouth water. Achieving that perfect, smooth consistency is key here, so pay close attention to the details.
-
Soften the Cream Cheese: First things first, ensure your three blocks of full-fat cream cheese are fully softened to room temperature. This is absolutely critical for a lump-free mixture. If your cream cheese is cold, you’ll end up with stubborn lumps, no matter how long you beat it. I usually take mine out of the fridge at least an hour or two before I plan to start baking. You want it pliable, almost spreadable. In your large mixing bowl, using either a stand mixer with the paddle attachment or an electric hand mixer, beat the softened cream cheese on medium speed for about 2-3 minutes until it’s incredibly light, fluffy, and completely smooth. Scrape down the sides of the bowl frequently to ensure everything gets incorporated.
-
Sweeten the Deal: Gradually add the ½ cup of granulated sugar to the cream cheese, beating on medium-low speed until it’s just combined. Once the sugar is mostly incorporated, increase the speed to medium and beat for another 1-2 minutes until the mixture is truly smooth and creamy. You shouldn’t feel any grittiness from the sugar. Remember to scrape down the sides of the bowl again to make sure everything is evenly mixed.
-
Infuse with Vanilla and Biscoff: Now for the flavor powerhouses! Add the 1 teaspoon of pure vanilla extract and the ½ cup of smooth Biscoff cookie butter to the cream cheese mixture. Beat on low speed until just combined, then increase to medium and beat until the cookie butter is fully integrated, creating a beautiful, uniform caramel-colored batter. This Biscoff flavor is what truly makes these pops sing!
-
Fold in Crushed Biscoff Cookies: This is where we add that delightful texture. Gently fold in the 1 ½ cups of finely crushed Lotus Biscoff cookies using your rubber spatula. You want to mix just until the cookie crumbs are evenly distributed throughout the cheesecake mixture. Be careful not to overmix here; we want those little pockets of cookie goodness. My first attempt at these was a bit of a learning experience, and I realized then that finding the ideal balance of creaminess and cookie bits is so important. Too many crushed cookies can make the final frozen pop a little too firm, but the amount in this recipe creates that perfect harmony of soft cheesecake and delightful crunch.
Forming and Initial Freezing of Your Cheesecake Pops
Now that our magnificent Biscoff cheesecake mixture is ready, it’s time to transform it into individual pops! This stage requires a little precision and, most importantly, patience. Trust me, it pays off in the end with perfectly formed, easy-to-handle treats.
-
Scoop and Roll: Line two large baking sheets with parchment paper or silicone mats. Using a 1-inch or 1.5-inch cookie scoop (I find a 1.5-inch scoop works best for a good-sized pop), scoop out portions of the cheesecake mixture. Gently roll each portion between your palms to form smooth, round balls. Try to make them as uniform in size as possible for consistent freezing and dipping. Place the rolled cheesecake balls onto the prepared baking sheets, leaving a little space between each one.
-
Chill for Firmness: Once all your cheesecake balls are formed, place the baking sheets into the freezer for at least 30-45 minutes. This initial chill is crucial; it helps the balls firm up enough so you can easily insert the lollipop sticks without the pops crumbling or losing their shape.
-
Insert the Sticks: After the initial chilling period, remove the cheesecake balls from the freezer. Dip the tip of each lollipop stick (about ½ inch) into a little bit of the melted cookie butter (or melted chocolate, if you plan to use it for dipping later) – this acts as “glue” to help the stick adhere better. Carefully insert a stick about halfway into the center of each chilled cheesecake ball. Work relatively quickly so the balls don’t soften too much.
-
Deep Freeze for Structure: Return the baking sheets with the stick-inserted cheesecake pops to the freezer. This is the most crucial freezing step. Allow them to freeze for a minimum of 4-6 hours, or even better, overnight. I’ve since learned that patience during the freezing process pays off with perfectly formed pops. Rushing this step will lead to messy, misshapen pops when you try to dip them. They need to be absolutely solid for a clean, even coating. This prolonged freezing time ensures they hold their shape beautifully and makes the dipping process much easier.
Dipping and Decorating Your Instagram-Worthy Pops
Here’s where your Biscoff Cookie Butter Cheesecake Pops truly transform into those impressive, Instagram-worthy desserts! This is arguably the most fun part, as you get to add the final touches that make them so visually appealing and utterly delicious. Whether you choose a classic cookie butter drizzle or go for a decadent chocolate dip, you’re in for a treat.
-
Prepare Your Coating: Once your cheesecake pops are thoroughly frozen solid, prepare your chosen coating.
- For Cookie Butter Drizzle: Place the ¾ cup of smooth Biscoff cookie butter into a small, deep microwave-safe bowl or mug. Microwave in 15-20 second intervals, stirring well after each, until it’s smooth and pourable, but not hot. You want it warm enough to be liquid, but not so hot that it melts the cheesecake pop.
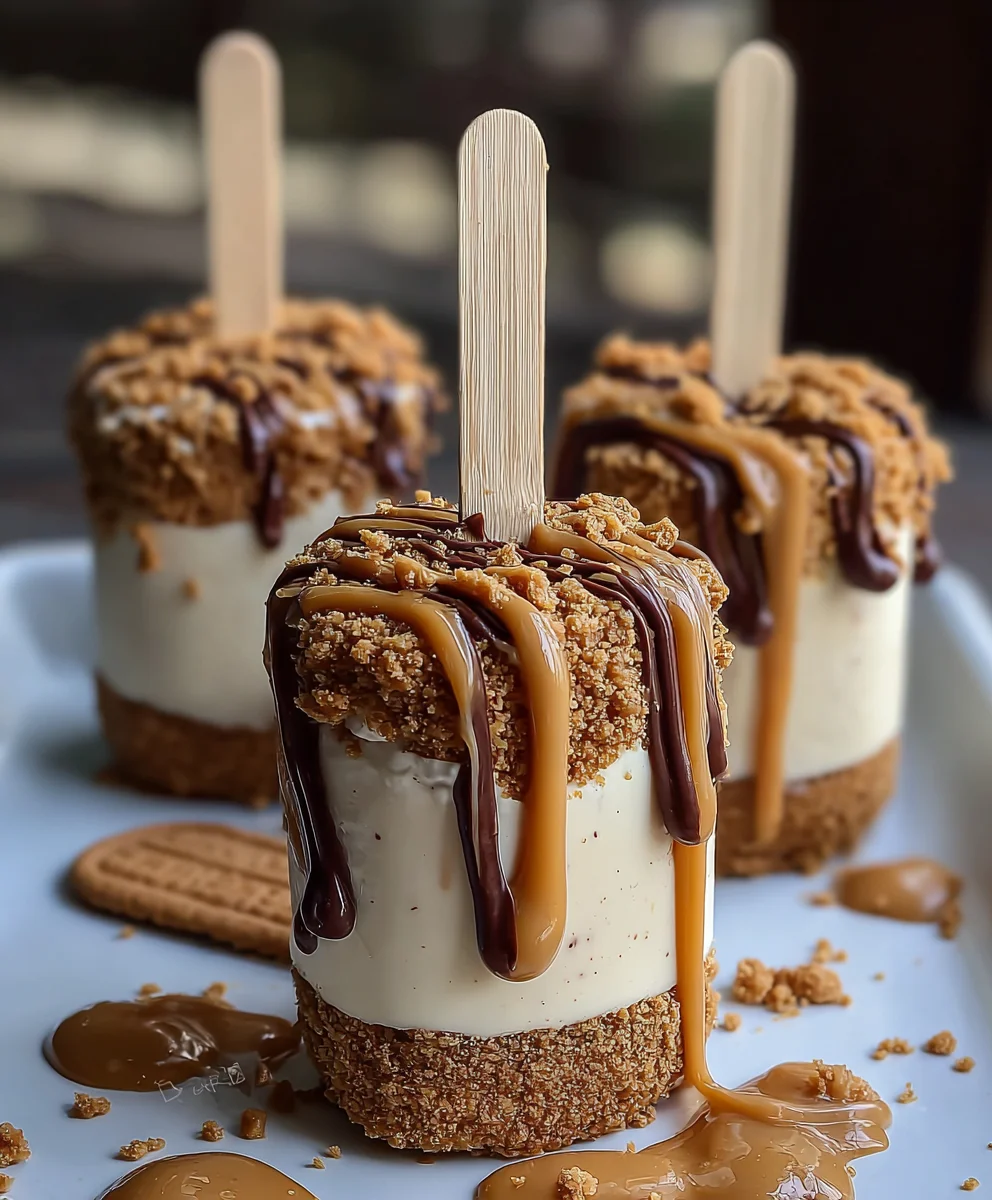
- For Chocolate Dipped Pops: If you’re opting for the Chocolate Dipped variation, melt your 12 ounces of chosen melting chocolate (white, milk, or dark). You can do this in a microwave-safe bowl in 30-second intervals, stirring vigorously after each, until smooth. Alternatively, use a double boiler over simmering water for a perfectly tempered, glossy finish. Ensure the chocolate isn’t too hot, again, to prevent melting the pop.
Keep your ½ cup of finely crushed Lotus Biscoff cookies ready in a shallow dish for sprinkling.
-
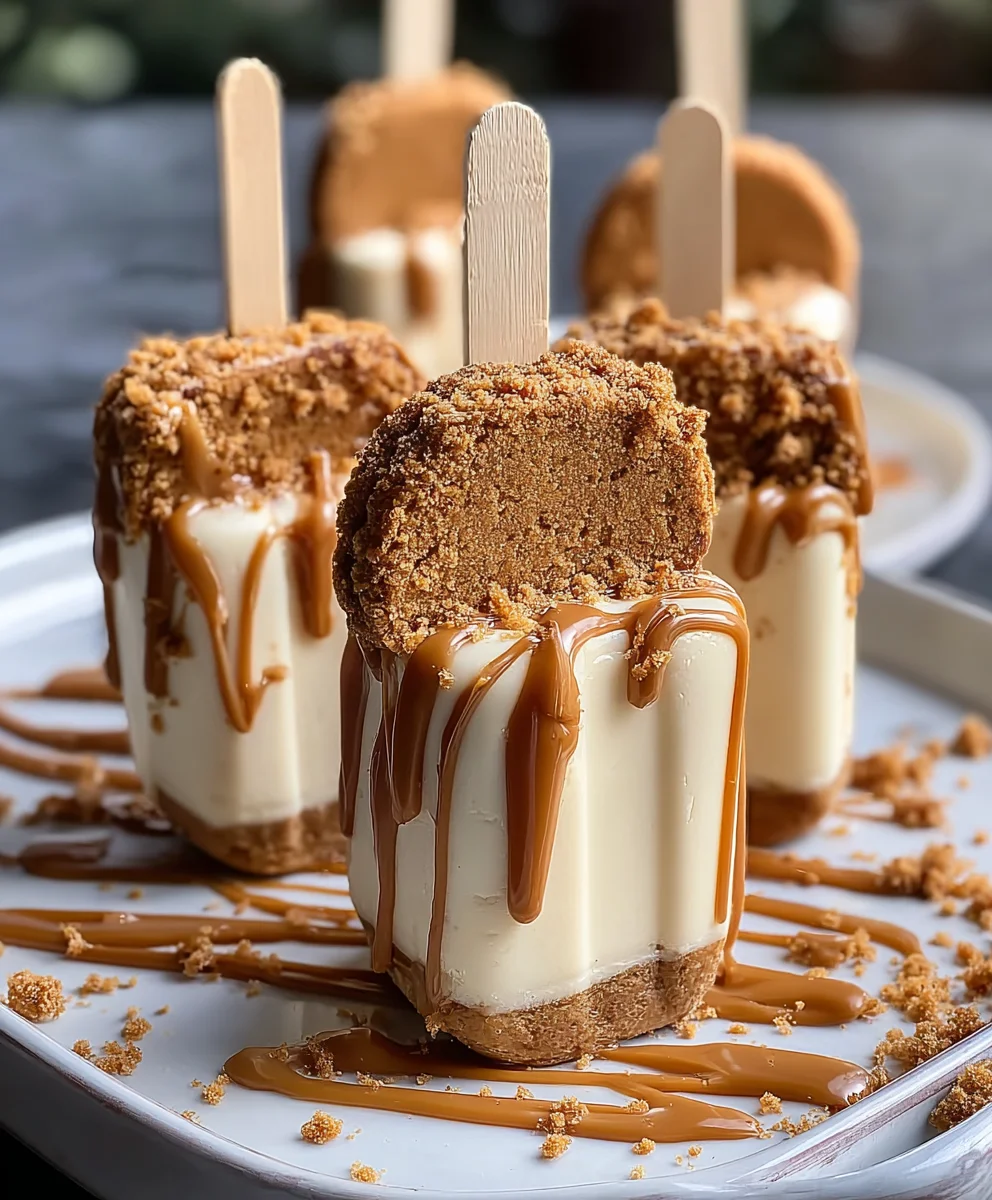
Dip and Decorate: Working with one frozen cheesecake pop at a time, swiftly dip it into the melted Biscoff cookie butter or melted chocolate, rotating to fully coat the cheesecake ball. Let any excess coating drip off back into the bowl. This speed is key since the pop is very cold and will cause the coating to set quickly. Immediately after dipping, sprinkle the coated pop with the additional finely crushed Biscoff cookies. You can roll it gently in the crumbs or sprinkle them by hand for a more controlled look. Place the decorated pop back onto a clean parchment-lined baking sheet.
-
Repeat and Chill: Continue this process with the remaining cheesecake pops. If your melted cookie butter or chocolate starts to thicken, gently rewarm it for a few seconds. Once all pops are dipped and decorated, return the baking sheet to the freezer for a final chill of at least 15-30 minutes to ensure the coating is completely set and firm. This makes them much easier to handle and serve.
Serving and Storing Your Biscoff Cookie Butter Cheesecake Pops
Congratulations! You’ve successfully created a batch of these truly impressive, Instagram-worthy desserts with minimal effort (well, minimal active effort once the chilling is accounted for!). Now for the best part – enjoying them!
-
Serve Chilled: These Biscoff Cookie Butter Cheesecake Pops are best enjoyed directly from the freezer or after sitting out for just 5-10 minutes to slightly soften, though they are delicious frozen solid too. The texture is a delightful mix of creamy and firm, with those wonderful cookie bits providing a subtle crunch.
-
Storage: Store any leftover pops in an airtight, freezer-safe container. You can arrange them in a single layer or separate layers with parchment paper to prevent sticking. They will keep beautifully in the freezer for up to 2-3 weeks. When you’re ready for another treat, just grab one and enjoy!
Tips for Success & Delightful Variations
Throughout my journey in creating these Biscoff Cookie Butter Cheesecake Pops, I’ve picked up a few invaluable insights that I’m thrilled to share. These tips will not only help you achieve perfect results but also open doors to even more delicious possibilities!
Embracing the Learning Curve
As I mentioned earlier, my first attempt at these was a bit of a learning experience – I tried to unmold them too soon and ended up with some misshapen (but still delicious) creations. This taught me the paramount importance of patience, especially during the freezing stages. Don’t be discouraged if your first few aren’t picture-perfect; the flavor will always be there, and practice truly makes perfect. The key takeaway from my initial experiments was that solid freezing is non-negotiable for that clean, professional finish.
The Art of Crushed Cookies
I’ve also experimented with different amounts of crushed cookies in the mixture, finding that too many can make the texture too firm when frozen, while the amount in this recipe creates the ideal balance of creaminess and cookie bits. This delicate balance is what gives these pops their unique appeal – a delightful chewiness from the cheesecake, complemented by the distinctive crunch and spice of Biscoff cookies. If you’re tempted to add more, I’d suggest starting with the recommended amount and adjusting only slightly on subsequent batches if you prefer a firmer texture. Remember, the goal is “creamy cheesecake pop,” not “frozen cookie dough ball.”
Patience: Your Secret Ingredient
Let me reiterate: I’ve since learned that patience during the freezing process pays off with perfectly formed pops. This isn’t just about avoiding misshapen pops; it’s about achieving a smooth, even coating when you dip them. A perfectly frozen pop won’t melt instantly when it hits the warm coating, giving you precious seconds to ensure a beautiful, uniform layer and an even sprinkle of crumbs. Planning ahead and giving them ample time in the freezer (overnight is ideal!) will save you a lot of frustration and yield stunning results every single time.
Beyond the Drizzle: The Chocolate Dipped Revelation
While the Biscoff cookie butter drizzle is undeniably delicious and keeps the flavor profile consistently Biscoff-centric, sometimes you just crave that extra layer of decadence! This is where the Chocolate Dipped variation comes into play. Instead of the cookie butter drizzle, dip the frozen pops in melted chocolate (white, milk, or dark) before adding the cookie crumbs.
- White Chocolate: Offers a sweet, creamy contrast that truly lets the Biscoff flavor shine through. It creates a beautiful aesthetic, especially when paired with the dark Biscoff crumbs.
- Milk Chocolate: A classic pairing with most desserts, it adds a familiar richness that’s universally loved. The combination of milk chocolate and Biscoff is pure comfort.
- Dark Chocolate: For those who appreciate a deeper, slightly bitter note, dark chocolate is an excellent choice. It balances the sweetness of the cheesecake and Biscoff cookie butter beautifully, offering a more sophisticated flavor profile.
When using chocolate for dipping, ensure it’s high-quality melting chocolate or tempering chocolate for the best results. Tempering chocolate will give you a beautiful snap and sheen, though simply melting good quality chocolate chips with a touch of coconut oil or shortening will also work well for a smooth, dippable consistency. The combination of cold cheesecake and warm chocolate will make the chocolate set almost instantly, allowing for immediate sprinkling of the Biscoff crumbs.
Making Them Truly Instagram-Worthy
These truly create impressive, Instagram-worthy desserts with minimal effort. The vibrant contrast of the Biscoff cookie butter, the creamy interior, and the rustic sprinkle of crushed cookies make them visually appealing. To elevate their social media appeal even further:
- Arrange them artfully on a platter.
- Use a variety of backgrounds – a rustic wooden board, a clean white surface, or even a festive holiday setting.
- Consider adding a small sprig of mint or a delicate edible flower for a pop of color.
- Play with angles and natural light to capture their best side.
The “minimal effort” part comes from the fact that while there are multiple steps, none of them are overly complicated, and much of the work is passive freezing time. They look far more complex than they actually are to make, which is always a win in my book!
Enjoy creating these delightful Biscoff Cookie Butter Cheesecake Pops. They’re a guaranteed crowd-pleaser and a perfect treat for any occasion!
Conclusion:
My friends, if there’s one recipe that encapsulates pure joy, decadent indulgence, and effortless elegance all in one glorious bite, it’s these Biscoff Cookie Butter Cheesecake Pops. We’ve journeyed through the simple steps of transforming creamy cheesecake, iconic Biscoff cookie butter, and a crunchy cookie crust into a handheld masterpiece. From the very first creamy, spiced mouthful to the satisfying snap of the chocolate shell, these pops are an experience. They’re not just a dessert; they’re a celebration waiting to happen, a delightful surprise for guests, or simply your perfect companion for a quiet moment of self-indulgence. I promise you, making these Biscoff Cookie Butter Cheesecake Pops is going to be one of the most rewarding kitchen adventures you embark on. The combination of the smooth, tangy cream cheese filling, the warm, caramelized notes of Biscoff, and the delightful texture contrasts truly sets these pops apart from any other sweet treat you’ve encountered. It’s a symphony of flavors that dances on your palate, leaving you craving just one more… and then perhaps another!
Why These Are Your Next Go-To Dessert:
What makes these pops a true must-try? Firstly, their sheer novelty. Who wouldn’t be captivated by a dessert on a stick, especially one that tastes this incredible? They’re inherently fun and instantly elevate any dessert spread. Birthdays, potlucks, brunches, or even just a casual get-together – these pops are guaranteed to be the star. Their convenient, individual serving size means no messy slicing, no plates needed, just pure, unadulterated enjoyment. And let’s not forget the ‘wow’ factor; they look incredibly sophisticated and difficult to make, but only you and I will know just how straightforward the process truly is. They are the ultimate testament to the fact that you don’t need to spend hours slaving away in the kitchen to create something truly extraordinary. The effort-to-impressiveness ratio here is off the charts, making them perfect for both seasoned bakers looking for a new challenge and beginners eager to dip their toes into the wonderful world of dessert making. They are truly versatile and adapt to any occasion, making them the perfect centerpiece for a dessert table or a personal indulgence when you need a little pick-me-up.
Serving Suggestions and Creative Variations to Elevate Your Pops:
Now, when it comes to serving these delightful Biscoff Cookie Butter Cheesecake Pops, the world is truly your oyster. Of course, they are perfectly scrumptious straight out of the freezer, offering a refreshing chill that perfectly complements their rich flavors. But why stop there? Imagine arranging them artfully on a platter, perhaps with a delicate dusting of cocoa powder or a few extra crushed Biscoff cookies scattered around for an added visual and textural appeal. For an extra touch of decadence, consider having a small bowl of warm Biscoff spread on the side for dipping, or even a drizzle of white chocolate or salted caramel sauce over the chocolate shell just before serving. This creates an interactive dessert experience that your guests will absolutely adore.
And if you’re feeling a little adventurous, the variations for these pops are practically endless! Don’t feel confined to the classic chocolate coating. How about a white chocolate shell infused with a hint of espresso powder for a tiramisu-like twist? Or perhaps a milk chocolate coating adorned with colorful sprinkles, making them irresistible for a children’s party (or for the child in all of us!). For a sophisticated edge, roll the freshly coated pops in finely chopped toasted pecans or almonds, adding a nutty dimension that beautifully complements the Biscoff. You could even play with the filling itself! A tiny swirl of raspberry jam or a dab of dulce de leche nestled in the center of the cheesecake mixture before freezing would create an unexpected burst of flavor when bitten into. Think about mini versions, too – truffle-sized bites that are perfect for a dessert bar, or even serving the cheesecake mixture in tiny shot glasses with a Biscoff cookie crumble on top and a small spoon, for a ‘deconstructed’ pop experience. The possibilities are truly boundless, and each variation offers a new way to fall in love with these already phenomenal Biscoff Cookie Butter Cheesecake Pops.
I truly cannot wait for you to bring these delightful creations to life in your own kitchen. There’s something so incredibly satisfying about pulling these perfect, chilled treats from the freezer, seeing their glossy chocolate shell, and knowing you made them yourself. Please, do yourself a favor and set aside an afternoon to whip up a batch (or two!). They’re a fantastic project for a rainy day, a wonderful way to impress your friends and family, or simply a delicious reward after a long week. Once you’ve made them, I’d absolutely love to hear about your experience! Did you stick to the classic? Did you venture into creative variations? Share your photos and stories with me – tag me on social media or drop a comment below. Your culinary adventures inspire me, and I’m always thrilled to see your delicious creations come to life. Happy baking, my friends, and get ready to indulge in the best Biscoff Cookie Butter Cheesecake Pops you’ve ever tasted!
Frequently Asked Questions (FAQs):
-
How long do Biscoff Cookie Butter Cheesecake Pops last?
-
These pops are best enjoyed within 1-2 weeks if stored properly in an airtight container in the freezer. In the refrigerator, they’ll be good for about 3-4 days, but the chocolate coating might become a bit softer. For optimal texture and flavor, the freezer is definitely your best friend!
-
Can I make these without sticks?
-
Absolutely! You can shape the cheesecake mixture into small balls or squares and then coat them in chocolate. These would be perfect as truffles or mini cheesecake bites. Alternatively, you can press the crust into a small baking dish, top with the cheesecake mixture, chill, and then cut into squares or bars before coating, essentially creating Biscoff cheesecake bars without the need for sticks.
-
What if I can’t find Biscoff cookies for the crust?
-
No worries! You can substitute other crunchy digestive biscuits, graham crackers, shortbread cookies, or even vanilla wafers. The flavor profile will change slightly, but the structural integrity of the crust will remain similar. Just ensure you crush them finely and mix with melted butter as directed in the recipe.
-
Can I use a different type of cookie butter?
-
Yes, while Biscoff cookie butter offers a unique caramelized ginger spice flavor, you can certainly experiment with other brands of cookie butter or even use a different nut butter like almond butter or peanut butter for a completely different but equally delicious flavor profile. Just be aware that the taste will differ significantly from the classic Biscoff experience.
-
How do I prevent the chocolate coating from cracking or seizing?
-
To prevent cracking, ensure your Biscoff Cookie Butter Cheesecake Pops are thoroughly chilled and completely frozen. When dipping, work quickly and use chocolate that isn’t too hot (around 90-92°F or 32-33°C is ideal for tempering, but even melted chocolate should be just warm enough to be fluid, not piping hot). For seizing, make sure no water or steam comes into contact with your melted chocolate. Using high-quality chocolate or chocolate melting wafers also helps achieve a smooth, stable coating.
-
Are these Biscoff Cookie Butter Cheesecake Pops suitable for making ahead of time?
-
Absolutely! In fact, they are perfect for making ahead. You can prepare the entire batch, freeze them, and then store them in an airtight container for up to two weeks. This makes them an ideal party dessert or a convenient treat to have on hand for when a craving strikes. Just pull them out of the freezer about 5-10 minutes before serving to allow them to soften slightly for the best texture.
Biscoff Cookie Butter Cheesecake Pops: Sweet Treat Perfection
Impressive, Instagram-worthy desserts with minimal effort. These Biscoff Cookie Butter Cheesecake Pops are a delightful blend of creamy cheesecake and crunchy Biscoff cookies, either drizzled with more cookie butter or dipped in chocolate. Perfect for any occasion and easily customizable.
Ingredients
-
24 ounces full-fat cream cheese, softened
-
½ cup granulated sugar
-
1 teaspoon pure vanilla extract
-
½ cup smooth Biscoff cookie butter (for base)
-
1 ½ cups finely crushed Lotus Biscoff cookies (for base)
-
¾ cup smooth Biscoff cookie butter, melted (for coating) OR 12 ounces melting chocolate (white, milk, or dark), melted
-
½ cup finely crushed Lotus Biscoff cookies (for sprinkling)
-
40-50 lollipop sticks or cake pop sticks
Instructions
-
Step 1
In a large mixing bowl, beat softened cream cheese until light, fluffy, and completely smooth (2-3 minutes). Gradually add ½ cup granulated sugar, beating until smooth. Mix in 1 teaspoon pure vanilla extract and ½ cup Biscoff cookie butter until fully combined and uniform. Gently fold in 1 ½ cups finely crushed Biscoff cookies until evenly distributed. -
Step 2
Line two large baking sheets with parchment paper. Using a 1-inch or 1.5-inch cookie scoop, form the cheesecake mixture into smooth, round balls. Place them on the prepared sheets, leaving space between each. Freeze the balls for 30-45 minutes. After chilling, dip the tip of each lollipop stick into a little melted cookie butter or chocolate, then carefully insert a stick halfway into the center of each chilled ball. Return the baking sheets to the freezer for a minimum of 4-6 hours, or ideally overnight, until the pops are completely solid. -
Step 3
Once pops are thoroughly frozen, melt ¾ cup Biscoff cookie butter (in 15-20 second intervals, stirring) or 12 ounces of melting chocolate (in 30-second intervals or double boiler) in a small, deep microwave-safe bowl until smooth and pourable (not hot). Have ½ cup finely crushed Biscoff cookies ready in a shallow dish. Working with one pop at a time, swiftly dip it into the melted coating, rotating to fully coat. Let any excess drip off. Immediately sprinkle the coated pop with crushed Biscoff cookies. Place the decorated pop onto a clean parchment-lined baking sheet. Repeat for all pops. Return the baking sheet to the freezer for a final chill of 15-30 minutes to ensure the coating is completely set. -
Step 4
Serve Biscoff Cookie Butter Cheesecake Pops directly from the freezer or after sitting out for 5-10 minutes to slightly soften. Store any leftover pops in an airtight, freezer-safe container in the freezer for up to 2-3 weeks.
Important Information
Nutrition Facts (Per Serving)
It is important to consider this information as approximate and not to use it as definitive health advice.
Allergy Information
Please check ingredients for potential allergens and consult a health professional if in doubt.

Leave a Comment