
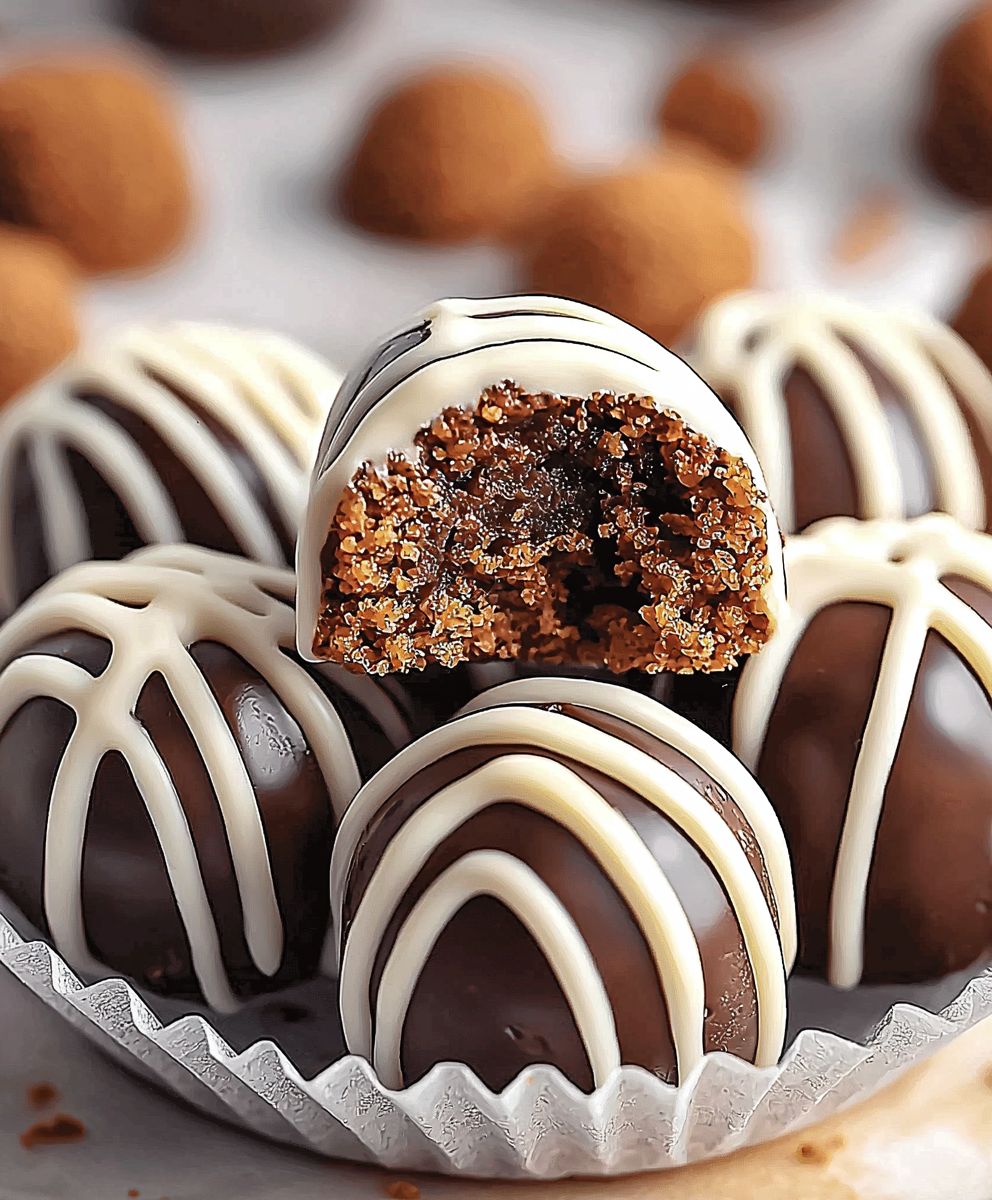
Biscoff Cookie Truffles: Prepare to be utterly captivated by these little bites of heaven! Imagine the irresistible, spiced caramel flavor of Biscoff cookies transformed into a decadent, melt-in-your-mouth truffle. It’s a dream come true for any Biscoff lover, and trust me, once you make these, they’ll disappear faster than you can say “Lotus Biscoff.”
The story of Biscoff cookies began in 1932 in a small Belgian bakery. Originally named Lotus cookies, they were a perfect accompaniment to coffee (“biscuit for coffee,” hence “Biscoff”). Over the years, their unique flavor profile, a delightful blend of cinnamon, caramel, and other secret spices, has garnered a devoted following worldwide. Now, we’re taking that beloved flavor and elevating it to a new level of indulgence.
What makes these Biscoff Cookie Truffles so irresistible? It’s the perfect combination of textures the slight crunch of the crushed cookies, the creamy smoothness of the filling, and the optional coating of melted chocolate. Plus, they’re incredibly easy to make! With just a few simple ingredients and minimal effort, you can create a batch of these delightful treats that are perfect for gifting, parties, or simply satisfying your own sweet cravings. Get ready to experience the magic of Biscoff in a whole new way!

Ingredients:
- 1 (8.8 ounce) package Biscoff cookies (about 32 cookies)
- 4 ounces cream cheese, softened
- 1/2 cup Biscoff spread, melted
- 1/4 cup powdered sugar, plus more for dusting
- 1 teaspoon vanilla extract
- 1/4 teaspoon salt
- 1 cup high-quality white chocolate chips, for coating
- 1 tablespoon coconut oil (optional, for smoother melting)
- Crushed Biscoff cookies, for garnish (optional)
Preparing the Biscoff Cookie Crumbs:
Okay, let’s get started! The first thing we need to do is turn those delicious Biscoff cookies into crumbs. This is the foundation of our truffles, so let’s make sure we get it right.
- Pulse the Cookies: Place the entire package of Biscoff cookies into a food processor. Pulse until the cookies are finely ground into crumbs. You want them to be as fine as possible, so there aren’t any large chunks in your truffles. If you don’t have a food processor, you can place the cookies in a large zip-top bag and crush them with a rolling pin. This will take a little more elbow grease, but it works just as well!
- Check the Consistency: Once you think the cookies are finely ground, take a look. If you see any larger pieces, pulse or crush them a bit more. We’re aiming for a sand-like consistency.
- Transfer to a Bowl: Pour the cookie crumbs into a large mixing bowl. Set aside for now.
Making the Truffle Mixture:
Now for the fun part creating the truffle mixture! This is where all the magic happens, and the Biscoff flavor really shines through.
- Cream the Cream Cheese: In a separate mixing bowl (or the same one, after washing it!), add the softened cream cheese. Using an electric mixer (handheld or stand mixer), beat the cream cheese until it’s smooth and creamy. This is important because we don’t want any lumps in our truffles.
- Add the Biscoff Spread: Pour the melted Biscoff spread into the bowl with the cream cheese. Continue to beat with the mixer until the Biscoff spread is fully incorporated and the mixture is smooth and uniform in color. The melted Biscoff spread will add a rich, caramel-like flavor that complements the cookies perfectly.
- Incorporate the Powdered Sugar: Add the powdered sugar to the cream cheese and Biscoff mixture. Beat on low speed until the powdered sugar is fully incorporated. Be careful not to overmix, as this can make the truffles tough. The powdered sugar will add sweetness and help bind the mixture together.
- Add Vanilla and Salt: Pour in the vanilla extract and add the salt. Mix until just combined. The vanilla extract enhances the overall flavor, and the salt balances the sweetness.
- Combine Wet and Dry Ingredients: Gradually add the Biscoff cookie crumbs to the cream cheese mixture. Mix on low speed until everything is well combined. You might need to scrape down the sides of the bowl a few times to ensure that all the crumbs are incorporated. The mixture should be thick and slightly sticky.
Chilling and Rolling the Truffles:
Chilling the mixture is crucial for easy rolling. It allows the ingredients to meld together and firms up the mixture, making it much easier to handle.
- Chill the Mixture: Cover the bowl with plastic wrap and place it in the refrigerator for at least 1 hour, or preferably 2 hours. This will allow the mixture to firm up and make it easier to roll into balls. You can even chill it overnight if you want to prepare it in advance.
- Prepare Your Workspace: Line a baking sheet with parchment paper or wax paper. This will prevent the truffles from sticking to the sheet.
- Roll the Truffles: Once the mixture is chilled, remove it from the refrigerator. Using a small cookie scoop or a spoon, scoop out about 1 tablespoon of the mixture. Roll it between your palms to form a smooth ball. Place the truffle on the prepared baking sheet.
- Repeat: Continue scooping and rolling the mixture until you’ve used it all up. You should end up with about 24-30 truffles, depending on the size of your scoops.
- Re-Chill (Optional): If the truffles become too soft while you’re rolling them, you can place the baking sheet back in the refrigerator for 15-20 minutes to firm them up again.
Coating the Truffles:
The white chocolate coating adds a touch of elegance and sweetness to these already irresistible truffles. Make sure to use high-quality white chocolate for the best flavor and texture.
- Melt the White Chocolate: Place the white chocolate chips and coconut oil (if using) in a microwave-safe bowl. Microwave in 30-second intervals, stirring after each interval, until the chocolate is completely melted and smooth. Be careful not to overheat the chocolate, as it can seize up and become grainy. The coconut oil helps to thin the chocolate and make it easier to dip the truffles. You can also melt the chocolate in a double boiler over simmering water.
- Prepare for Dipping: Have your baking sheet with parchment paper ready. Also, prepare a small bowl with crushed Biscoff cookies (if using) for garnish.
- Dip the Truffles: Using a fork or dipping tools, carefully dip each truffle into the melted white chocolate, ensuring that it’s fully coated. Lift the truffle out of the chocolate and gently tap the fork against the side of the bowl to remove any excess chocolate.
- Garnish (Optional): Immediately place the dipped truffle back on the prepared baking sheet. If you’re using crushed Biscoff cookies for garnish, sprinkle them over the top of the truffle while the chocolate is still wet.
- Repeat: Continue dipping and garnishing the truffles until they’re all coated.
Setting and Storing the Truffles:
Patience is key here! Allowing the chocolate to set properly ensures a beautiful finish and prevents the truffles from becoming messy.
- Let the Chocolate Set: Place the baking sheet with the coated truffles in the refrigerator for at least 30 minutes, or until the chocolate is completely set. This will help the chocolate harden and prevent it from melting at room temperature.
- Dust with Powdered Sugar (Optional): Once the chocolate is set, you can lightly dust the truffles with powdered sugar for an extra touch of sweetness and visual appeal.
- Store Properly: Store the Biscoff cookie truffles in an airtight container in the refrigerator for up to 1 week. You can also freeze them for up to 2 months. If freezing, let them thaw in the refrigerator before serving.
Tips for Success:
- Use High-Quality Ingredients: The better the ingredients, the better the truffles will taste. Opt for high-quality Biscoff cookies, cream cheese, and white chocolate.
- Don’t Overmix: Overmixing the truffle mixture can result in tough truffles. Mix until just combined.
- Chill Thoroughly: Chilling the mixture and the coated truffles is essential for easy handling and a firm texture.
- Melt Chocolate Carefully: Be careful not to overheat the white chocolate, as it can seize up and become grainy. Microwave in short intervals and stir frequently.
- Get Creative with Garnishes: Feel free to experiment with different garnishes, such as sprinkles, chopped nuts, or a drizzle of melted Biscoff spread.
Enjoy!
These Biscoff cookie truffles are perfect for parties, holidays, or any time you’re craving a sweet treat. They’re also a great homemade gift for friends and family. Enjoy!
Conclusion:
And there you have it! These Biscoff Cookie Truffles are truly irresistible, and I genuinely believe they’re a must-try for anyone who loves a sweet treat. The creamy, spiced Biscoff flavor combined with the rich chocolate coating creates a symphony of textures and tastes that will leave you wanting more. They’re incredibly easy to make, requiring minimal ingredients and effort, yet they deliver a gourmet experience that’s perfect for any occasion.
Why are these truffles a must-try? Because they’re the perfect balance of simplicity and indulgence. They’re quick enough to whip up for a last-minute dessert craving, yet elegant enough to serve at a party or give as a thoughtful homemade gift. Plus, who can resist the allure of Biscoff? That unique caramelized biscuit flavor is simply addictive!
But the best part? These truffles are incredibly versatile. While the recipe I’ve shared is my go-to, feel free to experiment and make them your own.
Serving Suggestions and Variations:
* Drizzle Delight: Instead of a simple chocolate coating, try drizzling melted white chocolate or even more melted Biscoff spread over the finished truffles for an extra touch of elegance and flavor.
* Nutty Goodness: Add chopped nuts, like pecans or walnuts, to the truffle mixture for a delightful crunch. You can also roll the finished truffles in finely chopped nuts instead of cocoa powder.
* Spice It Up: For a more intense spiced flavor, add a pinch of cinnamon, nutmeg, or even a tiny bit of cardamom to the truffle mixture.
* Coffee Kick: Incorporate a teaspoon of instant espresso powder into the melted chocolate for a mocha-inspired twist.
* Boozy Bites: A splash of your favorite liqueur, like Baileys or Kahlua, can add a sophisticated touch to these truffles. Just be sure to add it sparingly to avoid making the mixture too wet.
* Presentation is Key: Arrange the truffles on a decorative platter, in mini cupcake liners, or package them in a beautiful box for a stunning presentation. They make a wonderful homemade gift for birthdays, holidays, or just because!
* Ice Cream Topping: Crumble these Biscoff Cookie Truffles over your favorite ice cream for an extra special dessert.
* Cookie Butter Swirl: Gently swirl some melted Biscoff spread into the melted chocolate before dipping the truffles for a marbled effect and an extra burst of Biscoff flavor.
I’m so excited for you to try this recipe and experience the magic of these Biscoff Cookie Truffles for yourself. I truly believe you’ll love them as much as I do. They’re the perfect little bite of happiness!
So, what are you waiting for? Gather your ingredients, put on some music, and get ready to create some deliciousness. Don’t be afraid to get creative and experiment with different variations to find your perfect truffle combination.
And most importantly, I’d love to hear about your experience! Once you’ve made these truffles, please come back and share your thoughts in the comments below. Let me know what variations you tried, what you loved, and any tips or tricks you discovered along the way. Your feedback is invaluable, and I can’t wait to see your creations! Happy baking!
Biscoff Cookie Truffles: Easy Recipe & Delicious Dessert
Creamy, melt-in-your-mouth Biscoff Cookie Truffles made with crushed Biscoff cookies, cream cheese, and a smooth white chocolate coating. Perfect for gifting or indulging!
Ingredients
- 1 (8.8 ounce) package Biscoff cookies (about 32 cookies)
- 4 ounces cream cheese, softened
- 1/2 cup Biscoff spread, melted
- 1/4 cup powdered sugar, plus more for dusting
- 1 teaspoon vanilla extract
- 1/4 teaspoon salt
- 1 cup high-quality white chocolate chips, for coating
- 1 tablespoon coconut oil (optional, for smoother melting)
- Crushed Biscoff cookies, for garnish (optional)
Instructions
- Place Biscoff cookies in a food processor and pulse until finely ground. Alternatively, crush in a zip-top bag with a rolling pin. Transfer to a large bowl.
- In a separate bowl, beat softened cream cheese until smooth. Add melted Biscoff spread and beat until combined. Beat in powdered sugar on low speed until incorporated. Add vanilla extract and salt; mix until just combined.
- Gradually add the Biscoff cookie crumbs to the cream cheese mixture. Mix on low speed until everything is well combined.
- Cover the bowl with plastic wrap and refrigerate for at least 1 hour (preferably 2 hours) to firm up.
- Line a baking sheet with parchment paper. Scoop out about 1 tablespoon of the chilled mixture and roll into a smooth ball. Place on the prepared baking sheet. Repeat until all mixture is used. Re-chill if truffles become too soft.
- Place white chocolate chips and coconut oil (if using) in a microwave-safe bowl. Microwave in 30-second intervals, stirring after each interval, until melted and smooth. Alternatively, melt in a double boiler.
- Using a fork or dipping tools, dip each truffle into the melted white chocolate, ensuring it’s fully coated. Tap off excess chocolate.
- Immediately sprinkle with crushed Biscoff cookies (if using).
- Place the baking sheet in the refrigerator for at least 30 minutes, or until the chocolate is completely set.
- Lightly dust the truffles with powdered sugar.
- Store in an airtight container in the refrigerator for up to 1 week, or freeze for up to 2 months. Thaw in the refrigerator before serving.
Notes
- Use high-quality ingredients for the best flavor.
- Don’t overmix the truffle mixture.
- Chilling is essential for easy handling and a firm texture.
- Melt white chocolate carefully to avoid seizing.
- Get creative with garnishes!
Leave a Comment