
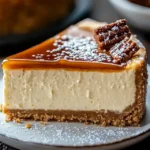
Biscoff Salted Caramel Cheesecake is a delightful dessert that combines the rich, creamy texture of cheesecake with the irresistible flavors of Biscoff cookies and salted caramel. As a passionate home baker, I can confidently say that this recipe has become a favorite in my household, and its easy to see why! The crunchy Biscoff crust perfectly complements the smooth, velvety cheesecake filling, while the salted caramel drizzle adds a touch of indulgence that elevates this dessert to a whole new level.
This cheesecake not only boasts a delicious taste but also carries a sense of nostalgia for many, as Biscoff cookies have been a beloved treat for generations. The combination of sweet and salty flavors creates a harmonious balance that keeps everyone coming back for more. Whether youre hosting a dinner party or simply treating yourself, this Biscoff Salted Caramel Cheesecake is sure to impress. Join me as we dive into this scrumptious recipe thats perfect for any occasion!

Ingredients:
- For the crust:
- 250g Biscoff biscuits (crushed)
- 100g unsalted butter (melted)
- For the cheesecake filling:
- 600g cream cheese (softened)
- 200g powdered sugar
- 200ml heavy cream
- 1 teaspoon vanilla extract
- 200g Biscoff spread
- 1 tablespoon lemon juice
- For the salted caramel sauce:
- 200g granulated sugar
- 90g unsalted butter (cubed)
- 120ml heavy cream
- 1 teaspoon sea salt
- For the topping:
- Extra Biscoff spread (for drizzling)
- Crushed Biscoff biscuits (for garnish)
- Sea salt flakes (for garnish)
Preparing the Crust
- Start by preheating your oven to 180°C (350°F). This will ensure that your crust bakes evenly.
- In a mixing bowl, combine the crushed Biscoff biscuits with the melted butter. Stir until the mixture resembles wet sand.
- Press the mixture firmly into the bottom of a 9-inch springform pan. Make sure to pack it tightly to create a solid base for your cheesecake.
- Bake the crust in the preheated oven for about 10 minutes, then remove it and let it cool completely while you prepare the filling.
Making the Cheesecake Filling
- In a large mixing bowl, add the softened cream cheese. Using an electric mixer, beat it on medium speed until smooth and creamy, about 2-3 minutes.
- Gradually add the powdered sugar, mixing until fully incorporated. Scrape down the sides of the bowl as needed to ensure everything is well combined.
- In a separate bowl, whip the heavy cream until stiff peaks form. This will give your cheesecake a light and airy texture.
- Gently fold the whipped cream into the cream cheese mixture using a spatula. Be careful not to deflate the whipped cream; you want to keep that fluffiness!
- Add the vanilla extract, Biscoff spread, and lemon juice to the mixture. Fold until everything is well combined and you have a smooth, creamy filling.
Preparing the Salted Caramel Sauce
- In a medium saucepan over medium heat, add the granulated sugar. Stir continuously until the sugar melts and turns a golden amber color. This should take about 5-7 minutes.
- Once the sugar is melted, carefully add the cubed butter. The mixture will bubble up, so be cautious! Stir until the butter is completely melted and combined.
- Slowly pour in the heavy cream while stirring. The mixture will bubble again, so keep stirring until smooth.
- Remove the saucepan from heat and stir in the sea salt. Allow the caramel sauce to cool slightly before using it in the cheesecake.
Assembling the Cheesecake
- Once the crust has cooled completely, pour half of the cheesecake filling over the crust, smoothing it out with a spatula.
- Drizzle a generous amount of the salted caramel sauce over the filling. You can use as much or as little as you like, but I recommend a good layer for that rich flavor!
- Pour the remaining cheesecake filling on top of the caramel layer, smoothing it out again.
- Cover the cheesecake with plastic wrap and refrigerate for at least 4 hours, or preferably overnight. This allows the cheesecake to set properly.
Finishing Touches
- Once the cheesecake has set, carefully remove it from the springform pan. You can run a knife around the edges to help release it if needed.
- Prep Time: 30 minutes
- Cook Time: 10 minutes
- Total Time: 280 minutes
- Yield: 12 servings
- Biscoff spread
- Crushed Biscoff biscuits
- Sea salt flakes
- Full-fat cream cheese (optional)
- Salted caramel sauce (to taste)
- Drizzle extra Biscoff spread over the top of the cheesecake for added flavor and decoration.
- Sprinkle crushed Biscoff biscuits and sea salt flakes on top for garnish.
- Slice and serve chilled. Enjoy your delicious Biscoff cheesecake!
- For a richer flavor, you can use full-fat cream cheese.
- Make sure to let the cheesecake set for at least 4 hours, but overnight is best for optimal texture.
- Feel free to adjust the amount of salted caramel sauce based on your preference.

Conclusion:
In conclusion, this Biscoff Salted Caramel Cheesecake is an absolute must-try for anyone who loves a delightful blend of flavors and textures. The creamy, rich cheesecake paired with the crunchy Biscoff crust and the luscious salted caramel creates a dessert experience that is simply unforgettable. Whether you’re hosting a dinner party, celebrating a special occasion, or just treating yourself, this cheesecake is sure to impress. For serving suggestions, consider topping each slice with a drizzle of extra salted caramel and a sprinkle of crushed Biscoff cookies for that extra touch of indulgence. You can also experiment with variations by adding a layer of chocolate ganache or incorporating fresh fruit like strawberries or raspberries for a refreshing twist. I encourage you to give this Biscoff Salted Caramel Cheesecake a try and share your experience with friends and family. I would love to hear how it turns out for you! Dont forget to snap a picture and tag me on social media; I cant wait to see your delicious creations. Happy baking! PrintBiscoff Salted Caramel Cheesecake: A Decadent Dessert Recipe You Must Try
This indulgent Biscoff cheesecake features a crunchy Biscoff biscuit crust, a creamy filling infused with Biscoff spread, and a luscious salted caramel sauce, making it a perfect dessert for any occasion.


Leave a Comment