
Blue Cheese Spread: Prepare to elevate your snacking game with a recipe that’s as sophisticated as it is simple! Have you ever craved a creamy, tangy, and utterly addictive appetizer that takes mere minutes to whip up? Look no further. This isn’t just another dip; it’s an experience.
While the exact origins of blue cheese are debated, its presence has graced tables for centuries, with variations found across Europe. Its bold flavor has always been a statement, a culinary adventure for those seeking something beyond the ordinary. Our blue cheese spread builds upon this legacy, transforming a classic ingredient into a modern marvel.
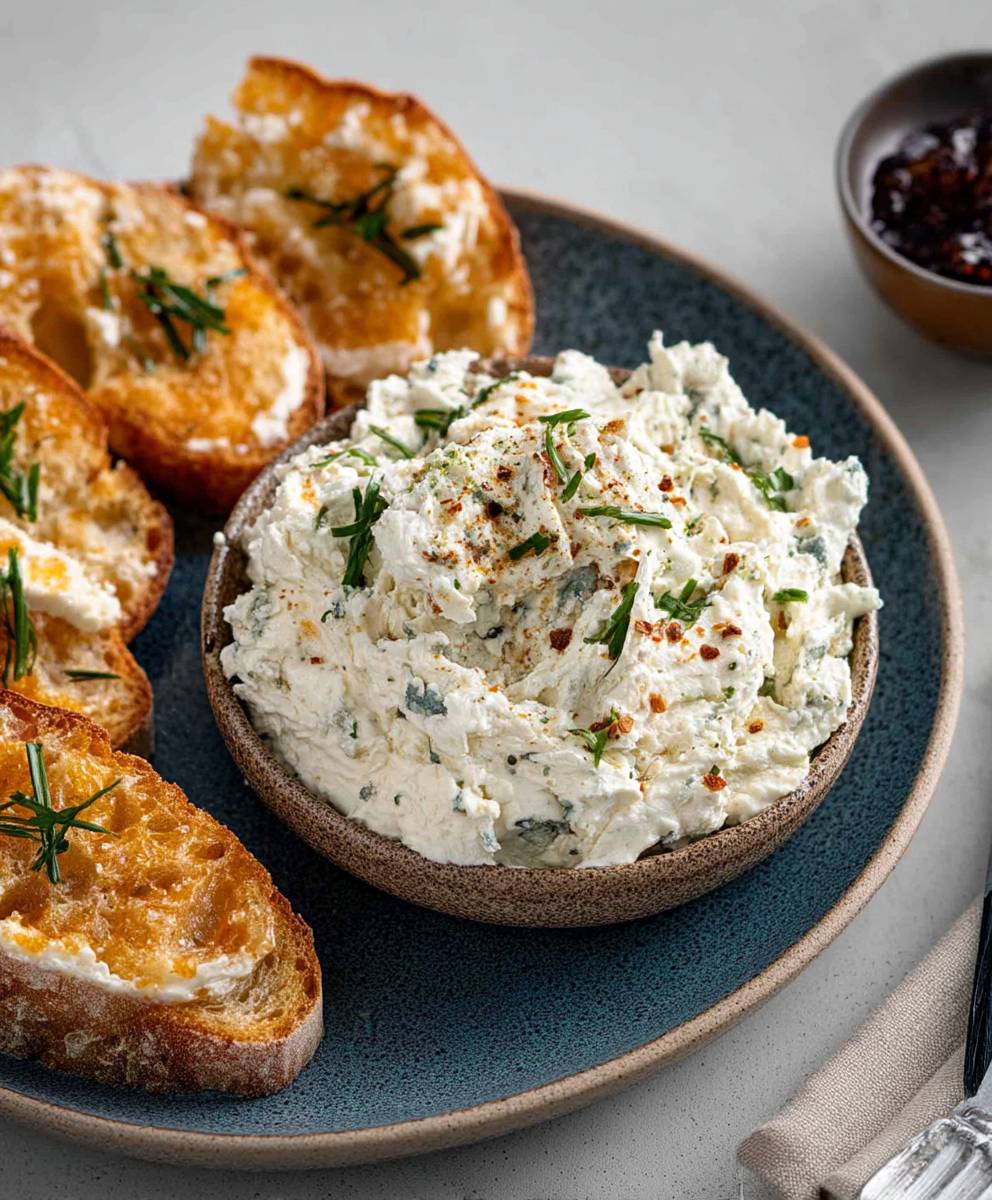
People adore this spread for its incredible versatility and complex flavor profile. The pungent blue cheese is perfectly balanced by creamy elements, creating a symphony of taste and texture that dances on your palate. Whether you’re hosting a fancy cocktail party or simply craving a satisfying snack, this spread is your answer. It’s quick, easy, and guaranteed to impress. The combination of sharp, salty, and creamy notes makes it irresistible, and its convenience means you can enjoy gourmet flavors without spending hours in the kitchen. Get ready to discover your new favorite appetizer!

Ingredients:
- 4 ounces high-quality blue cheese, such as Roquefort, Gorgonzola, or Stilton, crumbled
- 4 ounces cream cheese, softened to room temperature
- 1/4 cup sour cream
- 2 tablespoons mayonnaise
- 2 tablespoons finely chopped fresh chives
- 1 tablespoon finely chopped fresh parsley
- 1 tablespoon lemon juice, freshly squeezed
- 1 teaspoon Worcestershire sauce
- 1/4 teaspoon garlic powder
- 1/8 teaspoon black pepper, freshly ground
- Pinch of cayenne pepper (optional, for a touch of heat)
- Crackers, baguette slices, celery sticks, or crudités, for serving
- Optional garnishes: chopped walnuts, pecans, or a drizzle of honey
Preparing the Blue Cheese Spread
- Soften the Cream Cheese: This is crucial for a smooth and creamy spread. Make sure your cream cheese is at room temperature. You can leave it out on the counter for about an hour, or if you’re in a hurry, you can microwave it in 15-second intervals, checking frequently to avoid melting.
- Crumble the Blue Cheese: If your blue cheese comes in a block, crumble it into small pieces. The smaller the pieces, the easier it will be to incorporate into the spread. I like to use a fork to crumble it, but you can also use your fingers.
- Combine the Cheeses: In a medium-sized mixing bowl, combine the softened cream cheese and the crumbled blue cheese. Use a fork or a rubber spatula to mash the two cheeses together until they are well combined. Don’t worry if there are still some small chunks of blue cheese; that’s perfectly fine and adds to the texture.
- Add the Sour Cream and Mayonnaise: Add the sour cream and mayonnaise to the cheese mixture. These ingredients will add moisture and richness to the spread. Stir everything together until it is smooth and creamy. Make sure to scrape down the sides of the bowl to ensure that all of the ingredients are evenly incorporated.
- Incorporate the Herbs and Seasonings: Add the chopped chives, parsley, lemon juice, Worcestershire sauce, garlic powder, black pepper, and cayenne pepper (if using) to the cheese mixture. Stir well to combine. The lemon juice will brighten the flavors, while the Worcestershire sauce adds a savory depth. The garlic powder and pepper provide a subtle kick.
- Taste and Adjust: This is the most important step! Taste the spread and adjust the seasonings as needed. You might want to add more lemon juice for brightness, more Worcestershire sauce for savory flavor, or more pepper for heat. Remember that the flavors will meld together as the spread sits, so don’t over-season it.
Chilling and Serving
- Chill the Spread: Cover the bowl with plastic wrap and refrigerate the spread for at least 30 minutes, or preferably an hour, to allow the flavors to meld together. Chilling also helps the spread to firm up, making it easier to serve.
- Prepare Your Serving Platter: While the spread is chilling, prepare your serving platter. Arrange crackers, baguette slices, celery sticks, or crudités around the platter. You can also add some optional garnishes, such as chopped walnuts, pecans, or a drizzle of honey.
- Serve and Enjoy: Remove the spread from the refrigerator and transfer it to a serving bowl. Garnish with chopped walnuts, pecans, or a drizzle of honey, if desired. Serve immediately with crackers, baguette slices, celery sticks, or crudités.
Tips and Variations
- Cheese Selection: The type of blue cheese you use will greatly affect the flavor of the spread. Roquefort is a strong and pungent blue cheese, while Gorgonzola is milder and creamier. Stilton is a good middle-ground option. Experiment with different types of blue cheese to find your favorite.
- Herb Variations: Feel free to experiment with different herbs. Dill, thyme, or rosemary would all be delicious additions. You can also use dried herbs if you don’t have fresh herbs on hand. Use about 1 teaspoon of dried herbs for every 1 tablespoon of fresh herbs.
- Spice It Up: If you like a little heat, add a pinch of cayenne pepper or a few drops of hot sauce to the spread. You can also add some finely chopped jalapeño peppers for a more intense heat.
- Sweeten It Up: For a sweeter spread, add a tablespoon of honey or maple syrup to the cheese mixture. This will balance out the sharpness of the blue cheese.
- Add Some Crunch: Add some chopped walnuts, pecans, or toasted almonds to the spread for added texture and flavor.
- Make it Vegan: You can easily make this spread vegan by using vegan cream cheese and vegan sour cream. There are many delicious vegan blue cheese alternatives available as well.
- Serving Suggestions: This spread is delicious served with crackers, baguette slices, celery sticks, or crudités. It’s also great on sandwiches, burgers, or as a topping for grilled meats or vegetables. You can even use it as a dip for chicken wings or potato chips.
- Make Ahead: This spread can be made ahead of time and stored in the refrigerator for up to 3 days. In fact, the flavors will meld together even more as it sits, so it’s often even better the next day.
- Storage: Store any leftover spread in an airtight container in the refrigerator for up to 3 days.
Troubleshooting
- Spread is too thick: If the spread is too thick, add a little more sour cream or mayonnaise until it reaches the desired consistency.
- Spread is too thin: If the spread is too thin, add a little more cream cheese until it reaches the desired consistency.
- Spread is too salty: If the spread is too salty, add a little more lemon juice or sour cream to balance out the saltiness.
- Spread is not flavorful enough: If the spread is not flavorful enough, add more herbs, spices, or Worcestershire sauce to taste.
Nutritional Information (Approximate)
Note: Nutritional information is an estimate and may vary based on specific ingredients and portion sizes.
- Serving Size: 2 tablespoons
- Calories: Approximately 120-150
- Fat: 10-13g
- Saturated Fat: 6-8g
- Cholesterol: 30-40mg
- Sodium: 150-200mg
- Carbohydrates: 2-3g
- Fiber: 0g
- Sugar: 1-2g
- Protein: 3-4g
Why This Recipe Works
This blue cheese spread recipe is a winner because it strikes the perfect balance between creamy, tangy, and savory. The combination of high-quality blue cheese, softened cream cheese, sour cream, and mayonnaise creates a luxuriously smooth and rich texture. The addition of fresh chives, parsley, lemon juice, and Worcestershire sauce adds layers of flavor that complement the blue cheese without overpowering it. The optional pinch of cayenne pepper provides a subtle kick that keeps things interesting. The recipe is also incredibly versatile and can be easily customized to suit your taste preferences. Whether you prefer a stronger or milder blue cheese, more or less heat, or different herbs and spices, you can easily adjust the recipe to create your perfect blue cheese spread.
The chilling step is also crucial for the success of this recipe. Allowing the spread to chill for at least 30 minutes allows the flavors to meld together and the spread to firm up, making it easier to serve. This also gives you time to prepare your serving platter and gather your favorite dippers.
Finally, this recipe is incredibly easy to make. It requires minimal ingredients and equipment, and the instructions are straightforward and easy to follow. Even if you’re a beginner cook, you can easily whip up this delicious blue cheese spread in no time.
Enjoy your homemade Blue Cheese Spread!
Conclusion:
This Blue Cheese Spread isn’t just another appetizer; it’s a flavor explosion waiting to happen! I truly believe this recipe is a must-try for anyone who appreciates bold, creamy, and utterly addictive flavors. The combination of the tangy blue cheese, the creamy base, and the subtle hints of garlic and herbs creates a symphony of taste that will leave your guests begging for more. It’s incredibly easy to whip up, requiring minimal effort for maximum impact, making it perfect for both casual gatherings and more formal occasions.
But what truly sets this spread apart is its versatility. While it’s fantastic served simply with crackers or crusty bread, don’t be afraid to get creative! Imagine dolloping it onto grilled steak for an extra layer of richness, or using it as a decadent spread for burgers. It’s also incredible with roasted vegetables like Brussels sprouts or asparagus, adding a delightful savory note.
For serving suggestions, consider offering a variety of accompaniments. A selection of different crackers, from plain water crackers to multigrain options, will cater to different preferences. Fresh vegetables like celery sticks, carrot sticks, and cucumber slices provide a refreshing contrast to the richness of the spread. And don’t forget the fruit! Apple slices, pear slices, or even grapes pair beautifully with the blue cheese, creating a balanced and sophisticated flavor profile.
Looking for variations? You can easily customize this recipe to suit your own taste. If you prefer a milder flavor, try using a softer blue cheese like Gorgonzola Dolce. For a spicier kick, add a pinch of red pepper flakes or a dash of hot sauce. To add some sweetness, stir in a tablespoon of honey or maple syrup. And for a more sophisticated touch, consider adding chopped walnuts or pecans for extra texture and flavor. You can also experiment with different herbs, such as fresh thyme, rosemary, or chives. The possibilities are endless!
I’ve made this Blue Cheese Spread countless times, and it’s always a hit. It’s the kind of recipe that people ask for again and again, and it’s guaranteed to impress even the most discerning palates. The best part is that it’s so simple to make, you can easily whip it up on a moment’s notice.
So, what are you waiting for? Grab your ingredients and get ready to experience the magic of this incredible spread. I promise you won’t be disappointed. And once you’ve tried it, I’d love to hear about your experience! Share your photos and comments on social media, and let me know what variations you tried and how you served it. I’m always looking for new and exciting ways to enjoy this delicious recipe. Happy spreading! I am confident that you will find this recipe to be a new staple in your kitchen.
Blue Cheese Spread: The Ultimate Guide to Delicious Dips & Appetizers
Creamy, tangy, and savory blue cheese spread perfect for crackers, veggies, or baguette slices. Easy to make and customizable to your taste!
Ingredients
- 4 ounces high-quality blue cheese, such as Roquefort, Gorgonzola, or Stilton, crumbled
- 4 ounces cream cheese, softened to room temperature
- 1/4 cup sour cream
- 2 tablespoons mayonnaise
- 2 tablespoons finely chopped fresh chives
- 1 tablespoon finely chopped fresh parsley
- 1 tablespoon lemon juice, freshly squeezed
- 1 teaspoon Worcestershire sauce
- 1/4 teaspoon garlic powder
- 1/8 teaspoon black pepper, freshly ground
- Pinch of cayenne pepper (optional, for a touch of heat)
- Crackers, baguette slices, celery sticks, or crudités, for serving
- Optional garnishes: chopped walnuts, pecans, or a drizzle of honey
Instructions
- Ensure cream cheese is at room temperature for a smooth spread.
- Crumble blue cheese into small pieces.
- In a medium bowl, combine softened cream cheese and crumbled blue cheese. Mash together with a fork or spatula.
- Add sour cream and mayonnaise to the cheese mixture. Stir until smooth and creamy.
- Add chopped chives, parsley, lemon juice, Worcestershire sauce, garlic powder, black pepper, and cayenne pepper (if using). Stir well to combine.
- Taste and adjust seasonings as needed.
- Cover and refrigerate for at least 30 minutes (preferably an hour) to allow flavors to meld.
- Arrange crackers, baguette slices, celery sticks, or crudités on a platter. Add optional garnishes.
- Transfer spread to a serving bowl. Garnish with chopped walnuts, pecans, or a drizzle of honey, if desired. Serve immediately.
Notes
- The type of blue cheese you use will greatly affect the flavor of the spread. Roquefort is a strong and pungent blue cheese, while Gorgonzola is milder and creamier. Stilton is a good middle-ground option. Experiment with different types of blue cheese to find your favorite.
- Feel free to experiment with different herbs. Dill, thyme, or rosemary would all be delicious additions. You can also use dried herbs if you don’t have fresh herbs on hand. Use about 1 teaspoon of dried herbs for every 1 tablespoon of fresh herbs.
- If you like a little heat, add a pinch of cayenne pepper or a few drops of hot sauce to the spread. You can also add some finely chopped jalapeño peppers for a more intense heat.
- For a sweeter spread, add a tablespoon of honey or maple syrup to the cheese mixture. This will balance out the sharpness of the blue cheese.
- Add some chopped walnuts, pecans, or toasted almonds to the spread for added texture and flavor.
- You can easily make this spread vegan by using vegan cream cheese and vegan sour cream. There are many delicious vegan blue cheese alternatives available as well.
- This spread is delicious served with crackers, baguette slices, celery sticks, or crudités. It’s also great on sandwiches, burgers, or as a topping for grilled meats or vegetables. You can even use it as a dip for chicken wings or potato chips.
- This spread can be made ahead of time and stored in the refrigerator for up to 3 days. In fact, the flavors will meld together even more as it sits, so it’s often even better the next day.
- Store any leftover spread in an airtight container in the refrigerator for up to 3 days.
- Spread is too thick: If the spread is too thick, add a little more sour cream or mayonnaise until it reaches the desired consistency.
- Spread is too thin: If the spread is too thin, add a little more cream cheese until it reaches the desired consistency.
- Spread is too salty: If the spread is too salty, add a little more lemon juice or sour cream to balance out the saltiness.
- Spread is not flavorful enough: If the spread is not flavorful enough, add more herbs, spices, or Worcestershire sauce to taste.


Leave a Comment