
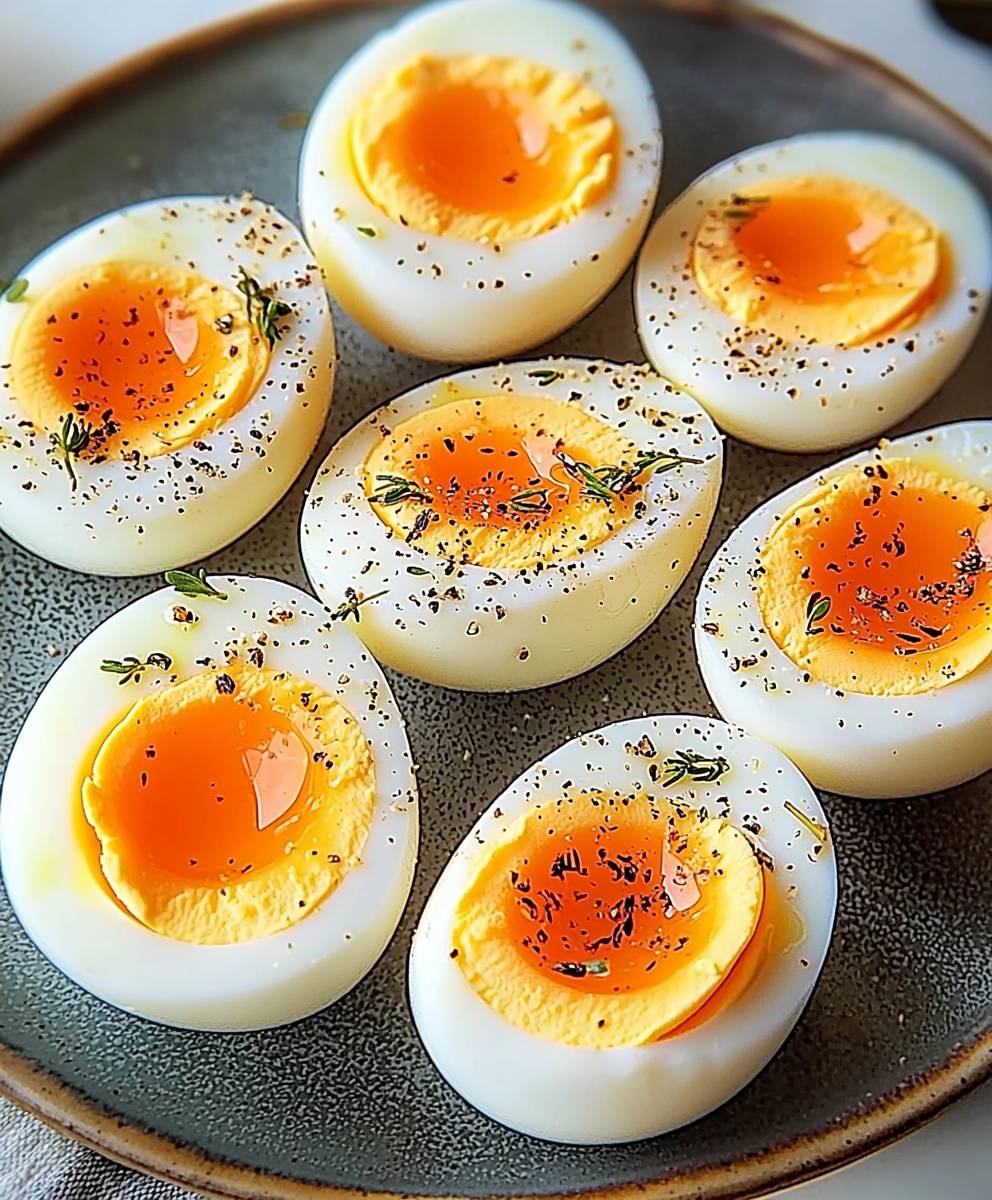
Boiled eggs perfectly cooked is there anything more fundamental, yet so often frustratingly elusive, in the culinary world? We’ve all been there: the cracked shells, the stubbornly clinging membranes, the dreaded green ring around the yolk. But fear not, fellow egg enthusiasts! I’m here to share my foolproof method for achieving boiled eggs perfectly cooked every single time, transforming this simple ingredient into a versatile star of your kitchen.
The humble boiled egg has a history as rich and varied as the cultures that have embraced it. From ancient Roman banquets to Japanese ramen bowls, this protein-packed powerhouse has nourished generations. In many cultures, eggs symbolize new beginnings and fertility, making them a staple at celebratory meals. But beyond its historical significance, the boiled egg’s enduring appeal lies in its simplicity and adaptability.
People adore boiled eggs for their incredible versatility. Enjoy them sliced on toast with a sprinkle of salt and pepper, deviled for a party appetizer, added to a vibrant salad, or simply eaten straight from the shell as a quick and healthy snack. The creamy, satisfying texture of a perfectly cooked yolk combined with the firm, yet tender, white is a culinary delight. Plus, they are incredibly convenient! Cook a batch at the beginning of the week, and you’ll have a protein-rich option ready to go whenever hunger strikes. So, let’s dive in and unlock the secrets to consistently perfect boiled eggs!

Ingredients:
- 12 large eggs
- Water (enough to cover the eggs in the pot)
- 1 tablespoon white vinegar (optional, helps prevent cracking)
- 1 teaspoon salt (optional, seasons the eggs slightly and may help with peeling)
- Ice water bath (a large bowl filled with ice and water)
Preparing the Eggs for Boiling
Okay, let’s get started! Making perfectly boiled eggs is easier than you might think, but there are a few tricks to ensure they turn out just right every time. First, we need to prepare our eggs. The fresher the eggs, the harder they can be to peel, so using eggs that are a week or two old is actually preferable. Don’t worry, they’re still perfectly safe to eat!
- Choose the Right Pot: Select a saucepan that’s large enough to hold all the eggs in a single layer without overcrowding. Overcrowding can lead to uneven cooking.
- Arrange the Eggs: Gently place the eggs in the saucepan. Be careful not to drop them, as cracked eggs will leak during boiling.
- Add Cold Water: Pour cold water over the eggs until they are completely submerged by at least an inch. Using cold water is crucial because it allows the eggs to heat up gradually, which helps prevent them from cracking due to sudden temperature changes.
- Add Vinegar and Salt (Optional): Add the vinegar and salt to the water. The vinegar is said to help coagulate the egg white quickly if a crack does occur, minimizing leakage. The salt can subtly season the eggs and some believe it aids in peeling.
The Boiling Process
Now comes the critical part: the actual boiling! This is where timing is everything. We’ll use a method that starts with a cold start, which I find gives the most consistent results.
- Bring to a Boil: Place the saucepan over medium-high heat and bring the water to a rolling boil. A rolling boil means the water is bubbling vigorously and consistently.
- Adjust the Heat: Once the water reaches a rolling boil, immediately reduce the heat to low. You want the water to be at a gentle simmer, not a furious boil. A gentle simmer prevents the eggs from bouncing around and cracking.
- Set the Timer: This is where the magic happens! The cooking time determines whether you get soft-boiled, medium-boiled, or hard-boiled eggs. Here’s a breakdown of the cooking times for different levels of doneness:
- Soft-Boiled (Runny Yolk): 6-7 minutes
- Medium-Boiled (Slightly Soft Yolk): 8-9 minutes
- Hard-Boiled (Firm Yolk): 10-12 minutes
I usually aim for 10 minutes for hard-boiled eggs that have a firm but not dry yolk. Set a timer and stick to it!
- Monitor the Simmer: Keep an eye on the water to ensure it remains at a gentle simmer. Adjust the heat as needed to maintain this consistent temperature.
The Ice Bath and Peeling
The ice bath is just as important as the boiling process. It stops the cooking immediately and helps to prevent that dreaded green ring from forming around the yolk. It also makes the eggs much easier to peel.
- Prepare the Ice Bath: While the eggs are cooking, prepare a large bowl filled with ice and water. Make sure there’s enough ice to keep the water very cold.
- Transfer to Ice Bath: Once the timer goes off, immediately remove the saucepan from the heat and carefully transfer the eggs to the ice bath using a slotted spoon.
- Cool Completely: Let the eggs sit in the ice bath for at least 10-15 minutes, or until they are completely cool to the touch. This allows the eggs to cool evenly and helps the egg white to contract slightly, making them easier to peel.
- Peel the Eggs: Now for the fun part (or not, depending on your peeling skills!). There are a few techniques you can use to peel the eggs easily:
- Tap and Roll: Gently tap the egg all over on a hard surface to create small cracks in the shell. Then, roll the egg between your hands to loosen the shell further.
- Peel Under Running Water: Start peeling the egg under a stream of cold running water. The water helps to separate the shell from the egg white.
- Start at the Large End: The large end of the egg usually has an air pocket, which makes it easier to start peeling.
Be patient and gentle while peeling. If the shell is stubborn, try peeling under running water or using a small spoon to help separate the shell from the egg white.
- Rinse and Dry: Once the eggs are peeled, rinse them under cold water to remove any remaining shell fragments. Pat them dry with a paper towel.
Tips for Perfect Boiled Eggs
Here are a few extra tips to help you achieve perfect boiled eggs every time:
- Use Older Eggs: As mentioned earlier, older eggs are generally easier to peel than fresh eggs.
- Don’t Overcrowd the Pot: Make sure the eggs are in a single layer in the pot to ensure even cooking.
- Use Cold Water: Starting with cold water helps prevent the eggs from cracking.
- Don’t Overcook: Overcooking can lead to dry, rubbery eggs with a green ring around the yolk.
- Cool Completely in Ice Bath: The ice bath is crucial for stopping the cooking process and making the eggs easier to peel.
- Peel Under Running Water: Peeling under running water helps to separate the shell from the egg white.
- Store Properly: Hard-boiled eggs can be stored in the refrigerator for up to a week. Keep them in their shells to prevent them from drying out.
Troubleshooting Common Issues
Sometimes, even with the best intentions, things can go wrong. Here are some common issues and how to troubleshoot them:
- Cracked Eggs: If your eggs crack during boiling, it could be due to sudden temperature changes or overcrowding in the pot. Try using cold water and ensuring the eggs are in a single layer. Adding vinegar to the water can also help.
- Difficult to Peel: If your eggs are difficult to peel, it could be because they are too fresh or they weren’t cooled properly in the ice bath. Try using older eggs and ensuring they are completely cool before peeling.
- Green Ring Around Yolk: The green ring around the yolk is caused by overcooking. Reduce the cooking time and cool the eggs quickly in an ice bath.
- Rubbery Texture: A rubbery texture is also a sign of overcooking. Reduce the cooking time and cool the eggs quickly in an ice bath.
Serving Suggestions
Now that you have perfectly boiled eggs, what can you do with them? The possibilities are endless!
- Deviled Eggs: A classic appetizer that’s always a crowd-pleaser.
- Egg Salad Sandwiches: A simple and satisfying lunch option.
- Salads: Add sliced or quartered boiled eggs to salads for extra protein and flavor.
- Snacks: Enjoy a boiled egg as a healthy and filling snack.
- Pickled Eggs: A tangy and flavorful treat.
- Scotch Eggs: A delicious and indulgent snack or appetizer.
Enjoy your perfectly boiled eggs! I hope these tips and tricks help you achieve success every time. Happy cooking!
Conclusion:
So there you have it! Perfectly boiled eggs, every single time. I know, I know, it sounds almost too simple to be life-changing, but trust me, once you master this method, you’ll never look at a hard-boiled egg the same way again. This isn’t just about cooking an egg; it’s about unlocking a world of culinary possibilities, and that’s why this recipe is a must-try. Think about it: no more green rings around the yolk, no more rubbery whites, just creamy, dreamy perfection waiting to be devoured. And the best part? It’s incredibly versatile! But why is this method so special? It’s all about the gentle cooking and the ice bath. The gradual heating prevents the proteins from seizing up and becoming tough, while the ice bath stops the cooking process immediately, ensuring that perfect texture. It’s a simple science, but the results are truly remarkable. Now, let’s talk about serving suggestions. Of course, you can enjoy these beauties straight up with a sprinkle of salt and pepper. But why stop there? Slice them up and add them to a vibrant salad, like a classic Niçoise or a simple green salad with a tangy vinaigrette. Mash them with avocado and a squeeze of lime for a delicious and healthy toast topping. Dice them and mix them with mayonnaise, mustard, and celery for a classic egg salad sandwich. Or, get creative and use them as a garnish for ramen, deviled eggs, or even a hearty stew. And speaking of deviled eggs, this recipe is the *perfect* starting point. Imagine those perfectly smooth, creamy yolks transformed into a decadent filling, seasoned to your liking and piped back into the whites. Talk about a crowd-pleaser! Looking for variations? Try adding a splash of vinegar to the boiling water to help prevent cracking. Or, experiment with different cooking times to achieve your desired level of doneness. Some people prefer a slightly softer yolk, while others like it completely firm. The beauty of this recipe is that you can customize it to your exact preferences. Don’t be afraid to experiment with different types of eggs, too! While chicken eggs are the most common, you can also use this method for duck eggs, quail eggs, or even goose eggs. Just be sure to adjust the cooking time accordingly. But the most important thing is to just give it a try! I promise you won’t be disappointed. This method for achieving perfectly boiled eggs is so easy and reliable, it will quickly become a staple in your kitchen. So, what are you waiting for? Grab a pot, some eggs, and get cooking! And when you do, I’d love to hear about your experience. Did you find the recipe easy to follow? Did you make any variations? What are your favorite ways to enjoy perfectly boiled eggs? Share your thoughts and photos in the comments below! I can’t wait to see what you create. Happy cooking! PrintBoiled Eggs Perfectly Cooked: Your Guide to Success

Perfectly boiled eggs made easy! Achieve your ideal yolk consistency and effortless peeling with these simple steps.
- Prep Time: 5 minutes
- Cook Time: 12
- Total Time: 21-27 minutes
- Yield: 12 eggs 1x
Ingredients
- 12 large eggs
- Water (enough to cover the eggs in the pot)
- 1 tablespoon white vinegar (optional, helps prevent cracking)
- 1 teaspoon salt (optional, seasons the eggs slightly and may help with peeling)
- Ice water bath (a large bowl filled with ice and water)
Instructions
- Prepare the Eggs: Choose a saucepan large enough to hold the eggs in a single layer. Gently place the eggs in the saucepan. Pour cold water over the eggs until they are submerged by at least an inch. Add vinegar and salt (optional).
- Boil: Place the saucepan over medium-high heat and bring the water to a rolling boil.
- Simmer: Once boiling, reduce the heat to low for a gentle simmer.
- Set Timer: Cook for the desired time: 6-7 minutes for soft-boiled, 8-9 minutes for medium-boiled, or 10-12 minutes for hard-boiled.
- Ice Bath: Prepare an ice bath. Once the timer goes off, immediately transfer the eggs to the ice bath using a slotted spoon.
- Cool: Let the eggs sit in the ice bath for at least 10-15 minutes, or until completely cool.
- Peel: Gently tap the egg all over on a hard surface to create small cracks. Roll the egg between your hands to loosen the shell. Peel under running water, starting at the large end.
- Rinse and Dry: Rinse the peeled eggs under cold water to remove any shell fragments. Pat dry with a paper towel.
Notes
- Use eggs that are a week or two old for easier peeling.
- Starting with cold water helps prevent cracking.
- The ice bath is crucial for stopping the cooking process and making the eggs easier to peel.
- Store hard-boiled eggs in the refrigerator for up to a week, in their shells.
- For cracked eggs, add vinegar to the water.
- For difficult to peel eggs, use older eggs and ensure they are completely cool before peeling.
- For green ring around the yolk, reduce the cooking time and cool the eggs quickly in an ice bath.
- For rubbery texture, reduce the cooking time and cool the eggs quickly in an ice bath.


Leave a Comment