
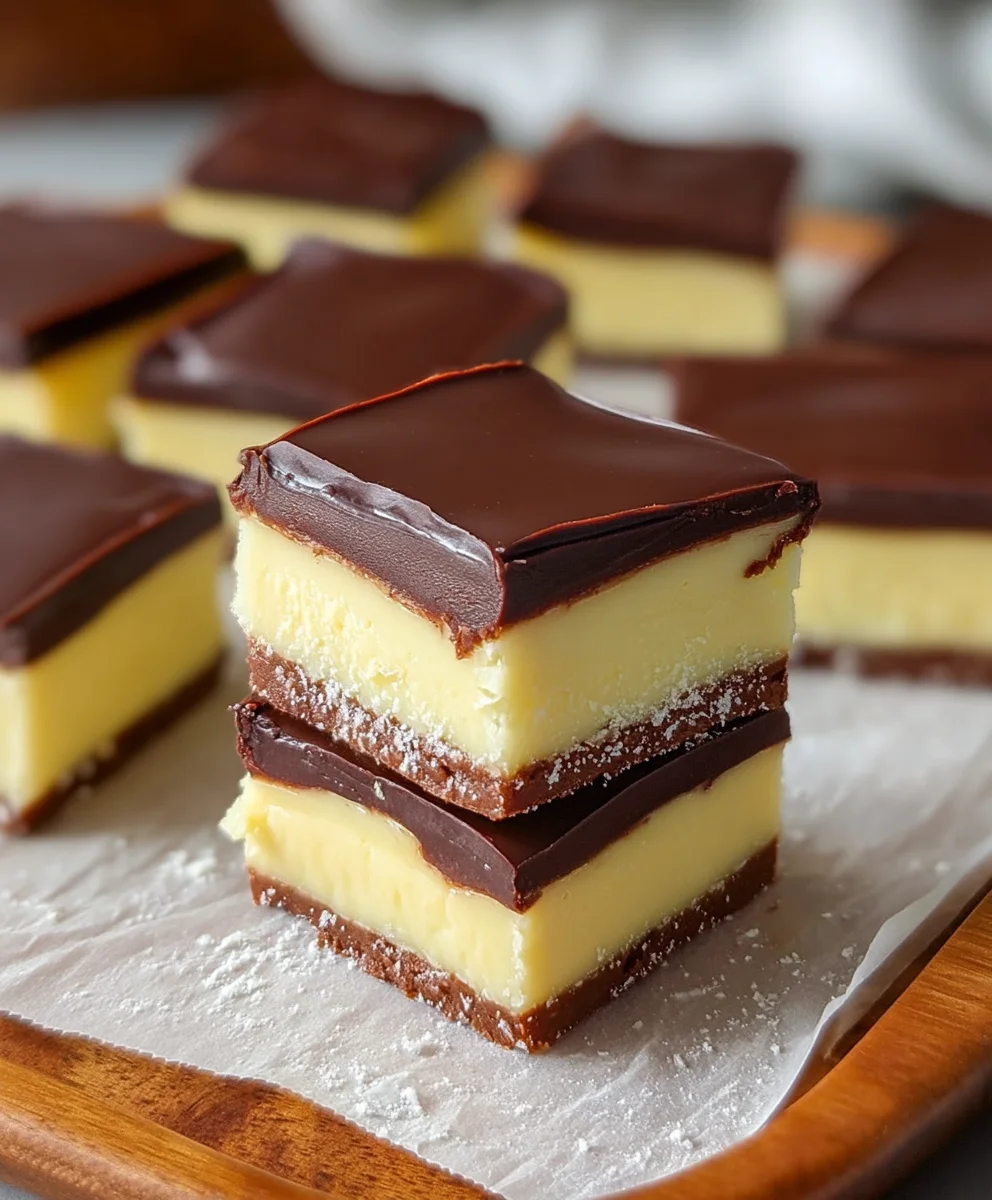
Boston Cream Pie Fudge – what a delightful concept, isn’t it? Imagine taking the quintessential flavors of a beloved American classic and transforming them into a decadent, easy-to-make confection that melts in your mouth. I have always been captivated by the ingenuity of desserts that pay homage to their origins while offering a fresh, exciting experience. This recipe promises an unforgettable journey for your taste buds, delivering all the nostalgic comfort of the traditional dessert in a surprisingly convenient format.
The original Boston Cream Pie, often lauded as Massachusetts’ official state dessert, boasts a fascinating history, originating at Boston’s Omni Parker House Hotel back in 1856. It’s a dessert synonymous with elegant layers of golden sponge cake, velvety custard, and a generous pour of rich chocolate glaze – a true icon of American pastry. This particular fudge recipe brilliantly captures that very essence, distilling the beloved cake’s distinct flavors into a convenient, no-bake square, bringing a piece of that heritage directly to your kitchen.
Why You’ll Adore This Boston Cream Pie Fudge!
People absolutely adore this treat not only for its incredible taste profile – the sweet custard undertones perfectly balanced with the deep chocolate – but also for its wonderfully smooth texture and sheer convenience. It offers all the nostalgic charm of the pie without the need for extensive baking, making this Boston Cream Pie Fudge an ideal candidate for gatherings, gifts, or simply a luxurious personal indulgence. Get ready to create a truly special treat that will impress everyone with its familiar yet innovative appeal!

Ingredients:
- For the Silky Vanilla Bean Custard Filling:
- 1 cup (240ml) whole milk
- ½ cup (120ml) heavy cream
- ½ vanilla bean, split lengthwise and scraped, or 1 ½ teaspoons pure vanilla extract
- 4 large egg yolks
- ⅓ cup (65g) granulated sugar
- 2 tablespoons cornstarch
- Pinch of fine sea salt
- 2 tablespoons (28g) unsalted butter, cut into small pieces, at room temperature
- For the Rich Boston Cream Pie Fudge Base:
- 2 ½ cups (about 425g) good quality white chocolate chips or finely chopped white chocolate bar
- 1 can (14 ounces / 397g) sweetened condensed milk
- 1 cup (226g) unsalted butter
- ¾ cup (150g) granulated sugar
- ½ cup (120ml) whole milk (or half-and-half for extra richness)
- 1 teaspoon pure vanilla extract
- ¼ teaspoon yellow gel food coloring (optional, but gives that classic cake batter look!)
- For the Glossy Chocolate Ganache Topping:
- 1 cup (170g) semi-sweet chocolate chips or finely chopped semi-sweet chocolate
- ½ cup (120ml) heavy cream
- 1 tablespoon (14g) unsalted butter (optional, for extra shine and smooth texture)
Preparing the Decadent Vanilla Bean Custard Filling
- Begin by Infusing the Dairy: In a medium saucepan, I combine the whole milk, heavy cream, and if I’m using a vanilla bean, I’ll add both the scraped seeds and the pod itself. I gently warm this mixture over medium-low heat, just until it begins to simmer around the edges – I don’t want it to boil vigorously. This slow heating allows the vanilla to really infuse its wonderful aroma into the dairy. If I’m using vanilla extract, I’ll hold off and add it later.
- Whisking the Egg Yolk Mixture: While the milk mixture is warming, in a separate medium bowl, I whisk together the four large egg yolks, granulated sugar, cornstarch, and that tiny pinch of sea salt. I whisk them until the mixture is light yellow and creamy, and all the sugar seems dissolved. The cornstarch is my secret weapon here; it helps to thicken the custard beautifully and prevents it from becoming runny, which is absolutely crucial for our multi-layered Boston Cream Pie Fudge.
- Tempering the Egg Yolks: This step is vital to prevent scrambled eggs! Once the milk mixture is warm and fragrant, I carefully ladle about half a cup of the hot milk into the egg yolk mixture, whisking constantly and vigorously. I continue to slowly add another half cup, still whisking. This gradual addition raises the temperature of the egg yolks gently, making them ready for the saucepan without curdling.
- Thickening the Custard: Now, I slowly pour the tempered egg yolk mixture back into the saucepan with the remaining warm milk, stirring continuously with a whisk or a heatproof spatula. I continue to cook this over medium-low heat, still stirring constantly, until the custard thickens significantly. It will coat the back of my spoon, and when I run my finger across the spoon, a clear path should remain. This usually takes about 5-8 minutes. It’s important not to rush this process; patience will be rewarded with a perfectly smooth, luscious custard for our Boston Cream Pie Fudge.
- Finishing and Chilling: Once thickened, I immediately remove the saucepan from the heat. If I used a vanilla bean pod, I’ll take it out now. I then stir in the two tablespoons of unsalted butter and, if I’m using extract instead of a bean, the vanilla extract. The butter adds a wonderful silkiness and richness. I pour the hot custard into a clean, shallow dish or bowl, press a piece of plastic wrap directly onto the surface of the custard to prevent a skin from forming, and pop it into the refrigerator. It needs to chill for at least 3-4 hours, or ideally overnight, until it’s very firm and cold. This firmness is key to layering it successfully in our Boston Cream Pie Fudge.
Crafting the Irresistible Boston Cream Pie Fudge Base
- Prepare Your Pan: Before I start cooking, I always get my pan ready. I line an 8×8 inch (20×20 cm) square baking pan with parchment paper, leaving an overhang on two sides. This overhang acts as “handles,” making it incredibly easy to lift the finished Boston Cream Pie Fudge out of the pan for cutting. A little spray of non-stick cooking spray under the parchment helps it stick better.
- Combine and Cook the Base: In a large, heavy-bottomed saucepan (this is important to prevent scorching!), I combine the unsalted butter, granulated sugar, and ½ cup of whole milk. I place this mixture over medium heat, stirring occasionally with a sturdy spoon or spatula, until the butter is completely melted and the sugar is dissolved. Once dissolved, I increase the heat slightly and bring the mixture to a full, rolling boil. I let it boil for exactly 5 minutes, stirring occasionally. This precise boiling time is important for the texture of our fudge – it helps create that classic, slightly grainy yet melt-in-your-mouth consistency that makes homemade fudge so delightful.
- Adding the Key Ingredients: After the 5 minutes of boiling, I immediately remove the saucepan from the heat. This is where the magic happens! I quickly stir in the good quality white chocolate chips, the entire can of sweetened condensed milk, and the pure vanilla extract. If I’m using the optional yellow gel food coloring, I add it now as well. I stir vigorously and continuously with a wooden spoon or heatproof spatula. The residual heat from the cooked sugar mixture will melt the white chocolate and blend everything into a beautiful, smooth, and creamy fudge. I keep stirring until there are no lumps of white chocolate left and the mixture is perfectly uniform. The yellow food coloring, even just a tiny bit, really helps mimic the appearance of a yellow cake layer, making this truly a Boston Cream Pie Fudge!
- First Layer of Fudge: Once the fudge mixture is smooth and vibrant, I quickly pour exactly half of it into my prepared 8×8-inch pan. I use an offset spatula or the back of a spoon to spread it evenly across the bottom. Speed is key here because fudge sets up quickly as it cools! I then place the pan in the refrigerator for about 15-20 minutes, just until this bottom layer is firm enough to support the custard without it sinking. I don’t want it to be rock hard, just set.
Assembling Your Dreamy Boston Cream Pie Fudge
- Retrieve and Prepare the Custard: While the first layer of fudge is setting, I take my very cold and firm vanilla bean custard out of the refrigerator. It should be quite thick and spoonable. If it feels too stiff, I might give it a quick whisk to loosen it slightly, but I’m careful not to over-whisk and introduce too much air. The goal is a smooth, spreadable consistency.
- Layering the Custard: Once the bottom fudge layer is adequately set, I carefully spoon the entire vanilla bean custard filling over the top of it. I use an offset spatula to gently spread the custard evenly from edge to edge. It’s important to create an even layer, as this is the “cream” part of our Boston Cream Pie Fudge and we want every bite to have that delightful vanilla burst. I try to be gentle so I don’t disturb the bottom fudge layer.
- Adding the Top Fudge Layer: Now for the tricky part – the second layer of fudge! The remaining fudge mixture that’s been sitting in the saucepan might have started to thicken a bit. If it’s too thick to pour, I can gently warm it over very low heat for just a minute or two, stirring constantly, until it becomes pourable again. I then carefully and slowly pour this remaining fudge mixture over the custard layer. I try to pour it as evenly as possible from the start to minimize spreading, which can sometimes push the custard around.
- Smoothing and Chilling: Once the top fudge layer is poured, I use my offset spatula again, very gently, to smooth it out from edge to edge. I work quickly and lightly, trying not to mix it with the custard layer underneath. This creates a beautiful, distinct layered effect. Once smoothed, I return the pan to the refrigerator for at least 3-4 hours, or preferably overnight, until the entire block of Boston Cream Pie Fudge is completely firm and chilled. This is crucial before moving on to the ganache and cutting.
Whipping Up the Silky Chocolate Ganache Topping
- Heating the Cream: In a small, microwave-safe bowl or a very small saucepan, I heat the heavy cream until it’s just simmering or steaming gently, but not boiling vigorously. If using a microwave, I heat it in 30-second intervals, stirring in between, until hot.
- Melting the Chocolate: I place the semi-sweet chocolate chips (or finely chopped chocolate) into a medium heatproof bowl. Once the cream is hot, I immediately pour it over the chocolate chips. I let it sit undisturbed for about 5 minutes. This allows the heat from the cream to really melt the chocolate without scorching.
- Whisking to Perfection: After 5 minutes, I start whisking the cream and chocolate mixture from the center outwards. Slowly but surely, the chocolate will melt into the cream, transforming into a beautiful, glossy, and smooth ganache. If I’m using the optional tablespoon of unsalted butter, I stir it in now until it’s fully incorporated and melted. The butter really adds a luxurious shine and helps create an even smoother texture, enhancing the “pie” aspect of our Boston Cream Pie Fudge.
- Cooling for Optimal Spreading: I allow the ganache to cool at room temperature for about 15-20 minutes, stirring occasionally. It should thicken slightly to a pourable but not runny consistency. This slightly cooled and thickened ganache will spread more easily over the fudge and set nicely without running off the edges or melting the fudge layers underneath.
Finishing and Serving Your Boston Cream Pie Fudge
- Ganache Application: Once the Boston Cream Pie Fudge is completely chilled and firm from the refrigerator, I carefully remove it. I then pour the slightly cooled ganache evenly over the top layer of the fudge. I gently tilt the pan from side to side to help the ganache spread into an even, beautiful layer. Alternatively, I can use an offset spatula to carefully spread it.
- Final Chill for Setting: I return the pan to the refrigerator for another 30-60 minutes, or until the chocolate ganache topping is completely set and firm. This ensures clean cuts and a beautiful presentation for our stunning Boston Cream Pie Fudge.
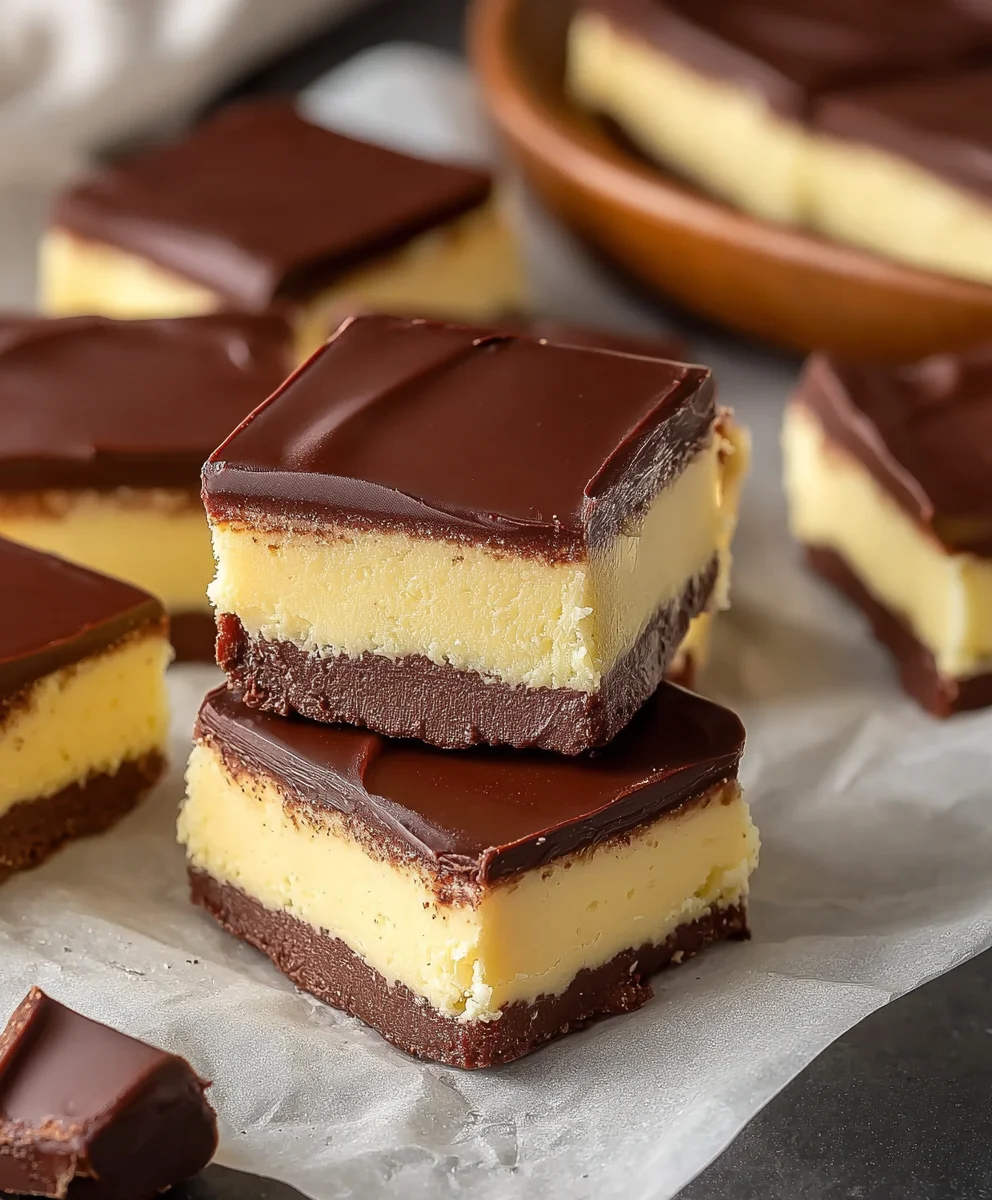
- Cutting and Serving: Once everything is perfectly firm, I use the parchment paper overhangs to carefully lift the entire block of Boston Cream Pie Fudge out of the pan and onto a cutting board. For the neatest slices, I recommend using a large, sharp chef’s knife. I wipe the knife blade clean with a hot, damp cloth after each cut to prevent dragging the layers. I typically cut the fudge into 1-inch or 1.5-inch squares – it’s a rich treat, so a little goes a long way!
- Storage and Enjoyment: Store your delightful Boston Cream Pie Fudge in an airtight container in the refrigerator. It will stay fresh and delicious for up to 1-2 weeks. I find that allowing it to sit at room temperature for about 15 minutes before serving slightly softens the fudge and custard, enhancing its luxurious texture and flavor. This makes it an absolutely perfect treat to share or to savor all on your own. Enjoy every single layer of this incredibly indulgent dessert!
Conclusion:
So there you have it, my friends! We’ve journeyed through the simple yet incredibly rewarding process of creating a truly remarkable dessert. This isn’t just any fudge; it’s a culinary marvel that brings together the best of two beloved worlds. Imagine the tender, fluffy sponge cake of a classic Boston Cream Pie, elevated with that iconic vanilla cream filling and glossy chocolate ganache, all condensed into a decadent, melt-in-your-mouth square of fudge. This is precisely what makes our Boston Cream Pie Fudge an absolute game-changer. It’s the ultimate treat for anyone who adores the rich, custardy notes of the pie but prefers the convenience and intense sweetness of fudge. I can confidently say that once you taste the harmonious blend of creamy vanilla, deep chocolate, and subtle cake-like essence, you’ll understand exactly why this recipe has become one of my personal favorites. It’s incredibly easy to make, requires no baking whatsoever, and yet it delivers a flavor profile that is sophisticated and deeply satisfying. It’s perfect for impressing guests, delighting your family, or simply indulging your own sweet tooth after a long day. The textural contrast, the sweetness, the nostalgic flavors—it all comes together in a way that truly surprises and delights. You get all the comfort and joy of the classic pie without any of the fuss of assembling layers or dealing with a delicate cake. It’s robust, reliable, and utterly delicious every single time.
Trust me, this fudge is a dessert experience you won’t want to miss.
When it comes to serving this magnificent treat, I find that a slight chill from the refrigerator really enhances its firm yet creamy texture. However, don’t be afraid to let it sit at room temperature for a few minutes before serving; it allows the flavors to truly bloom and the chocolate topping to become just slightly softer. For an extra touch of elegance, I often sprinkle a few delicate chocolate shavings on top, or even a tiny dollop of freshly whipped cream if I’m feeling fancy. A maraschino cherry on top of each square would also be a lovely, retro touch, reminiscent of classic diner desserts. These small additions truly elevate the presentation, making each piece look as appealing as it tastes. You could even serve smaller, bite-sized squares on a dessert platter for a party, allowing guests to sample various treats without feeling overwhelmed.
But let’s talk about variations – this is where you can truly make this dessert your own! If you want to lean even more into the ‘cake’ aspect, consider very lightly toasting some crushed vanilla wafers or shortbread cookies and pressing a thin layer into the bottom of your pan before adding the fudge mixture. This creates a delightful crust-like base that adds another layer of texture. For those who love a bit of a coffee kick, a tiny splash of espresso powder dissolved in the milk component of the fudge or a hint of coffee extract can add an incredible depth to the chocolate layer, mimicking the popular coffee-flavored desserts. You could also experiment with different extracts in the vanilla fudge layer; perhaps a touch of almond or even a hint of rum extract for a more grown-up flavor profile. For the chocolate topping, while my recipe uses a classic ganache, feel free to try a milk chocolate version for a sweeter, creamier finish, or even a white chocolate swirl for a visually stunning treat. Imagine a delicate pattern of dark and white chocolate – absolutely beautiful!
This fudge also makes a truly wonderful homemade gift. Pack a few pieces into a decorative tin or box, tie it with a pretty ribbon, and you’ve got a thoughtful, delicious present that will be cherished. It’s perfect for holiday gift-giving, as a hostess gift, or just a sweet surprise for a friend who needs a little pick-me-up. Imagine presenting a box of these exquisite squares during a holiday gathering – they’re sure to be a conversation starter and a definite crowd-pleaser. The versatility of this recipe means you can tailor it to specific occasions or preferences, making it an even more personal gift. I’ve found that serving them alongside a strong cup of coffee or a glass of cold milk truly brings out the best in their rich, decadent qualities, creating a perfect pairing for any time of day. The possibilities are truly endless, and each small tweak can lead to a whole new level of enjoyment and admiration from anyone lucky enough to try a piece.
Now, here’s my sincere plea: don’t just read about this incredible dessert – go make it! I promise you, the process is far simpler than you might imagine, and the payoff is absolutely worth every single moment. You’ll be so proud of what you create, and your taste buds will thank you for the delightful journey.
I genuinely believe this Boston Cream Pie Fudge is a recipe that deserves a permanent spot in your repertoire.
It’s that good. Once you’ve whipped up your own batch, and perhaps even put your unique spin on it with one of my suggested variations or your own creative ideas, I would be absolutely thrilled to hear all about your experience. Did you love it as much as I do? Did you make any fun changes? What did your friends and family think? Your insights and culinary adventures are what make cooking and baking so much fun for me!
Please, don’t hesitate to share your thoughts, your successes, and even any questions you might have. Your feedback is incredibly valuable to me, and it helps our little community of dessert lovers grow. I love seeing your creations, so if you take a picture, tag me or leave a comment on the blog! Let’s inspire each other with our sweet endeavors. There’s something truly special about sharing the joy of homemade treats, and this fudge is definitely designed for sharing. Whether you bring it to a potluck, serve it at a birthday party, or simply enjoy a quiet moment with a piece and a cup of tea, you’re not just eating dessert – you’re creating memories. So, gather your ingredients, set aside a little time, and prepare to be utterly charmed by this fantastic Boston Cream Pie Fudge. Happy fudging!
Boston Cream Pie Fudge
Decadent, easy-to-make fudge capturing the beloved flavors of traditional Boston Cream Pie – golden sponge cake, velvety custard, and rich chocolate glaze – in a convenient, no-bake square.
Ingredients
-
1 cup (240ml) whole milk
-
½ cup (120ml) heavy cream
-
½ vanilla bean (scraped) or 1 ½ tsp pure vanilla extract
-
4 large egg yolks
-
⅓ cup (65g) granulated sugar
-
2 tbsp cornstarch
-
Pinch sea salt
-
2 tbsp (28g) unsalted butter
-
2 ½ cups (425g) white chocolate chips or chopped white chocolate
-
1 can (14 oz / 397g) sweetened condensed milk
-
1 cup (226g) unsalted butter
-
¾ cup (150g) granulated sugar
-
½ cup (120ml) whole milk (or half-and-half)
-
1 tsp pure vanilla extract
-
¼ tsp yellow gel food coloring (optional)
-
1 cup (170g) semi-sweet chocolate chips or chopped semi-sweet chocolate
-
½ cup (120ml) heavy cream
-
1 tbsp (14g) unsalted butter (optional)
Instructions
-
Step 1
Combine 1 cup milk, ½ cup heavy cream, and vanilla bean (if using) in a saucepan. Warm over medium-low heat until simmering. -
Step 2
In a separate bowl, whisk egg yolks, ⅓ cup sugar, cornstarch, and salt until light yellow. -
Step 3
Gradually ladle about 1 cup of hot milk mixture into egg yolks, whisking constantly. -
Step 4
Pour tempered egg mixture back into the saucepan. Cook over medium-low heat, stirring constantly, 5-8 minutes, until thickened and coats the back of a spoon. -
Step 5
Remove from heat. Remove vanilla bean pod. Stir in 2 tbsp butter and vanilla extract (if using). Pour custard into a shallow dish, cover surface directly with plastic wrap, and chill 3-4 hours or overnight until firm. -
Step 6
Line an 8×8 inch (20×20 cm) baking pan with parchment paper, leaving an overhang. -
Step 7
In a large saucepan, combine 1 cup butter, ¾ cup sugar, and ½ cup milk. Heat over medium heat, stirring, until butter melts and sugar dissolves. Bring to a rolling boil and boil for exactly 5 minutes, stirring occasionally. -
Step 8
Remove from heat. Stir in white chocolate chips, sweetened condensed milk, 1 tsp vanilla extract, and optional yellow food coloring until smooth and uniform. -
Step 9
Quickly pour half of the fudge mixture into the prepared pan. Spread evenly and chill for 15-20 minutes until set. -
Step 10
Once the bottom fudge layer is set, gently spread the chilled, firm custard evenly over it. -
Step 11
If necessary, gently rewarm remaining fudge mixture to a pourable consistency. Carefully pour and spread it over the custard layer, smoothing gently. -
Step 12
Return pan to the refrigerator for 3-4 hours or overnight, until completely firm. -
Step 13
Heat ½ cup heavy cream in a small saucepan or microwave-safe bowl until simmering. -
Step 14
Place semi-sweet chocolate chips in a heatproof bowl. Pour hot cream over chocolate and let sit 5 minutes. -
Step 15
Whisk from the center outwards until smooth and glossy. Stir in optional 1 tbsp butter until melted. -
Step 16
Let ganache cool at room temperature for 15-20 minutes, stirring occasionally, until slightly thickened but pourable. -
Step 17
Pour cooled ganache over the chilled fudge. Gently tilt pan or spread with a spatula to create an even layer. -
Step 18
Return to refrigerator for 30-60 minutes until ganache is set. -
Step 19
Lift fudge from pan using parchment overhangs. Cut into 1-1.5 inch squares with a hot, damp knife. -
Step 20
Store in an airtight container in the refrigerator for up to 1-2 weeks. For best texture, let sit at room temperature for 15 minutes before serving.
Important Information
Nutrition Facts (Per Serving)
It is important to consider this information as approximate and not to use it as definitive health advice.
Allergy Information
Please check ingredients for potential allergens and consult a health professional if in doubt.

Leave a Comment