
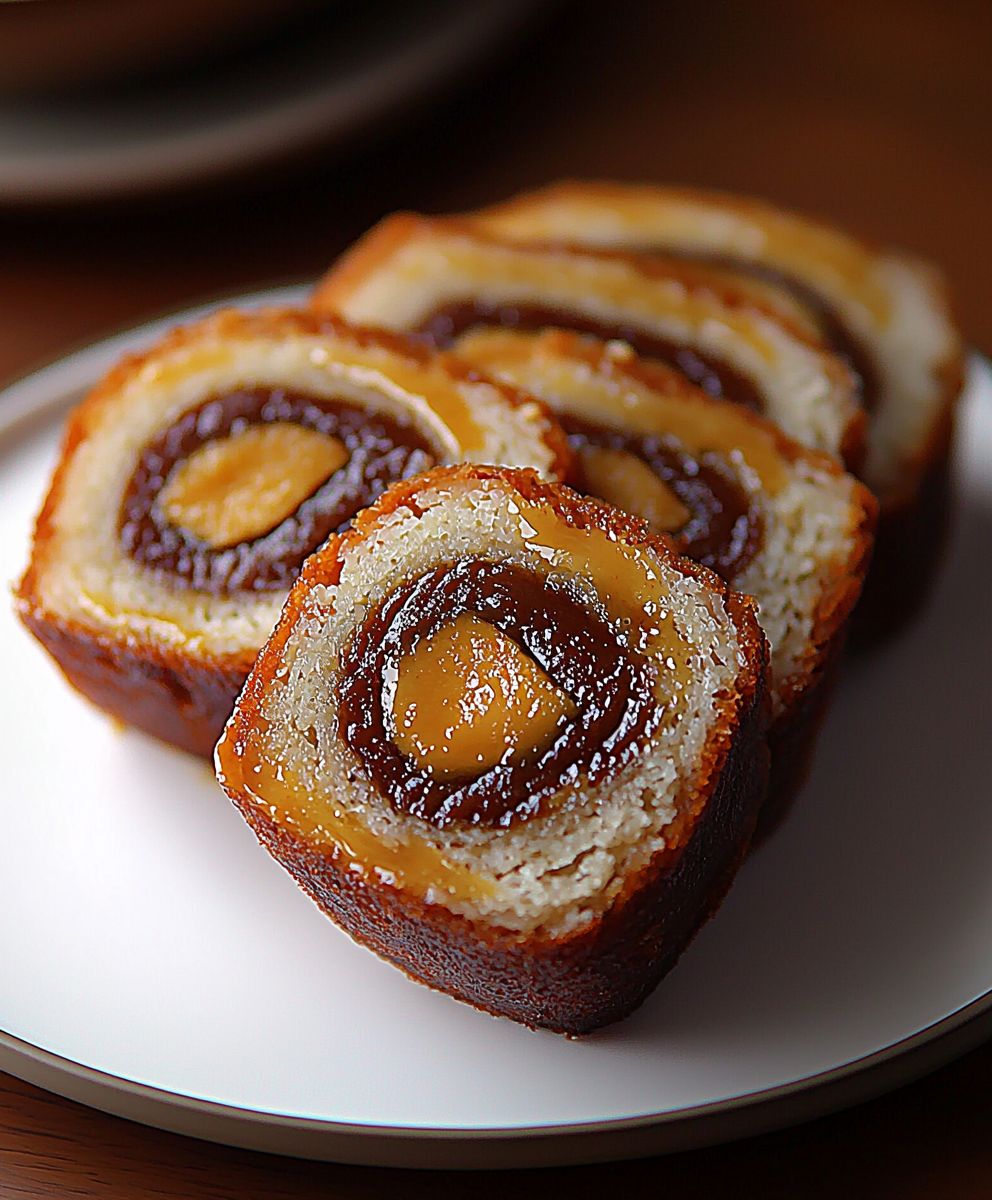
Buckeye Roll Candy: Prepare to be transported back to childhood with this irresistible treat! Imagine the perfect marriage of creamy peanut butter and rich chocolate, all rolled into a bite-sized piece of pure bliss. This isn’t just candy; it’s a nostalgic trip down memory lane, evoking images of cozy kitchens and holiday gatherings.
While the exact origins of Buckeye candies are debated, they are undeniably linked to the state of Ohio, nicknamed the “Buckeye State.” The candy’s resemblance to the buckeye nut, the state’s official tree nut, is unmistakable. The smooth, peanut butter center peeking out from beneath a chocolate coating mirrors the nut’s appearance, making it a beloved symbol of Ohioan pride. It’s a sweet treat with a touch of local history!
What makes Buckeye Roll Candy so universally adored? It’s the delightful combination of textures and flavors. The smooth, melt-in-your-mouth peanut butter filling contrasts beautifully with the slightly firm, decadent chocolate shell. The salty-sweet balance is simply addictive, and the small size makes them perfect for popping one (or several!) into your mouth. Plus, they are surprisingly easy to make at home, making them a fantastic option for homemade gifts or a fun family activity. Get ready to experience a taste of pure happiness!

Ingredients:
- 1 1/2 cups creamy peanut butter
- 1 cup (2 sticks) unsalted butter, softened
- 6 cups powdered sugar, plus more for dusting
- 1 teaspoon vanilla extract
- 1/4 teaspoon salt
- 12 ounces semi-sweet chocolate chips
- 2 tablespoons shortening (vegetable or coconut oil)
Preparing the Peanut Butter Filling:
Alright, let’s get started with the heart of our Buckeye Rolls: the peanut butter filling! This is where the magic happens, and trust me, it’s incredibly easy. The key is to have your butter properly softened not melted, but nice and pliable. This will ensure a smooth and creamy filling that’s a dream to work with.
- Cream the Butter and Peanut Butter: In a large bowl, using an electric mixer (either a stand mixer or a hand mixer), cream together the softened butter and peanut butter until they are light and fluffy. This usually takes about 2-3 minutes. Don’t rush this step; you want them fully combined for the best texture. Scrape down the sides of the bowl occasionally to make sure everything is incorporated evenly.
- Add Vanilla and Salt: Now, add the vanilla extract and salt to the mixture. Mix until just combined. The vanilla enhances the peanut butter flavor, and the salt balances the sweetness.
- Gradually Add the Powdered Sugar: This is where you need a little patience. Gradually add the powdered sugar, one cup at a time, mixing on low speed after each addition. This prevents a powdered sugar explosion in your kitchen (trust me, you don’t want that!). After each cup is added, scrape down the sides of the bowl to ensure everything is mixing evenly.
- Adjust Consistency: After adding all the powdered sugar, the mixture might seem a little dry. If it does, add a tablespoon of milk or water at a time until the dough comes together and is easy to handle. You want a consistency that’s firm enough to roll but not so dry that it crumbles. If the mixture is too sticky, add a little more powdered sugar, a tablespoon at a time. Remember, you can always add more, but it’s harder to take away!
- Chill the Dough: Wrap the peanut butter dough in plastic wrap and refrigerate for at least 30 minutes. This chilling time is crucial! It allows the dough to firm up, making it much easier to roll into logs. If you skip this step, you’ll end up with a sticky mess. You can chill it for longer, even overnight, if you need to prep ahead.
Forming the Buckeye Rolls:
Okay, the peanut butter filling is chilled and ready to go! Now comes the fun part: shaping our Buckeye Rolls. This is where you get to be a little creative and make them your own. Don’t worry about perfection; even if they’re not perfectly uniform, they’ll still taste amazing!
- Prepare Your Work Surface: Lightly dust your work surface with powdered sugar. This will prevent the peanut butter dough from sticking. You can use a silicone mat, parchment paper, or even just a clean countertop.
- Divide the Dough: Remove the chilled peanut butter dough from the refrigerator and divide it in half. This makes it easier to work with. Keep the other half wrapped in plastic wrap while you’re working with the first half to prevent it from drying out.
- Roll into a Log: On the prepared surface, gently roll one half of the dough into a log about 1 inch in diameter. Try to keep the log as even as possible in thickness. If it starts to stick, add a little more powdered sugar to your work surface.
- Cut into Pieces: Using a sharp knife, cut the log into 1-inch pieces. You should get quite a few pieces from each log.
- Shape into Ovals: Gently roll each piece into an oval shape. You can make them as long or as short as you like, depending on your preference. I like mine to be about 2-3 inches long. Place the shaped ovals on a baking sheet lined with parchment paper or a silicone mat.
- Repeat: Repeat steps 3-5 with the remaining half of the peanut butter dough.
- Chill Again: Once all the Buckeye Rolls are shaped, place the baking sheet in the freezer for at least 15 minutes. This will help them firm up even more before dipping them in chocolate. This step is important because it prevents the peanut butter from melting into the chocolate.
Dipping in Chocolate:
The grand finale! Dipping the Buckeye Rolls in chocolate is what transforms them from simple peanut butter ovals into decadent treats. The key here is to melt the chocolate smoothly and evenly, and to work quickly so the chocolate doesn’t harden before you’re finished dipping.
- Melt the Chocolate: In a heat-safe bowl set over a saucepan of simmering water (make sure the bottom of the bowl doesn’t touch the water), melt the semi-sweet chocolate chips and shortening, stirring occasionally until smooth. The shortening helps to thin the chocolate and gives it a nice shine. You can also melt the chocolate in the microwave in 30-second intervals, stirring in between, until smooth. Be careful not to overheat the chocolate, as it can seize up.
- Prepare Your Dipping Station: Line a baking sheet with parchment paper or a silicone mat. This is where you’ll place the dipped Buckeye Rolls to set.
- Dip the Buckeye Rolls: Remove the chilled Buckeye Rolls from the freezer. Using a fork or dipping tools, dip each roll into the melted chocolate, leaving a small portion of the peanut butter exposed at the top. This is what gives them their signature “Buckeye” look.
- Remove Excess Chocolate: Gently tap the fork or dipping tool against the side of the bowl to remove any excess chocolate.
- Place on Baking Sheet: Place the dipped Buckeye Roll on the prepared baking sheet.
- Repeat: Repeat steps 3-5 with the remaining Buckeye Rolls.
- Chill to Set: Place the baking sheet in the refrigerator for at least 30 minutes, or until the chocolate is completely set. This will ensure that the chocolate is firm and doesn’t melt when you handle the Buckeye Rolls.
Storage:
Once the chocolate is set, your Buckeye Rolls are ready to be enjoyed! But if you’re not planning on eating them all right away (which is totally understandable!), here’s how to store them to keep them fresh and delicious.
- Refrigerate: Store the Buckeye Rolls in an airtight container in the refrigerator for up to 2 weeks. This will prevent the peanut butter filling from becoming too soft.
- Freeze: For longer storage, you can freeze the Buckeye Rolls in an airtight container for up to 2 months. Thaw them in the refrigerator before serving.
Enjoy your homemade Buckeye Rolls! They’re perfect for parties, holidays, or just a sweet treat any time of day. And remember, don’t be afraid to experiment with different types of chocolate or add-ins to make them your own. Happy baking!
Conclusion:
This Buckeye Roll Candy recipe isn’t just another sweet treat; it’s a nostalgic trip down memory lane and a guaranteed crowd-pleaser all rolled into one delicious package. The creamy peanut butter center, perfectly balanced with the rich chocolate coating, creates a symphony of flavors that will have everyone reaching for seconds (and maybe thirds!). I truly believe this is a must-try recipe for anyone who loves the classic combination of peanut butter and chocolate, and especially for those looking for a fun and easy candy to make at home. Why is it a must-try? Because it’s simple, satisfying, and utterly addictive! Forget complicated candy-making processes; this recipe uses readily available ingredients and requires minimal effort. Plus, the results are far superior to anything you’ll find on store shelves. The homemade touch makes all the difference, allowing you to control the sweetness and peanut butter intensity to perfectly suit your taste. It’s also a fantastic activity to do with kids they’ll love rolling the peanut butter mixture and dipping it in chocolate (just be prepared for some sticky fingers!). But the best part? The versatility! While the classic Buckeye Roll Candy is divine on its own, there are so many ways to customize it and make it your own signature treat.Serving Suggestions and Variations:
* Elevate the Chocolate: Experiment with different types of chocolate. Dark chocolate adds a sophisticated bitterness, while milk chocolate provides a classic sweetness. You could even try using white chocolate for a unique twist! * Add a Crunch: Incorporate chopped nuts, like peanuts, pecans, or walnuts, into the peanut butter mixture for added texture and flavor. * Spice it Up: A pinch of cayenne pepper in the peanut butter mixture adds a subtle kick that complements the sweetness beautifully. * Make it Festive: Decorate the finished rolls with sprinkles, edible glitter, or a drizzle of melted white chocolate for a holiday-themed treat. * Individual Bites: Instead of a roll, form the peanut butter mixture into small balls and dip them in chocolate for individual Buckeye bites. Perfect for parties or a quick snack! * Peanut Butter Variety: Use crunchy peanut butter instead of creamy for a different texture. You can also use different types of nut butter, like almond or cashew butter, for a unique flavor profile. * Vegan Option: Substitute the butter with vegan butter and use dairy-free chocolate to make this recipe completely vegan-friendly. I’m so excited for you to try this recipe and experience the joy of homemade Buckeye Roll Candy. It’s a guaranteed winner for holiday gatherings, potlucks, or simply a sweet treat to enjoy any time of year. So, gather your ingredients, put on some music, and get ready to create some delicious memories. Don’t be afraid to experiment with the variations and make it your own. Once you’ve made your batch, I’d love to hear about your experience! Share your photos and stories in the comments below. Let me know what variations you tried and how they turned out. Happy baking (or rather, candy-making)! I can’t wait to see what you create! PrintBuckeye Roll Candy: A Deliciously Addictive Treat

Creamy peanut butter filling dipped in rich chocolate, these Buckeye Rolls are a classic treat that’s easy to make and impossible to resist!
- Prep Time: 30 minutes
- Cook Time: 15 minutes
- Total Time: 75 minutes
- Yield: 48 Buckeye Rolls 1x
Ingredients
- 1 1/2 cups creamy peanut butter
- 1 cup (2 sticks) unsalted butter, softened
- 6 cups powdered sugar, plus more for dusting
- 1 teaspoon vanilla extract
- 1/4 teaspoon salt
- 12 ounces semi-sweet chocolate chips
- 2 tablespoons shortening (vegetable or coconut oil)
Instructions
- In a large bowl, cream together the softened butter and peanut butter with an electric mixer until light and fluffy (2-3 minutes). Scrape down the sides of the bowl as needed.
- Add vanilla extract and salt. Mix until just combined.
- Gradually add the powdered sugar, one cup at a time, mixing on low speed after each addition. Scrape down the sides of the bowl.
- If the mixture is too dry, add a tablespoon of milk or water at a time until the dough comes together. If it’s too sticky, add a little more powdered sugar, a tablespoon at a time.
- Wrap the peanut butter dough in plastic wrap and refrigerate for at least 30 minutes.
- Lightly dust your work surface with powdered sugar.
- Remove the chilled peanut butter dough from the refrigerator and divide it in half. Keep the other half wrapped.
- Roll one half of the dough into a log about 1 inch in diameter.
- Cut the log into 1-inch pieces.
- Gently roll each piece into an oval shape. Place the shaped ovals on a baking sheet lined with parchment paper or a silicone mat.
- Repeat steps 3-5 with the remaining half of the peanut butter dough.
- Place the baking sheet in the freezer for at least 15 minutes.
- In a heat-safe bowl set over a saucepan of simmering water (or in the microwave in 30-second intervals), melt the semi-sweet chocolate chips and shortening, stirring occasionally until smooth.
- Line a baking sheet with parchment paper or a silicone mat.
- Remove the chilled Buckeye Rolls from the freezer. Using a fork or dipping tools, dip each roll into the melted chocolate, leaving a small portion of the peanut butter exposed at the top.
- Gently tap the fork or dipping tool against the side of the bowl to remove any excess chocolate.
- Place the dipped Buckeye Roll on the prepared baking sheet.
- Repeat steps 3-5 with the remaining Buckeye Rolls.
- Place the baking sheet in the refrigerator for at least 30 minutes, or until the chocolate is completely set.
Notes
- Make sure the butter is properly softened, not melted, for the filling.
- Add powdered sugar gradually to avoid a mess.
- Chilling the dough is crucial for easy handling.
- Freezing the shaped rolls before dipping prevents the peanut butter from melting into the chocolate.
- Store in an airtight container in the refrigerator for up to 2 weeks or freeze for up to 2 months.
Leave a Comment