
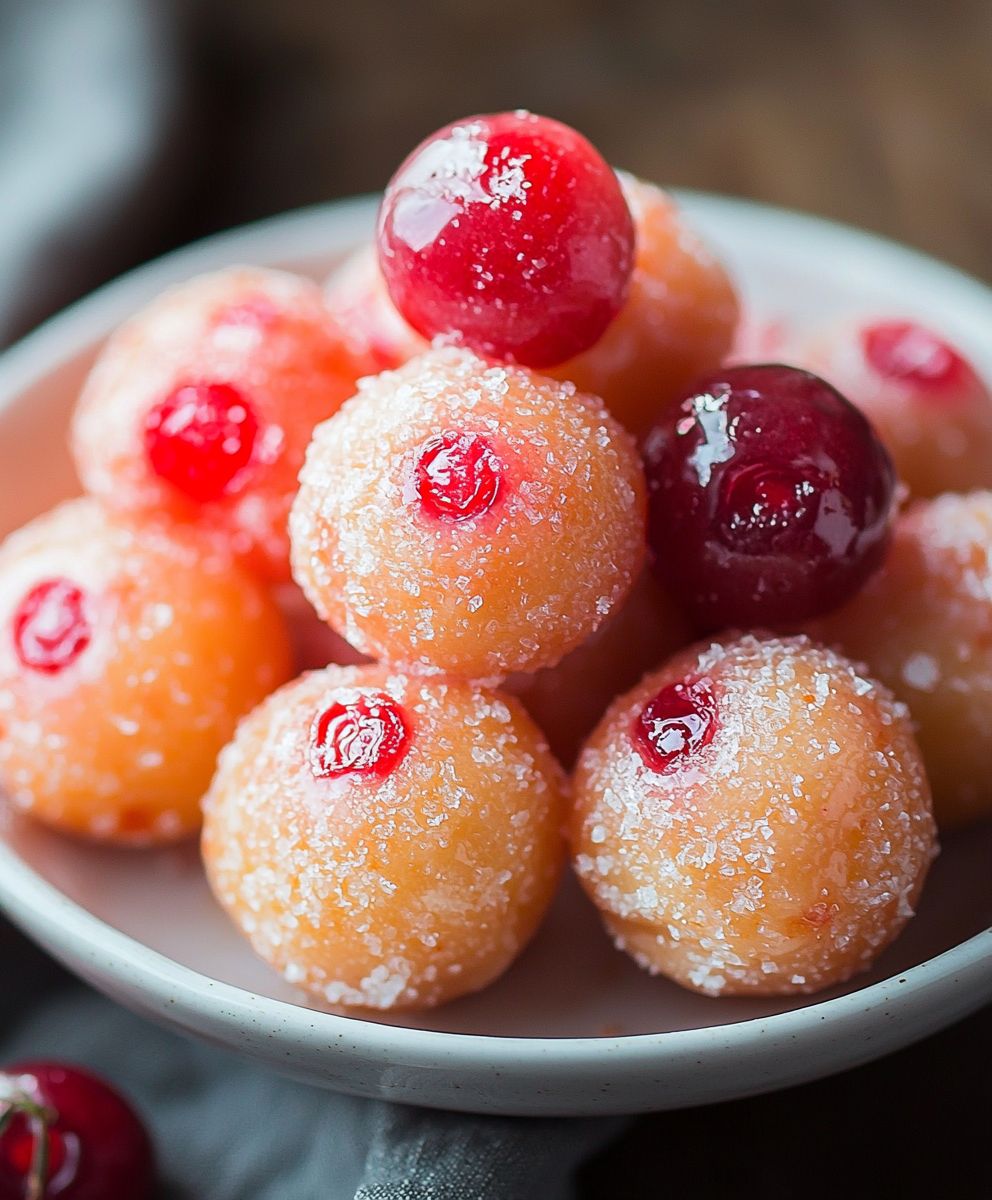
Cherry doughnut holes: bite-sized bursts of joy that are impossible to resist! Imagine sinking your teeth into a perfectly golden, slightly crisp exterior, giving way to a soft, pillowy interior bursting with the sweet and tangy flavor of cherries. Are you ready to experience this delightful treat?
While the exact origins of doughnut holes are debated, they’ve become a beloved part of doughnut culture worldwide. Some say they were a resourceful way to use the dough removed from the center of ring doughnuts, while others believe they were created to ensure even cooking. Regardless of their history, these little morsels have earned their place as a classic indulgence.
What makes cherry doughnut holes so irresistible? It’s a combination of factors! The convenient, poppable size makes them perfect for snacking on the go or sharing with friends and family. The combination of the fried dough, the sweet cherry flavor, and a dusting of sugar creates a symphony of textures and tastes that’s simply addictive. Plus, who can resist the nostalgic charm of a classic doughnut shop treat? Get ready to bake a batch of these delightful treats and experience the magic for yourself!

Ingredients:
- For the Doughnut Holes:
- 2 1/4 cups (281g) all-purpose flour, plus more for dusting
- 1/4 cup (50g) granulated sugar
- 1 teaspoon baking powder
- 1/2 teaspoon baking soda
- 1/4 teaspoon salt
- 1/2 cup (120ml) buttermilk, cold
- 1 large egg
- 2 tablespoons (30g) unsalted butter, melted and cooled
- 1 teaspoon vanilla extract
- 1/2 cup (about 4 ounces) fresh or frozen (thawed and patted dry) sweet cherries, pitted and chopped
- For the Cherry Glaze:
- 2 cups (240g) powdered sugar
- 1/4 cup (60ml) milk, plus more as needed
- 1/4 teaspoon almond extract (optional, but enhances the cherry flavor!)
- 1/4 cup (about 2 ounces) fresh or frozen (thawed and patted dry) sweet cherries, pitted and finely chopped, for color and flavor
- Red food coloring (optional, for a more vibrant color)
- For Frying:
- Vegetable oil, for frying (about 4-6 cups, depending on your pot)
Preparing the Doughnut Holes
- Combine Dry Ingredients: In a large bowl, whisk together the flour, sugar, baking powder, baking soda, and salt. Make sure everything is evenly distributed this helps the doughnut holes rise properly.
- Combine Wet Ingredients: In a separate bowl, whisk together the buttermilk, egg, melted butter, and vanilla extract. Don’t overheat the butter, or it might cook the egg!
- Combine Wet and Dry: Pour the wet ingredients into the dry ingredients and stir until just combined. Be careful not to overmix! Overmixing develops the gluten in the flour, which can make the doughnut holes tough. A few streaks of flour are okay.
- Fold in Cherries: Gently fold in the chopped cherries. Make sure they’re evenly distributed throughout the dough. If you’re using frozen cherries, make sure they’re well-drained and patted dry to avoid adding excess moisture to the dough.
- Chill the Dough: Cover the bowl with plastic wrap and refrigerate the dough for at least 30 minutes, or up to 2 hours. Chilling the dough makes it easier to handle and prevents the doughnut holes from spreading too much during frying. This is a crucial step, so don’t skip it!
Shaping and Frying the Doughnut Holes
- Prepare for Frying: Pour the vegetable oil into a deep, heavy-bottomed pot or Dutch oven. You’ll want the oil to be at least 3 inches deep. Attach a deep-fry thermometer to the side of the pot to monitor the oil temperature. Heat the oil over medium heat to 350°F (175°C). Maintaining the correct oil temperature is essential for perfectly cooked doughnut holes. If the oil is too hot, they’ll brown too quickly on the outside and be raw on the inside. If it’s too cold, they’ll absorb too much oil and be greasy.
- Prepare a Work Surface: While the oil is heating, line a baking sheet with paper towels. This is where you’ll place the fried doughnut holes to drain excess oil.
- Shape the Doughnut Holes: Lightly flour your hands and a clean work surface. Scoop out a spoonful of dough (about 1 tablespoon) and gently roll it into a ball. You can also use a small cookie scoop for more uniform doughnut holes. Place the shaped doughnut holes on a lightly floured plate or baking sheet. Work in batches to avoid overcrowding.
- Fry the Doughnut Holes: Carefully drop a few doughnut holes into the hot oil, being careful not to overcrowd the pot. Overcrowding will lower the oil temperature and result in greasy doughnut holes. Fry for 2-3 minutes per side, or until golden brown and cooked through. Use a slotted spoon or spider to turn the doughnut holes occasionally to ensure even cooking.
- Drain the Doughnut Holes: Remove the fried doughnut holes from the oil with a slotted spoon or spider and place them on the prepared baking sheet lined with paper towels to drain excess oil.
- Repeat: Repeat the shaping and frying process with the remaining dough, working in batches. Make sure to monitor the oil temperature and adjust the heat as needed to maintain 350°F (175°C).
Preparing the Cherry Glaze
- Combine Ingredients: In a medium bowl, whisk together the powdered sugar, milk, and almond extract (if using). Start with the 1/4 cup of milk and add more, 1 tablespoon at a time, until the glaze reaches a smooth, pourable consistency. You want it to be thick enough to coat the doughnut holes but thin enough to drip slightly.
- Add Cherry Flavor and Color: Stir in the finely chopped cherries. If you want a more vibrant pink or red color, add a drop or two of red food coloring. Be careful not to add too much, as it can easily overpower the flavor.
- Adjust Consistency: If the glaze is too thick, add a little more milk. If it’s too thin, add a little more powdered sugar.
Glazing the Doughnut Holes
- Glaze While Warm: For the best results, glaze the doughnut holes while they are still slightly warm. This allows the glaze to adhere better and creates a nice, glossy finish.
- Dip or Drizzle: You can either dip the doughnut holes directly into the glaze or drizzle the glaze over them. For dipping, simply hold a doughnut hole over the bowl of glaze and spoon the glaze over it, allowing the excess to drip off. For drizzling, use a spoon or fork to drizzle the glaze over the doughnut holes.
- Let Set: Place the glazed doughnut holes on a wire rack to allow the glaze to set completely. This usually takes about 15-20 minutes.
- Enjoy! Once the glaze is set, the cherry doughnut holes are ready to enjoy! They’re best served fresh, but they can be stored in an airtight container at room temperature for up to 2 days.
Conclusion:
So, there you have it! These cherry doughnut holes are more than just a sweet treat; they’re a burst of sunshine in every bite, a little pocket of happiness you can whip up in your own kitchen. I truly believe this recipe is a must-try for anyone who loves the comforting taste of doughnuts with a delightful fruity twist. The combination of the soft, pillowy dough, the sweet-tart cherries, and that irresistible glaze is simply divine.
But why should you *really* try this recipe? Because it’s surprisingly easy! Don’t let the word “doughnut” intimidate you. This recipe is designed for home bakers of all skill levels. Plus, the satisfaction of making your own doughnuts from scratch is unparalleled. Imagine the look on your family’s faces when you present them with a warm batch of these beauties!
And the best part? You can totally customize them to your liking!
Serving Suggestions and Variations:
* For a classic touch: Serve them warm with a glass of cold milk or a steaming cup of coffee.
* Elevate the experience: Drizzle them with melted white chocolate and sprinkle with chopped pistachios.
* Make it a sundae: Crumble the doughnut holes over vanilla ice cream and top with hot fudge sauce and whipped cream.
* Get creative with the glaze: Experiment with different flavors like lemon, raspberry, or even a hint of almond extract.
* Add some spice: A pinch of cinnamon or nutmeg in the dough will add a warm, comforting flavor.
* Go nuts: Roll the glazed doughnut holes in chopped nuts, shredded coconut, or sprinkles for added texture and visual appeal.
* Cherry variations: If you’re feeling adventurous, try using different types of cherries, like Rainier cherries for a sweeter flavor or sour cherries for a more intense tang. You could even use a cherry jam filling for an extra burst of cherry goodness inside!
* Doughnut Hole Skewers: Thread the doughnut holes onto skewers with fresh cherries and other fruits for a fun and festive presentation. Perfect for parties!
* Mini Cherry Doughnut Hole Parfaits: Layer the doughnut holes with yogurt, granola, and fresh cherries in small glasses for a delicious and healthy breakfast or snack.
I’m confident that once you try this recipe, it will become a new favorite in your household. It’s perfect for breakfast, brunch, dessert, or even a late-night snack. They’re also a fantastic treat to bring to potlucks, parties, or any gathering where you want to impress your friends and family with your baking skills.
So, what are you waiting for? Gather your ingredients, preheat your oven (or get your fryer ready!), and get ready to embark on a delicious doughnut-making adventure. I promise you won’t regret it!
And most importantly, I want to hear about your experience! Did you try the recipe? Did you make any variations? What did you think? Share your photos, comments, and feedback in the comments section below. I can’t wait to see your creations and hear your stories. Happy baking, and enjoy these delightful cherry doughnut holes!
Cherry Doughnut Holes: A Delicious & Easy Recipe
Soft, fluffy cherry doughnut holes bursting with sweet cherry flavor and topped with a vibrant cherry glaze. The perfect homemade treat!
Ingredients
- 2 1/4 cups (281g) all-purpose flour, plus more for dusting
- 1/4 cup (50g) granulated sugar
- 1 teaspoon baking powder
- 1/2 teaspoon baking soda
- 1/4 teaspoon salt
- 1/2 cup (120ml) buttermilk, cold
- 1 large egg
- 2 tablespoons (30g) unsalted butter, melted and cooled
- 1 teaspoon vanilla extract
- 1/2 cup (about 4 ounces) fresh or frozen (thawed and patted dry) sweet cherries, pitted and chopped
- 2 cups (240g) powdered sugar
- 1/4 cup (60ml) milk, plus more as needed
- 1/4 teaspoon almond extract (optional, but enhances the cherry flavor!)
- 1/4 cup (about 2 ounces) fresh or frozen (thawed and patted dry) sweet cherries, pitted and finely chopped, for color and flavor
- Red food coloring (optional, for a more vibrant color)
- Vegetable oil, for frying (about 4-6 cups, depending on your pot)
Instructions
- Combine Dry Ingredients: In a large bowl, whisk together the flour, sugar, baking powder, baking soda, and salt.
- Combine Wet Ingredients: In a separate bowl, whisk together the buttermilk, egg, melted butter, and vanilla extract.
- Combine Wet and Dry: Pour the wet ingredients into the dry ingredients and stir until just combined. Be careful not to overmix.
- Fold in Cherries: Gently fold in the chopped cherries.
- Chill the Dough: Cover the bowl with plastic wrap and refrigerate the dough for at least 30 minutes, or up to 2 hours.
- Prepare for Frying: Pour the vegetable oil into a deep, heavy-bottomed pot or Dutch oven. Heat the oil over medium heat to 350°F (175°C).
- Prepare a Work Surface: Line a baking sheet with paper towels.
- Shape the Doughnut Holes: Lightly flour your hands and a clean work surface. Scoop out a spoonful of dough (about 1 tablespoon) and gently roll it into a ball. Place the shaped doughnut holes on a lightly floured plate or baking sheet.
- Fry the Doughnut Holes: Carefully drop a few doughnut holes into the hot oil, being careful not to overcrowd the pot. Fry for 2-3 minutes per side, or until golden brown and cooked through. Use a slotted spoon or spider to turn the doughnut holes occasionally to ensure even cooking.
- Drain the Doughnut Holes: Remove the fried doughnut holes from the oil with a slotted spoon or spider and place them on the prepared baking sheet lined with paper towels to drain excess oil.
- Repeat: Repeat the shaping and frying process with the remaining dough, working in batches. Make sure to monitor the oil temperature and adjust the heat as needed to maintain 350°F (175°C).
- Combine Glaze Ingredients: In a medium bowl, whisk together the powdered sugar, milk, and almond extract (if using). Start with the 1/4 cup of milk and add more, 1 tablespoon at a time, until the glaze reaches a smooth, pourable consistency.
- Add Cherry Flavor and Color: Stir in the finely chopped cherries. If you want a more vibrant pink or red color, add a drop or two of red food coloring.
- Adjust Consistency: If the glaze is too thick, add a little more milk. If it’s too thin, add a little more powdered sugar.
- Glaze While Warm: For the best results, glaze the doughnut holes while they are still slightly warm.
- Dip or Drizzle: You can either dip the doughnut holes directly into the glaze or drizzle the glaze over them.
- Let Set: Place the glazed doughnut holes on a wire rack to allow the glaze to set completely. This usually takes about 15-20 minutes.
- Enjoy!: Once the glaze is set, the cherry doughnut holes are ready to enjoy! They’re best served fresh, but they can be stored in an airtight container at room temperature for up to 2 days.
Notes
- Chilling the dough is crucial for easier handling and prevents spreading during frying.
- Maintaining the correct oil temperature (350°F/175°C) is essential for perfectly cooked doughnut holes.
- Don’t overcrowd the pot when frying, as it will lower the oil temperature.
- Glaze the doughnut holes while they are still slightly warm for the best results.
- If using frozen cherries, make sure they’re well-drained and patted dry to avoid adding excess moisture to the dough.
Leave a Comment