
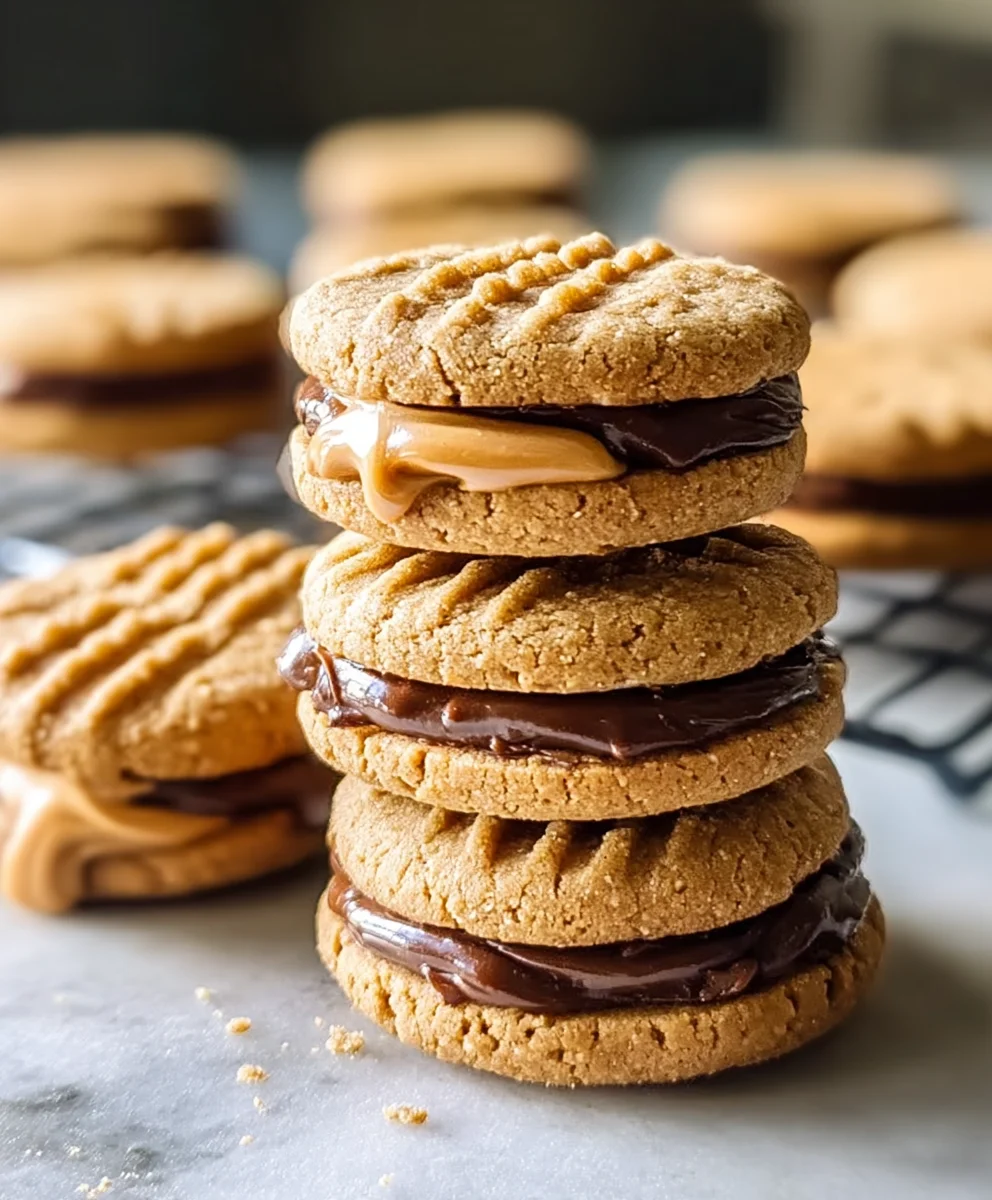
Peanut Butter Sandwich Cookies are more than just a simple sweet treat; they are a delightful journey back to childhood, a perfect blend of comforting flavors and textures that simply melt in your mouth. From their humble beginnings as simple peanut butter cookies, a cherished staple in American kitchens since the early 20th century, these treats have evolved into something truly special. The innovative idea of pairing two soft, chewy peanut butter cookies with a luscious, creamy filling elevates them from a beloved classic to an irresistible masterpiece.
I find that it’s this harmonious combination—the distinct salty-sweet crunch from the classic crisscross pattern on the cookies, perfectly balanced by a velvety, rich peanut butter cream filling—that makes them utterly addictive. People adore these Peanut Butter Sandwich Cookies not just for their deep nostalgic appeal, but for the sheer delight each bite delivers. They are wonderfully satisfying, incredibly versatile for any occasion from a casual snack to a party dessert, and surprisingly simple to master in your own kitchen. Prepare yourself to bake a batch of pure, unadulterated happiness!

Ingredients:
-
For the Peanut Butter Cookies:
- 2 ½ cups (300g) all-purpose flour
- 1 teaspoon baking soda
- ½ teaspoon salt
- 1 cup (226g) unsalted butter, softened to room temperature
- ¾ cup (150g) granulated sugar
- ¾ cup (165g) packed light brown sugar
- 1 cup (250g) creamy peanut butter (I prefer natural, unsweetened for better flavor control, but any creamy kind works!)
- 2 large eggs, at room temperature
- 1 teaspoon pure vanilla extract
-
For the Creamy Peanut Butter Filling:
- 1 cup (226g) unsalted butter, softened to room temperature
- 1 cup (250g) creamy peanut butter
- 3-4 cups (360-480g) powdered sugar, sifted (adjust to your desired sweetness and consistency)
- 2-4 tablespoons milk or heavy cream (use more or less to achieve desired consistency)
- 1 teaspoon pure vanilla extract
- ¼ teaspoon salt (optional, but it really helps to balance the sweetness!)
Preparing the Peanut Butter Cookie Dough:
- Preheat your oven and prepare your baking sheets: Before we dive into mixing, let’s get organized! Preheat your oven to 350°F (175°C). Line two large baking sheets with parchment paper or silicone baking mats. This will prevent your cookies from sticking and ensure even baking. Trust me, parchment paper is your best friend when baking cookies!
- Whisk together the dry ingredients: In a medium bowl, whisk together the all-purpose flour, baking soda, and salt. Give it a good whisk for about 30 seconds to a minute to ensure everything is thoroughly combined. This step is crucial because it distributes the leavening agent evenly, leading to perfectly risen cookies. Set this bowl aside for now.
- Cream the butter and sugars: In the bowl of a stand mixer fitted with the paddle attachment, or using a large bowl with a handheld electric mixer, cream together the softened unsalted butter, granulated sugar, and light brown sugar. Beat on medium-high speed for about 2-3 minutes, until the mixture is light, fluffy, and pale in color. This creaming process is vital for incorporating air into the dough, which contributes to the cookies’ soft texture. Scrape down the sides of the bowl as needed to ensure everything is fully combined.
- Add the peanut butter: Reduce the mixer speed to medium and add the creamy peanut butter to the butter and sugar mixture. Beat for another 1-2 minutes until the peanut butter is fully incorporated and the mixture is smooth. The aroma at this stage is absolutely heavenly!
- Incorporate the eggs and vanilla: With the mixer still on medium speed, add the eggs one at a time, beating well after each addition. Make sure each egg is fully combined before adding the next. Once the eggs are incorporated, stir in the vanilla extract. The mixture might look a little curdled at first, but keep mixing, and it will come together beautifully.
- Gradually add the dry ingredients: Reduce the mixer speed to low. Gradually add the dry ingredient mixture to the wet ingredients, mixing until just combined. Be careful not to overmix the dough at this stage. Overmixing can develop the gluten in the flour too much, resulting in tough, dry cookies. Stop mixing as soon as you no longer see streaks of flour. A few small pockets of flour are fine; you can gently fold them in by hand.
- Chill the dough (optional but recommended): While you can bake these cookies immediately, I highly recommend chilling the dough for at least 30 minutes, or up to 2 hours. Chilling the dough helps the flavors meld, prevents the cookies from spreading too much, and makes them easier to handle. If you’re making these amazing Peanut Butter Sandwich Cookies for a special occasion, planning this chilling time can make a big difference in the final texture and appearance.
Baking the Peanut Butter Cookies:
- Scoop and shape the dough: Once your dough is chilled (or if you’re skipping the chill), scoop rounded tablespoons of dough. I find that a cookie scoop (about 1.5 tablespoons) works perfectly for uniform cookies. Roll each scoop into a smooth ball between your palms. Place the dough balls about 2 inches apart on your prepared baking sheets.
- Create the classic crosshatch pattern: This is the signature look for peanut butter cookies! Using the tines of a fork, gently press down on each cookie dough ball, first in one direction to flatten it slightly, then again perpendicularly to create a classic crosshatch pattern. Don’t press too hard, just enough to flatten them to about ½-inch thickness. This step not only looks lovely but also helps the cookies bake more evenly.
- Bake the cookies: Bake the cookies for 10-12 minutes, or until the edges are lightly golden and the centers are just set. They might still look a little soft in the middle, but they will firm up as they cool. Do not overbake these cookies! Overbaked cookies will be dry and crumbly, and we want them perfectly soft for our Peanut Butter Sandwich Cookies.
- Cool the cookies: Once baked, remove the baking sheets from the oven and let the cookies cool on the sheets for about 5 minutes. This allows them to set fully without breaking. After 5 minutes, carefully transfer the cookies to a wire rack to cool completely. It’s crucial that the cookies are entirely cool before you attempt to fill them; otherwise, your filling will melt and slide right off!
Making the Creamy Peanut Butter Filling:
- Cream the butter and peanut butter: In the bowl of a stand mixer fitted with the paddle attachment, or using a large bowl with a handheld electric mixer, beat the softened unsalted butter and creamy peanut butter on medium speed until smooth and creamy. This will take about 2-3 minutes. Scrape down the sides of the bowl frequently to ensure everything is well combined.
- Gradually add powdered sugar: With the mixer on low speed, gradually add the sifted powdered sugar, one cup at a time. Beat until each addition is incorporated before adding the next. The mixture will start to look crumbly at first, but don’t worry!
- Add milk/cream, vanilla, and salt: Once all the powdered sugar is in, add the vanilla extract and salt (if using). Then, gradually add the milk or heavy cream, 1 tablespoon at a time, beating on medium-high speed until the frosting is light, fluffy, and reaches your desired consistency. You might need more or less liquid depending on the consistency of your peanut butter and the humidity in your kitchen. You’re looking for a smooth, spreadable, yet firm enough consistency that will hold its shape when piped or spread between two cookies.
Assembling Your Peanut Butter Sandwich Cookies:
- Pair up the cookies: Look through your cooled peanut butter cookies and find pairs of similar size. This will make your Peanut Butter Sandwich Cookies look neat and professional.
-
Fill the cookies: You have a couple of options here!
- Using a knife or small offset spatula: Take one cooled cookie and spread a generous dollop of the creamy peanut butter filling onto its flat underside.
- Using a piping bag: For a neater, more uniform look, transfer the filling to a piping bag fitted with a large round or star tip. Pipe a swirl or a mound of filling onto the flat underside of one cookie.
Aim for a good amount of filling – we want a nice ratio of cookie to creamy goodness!
- Top with the second cookie: Gently place the second cookie on top of the filling, flat side down, and lightly press it to create a sandwich. The filling should spread slightly to the edges. Repeat this process with the remaining cookies and filling.
- Serve or store: Your delicious Peanut Butter Sandwich Cookies are now ready to be enjoyed! They are wonderful served immediately.
Tips for Perfect Peanut Butter Sandwich Cookies:
Dough Consistency:
Don’t skip the chilling step if you have time. While these cookies can be baked without chilling, a brief chill (30 minutes to an hour) makes the dough easier to handle and helps prevent excessive spreading. This results in thicker, chewier cookies which are ideal for our sandwich cookies, offering a more robust base for the filling. If your dough feels too sticky, a little extra time in the fridge will do wonders. Conversely, if it’s too firm after chilling for a long time, let it sit at room temperature for 10-15 minutes to soften just enough to scoop easily.
Baking Uniformity:
For uniform Peanut Butter Sandwich Cookies, use a cookie scoop. This ensures that all your cookies are roughly the same size, which is critical for making neat pairs for sandwiching. Baking at the correct temperature is also key; an oven thermometer can confirm your oven’s accuracy. If your oven runs hot or cold, adjust the temperature accordingly to prevent burnt edges or undercooked centers. Rotating your baking sheets halfway through baking can also help achieve even browning, especially if your oven has hot spots.
Filling Flavor and Texture:
The quality of your peanut butter greatly influences the final taste of these Peanut Butter Sandwich Cookies. For both the cookies and the filling, I suggest using a good quality, creamy peanut butter. If you prefer natural peanut butter, ensure it’s well-stirred before using, as the oils can separate. For the filling, adjust the powdered sugar and milk/cream to achieve your desired sweetness and consistency. If the filling is too thick, add more milk/cream sparingly, one teaspoon at a time. If it’s too thin, add more sifted powdered sugar until it reaches a spreadable but firm texture. A pinch of salt in the filling truly elevates the flavor, cutting through the sweetness and enhancing the peanut butter notes. Don’t be afraid to taste and adjust!
Storage:
Once assembled, Peanut Butter Sandwich Cookies can be stored in an airtight container at room temperature for up to 3-4 days. For longer storage, you can keep them in the refrigerator for up to a week. If refrigerating, let them come back to room temperature for about 15-20 minutes before serving for the best texture and flavor. You can also freeze the baked, unfilled cookies for up to 3 months. Thaw them at room temperature, then make the filling fresh and assemble your sandwich cookies when ready to serve. This is a great way to prep ahead for a future treat!
Making Ahead:
The cookie dough can be made ahead of time and stored in the refrigerator for up to 3 days, or frozen for up to 3 months. If freezing the dough, wrap it tightly in plastic wrap and then in foil. When ready to bake, thaw the dough in the refrigerator overnight before scooping and baking as directed. The filling can also be made a day in advance and stored in an airtight container in the refrigerator; just let it come to room temperature and give it a good whip with your mixer before using to restore its fluffy texture.
Ingredient Temperature Matters:
Always use room temperature butter and eggs. This is not just a suggestion; it’s a critical step for consistent results in baking. Room temperature butter creams beautifully with sugar, creating a light and airy base for your cookies, essential for the texture of these Peanut Butter Sandwich Cookies. Cold butter won’t incorporate properly, leading to a denser cookie. Similarly, room temperature eggs emulsify much better into the butter mixture, preventing curdling and ensuring a smooth, cohesive dough and filling. Plan ahead and take these ingredients out of the fridge at least an hour before you start baking.

Conclusion:
And there you have it, friends! We’ve journeyed through the delightful process of creating what I genuinely believe are some of the most irresistible treats you’ll ever pull from your oven. These aren’t just any cookies; they are a celebration of comfort, a hug in edible form, and an absolute game-changer for anyone who adores that classic combination of sweet and salty. What truly makes this recipe a must-try is its remarkable balance of simplicity and profound satisfaction. You’re not just baking; you’re crafting moments. The rich, nutty aroma that will fill your kitchen is merely the prelude to the extraordinary texture you’re about to experience – a perfect chewiness that melts in your mouth, contrasted beautifully with the creamy, dreamy filling sandwiched between. Forget complicated desserts; this recipe proves that true joy often comes in the most straightforward packages. I promise you, once you taste these, you’ll understand exactly why they’ve earned a permanent spot in my own recipe rotation and why I’m so excited for them to become a staple in yours too. They are quick enough for a spontaneous craving yet impressive enough for any special occasion. This recipe truly delivers on flavor, ease, and that comforting nostalgia we all crave from a homemade treat.
Now, about enjoying your magnificent creations! While these cookies are utterly perfect straight off the cooling rack, there are so many wonderful ways to elevate the experience even further. Imagine sinking your teeth into one alongside a tall, icy glass of milk – a truly timeless pairing that never disappoints. For the adults, a warm cup of coffee or a robust espresso makes for an exquisite afternoon treat, allowing the nuanced flavors of the peanut butter to truly shine. If you’re looking to impress at your next gathering, arrange them artfully on a platter; they make a fantastic addition to any dessert spread, often disappearing faster than anything else!
But why stop there? Let your culinary imagination run wild with variations.
Serving Suggestions to Make Them Shine:
- For a delightful breakfast or brunch treat, serve them alongside fresh fruit or a dollop of Greek yogurt.
- Pack them into lunchboxes for a much-anticipated midday snack that will bring a smile to anyone’s face.
- Crush them slightly and sprinkle over a scoop of vanilla ice cream for an instant, elevated sundae.
- Dip half of a finished cookie into melted dark chocolate and sprinkle with sea salt for an extra touch of decadence.
- Serve them as part of a homemade cookie assortment for holidays or special events, showcasing their irresistible charm.
- Pair them with a mug of hot cocoa on a chilly evening for ultimate comfort.
Creative Variations to Personalize Your Batch:
Feeling adventurous? This recipe is incredibly adaptable! Instead of a classic peanut butter filling, consider a cream cheese frosting for a tangy counterpoint, or perhaps a rich chocolate ganache for an ultimate indulgence. For those with a love for texture, try folding in a handful of mini chocolate chips or chopped roasted peanuts into the cookie dough itself before baking. You could even experiment with different nut butters – almond butter or cashew butter would offer a subtly different, yet equally delicious, flavor profile. Just be sure the consistency is similar to peanut butter. A dash of cinnamon or a pinch of nutmeg in the cookie dough can also add a wonderfully warm spice note. For a festive touch, decorate the edges of the finished cookies with sprinkles before the filling sets completely. You might also try adding a pinch of chili powder to the dough for a surprising, subtle kick that complements the sweetness beautifully. The possibilities are truly endless, and each variation simply builds upon the foundational deliciousness of the original, allowing you to tailor them perfectly to your taste.
So, my dear readers, I implore you: don’t just read about these wonders; go forth and bake! There’s a special kind of magic that happens when you bring delicious food to life in your own kitchen, and these Peanut Butter Sandwich Cookies are designed to deliver that magic in spades. They are incredibly satisfying to make, and even more so to share. Once you’ve experienced the joy of creating and tasting these delightful treats, I would absolutely love to hear all about it.
Share Your Cookie Journey!
Did you stick to the classic recipe, or did you venture into some exciting variations? What was your favorite serving suggestion? Did you find a unique ingredient that elevated them even further? Your feedback and culinary adventures are what make this community so vibrant and inspiring. Please, don’t hesitate to share your photos, your tips, and your honest reviews in the comments section below. Tag me on social media if you post your creations – I always get a thrill seeing your masterpieces! Let’s spread the joy of homemade baking far and wide, one delicious cookie at a time. Happy baking, everyone, and may your kitchens always be filled with the sweet aroma of success!
Chewy Peanut Butter Sandwich Cookies
A delightful journey back to childhood, these Chewy Peanut Butter Sandwich Cookies feature soft, chewy peanut butter cookies paired with a luscious, creamy peanut butter filling.
Ingredients
-
2 ½ cups (300g) all-purpose flour
-
1 teaspoon baking soda
-
½ teaspoon salt
-
1 cup (226g) unsalted butter, softened
-
¾ cup (150g) granulated sugar
-
¾ cup (165g) packed light brown sugar
-
1 cup (250g) creamy peanut butter
-
2 large eggs, at room temperature
-
1 teaspoon pure vanilla extract
-
1 cup (226g) unsalted butter, softened (for filling)
-
1 cup (250g) creamy peanut butter (for filling)
-
3-4 cups (360-480g) powdered sugar, sifted (for filling)
-
2-4 tablespoons milk or heavy cream (for filling)
-
1 teaspoon pure vanilla extract (for filling)
-
¼ teaspoon salt (optional, for filling)
Instructions
-
Step 1
Preheat oven to 350°F (175°C) and line baking sheets with parchment. In a medium bowl, whisk together flour, baking soda, and salt. In a stand mixer, cream softened butter, granulated sugar, and brown sugar until light and fluffy (2-3 min). Beat in 1 cup peanut butter (1-2 min), then add eggs one at a time, followed by 1 teaspoon vanilla. Gradually add the dry ingredients, mixing on low speed until just combined. Chill dough for 30 minutes (optional). -
Step 2
Scoop 1.5 tbsp dough, roll into balls, and place 2 inches apart on prepared sheets. Press a crosshatch pattern onto each cookie with a fork. Bake for 10-12 minutes until edges are lightly golden. Cool on baking sheets for 5 minutes, then transfer to a wire rack to cool completely. -
Step 3
In a stand mixer, beat 1 cup softened butter and 1 cup creamy peanut butter until smooth and creamy (2-3 min). Gradually add sifted powdered sugar, then 1 teaspoon vanilla extract and optional ¼ teaspoon salt. Add milk or cream, 1 tablespoon at a time, beating until the filling is light, fluffy, and reaches a spreadable yet firm consistency. -
Step 4
Pair up cooled cookies of similar size. Spread or pipe a generous amount of the creamy peanut butter filling onto the flat underside of one cookie. Top with a second cookie and gently press to create a sandwich. Repeat with the remaining cookies and filling. Serve or store.
Important Information
Nutrition Facts (Per Serving)
It is important to consider this information as approximate and not to use it as definitive health advice.
Allergy Information
Please check ingredients for potential allergens and consult a health professional if in doubt.


Leave a Comment