
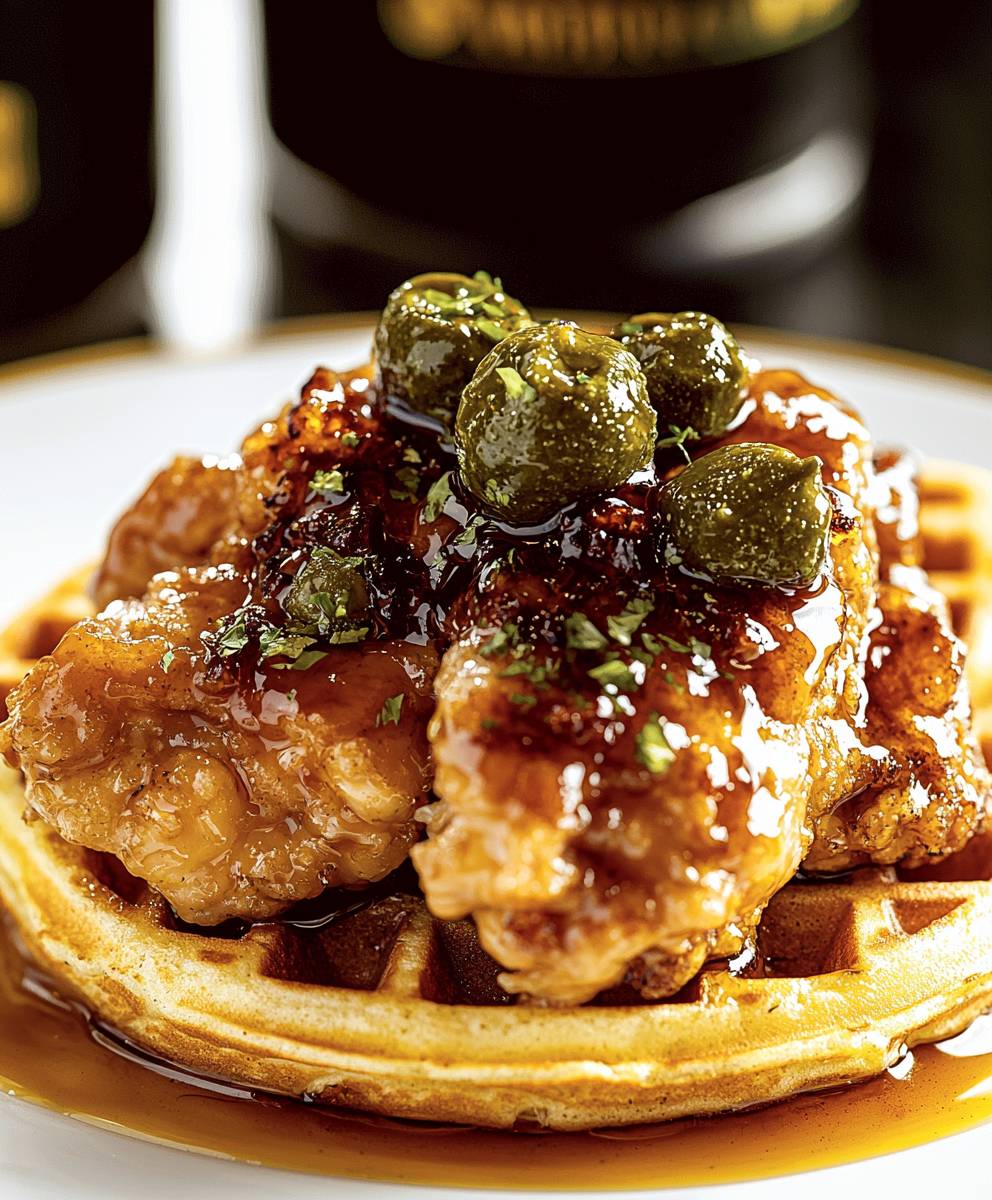
Chicken and Waffles: the ultimate comfort food combination that might sound unusual, but trust me, it’s a match made in culinary heaven! Have you ever craved something savory and sweet at the same time? This iconic dish perfectly satisfies both cravings in every single bite. It’s crispy, it’s fluffy, it’s utterly irresistible.
While the exact origins are debated, Chicken and Waffles as we know it gained popularity in the American South and later became a soul food staple. Some trace its roots back to Pennsylvania Dutch cuisine, while others credit the Wells Supper Club in Harlem for popularizing the dish in the 1930s. Regardless of its precise beginning, this dish has become a beloved brunch and dinner option across the United States.
What makes this dish so universally appealing? It’s the delightful contrast of textures and flavors. The crispy, savory fried chicken pairs beautifully with the light, fluffy, and slightly sweet waffles. Drizzle it all with maple syrup, and you have a symphony of tastes that dance on your palate. It’s also incredibly versatile! You can customize it with different spices, sauces, and waffle toppings to create your own unique version. Whether you’re looking for a decadent brunch or a satisfying dinner, Chicken and Waffles is always a winning choice. So, let’s get cooking and create this incredible dish together!

Ingredients:
- For the Chicken:
- 2 lbs boneless, skinless chicken thighs, cut into 1-inch pieces
- 2 cups buttermilk
- 2 tablespoons hot sauce (I like Frank’s RedHot)
- 2 cups all-purpose flour
- 1 cup cornstarch
- 2 tablespoons paprika
- 2 tablespoons garlic powder
- 2 tablespoons onion powder
- 1 tablespoon dried thyme
- 1 tablespoon dried oregano
- 1 tablespoon cayenne pepper (adjust to your spice preference)
- 2 teaspoons salt
- 1 teaspoon black pepper
- Vegetable oil, for frying (about 6-8 cups)
- For the Waffles:
- 2 cups all-purpose flour
- 2 tablespoons sugar
- 4 teaspoons baking powder
- 1/2 teaspoon salt
- 2 large eggs
- 1 3/4 cups milk
- 1/2 cup unsalted butter, melted
- 1 teaspoon vanilla extract
- For Serving:
- Maple syrup
- Hot sauce (optional, for drizzling)
- Butter, for topping (optional)
Preparing the Buttermilk Chicken:
- Marinate the Chicken: In a large bowl, combine the chicken pieces, buttermilk, and hot sauce. Make sure all the chicken is submerged in the buttermilk mixture. Cover the bowl with plastic wrap and refrigerate for at least 2 hours, or preferably overnight. The longer it marinates, the more tender and flavorful the chicken will be!
- Prepare the Dredging Station: In a separate large bowl, whisk together the flour, cornstarch, paprika, garlic powder, onion powder, thyme, oregano, cayenne pepper, salt, and pepper. This is your dry mixture for dredging the chicken. Make sure everything is well combined so each piece gets a good coating of flavor.
- Dredge the Chicken: Remove the chicken pieces from the buttermilk marinade, letting any excess drip off. One at a time, dredge each piece of chicken in the flour mixture, making sure it’s completely coated. Press the flour mixture onto the chicken to ensure it adheres well. Place the dredged chicken on a wire rack while you prepare the oil for frying. This helps the coating set and prevents it from becoming soggy.
Frying the Chicken:
- Heat the Oil: Pour the vegetable oil into a large, heavy-bottomed pot or Dutch oven. Heat the oil over medium-high heat until it reaches a temperature of 325-350°F (160-175°C). Use a deep-fry thermometer to monitor the temperature. Maintaining the correct temperature is crucial for crispy, evenly cooked chicken. If the oil is too hot, the chicken will burn on the outside before it’s cooked through. If it’s too cold, the chicken will absorb too much oil and become greasy.
- Fry the Chicken in Batches: Carefully add the dredged chicken to the hot oil in batches, being careful not to overcrowd the pot. Overcrowding will lower the oil temperature and result in soggy chicken. Fry for about 6-8 minutes per batch, flipping the chicken halfway through, until it’s golden brown and cooked through. The internal temperature of the chicken should reach 165°F (74°C). Use a meat thermometer to check for doneness.
- Remove and Drain: Once the chicken is cooked, remove it from the oil with a slotted spoon or tongs and place it on a wire rack lined with paper towels to drain off any excess oil. This helps keep the chicken crispy.
Making the Waffles:
- Combine Dry Ingredients: In a large bowl, whisk together the flour, sugar, baking powder, and salt. Make sure the baking powder is evenly distributed to ensure light and fluffy waffles.
- Combine Wet Ingredients: In a separate bowl, whisk together the eggs, milk, melted butter, and vanilla extract. Whisk until the mixture is smooth and well combined.
- Combine Wet and Dry Ingredients: Pour the wet ingredients into the dry ingredients and whisk until just combined. Be careful not to overmix the batter, as this can result in tough waffles. A few lumps are okay.
- Cook the Waffles: Preheat your waffle iron according to the manufacturer’s instructions. Lightly grease the waffle iron with cooking spray or melted butter. Pour the batter onto the hot waffle iron, using the amount recommended by your waffle iron’s instructions. Close the waffle iron and cook until the waffle is golden brown and crispy, usually about 3-5 minutes.
- Keep Waffles Warm: As you cook the waffles, place them on a wire rack in a preheated oven at 200°F (93°C) to keep them warm until ready to serve. This prevents them from becoming soggy.
Assembling and Serving:
- Stack and Serve: Place a warm waffle on a plate. Top with a few pieces of the crispy fried chicken.
- Drizzle and Enjoy: Drizzle generously with maple syrup. If you like a little heat, add a drizzle of hot sauce. You can also add a pat of butter on top of the chicken for extra richness.
- Serve Immediately: Serve immediately and enjoy the perfect combination of sweet and savory!
Tips for the Best Chicken and Waffles:
- Don’t skip the buttermilk marinade: This is key to tender and flavorful chicken.
- Use a deep-fry thermometer: Maintaining the correct oil temperature is crucial for crispy chicken.
- Don’t overcrowd the pot when frying: Fry the chicken in batches to ensure even cooking.
- Keep the waffles warm in the oven: This prevents them from becoming soggy.
- Experiment with different toppings: Try adding a sprinkle of powdered sugar, a dollop of whipped cream, or a side of fruit.
Variations:
- Spicy Chicken: Increase the amount of cayenne pepper in the flour mixture for a spicier kick. You can also add a pinch of chili powder.
- Honey Butter: Mix softened butter with honey for a sweet and savory topping.
- Savory Waffles: Add shredded cheese, herbs, or spices to the waffle batter for a savory twist.
- Chicken Tenders: Use chicken tenders instead of chicken thighs for a quicker cooking time.
- Belgian Waffles: Use a Belgian waffle maker for thicker, fluffier waffles.
Make Ahead Tips:
- Chicken: The chicken can be marinated overnight. You can also dredge the chicken ahead of time and store it in the refrigerator for up to 2 hours before frying.
- Waffles: The waffle batter can be made ahead of time and stored in the refrigerator for up to 24 hours. You may need to add a little extra milk to thin it out before cooking. Cooked waffles can be stored in the refrigerator for up to 3 days or frozen for up to 2 months. Reheat in a toaster or oven.
Storage Tips:
- Chicken: Leftover fried chicken can be stored in the refrigerator for up to 3 days. Reheat in the oven or air fryer for best results.
- Waffles: Leftover waffles can be stored in the refrigerator for up to 3 days or frozen for up to 2 months. Reheat in a toaster or oven.
Conclusion:
So there you have it! This isn’t just another recipe; it’s a culinary adventure waiting to happen. I truly believe this Chicken and Waffles recipe is a must-try for anyone looking to elevate their brunch game or simply craving a comforting and satisfying meal. The crispy, golden-brown chicken paired with the fluffy, slightly sweet waffles creates a symphony of textures and flavors that will dance on your taste buds. It’s the perfect balance of savory and sweet, crunchy and soft a truly unforgettable experience.
But why is this particular recipe so special? It’s all about the details. From the perfectly seasoned chicken batter to the light and airy waffle batter, every element has been carefully crafted to deliver maximum flavor and satisfaction. We’ve taken the guesswork out of the equation, providing you with clear, concise instructions that even a novice cook can follow with confidence. Plus, the ingredients are readily available, so you can whip up this masterpiece any time the craving strikes.
And the best part? This recipe is incredibly versatile! While I’ve shared my go-to method, feel free to experiment and make it your own. For a spicier kick, add a pinch of cayenne pepper to the chicken batter or drizzle your waffles with a homemade hot honey. If you’re feeling adventurous, try using different types of waffles, such as cornbread waffles for a Southern twist or Belgian waffles for a richer, more decadent treat.
Speaking of serving suggestions, the possibilities are endless! I personally love to top my Chicken and Waffles with a generous drizzle of maple syrup and a sprinkle of fresh herbs, like parsley or chives, for a pop of color and flavor. You could also add a dollop of whipped cream or a scoop of vanilla ice cream for an extra indulgent treat. For a savory twist, try serving it with a side of creamy coleslaw or a tangy vinegar-based sauce.
Serving Suggestions:
- Classic: Maple syrup and a sprinkle of fresh herbs.
- Spicy: Homemade hot honey and a dash of cayenne pepper.
- Sweet: Whipped cream or vanilla ice cream.
- Savory: Creamy coleslaw or tangy vinegar-based sauce.
Don’t be afraid to get creative and experiment with different toppings and sauces to find your perfect combination. Maybe you’ll discover a new favorite that you can share with the world!
I’m so excited for you to try this recipe and experience the magic of Chicken and Waffles for yourself. I’m confident that it will become a staple in your kitchen, a go-to dish for special occasions or simply a satisfying weeknight meal.
So, what are you waiting for? Gather your ingredients, put on your apron, and get ready to create a culinary masterpiece. I can’t wait to hear about your experience! Please, share your photos, your variations, and your thoughts in the comments below. Let’s build a community of Chicken and Waffles enthusiasts and inspire each other to create even more delicious variations of this classic dish. Happy cooking!
Chicken and Waffles: The Ultimate Guide to Making This Classic Dish
Crispy, juicy fried chicken served atop fluffy, golden waffles, drizzled with maple syrup and a touch of hot sauce. A perfect sweet and savory indulgence!
Ingredients
- 2 lbs boneless, skinless chicken thighs, cut into 1-inch pieces
- 2 cups buttermilk
- 2 tablespoons hot sauce (I like Frank’s RedHot)
- 2 cups all-purpose flour
- 1 cup cornstarch
- 2 tablespoons paprika
- 2 tablespoons garlic powder
- 2 tablespoons onion powder
- 1 tablespoon dried thyme
- 1 tablespoon dried oregano
- 1 tablespoon cayenne pepper (adjust to your spice preference)
- 2 teaspoons salt
- 1 teaspoon black pepper
- Vegetable oil, for frying (about 6-8 cups)
- 2 cups all-purpose flour
- 2 tablespoons sugar
- 4 teaspoons baking powder
- 1/2 teaspoon salt
- 2 large eggs
- 1 3/4 cups milk
- 1/2 cup unsalted butter, melted
- 1 teaspoon vanilla extract
- Maple syrup
- Hot sauce (optional, for drizzling)
- Butter, for topping (optional)
Instructions
- Marinate the Chicken: In a large bowl, combine the chicken pieces, buttermilk, and hot sauce. Make sure all the chicken is submerged in the buttermilk mixture. Cover the bowl with plastic wrap and refrigerate for at least 2 hours, or preferably overnight. The longer it marinates, the more tender and flavorful the chicken will be!
- Prepare the Dredging Station: In a separate large bowl, whisk together the flour, cornstarch, paprika, garlic powder, onion powder, thyme, oregano, cayenne pepper, salt, and pepper. This is your dry mixture for dredging the chicken. Make sure everything is well combined so each piece gets a good coating of flavor.
- Dredge the Chicken: Remove the chicken pieces from the buttermilk marinade, letting any excess drip off. One at a time, dredge each piece of chicken in the flour mixture, making sure it’s completely coated. Press the flour mixture onto the chicken to ensure it adheres well. Place the dredged chicken on a wire rack while you prepare the oil for frying. This helps the coating set and prevents it from becoming soggy.
- Heat the Oil: Pour the vegetable oil into a large, heavy-bottomed pot or Dutch oven. Heat the oil over medium-high heat until it reaches a temperature of 325-350°F (160-175°C). Use a deep-fry thermometer to monitor the temperature. Maintaining the correct temperature is crucial for crispy, evenly cooked chicken. If the oil is too hot, the chicken will burn on the outside before it’s cooked through. If it’s too cold, the chicken will absorb too much oil and become greasy.
- Fry the Chicken in Batches: Carefully add the dredged chicken to the hot oil in batches, being careful not to overcrowd the pot. Overcrowding will lower the oil temperature and result in soggy chicken. Fry for about 6-8 minutes per batch, flipping the chicken halfway through, until it’s golden brown and cooked through. The internal temperature of the chicken should reach 165°F (74°C). Use a meat thermometer to check for doneness.
- Remove and Drain: Once the chicken is cooked, remove it from the oil with a slotted spoon or tongs and place it on a wire rack lined with paper towels to drain off any excess oil. This helps keep the chicken crispy.
- Combine Dry Ingredients: In a large bowl, whisk together the flour, sugar, baking powder, and salt. Make sure the baking powder is evenly distributed to ensure light and fluffy waffles.
- Combine Wet Ingredients: In a separate bowl, whisk together the eggs, milk, melted butter, and vanilla extract. Whisk until the mixture is smooth and well combined.
- Combine Wet and Dry Ingredients: Pour the wet ingredients into the dry ingredients and whisk until just combined. Be careful not to overmix the batter, as this can result in tough waffles. A few lumps are okay.
- Cook the Waffles: Preheat your waffle iron according to the manufacturer’s instructions. Lightly grease the waffle iron with cooking spray or melted butter. Pour the batter onto the hot waffle iron, using the amount recommended by your waffle iron’s instructions. Close the waffle iron and cook until the waffle is golden brown and crispy, usually about 3-5 minutes.
- Keep Waffles Warm: As you cook the waffles, place them on a wire rack in a preheated oven at 200°F (93°C) to keep them warm until ready to serve. This prevents them from becoming soggy.
- Stack and Serve: Place a warm waffle on a plate. Top with a few pieces of the crispy fried chicken.
- Drizzle and Enjoy: Drizzle generously with maple syrup. If you like a little heat, add a drizzle of hot sauce. You can also add a pat of butter on top of the chicken for extra richness.
- Serve Immediately: Serve immediately and enjoy the perfect combination of sweet and savory!
Notes
- Don’t skip the buttermilk marinade: This is key to tender and flavorful chicken.
- Use a deep-fry thermometer: Maintaining the correct oil temperature is crucial for crispy chicken.
- Don’t overcrowd the pot when frying: Fry the chicken in batches to ensure even cooking.
- Keep the waffles warm in the oven: This prevents them from becoming soggy.
- Experiment with different toppings: Try adding a sprinkle of powdered sugar, a dollop of whipped cream, or a side of fruit.
Leave a Comment