
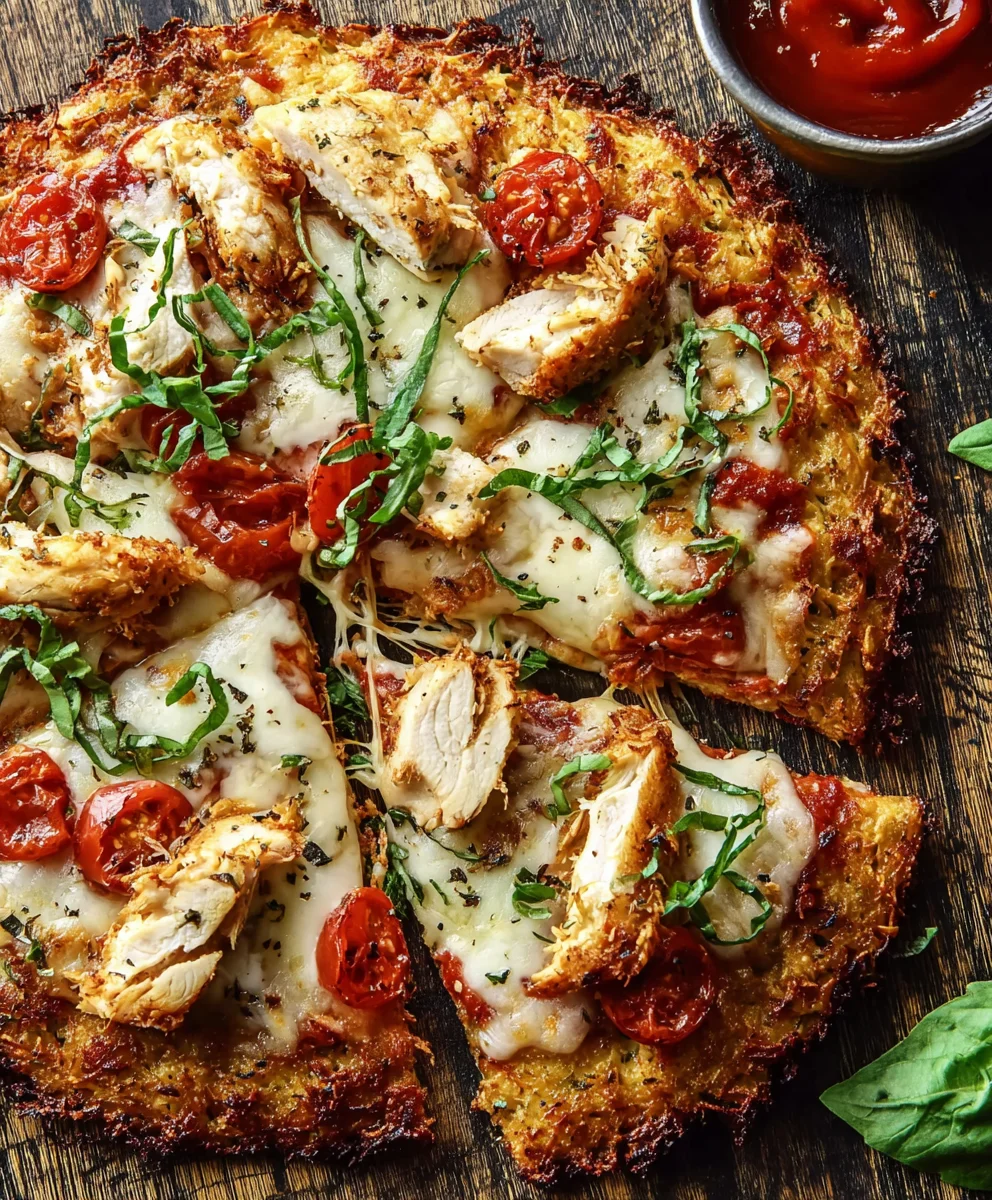
Chicken Crust Pizza is a culinary innovation that has truly revolutionized how we approach one of the world’s most beloved comfort foods. For anyone adhering to low-carb, keto, or gluten-free lifestyles, the absence of a traditional pizza could often feel like a significant culinary sacrifice. However, this ingenious creation offers a delectable, guilt-free solution that delivers all the satisfaction without compromising on flavor or that quintessential pizza experience.
While classic pizza boasts centuries of rich history and cultural significance, tracing its origins back to ancient flatbreads, the concept of a savory, protein-rich Chicken Crust Pizza is a distinctly modern marvel. It emerged from the collective desire of home cooks and culinary innovators to adapt beloved dishes to evolving dietary needs and preferences. This dish isn’t just a substitute; it’s a testament to culinary ingenuity, bridging the gap between healthy eating and pure, unadulterated indulgence. I’ve personally found immense delight in discovering the versatility and incredible taste of this recipe.
Why You’ll Love This Game-Changing Pizza!
People adore this dish for countless reasons: the deliciously savory and remarkably sturdy crust provides the perfect foundation for all your favorite toppings, offering a satisfying texture that stands up beautifully to cheese and sauce. It’s surprisingly simple to prepare, incredibly versatile for customization, and undeniably satisfying. Get ready to redefine your pizza night with a dish that truly has it all!

Ingredients:
-
For the Chicken Crust:
- 2 pounds (approx. 900g) lean ground chicken (92-93% lean works best, not too fatty, not too dry)
- ½ cup (approx. 50g) finely grated Parmesan cheese (freshly grated is always superior)
- 1 large egg
- 1 teaspoon garlic powder
- 1 teaspoon onion powder
- 1 teaspoon dried Italian seasoning blend
- ½ teaspoon sea salt, or to taste
- ¼ teaspoon freshly ground black pepper, or to taste
- Optional: A pinch of red pepper flakes for a little kick
-
For the Homemade Pizza Sauce:
- 1 tablespoon extra virgin olive oil
- 2 cloves garlic, minced
- ¼ cup finely diced yellow onion
- 1 (28-ounce/794g) can crushed tomatoes (good quality makes a difference!)
- 1 teaspoon dried oregano
- ½ teaspoon dried basil
- ¼ teaspoon sugar (just a pinch to balance acidity)
- ½ teaspoon sea salt, or to taste
- ¼ teaspoon freshly ground black pepper, or to taste
-
For the Toppings:
- 1 ½ cups (approx. 170g) shredded low-moisture, part-skim mozzarella cheese (divided)
- ¼ cup sliced pepperoni (or your preferred meat topping like cooked sausage or ham)
- ½ cup sliced bell peppers (any color), thinly sliced
- ½ cup sliced mushrooms, fresh
- ¼ cup thinly sliced red onion
- 2 tablespoons sliced black olives (canned or fresh)
- Optional: Fresh basil leaves for garnish
- Optional: Additional Parmesan cheese for serving
For the Chicken Crust:
- Preheat and Prep: Begin by preheating your oven to a good, hot temperature, around 400°F (200°C). This ensures your chicken crust cooks evenly and gets nicely browned. Line a large baking sheet (I find a 13×18-inch half-sheet pan works perfectly) with parchment paper. This step is absolutely crucial for preventing sticking and making it easy to transfer the crust later. If you want extra non-stick insurance, you can lightly spray the parchment paper with cooking spray, but usually, parchment alone is enough.
- Combine the Crust Ingredients: In a large mixing bowl, combine the ground chicken, finely grated Parmesan cheese, the large egg, garlic powder, onion powder, dried Italian seasoning blend, sea salt, and black pepper. If you’re feeling a bit adventurous and like a touch of heat, now’s the time to add that pinch of red pepper flakes!
- Mix it Up: Now, for the fun part – mixing! Dig in with clean hands (this is the most effective method, trust me) and thoroughly mix all the ingredients until everything is uniformly combined. You want to make sure the egg and cheese are evenly distributed throughout the chicken. This acts as a binder, helping your crust hold its shape. Be careful not to overmix, though, as this can make the chicken tough. Just mix until it’s all incorporated.
- Form the Crust: Transfer the chicken mixture onto the center of your prepared baking sheet. Using your hands or a spatula, gently press the mixture out into an even layer, forming a rustic, round or rectangular pizza crust shape. I usually aim for about a ¼ to ½-inch thickness. Make sure the edges are slightly thicker, creating a natural “crust” edge, much like you would with traditional pizza dough. Try to keep the thickness as consistent as possible across the entire crust to ensure even cooking. This might take a minute or two of careful shaping, but it’s worth it for a perfectly cooked crust.
- Pre-Bake the Crust: Carefully slide the baking sheet into your preheated oven. Bake the chicken crust for about 20-25 minutes. This pre-baking step is vital! It allows the crust to firm up, cook through, and lose some of its excess moisture. You’ll know it’s ready when the edges are lightly golden brown and the surface looks cooked and somewhat dry. Don’t worry if you see some liquid pooling on the surface; that’s completely normal and expected.
- Drain the Excess Moisture: Once the pre-bake time is up, carefully remove the baking sheet from the oven. You’ll likely see some liquid that has rendered out of the chicken. This is a good thing, as it prevents your final pizza from being soggy. Gently tilt the baking sheet and drain off any accumulated liquid. You can use a paper towel to blot any remaining excess moisture from the surface of the crust. This step contributes significantly to a crispier chicken crust pizza experience!
For the Homemade Pizza Sauce:
- Sauté the Aromatics: While your chicken crust is pre-baking, you can whip up this simple yet flavorful homemade pizza sauce. In a small saucepan, heat the extra virgin olive oil over medium heat. Add the minced garlic and finely diced yellow onion. Sauté for about 3-5 minutes, stirring occasionally, until the onion is translucent and the garlic is fragrant. Be careful not to burn the garlic – a gentle sizzle is what you’re after.
- Add the Tomatoes and Seasonings: Pour in the can of crushed tomatoes. Stir in the dried oregano, dried basil, the small pinch of sugar (this helps to cut through the acidity of the tomatoes and really brings out their natural sweetness), sea salt, and freshly ground black pepper. Give everything a good stir to combine all those wonderful flavors.
- Simmer and Thicken: Bring the sauce to a gentle simmer. Once it starts to bubble, reduce the heat to low, cover the saucepan loosely (or partially, to allow steam to escape), and let it simmer for at least 15-20 minutes. Stir occasionally to prevent sticking. The goal here is for the flavors to meld beautifully and for the sauce to thicken slightly. You want a consistency that’s easy to spread but not too watery, as excess moisture can make your crust soggy. If you have a little more time, simmering it for 30 minutes will make the flavors even richer!
- Taste and Adjust: Before you use it, give your sauce a quick taste. Does it need more salt? A little more pepper? Perhaps another pinch of sugar if your tomatoes were particularly tart? Adjust the seasonings to your preference. This sauce recipe is fantastic and freezes well, so feel free to make a double batch!
Assembling Your Chicken Crust Pizza:
- Prepare for Assembly: Once your pre-baked chicken crust has been drained of excess liquid, leave it on the parchment-lined baking sheet. This is its final resting place until it’s ready to be served. If your oven temperature was lowered for the sauce, remember to bring it back up to 400°F (200°C) for the final bake.
- Layer the Sauce: Spoon a generous but not overwhelming amount of your homemade pizza sauce evenly over the pre-baked chicken crust. I usually leave about a ½-inch border around the edge, allowing that chicken crust to develop a lovely crispy edge. Don’t go too heavy on the sauce, as too much moisture can make your crust less crispy. About ½ to ¾ of a cup is usually plenty for this size crust.
- Add the First Layer of Cheese: Sprinkle about half of your shredded mozzarella cheese directly over the sauce. This layer creates a wonderful cheesy base and helps “glue” your toppings down.
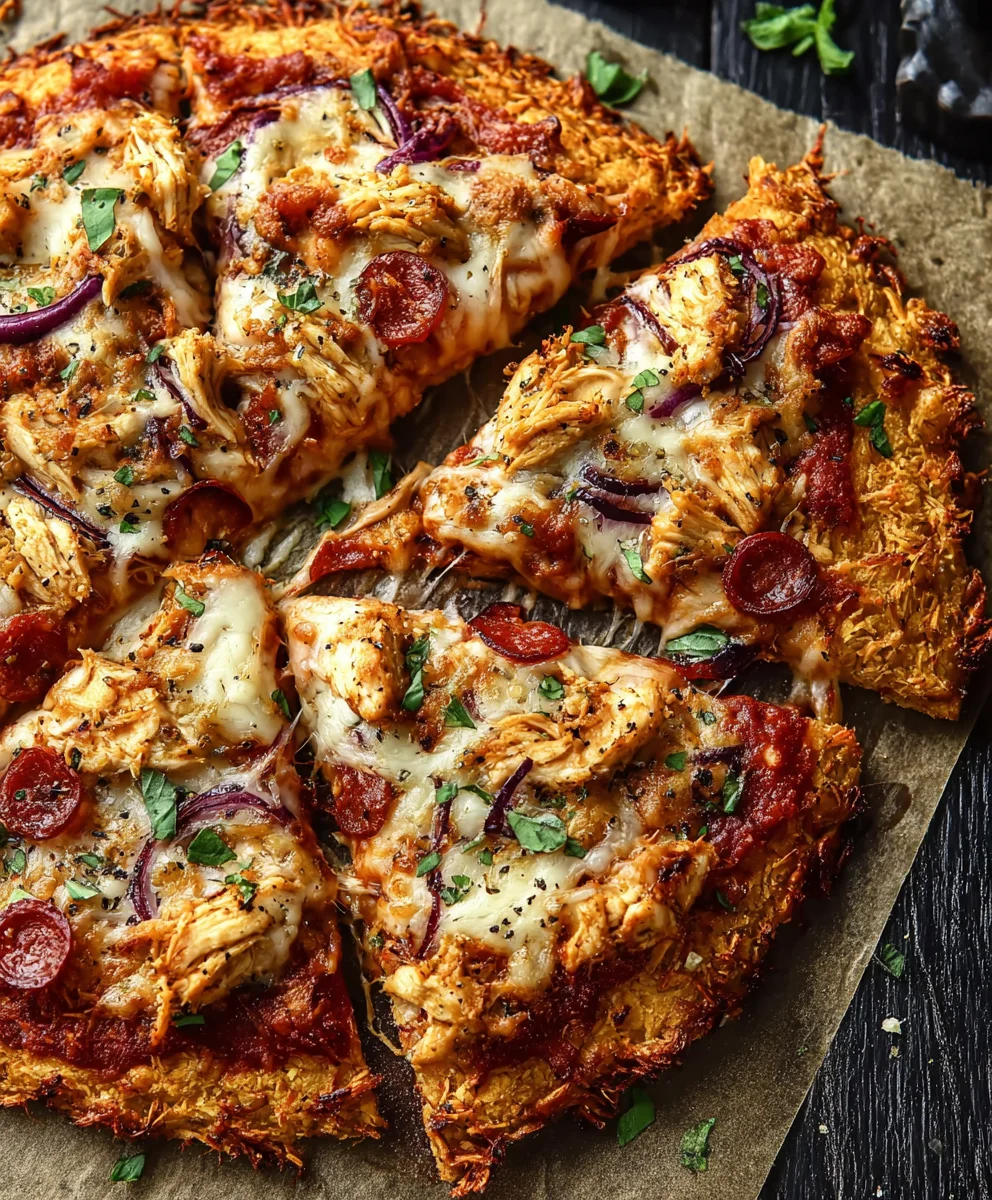
- Arrange Your Toppings: Now, it’s time to get creative with your toppings! Evenly arrange the sliced pepperoni, bell peppers, mushrooms, red onion, and black olives over the cheese layer. A friendly tip: try not to overload your pizza with too many toppings. While it’s tempting, too many toppings can make the pizza heavy, prevent even cooking, and lead to a soggy crust. Distribute them relatively evenly so every slice gets a bit of everything.
- The Final Cheese Layer: Finish by sprinkling the remaining shredded mozzarella cheese over all your delicious toppings. This final layer will melt and bubble, creating that classic pizza look and taste. If you like, you can also add a final dusting of finely grated Parmesan cheese for an extra salty, nutty kick.
Baking the Chicken Crust Pizza:
- Final Bake: Carefully return the baking sheet with your fully assembled chicken crust pizza to the preheated 400°F (200°C) oven.
- Bake Until Golden and Bubbly: Bake for another 15-20 minutes, or until the cheese is melted, bubbly, and beautifully golden brown. The toppings should look cooked, and the chicken crust edges should be deep golden and crispy. Keep a close eye on it during the last few minutes, as ovens can vary, and you want to achieve that perfect golden hue without burning. The smell of a freshly baked “Chicken Crust Pizza” filling your kitchen is truly one of life’s simple pleasures!
Serving Suggestions and Tips:
- Rest Before Slicing: Once your magnificent Chicken Crust Pizza emerges from the oven, resist the urge to slice into it immediately! Let it rest on the baking sheet for about 5-10 minutes. This resting period is crucial; it allows the cheese to set slightly and the internal juices to redistribute, preventing your toppings from sliding off and making for cleaner slices.
- Slice with Care: After resting, carefully transfer the pizza (still on its parchment paper) to a large cutting board. Using a sharp chef’s knife or a sturdy pizza cutter, slice your Chicken Crust Pizza into your desired number of wedges or squares. Because the crust is made of chicken, it has a slightly different texture than traditional dough, so gentle but firm pressure is key.
- Garnish and Serve: For a fresh burst of flavor and a beautiful presentation, tear or chop a few fresh basil leaves and scatter them over the hot pizza right before serving. A sprinkle of red pepper flakes for those who enjoy a little extra heat is also a fantastic addition. Serve immediately and enjoy the incredible taste of your homemade, low-carb Chicken Crust Pizza!
- Storage and Reheating: If you happen to have any leftovers (a rare occurrence with this recipe!), store them in an airtight container in the refrigerator for up to 3-4 days. To reheat, I highly recommend using an oven or a toaster oven at 350°F (175°C) for about 10-15 minutes, or until heated through and crispy. This helps revive the crust’s crispness much better than a microwave, which can make it a bit soft.
- Customization is Key: Remember, this recipe is a fantastic canvas for your favorite pizza toppings. Feel free to experiment! Try different cheeses like provolone or smoked gouda. Add cooked spinach, sun-dried tomatoes, or even a drizzle of pesto after baking. The possibilities for your “Chicken Crust Pizza” are endless, making it a versatile and healthy go-to meal! Enjoy every delicious, guilt-free bite!
Conclusion:
And there you have it, my friends! We’ve journeyed through the creation of what I sincerely believe will become a staple in your kitchen and a hero on your dinner table. This isn’t just another recipe; it’s a culinary revelation, a testament to how creative cooking can truly transform your meals without sacrificing flavor or fun. If you’ve been searching for a way to enjoy the classic comfort of pizza without the carb overload, or if you’re simply looking for an innovative, protein-packed dish that genuinely excites the taste buds, then this is unequivocally your answer. I am truly enthusiastic about this particular recipe because it consistently delivers on all fronts: taste, nutrition, and pure satisfaction. It’s a game-changer, plain and simple.
Why This Recipe is an Absolute Must-Try
What makes this creation so utterly compelling? First and foremost, the crust itself. Crafted from tender, seasoned chicken, it provides a incredibly sturdy yet surprisingly delicate foundation that beautifully holds all your favorite toppings. Forget soggy, flimsy alternatives; this chicken crust bakes up perfectly, offering a unique texture and a savory depth that traditional dough simply cannot match. It’s naturally gluten-free, wonderfully low-carb, and absolutely packed with protein, making it an ideal choice for a wide array of dietary needs and healthy lifestyle goals. But beyond its health benefits, its flavor profile is what truly sets it apart. The subtly seasoned chicken enhances, rather than overwhelms, the other ingredients, creating a harmonious and utterly delicious symphony of tastes. It’s comforting, it’s innovative, and it’s surprisingly easy to master once you get the hang of it. You’re not just making a meal; you’re crafting an experience, a truly delightful culinary adventure that will leave everyone at the table impressed and completely satisfied.
Endless Possibilities: Serving Suggestions and Delicious Variations
One of the aspects I adore most about this recipe is its incredible versatility. While I’ve guided you through a fantastic classic combination, the beauty of this Chicken Crust Pizza lies in its adaptability. For a vibrant, fresh take, consider loading it with roasted red peppers, artichoke hearts, crumbled feta, and a drizzle of balsamic glaze after baking. If you’re a fan of a little heat, add some sliced jalapeños or a sprinkle of red pepper flakes to your sauce. For a gourmet twist, try a white sauce base made from ricotta and garlic, topped with sautéed mushrooms, caramelized onions, and fresh thyme. Don’t forget about meat lovers – crispy bacon, pepperoni, or even thinly sliced prosciutto are fantastic additions. You could even turn it into a breakfast pizza with scrambled eggs, cheese, and a sprinkle of chives!
Thinking beyond the main course, this recipe makes for an excellent appetizer when cut into smaller squares. Serve it alongside a fresh green salad with a light vinaigrette for a balanced meal, or a simple side of roasted asparagus or broccoli for extra greens. For those with different dietary preferences at the table, you can easily divide the crust before adding toppings, allowing for personalized culinary creations. Think about a dairy-free section with plant-based cheese, or a veggie-heavy portion for your plant-forward friends. The possibilities truly are as boundless as your imagination. Don’t be afraid to experiment with different cheeses, herbs, and sauces. This robust chicken crust is designed to hold up to almost anything you can dream up, making it perfect for creative culinary exploration.
Your Turn: Try It and Share Your Experience!
Now that you have all the tips, tricks, and inspiration, it’s your turn to bring this incredible recipe to life in your own kitchen. I truly believe that once you try this, you’ll wonder how you ever lived without it. It’s a fantastic solution for weeknight dinners, a show-stopping dish for entertaining, and an all-around winner for anyone looking to enjoy incredible flavor with a healthier twist. So, gather your ingredients, fire up your oven, and prepare to be amazed. I am genuinely excited for you to experience the joy of making and tasting this dish.
Please, once you’ve whipped up your own masterpiece, I’d love nothing more than for you to share your experience. Did you stick to the script, or did you venture into exciting new topping combinations? What was your favorite part about making it? Snap a photo, share your stories, and let me know your triumphs and any creative twists you added. Your feedback and personal touches not only inspire me but also help build our wonderful community of enthusiastic home cooks. Let’s celebrate delicious, healthy eating together! Happy cooking, and I can’t wait to hear all about your amazing culinary adventure with this recipe!
Chicken Crust Pizza: Healthy, Low-Carb & Absolutely Delicious!
Chicken Crust Pizza is a culinary innovation that truly revolutionized how we approach one of the world’s most beloved comfort foods. For anyone adhering to low-carb, keto, or gluten-free lifestyles, this ingenious creation offers a delectable, guilt-free solution that delivers all the satisfaction without compromising on flavor or that quintessential pizza experience.
Ingredients
-
2 pounds (approx. 900g) lean ground chicken
-
½ cup (approx. 50g) finely grated Parmesan cheese
-
1 large egg
-
1 teaspoon garlic powder
-
1 teaspoon onion powder
-
1 teaspoon dried Italian seasoning blend
-
½ teaspoon sea salt
-
¼ teaspoon freshly ground black pepper
-
Optional: A pinch of red pepper flakes
-
1 tablespoon extra virgin olive oil
-
2 cloves garlic, minced
-
¼ cup finely diced yellow onion
-
1 (28-ounce/794g) can crushed tomatoes
-
1 teaspoon dried oregano
-
½ teaspoon dried basil
-
¼ teaspoon sugar
-
½ teaspoon sea salt (for sauce)
-
¼ teaspoon freshly ground black pepper (for sauce)
-
1 ½ cups (approx. 170g) shredded low-moisture, part-skim mozzarella cheese (divided)
-
¼ cup sliced beef pepperoni (or preferred meat topping)
-
½ cup sliced bell peppers
-
½ cup sliced mushrooms, fresh
-
¼ cup thinly sliced red onion
-
2 tablespoons sliced black olives
-
Optional: Fresh basil leaves for garnish
-
Optional: Additional Parmesan cheese for serving
Instructions
-
Step 1
Preheat oven to 400°F (200°C). Line a large baking sheet with parchment paper. In a bowl, combine ground chicken, Parmesan, egg, garlic powder, onion powder, Italian seasoning, salt, pepper, and optional red pepper flakes. Mix until just combined. Transfer mixture to the baking sheet and press firmly into an even, ¼ to ½-inch thick pizza shape with slightly thicker edges. This firmness is crucial for the crust to hold together. -
Step 2
Bake the chicken crust for 20-25 minutes until lightly golden. Remove from oven, tilt sheet to drain any liquid, and blot excess moisture with a paper towel. Set aside. -
Step 3
While crust bakes, heat olive oil in a small saucepan over medium heat. Sauté minced garlic and diced onion for 3-5 minutes until translucent and fragrant. Add crushed tomatoes, oregano, basil, sugar, salt, and pepper. Bring to a simmer, then reduce heat, cover loosely, and simmer for 15-20 minutes, stirring occasionally, until slightly thickened. Taste and adjust seasonings. -
Step 4
Keep oven at 400°F (200°C). Spread ½ to ¾ cup of pizza sauce evenly over the pre-baked chicken crust, leaving a ½-inch border. Sprinkle half of the mozzarella over the sauce, then arrange beef pepperoni, bell peppers, mushrooms, red onion, and black olives. Finish with the remaining mozzarella (and optional Parmesan). -
Step 5
Return the assembled pizza to the oven and bake for 15-20 minutes, or until the cheese is melted, bubbly, and golden brown, and the crust edges are crispy. -
Step 6
Remove from oven and let the pizza rest on the baking sheet for 5-10 minutes before slicing. This resting period is essential to prevent the pizza from falling apart. Transfer to a cutting board, slice, and garnish with fresh basil or red pepper flakes, if desired. Serve immediately. -
Step 7
Store leftovers in an airtight container in the refrigerator for up to 3-4 days. Reheat in an oven or toaster oven at 350°F (175°C) for 10-15 minutes for best crispness.
Important Information
Nutrition Facts (Per Serving)
It is important to consider this information as approximate and not to use it as definitive health advice.
Allergy Information
Please check ingredients for potential allergens and consult a health professional if in doubt.

Leave a Comment