
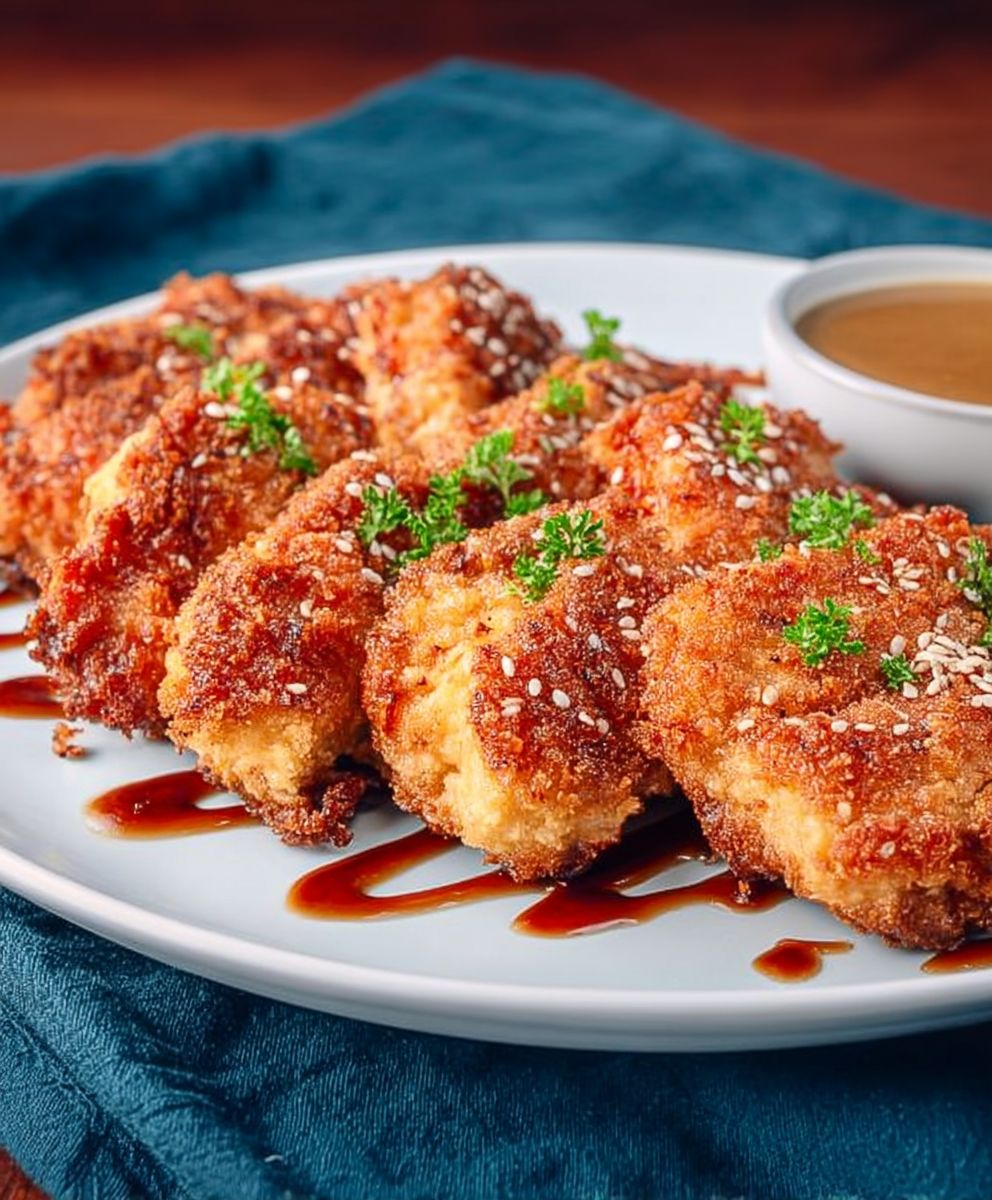
Chicken Katsu, a symphony of crispy, golden-brown perfection, is about to become your new favorite weeknight dinner! Imagine sinking your teeth into a juicy, tender chicken cutlet, encased in a shatteringly crisp panko crust. Are you drooling yet? I know I am! This isn’t just fried chicken; it’s an experience.
This delightful dish has its roots in Japan, where it evolved from European cutlet recipes during the Meiji era. Over time, it transformed into the beloved katsuretsu, or “cutlet,” we know and adore today. Chicken Katsu, specifically, gained immense popularity for its accessibility and satisfying flavor profile.
What makes Chicken Katsu so irresistible? It’s the harmonious blend of textures and tastes. The crunchy panko breading provides a delightful contrast to the succulent chicken within. Served with a tangy, slightly sweet katsu sauce, it’s a flavor explosion that will leave you wanting more. Plus, it’s surprisingly easy to make at home! Whether you’re a seasoned chef or a kitchen novice, this recipe will guide you through creating restaurant-quality Chicken Katsu that your family will rave about. Get ready to embark on a culinary adventure that’s both delicious and rewarding!

Ingredients:
- For the Chicken:
- 4 boneless, skinless chicken breasts (about 6-8 ounces each)
- 1 cup all-purpose flour
- 2 large eggs, beaten
- 2 cups panko breadcrumbs
- 1 teaspoon salt
- 1/2 teaspoon black pepper
- 1/2 teaspoon garlic powder
- 1/4 teaspoon paprika
- For Frying:
- Vegetable oil or canola oil (enough for deep frying, about 3-4 inches deep)
- For Serving (Optional):
- Cooked white rice or brown rice
- Shredded cabbage
- Katsu sauce (store-bought or homemade)
- Lemon wedges
- Japanese mayonnaise (Kewpie)
- Sesame seeds (for garnish)
- Green onions, thinly sliced (for garnish)
Preparing the Chicken:
- Pound the Chicken: This is a crucial step for even cooking! Place each chicken breast between two sheets of plastic wrap or in a resealable plastic bag. Use a meat mallet or rolling pin to pound the chicken to an even thickness of about 1/2 inch. This tenderizes the chicken and ensures it cooks quickly and evenly. Be careful not to pound it too thin, or it will become dry.
- Season the Chicken: In a small bowl, combine the salt, pepper, garlic powder, and paprika. Sprinkle this mixture evenly over both sides of the pounded chicken breasts. Make sure each piece is well-seasoned for the best flavor.
- Set up the Breading Station: Prepare three shallow dishes. In the first dish, place the all-purpose flour. In the second dish, whisk the eggs until they are well combined. In the third dish, place the panko breadcrumbs. Make sure you have enough panko to fully coat all the chicken. If you’re running low, add more!
Breading the Chicken:
- Coat with Flour: Take one chicken breast and dredge it thoroughly in the flour, making sure to coat all sides. Shake off any excess flour. This helps the egg adhere properly.
- Dip in Egg: Dip the floured chicken breast into the beaten eggs, ensuring it’s completely coated. Let any excess egg drip off.
- Coat with Panko: Transfer the egg-coated chicken breast to the dish of panko breadcrumbs. Press the panko firmly onto the chicken, making sure it’s completely covered on all sides. The panko should adhere well to the egg. This creates the crispy, golden crust we’re looking for.
- Repeat: Repeat the breading process with the remaining chicken breasts.
- Rest (Optional but Recommended): Place the breaded chicken breasts on a wire rack for about 10-15 minutes. This allows the breading to set and adhere even better during frying, resulting in a crispier katsu.
Frying the Chicken:
- Heat the Oil: Pour the vegetable oil or canola oil into a large, heavy-bottomed pot or deep fryer. Heat the oil over medium-high heat to 350-375°F (175-190°C). Use a deep-fry thermometer to monitor the temperature. Maintaining the correct temperature is crucial for even cooking and preventing the chicken from becoming greasy. If the oil is too hot, the outside will burn before the inside is cooked. If it’s too cold, the chicken will absorb too much oil.
- Fry the Chicken: Carefully place the breaded chicken breasts into the hot oil, being careful not to overcrowd the pot. Fry in batches if necessary to maintain the oil temperature. Overcrowding will lower the oil temperature and result in soggy katsu.
- Cook Until Golden Brown: Fry the chicken for about 3-4 minutes per side, or until golden brown and cooked through. The internal temperature of the chicken should reach 165°F (74°C). Use a meat thermometer to check the internal temperature.
- Remove and Drain: Remove the cooked chicken breasts from the oil using a slotted spoon or tongs. Place them on a wire rack lined with paper towels to drain off any excess oil. This helps keep the katsu crispy.
Serving the Chicken Katsu:
- Slice the Katsu: Place the cooked chicken katsu on a cutting board and slice it into strips about 1 inch wide. This makes it easier to eat and presents nicely.
- Assemble the Plate: Serve the sliced chicken katsu immediately with a side of cooked white rice or brown rice. Add a generous portion of shredded cabbage for a refreshing crunch.
- Add Sauce and Garnishes: Drizzle the chicken katsu with your favorite katsu sauce. You can use store-bought or homemade. A dollop of Japanese mayonnaise (Kewpie) is also a delicious addition. Garnish with sesame seeds and thinly sliced green onions for added flavor and visual appeal.
- Serve with Lemon: Serve with lemon wedges for an extra burst of flavor. Squeezing lemon juice over the katsu brightens the dish and cuts through the richness.
Tips for the Best Chicken Katsu:
- Don’t Overcrowd the Pan: Frying in batches is key to maintaining the oil temperature and ensuring crispy katsu.
- Use Fresh Oil: Fresh oil will give you the best flavor and prevent the katsu from tasting greasy.
- Pound Evenly: Pounding the chicken to an even thickness is crucial for even cooking.
- Don’t Skip the Resting Step: Letting the breaded chicken rest before frying helps the breading adhere better.
- Adjust Seasoning: Feel free to adjust the seasoning to your liking. You can add other spices like ginger or chili powder.
- Homemade Katsu Sauce: For a truly authentic experience, try making your own katsu sauce. There are many recipes available online.
Variations:
- Pork Katsu (Tonkatsu): You can use this same recipe to make pork katsu by substituting pork cutlets for the chicken breasts.
- Chicken Katsu Curry: Serve the chicken katsu with Japanese curry for a hearty and flavorful meal.
- Chicken Katsu Sandwich: Use the chicken katsu to make a delicious sandwich with shredded cabbage, katsu sauce, and Japanese mayonnaise on a toasted bun.
- Baked Chicken Katsu: For a healthier option, you can bake the breaded chicken instead of frying it. Preheat your oven to 400°F (200°C) and bake for about 20-25 minutes, or until golden brown and cooked through. Spray the breaded chicken with cooking spray before baking to help it crisp up.
Conclusion:
This isn’t just another chicken recipe; it’s a culinary adventure waiting to happen! I truly believe this Chicken Katsu recipe is a must-try for anyone looking to elevate their weeknight dinners or impress guests with a dish that’s both comforting and exciting. The crispy, golden-brown panko crust gives way to tender, juicy chicken, creating a symphony of textures and flavors that will have you coming back for more. It’s surprisingly simple to make, and the results are restaurant-quality, guaranteed to satisfy even the most discerning palate.
But the best part? It’s incredibly versatile! While I’ve outlined my favorite way to prepare it, feel free to experiment and make it your own.
Serving Suggestions and Variations:
* Classic Katsu Curry: Serve your crispy Chicken Katsu over a bed of fluffy rice, smothered in a rich and savory Japanese curry sauce. This is a classic combination for a reason! Add some steamed vegetables like carrots, potatoes, and peas to complete the meal.
* Katsu Sando: Transform your Katsu into a delectable sandwich! Layer slices of Chicken Katsu between soft, toasted milk bread with shredded cabbage, tonkatsu sauce, and a touch of Japanese mayonnaise. It’s the perfect grab-and-go lunch or a satisfying snack.
* Katsu Donburi: Create a comforting rice bowl by simmering sliced Chicken Katsu in a sweet and savory dashi broth with onions and eggs. Pour the mixture over a bowl of rice and garnish with chopped green onions for a quick and easy weeknight meal.
* Katsu Salad: For a lighter option, slice your Chicken Katsu and arrange it over a bed of mixed greens with your favorite vegetables and a tangy vinaigrette dressing. It’s a delicious and healthy way to enjoy the crispy goodness of Katsu.
* Spice it Up: Add a pinch of cayenne pepper or chili flakes to the panko breadcrumbs for a spicy kick. You can also incorporate some grated ginger or garlic into the chicken marinade for added flavor.
* Different Cuts of Chicken: While I prefer using chicken breasts, you can also use chicken thighs for a richer, more flavorful Katsu. Just be sure to adjust the cooking time accordingly.
* Sauce it Up: While tonkatsu sauce is the traditional accompaniment, don’t be afraid to experiment with other sauces! Try it with a spicy mayo, a sweet chili sauce, or even a simple teriyaki glaze.
I’m so excited for you to try this recipe and experience the joy of homemade Chicken Katsu. It’s a dish that’s sure to become a family favorite, and I can’t wait to hear about your creations!
So, what are you waiting for? Gather your ingredients, put on your apron, and get ready to create some culinary magic. Don’t be intimidated by the frying process; it’s easier than you think, and the results are well worth the effort. Remember to maintain a consistent oil temperature for that perfect golden-brown crust.
Once you’ve tried this recipe, I’d love to hear about your experience! Share your photos and comments on social media using [Your Hashtag] or leave a review on the blog. Let me know what variations you tried and what sauces you paired it with. Your feedback is invaluable and helps me continue to create delicious and inspiring recipes for you. Happy cooking! I hope you enjoy this Chicken Katsu as much as I do!
Chicken Katsu: The Ultimate Guide to Crispy Perfection
Crispy and golden Chicken Katsu, a Japanese classic! Tender chicken breasts coated in panko breadcrumbs and fried to perfection. Serve with rice, cabbage, and katsu sauce for a delicious and satisfying meal.
Ingredients
- 4 boneless, skinless chicken breasts (about 6-8 ounces each)
- 1 cup all-purpose flour
- 2 large eggs, beaten
- 2 cups panko breadcrumbs
- 1 teaspoon salt
- 1/2 teaspoon black pepper
- 1/2 teaspoon garlic powder
- 1/4 teaspoon paprika
- Vegetable oil or canola oil (enough for deep frying, about 3-4 inches deep)
- Cooked white rice or brown rice
- Shredded cabbage
- Katsu sauce (store-bought or homemade)
- Lemon wedges
- Japanese mayonnaise (Kewpie)
- Sesame seeds (for garnish)
- Green onions, thinly sliced (for garnish)
Instructions
- Place each chicken breast between two sheets of plastic wrap or in a resealable plastic bag. Use a meat mallet or rolling pin to pound the chicken to an even thickness of about 1/2 inch.
- In a small bowl, combine the salt, pepper, garlic powder, and paprika. Sprinkle this mixture evenly over both sides of the pounded chicken breasts.
- Prepare three shallow dishes. In the first dish, place the all-purpose flour. In the second dish, whisk the eggs until they are well combined. In the third dish, place the panko breadcrumbs.
- Take one chicken breast and dredge it thoroughly in the flour, making sure to coat all sides. Shake off any excess flour.
- Dip the floured chicken breast into the beaten eggs, ensuring it’s completely coated. Let any excess egg drip off.
- Transfer the egg-coated chicken breast to the dish of panko breadcrumbs. Press the panko firmly onto the chicken, making sure it’s completely covered on all sides.
- Repeat the breading process with the remaining chicken breasts.
- Place the breaded chicken breasts on a wire rack for about 10-15 minutes.
- Pour the vegetable oil or canola oil into a large, heavy-bottomed pot or deep fryer. Heat the oil over medium-high heat to 350-375°F (175-190°C). Use a deep-fry thermometer to monitor the temperature.
- Carefully place the breaded chicken breasts into the hot oil, being careful not to overcrowd the pot. Fry in batches if necessary to maintain the oil temperature.
- Fry the chicken for about 3-4 minutes per side, or until golden brown and cooked through. The internal temperature of the chicken should reach 165°F (74°C). Use a meat thermometer to check the internal temperature.
- Remove the cooked chicken breasts from the oil using a slotted spoon or tongs. Place them on a wire rack lined with paper towels to drain off any excess oil.
- Place the cooked chicken katsu on a cutting board and slice it into strips about 1 inch wide.
- Serve the sliced chicken katsu immediately with a side of cooked white rice or brown rice. Add a generous portion of shredded cabbage.
- Drizzle the chicken katsu with your favorite katsu sauce. A dollop of Japanese mayonnaise (Kewpie) is also a delicious addition. Garnish with sesame seeds and thinly sliced green onions.
- Serve with lemon wedges.
Notes
- Pounding the chicken to an even thickness is crucial for even cooking.
- Resting the breaded chicken before frying helps the breading adhere better.
- Maintain the correct oil temperature (350-375°F) for even cooking and preventing greasy chicken.
- Fry in batches to avoid overcrowding the pan and lowering the oil temperature.
- Use fresh oil for the best flavor.
- Adjust seasoning to your liking.
- For a healthier option, bake the breaded chicken at 400°F (200°C) for 20-25 minutes.
Leave a Comment