
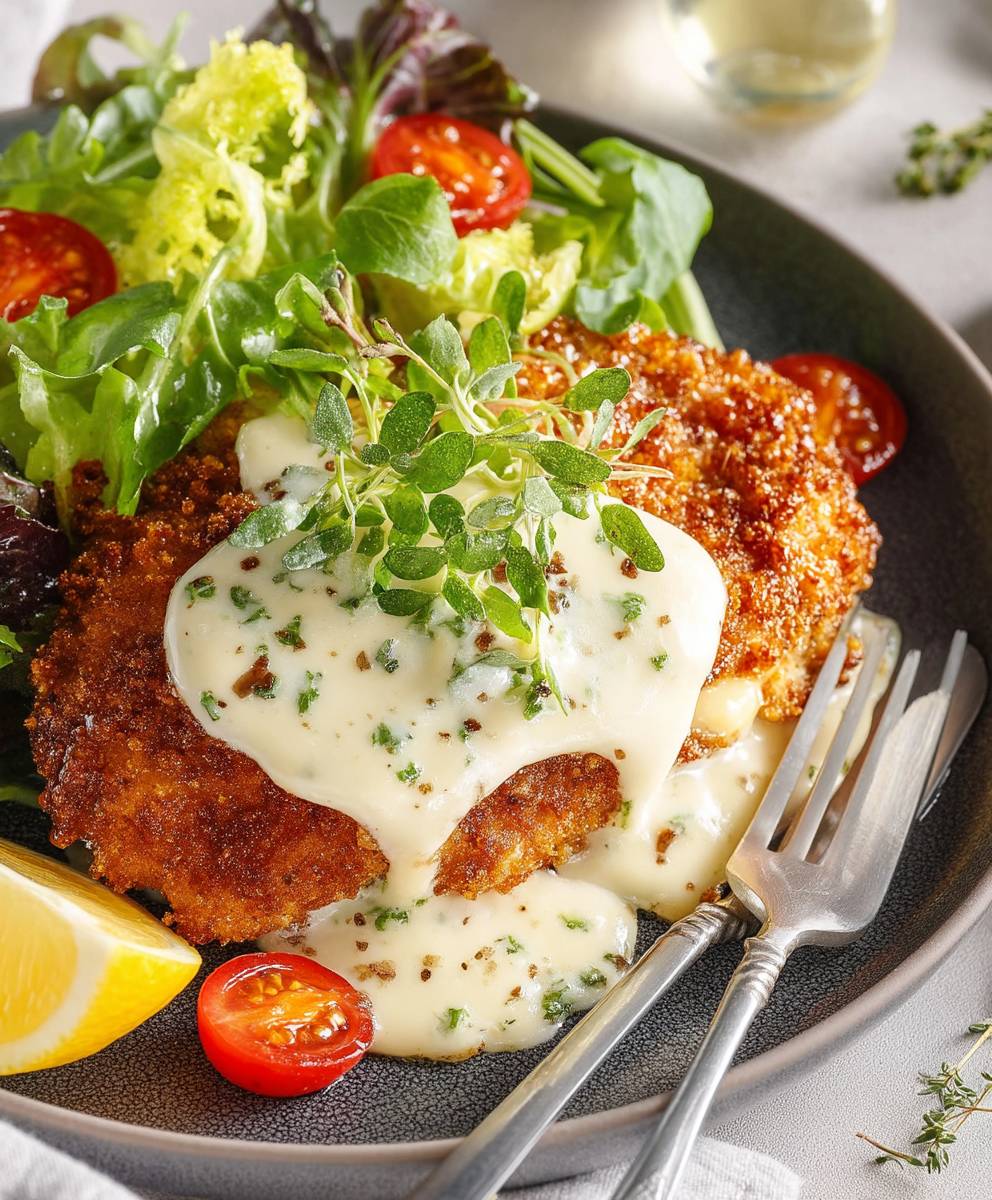
Chicken Romano, a dish that sings with the bright flavors of Italy, is about to become your new weeknight obsession. Imagine sinking your teeth into a perfectly golden, crispy chicken breast, its surface paved with a savory, cheesy crust that practically melts in your mouth. This isn’t just dinner; it’s an experience!
While the exact origins of Chicken Romano are debated, its roots are firmly planted in Italian-American cuisine, a vibrant melting pot of traditions and tastes. It’s a testament to the ingenuity of immigrants who adapted classic Italian recipes using ingredients readily available in their new home. Think of it as a delicious love letter to both the old world and the new.
But what makes this dish so irresistible? It’s the symphony of textures, the satisfying crunch giving way to tender, juicy chicken. The Romano cheese, with its salty, slightly sharp flavor, creates a crust that’s both comforting and exciting. And let’s be honest, who can resist a dish that’s relatively quick and easy to prepare, yet delivers restaurant-quality results? I know I can’t! Get ready to discover why Chicken Romano is a family favorite for generations.

Ingredients:
- 4 boneless, skinless chicken breasts (about 6-8 ounces each)
- 1 cup all-purpose flour
- 1 teaspoon salt
- 1/2 teaspoon black pepper
- 1/2 teaspoon garlic powder
- 1/4 teaspoon paprika
- 3 large eggs
- 1/4 cup milk
- 1 cup grated Romano cheese
- 1/2 cup grated Parmesan cheese
- 1/4 cup chopped fresh parsley
- 1/2 cup olive oil
- 1/4 cup butter
- 1 lemon, cut into wedges (for serving)
- Optional: Marinara sauce, for serving
Preparing the Chicken:
- First, we need to prepare the chicken breasts. Place each chicken breast between two sheets of plastic wrap or in a large resealable bag. Using a meat mallet or rolling pin, pound the chicken to an even thickness of about 1/4 inch. This ensures even cooking and tenderizes the chicken. Don’t overdo it, you want them thin but not torn.
- Once the chicken is pounded, set it aside. Now, let’s get our breading station ready.
Setting Up the Breading Station:
- In a shallow dish, combine the flour, salt, pepper, garlic powder, and paprika. Whisk these dry ingredients together thoroughly. This seasoned flour will be the first layer of our breading, adding flavor and helping the egg mixture adhere.
- In a second shallow dish, whisk together the eggs and milk. Make sure the eggs are fully incorporated with the milk for a smooth and even coating.
- In a third shallow dish, combine the Romano cheese, Parmesan cheese, and chopped parsley. Mix these ingredients well. The combination of these cheeses and fresh parsley will give our Chicken Romano its signature flavor and texture. I like to use a microplane for the Parmesan to get it really fine.
Breading the Chicken:
- Now comes the fun part! Take one chicken breast and dredge it in the seasoned flour mixture, making sure to coat it completely on both sides. Shake off any excess flour. We want a light coating, not a thick layer.
- Next, dip the floured chicken breast into the egg mixture, again ensuring it’s fully coated. Let any excess egg drip off.
- Finally, press the chicken breast into the cheese mixture, coating it generously on both sides. Press firmly to help the cheese adhere to the chicken. You want a nice, thick coating of cheese.
- Repeat this breading process with the remaining chicken breasts.
Cooking the Chicken:
- In a large skillet, heat the olive oil and butter over medium-high heat. The combination of oil and butter adds flavor and helps the chicken brown beautifully. Make sure the skillet is large enough to accommodate the chicken breasts without overcrowding. Overcrowding the pan will lower the temperature and result in steamed, not browned, chicken.
- Once the oil and butter are hot and shimmering (but not smoking!), carefully place the breaded chicken breasts into the skillet. Be careful not to overcrowd the pan; you may need to cook the chicken in batches.
- Cook the chicken for about 4-5 minutes per side, or until it’s golden brown and cooked through. The internal temperature should reach 165°F (74°C). Use a meat thermometer to ensure the chicken is fully cooked. The cheese coating should be nicely browned and crispy.
- If the cheese starts to brown too quickly, reduce the heat to medium. We want the chicken to cook through without burning the cheese.
- Once the chicken is cooked through, remove it from the skillet and place it on a wire rack to drain any excess oil. This will help keep the chicken crispy.
Serving the Chicken Romano:
- Serve the Chicken Romano immediately while it’s hot and crispy.
- Garnish with fresh parsley and serve with lemon wedges. The lemon juice adds a bright, acidic contrast to the rich, cheesy chicken.
- Optional: Serve with marinara sauce for dipping or spooning over the chicken. A simple marinara sauce complements the flavors of the Chicken Romano perfectly.
- Chicken Romano is delicious served with a side of pasta, roasted vegetables, or a simple salad.
Tips and Variations:
- Pounding the Chicken: Pounding the chicken to an even thickness is crucial for even cooking. If the chicken is too thick in some areas, it will take longer to cook, and the cheese coating may burn before the chicken is cooked through.
- Cheese Ratio: Feel free to adjust the ratio of Romano and Parmesan cheese to your liking. Some people prefer a stronger Romano flavor, while others prefer a milder Parmesan flavor.
- Adding Herbs: You can add other herbs to the cheese mixture, such as oregano, basil, or thyme. These herbs will add extra flavor and aroma to the Chicken Romano.
- Spicy Kick: For a spicy kick, add a pinch of red pepper flakes to the flour mixture or the cheese mixture.
- Baking Option: If you prefer to bake the Chicken Romano, preheat your oven to 375°F (190°C). Place the breaded chicken breasts on a baking sheet lined with parchment paper and bake for 20-25 minutes, or until the chicken is cooked through and the cheese is golden brown.
- Air Fryer Option: You can also cook the Chicken Romano in an air fryer. Preheat your air fryer to 375°F (190°C). Place the breaded chicken breasts in the air fryer basket in a single layer and cook for 12-15 minutes, or until the chicken is cooked through and the cheese is golden brown. You may need to flip the chicken halfway through cooking.
- Make Ahead: You can prepare the breaded chicken breasts ahead of time and store them in the refrigerator for up to 24 hours. Just make sure to cover them tightly with plastic wrap to prevent them from drying out. When you’re ready to cook them, simply follow the cooking instructions.
- Freezing: You can also freeze the breaded chicken breasts for longer storage. Place the breaded chicken breasts on a baking sheet lined with parchment paper and freeze them for about 2 hours, or until they’re solid. Then, transfer them to a freezer-safe bag or container and store them in the freezer for up to 3 months. When you’re ready to cook them, thaw them in the refrigerator overnight and then follow the cooking instructions.
- Gluten-Free Option: To make this recipe gluten-free, simply substitute the all-purpose flour with a gluten-free all-purpose flour blend. Make sure to choose a blend that contains xanthan gum for best results.
- Serving Suggestions: Chicken Romano is a versatile dish that can be served in many different ways. Here are a few serving suggestions:
- Serve it as a main course with a side of pasta, roasted vegetables, or a simple salad.
- Slice it and add it to a sandwich or wrap.
- Cut it into strips and serve it as an appetizer with dipping sauce.
- Use it as a topping for pizza or pasta.
Enjoy your delicious homemade Chicken Romano!
Conclusion:
And there you have it! This Chicken Romano recipe is truly a must-try for anyone looking to elevate their weeknight dinners or impress guests with a restaurant-quality meal. The combination of the crispy, parmesan-crusted chicken, the bright lemon sauce, and the fresh herbs creates a symphony of flavors that will leave you wanting more. I know I always do!
What makes this recipe so special, in my opinion, is its versatility. It’s elegant enough for a special occasion, yet simple enough to whip up on a busy weeknight. Plus, the leftovers (if there are any!) are fantastic the next day. Seriously, cold Chicken Romano in a salad? Don’t knock it ’til you try it!
But beyond the ease and elegance, it’s the taste that truly sets this recipe apart. The Romano cheese, with its sharper, saltier flavor than parmesan, adds a depth and complexity that you just won’t find in other chicken recipes. The breading is perfectly seasoned, creating a satisfying crunch with every bite. And that lemon butter sauce? Oh, that lemon butter sauce! It’s the perfect complement to the richness of the chicken, adding a bright, tangy note that balances everything beautifully.
Looking for serving suggestions? I’ve got you covered! This Chicken Romano pairs perfectly with a side of creamy mashed potatoes, a simple green salad, or some roasted asparagus. For a heartier meal, try serving it over a bed of linguine or fettuccine, tossed with a little extra lemon butter sauce. You could even add some sautéed spinach or mushrooms to the pasta for an extra boost of flavor and nutrients.
And speaking of variations, feel free to get creative! If you’re not a fan of Romano cheese, you can substitute it with parmesan or a blend of both. You could also add a pinch of red pepper flakes to the breading for a little bit of heat. Or, if you’re feeling adventurous, try adding some chopped sun-dried tomatoes or artichoke hearts to the lemon butter sauce. The possibilities are endless!
I’m confident that this Chicken Romano recipe will become a new favorite in your household. It’s a crowd-pleaser, it’s easy to make, and it’s absolutely delicious. So, what are you waiting for? Grab your ingredients and get cooking!
I truly hope you enjoy this recipe as much as I do. And I would absolutely love to hear about your experience! Did you make any modifications? What did you serve it with? What did your family think? Please, share your thoughts and photos in the comments below. Your feedback is invaluable, and it helps me to continue creating recipes that you’ll love. Happy cooking! I can’t wait to see your culinary creations! Don’t forget to tag me in your photos on social media so I can see your amazing Chicken Romano dishes!
Chicken Romano: A Delicious and Easy Recipe
Crispy, cheesy Chicken Romano! Tender chicken breasts coated in a flavorful Romano and Parmesan cheese crust, pan-fried to golden perfection. Serve with lemon wedges and marinara sauce for a delicious and satisfying meal.
Ingredients
- 4 boneless, skinless chicken breasts (about 6-8 ounces each)
- 1 cup all-purpose flour
- 1 teaspoon salt
- 1/2 teaspoon black pepper
- 1/2 teaspoon garlic powder
- 1/4 teaspoon paprika
- 3 large eggs
- 1/4 cup milk
- 1 cup grated Romano cheese
- 1/2 cup grated Parmesan cheese
- 1/4 cup chopped fresh parsley
- 1/2 cup olive oil
- 1/4 cup butter
- 1 lemon, cut into wedges (for serving)
- Optional: Marinara sauce, for serving
Instructions
- Place each chicken breast between two sheets of plastic wrap or in a large resealable bag. Using a meat mallet or rolling pin, pound the chicken to an even thickness of about 1/4 inch.
- In a shallow dish, combine the flour, salt, pepper, garlic powder, and paprika. Whisk together.
- In a second shallow dish, whisk together the eggs and milk.
- In a third shallow dish, combine the Romano cheese, Parmesan cheese, and chopped parsley. Mix well.
- Dredge one chicken breast in the seasoned flour mixture, coating completely. Shake off excess.
- Dip the floured chicken breast into the egg mixture, ensuring it’s fully coated. Let any excess egg drip off.
- Press the chicken breast into the cheese mixture, coating generously on both sides. Press firmly to help the cheese adhere.
- Repeat the breading process with the remaining chicken breasts.
- In a large skillet, heat the olive oil and butter over medium-high heat.
- Carefully place the breaded chicken breasts into the skillet. Be careful not to overcrowd the pan; you may need to cook the chicken in batches.
- Cook the chicken for about 4-5 minutes per side, or until it’s golden brown and cooked through. The internal temperature should reach 165°F (74°C).
- If the cheese starts to brown too quickly, reduce the heat to medium.
- Remove the chicken from the skillet and place it on a wire rack to drain any excess oil.
- Serve immediately while hot and crispy. Garnish with fresh parsley and serve with lemon wedges. Optional: Serve with marinara sauce.
Notes
- Pounding the chicken to an even thickness is crucial for even cooking.
- Adjust the ratio of Romano and Parmesan cheese to your liking.
- Add other herbs to the cheese mixture, such as oregano, basil, or thyme.
- For a spicy kick, add a pinch of red pepper flakes to the flour mixture or the cheese mixture.
- Baking Option: Bake at 375°F (190°C) for 20-25 minutes.
- Air Fryer Option: Air fry at 375°F (190°C) for 12-15 minutes, flipping halfway through.
- Breaded chicken can be prepared ahead of time and stored in the refrigerator for up to 24 hours.
- Breaded chicken can be frozen for up to 3 months.
- To make this recipe gluten-free, simply substitute the all-purpose flour with a gluten-free all-purpose flour blend.


Leave a Comment