
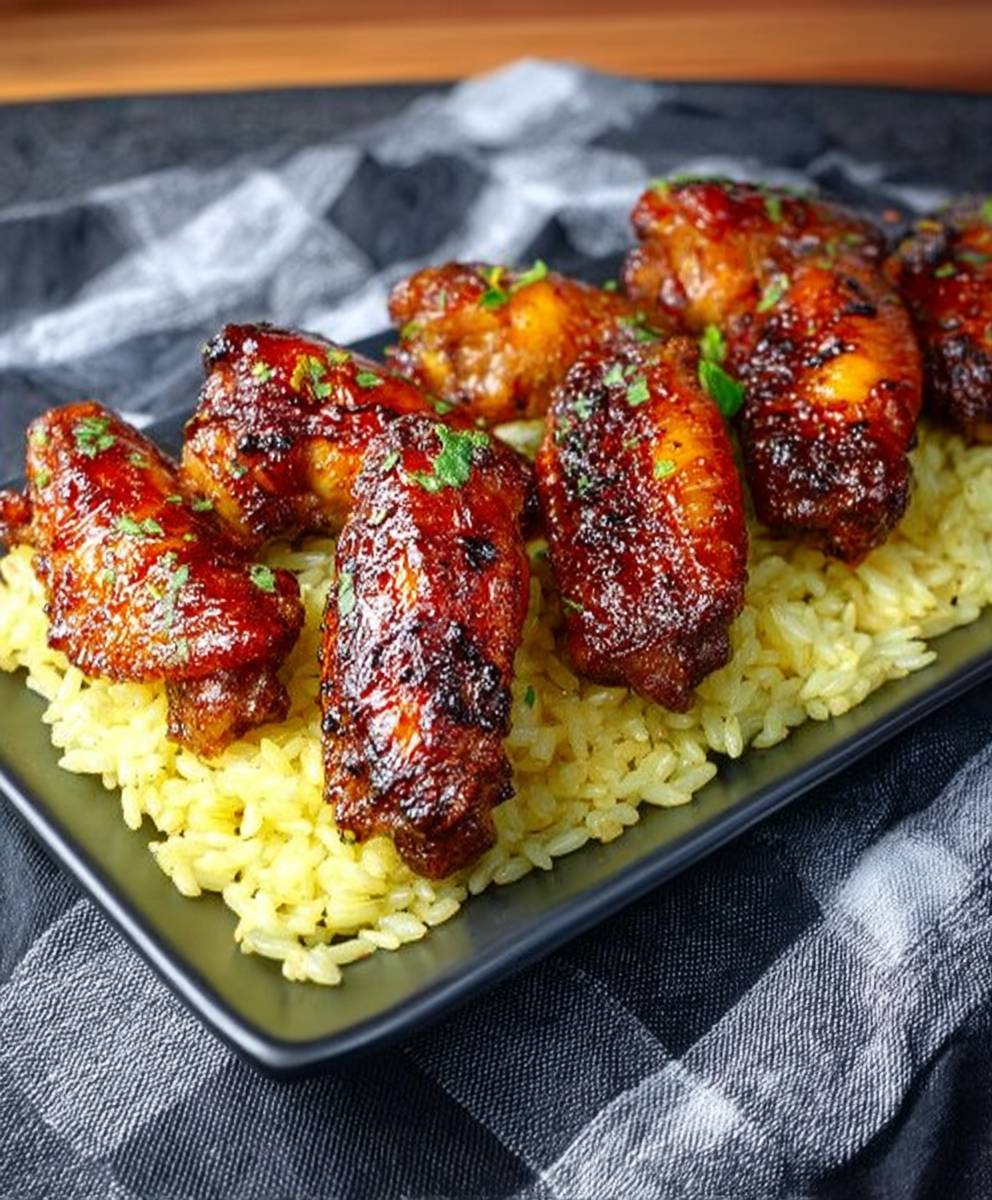
Chicken wings, finger lickin’ good! Is there anything quite as satisfying as biting into a perfectly cooked, saucy chicken wing? I think not! These aren’t just a game-day snack; they’re a culinary experience, a symphony of flavors and textures that dance on your palate. From the crispy skin to the juicy, tender meat, every bite is a little piece of heaven.
While the exact origins of the modern chicken wing are debated, most agree that they gained popularity in Buffalo, New York, in the 1960s. Legend has it that Teressa Bellissimo, co-owner of the Anchor Bar, created them as a late-night snack for her son and his friends. Little did she know, she was inventing a dish that would become a global phenomenon! The combination of spicy sauce, crispy skin, and creamy blue cheese dressing proved irresistible, and the rest, as they say, is history.
People adore chicken wings, finger lickin’ style, for so many reasons. The versatility is a huge draw you can customize the flavor profile to your heart’s content, from fiery hot to sweet and tangy. Plus, they’re incredibly convenient. Whether you’re hosting a party, watching a game, or just craving a delicious and satisfying meal, chicken wings are always a crowd-pleaser. And let’s be honest, there’s something inherently fun and social about sharing a plate of wings with friends and family. So, get ready to roll up your sleeves and dive into this ultimate comfort food!

Ingredients:
- 2.5 lbs Chicken Wings, separated at the joints, tips removed
- 1/4 cup All-Purpose Flour
- 1 tbsp Cornstarch
- 1 tsp Baking Powder
- 1 tsp Garlic Powder
- 1 tsp Onion Powder
- 1/2 tsp Smoked Paprika
- 1/2 tsp Cayenne Pepper (optional, for extra heat)
- 1/2 tsp Salt
- 1/4 tsp Black Pepper
For the Finger Lickin’ Sauce:
- 1 cup Honey
- 1/2 cup Soy Sauce (low sodium preferred)
- 1/4 cup Rice Vinegar
- 2 tbsp Gochujang (Korean Chili Paste) – adjust to taste
- 2 tbsp Brown Sugar, packed
- 1 tbsp Sesame Oil
- 2 cloves Garlic, minced
- 1 tsp Ginger, grated
- 1/2 tsp Red Pepper Flakes (optional)
- 1 tbsp Cornstarch mixed with 2 tbsp cold water (slurry)
Optional Garnishes:
- Sesame Seeds
- Chopped Green Onions
Preparing the Chicken Wings:
- Pat the wings dry: This is crucial for crispy wings! Use paper towels to thoroughly dry each wing, inside and out. Moisture is the enemy of crispiness. I usually go through a whole roll of paper towels for this step.
- Combine the dry ingredients: In a large bowl, whisk together the flour, cornstarch, baking powder, garlic powder, onion powder, smoked paprika, cayenne pepper (if using), salt, and black pepper. Make sure everything is evenly distributed. The baking powder helps create a lighter, crispier crust.
- Coat the wings: Add the dried wings to the bowl with the dry ingredients. Toss them thoroughly until each wing is evenly coated. Ensure no bare spots remain. You can also put the wings and dry ingredients in a large ziplock bag and shake to coat.
- Let the wings rest (optional but recommended): Place the coated wings on a wire rack set over a baking sheet. This allows the coating to adhere better and dry out slightly, resulting in even crispier wings. Let them rest in the refrigerator for at least 30 minutes, or up to a few hours. This step really makes a difference!
Cooking the Chicken Wings:
There are several ways to cook these wings, and I’ll outline my two favorite methods: baking and air frying. Baking is more hands-off, while air frying is quicker and yields incredibly crispy results.
Baking Method:
- Preheat the oven: Preheat your oven to 400°F (200°C).
- Prepare the baking sheet: Line a baking sheet with parchment paper or aluminum foil for easy cleanup. Place a wire rack on top of the baking sheet. This allows air to circulate around the wings, promoting even cooking and crisping.
- Arrange the wings: Arrange the coated wings in a single layer on the wire rack, making sure they are not overcrowded. Overcrowding will steam the wings instead of baking them.
- Bake the wings: Bake for 40-50 minutes, flipping halfway through, until the wings are golden brown and crispy, and the internal temperature reaches 165°F (74°C). Use a meat thermometer to check the internal temperature at the thickest part of the wing, avoiding the bone.
Air Frying Method:
- Preheat the air fryer (if required): Some air fryers require preheating. Check your air fryer’s instructions. I usually preheat mine to 380°F (190°C).
- Arrange the wings: Place the coated wings in the air fryer basket in a single layer. Do not overcrowd the basket. You may need to cook the wings in batches.
- Air fry the wings: Air fry for 20-25 minutes, flipping halfway through, until the wings are golden brown and crispy, and the internal temperature reaches 165°F (74°C). Again, use a meat thermometer to ensure they are cooked through.
Preparing the Finger Lickin’ Sauce:
- Combine the sauce ingredients: In a medium saucepan, whisk together the honey, soy sauce, rice vinegar, gochujang, brown sugar, sesame oil, minced garlic, grated ginger, and red pepper flakes (if using).
- Simmer the sauce: Bring the sauce to a simmer over medium heat, stirring occasionally.
- Thicken the sauce: In a small bowl, whisk together the cornstarch and cold water to create a slurry. Gradually pour the cornstarch slurry into the simmering sauce, whisking constantly, until the sauce thickens to your desired consistency. This usually takes just a minute or two.
- Taste and adjust: Taste the sauce and adjust the seasonings as needed. You can add more gochujang for extra heat, more honey for sweetness, or more soy sauce for saltiness.
- Keep warm: Remove the sauce from the heat and keep it warm until the wings are ready.
Coating and Serving the Wings:
- Toss the wings in the sauce: Once the wings are cooked, immediately transfer them to a large bowl. Pour the warm sauce over the wings and toss to coat evenly. Make sure every wing is generously covered in that delicious sauce!
- Garnish (optional): Sprinkle the wings with sesame seeds and chopped green onions for added flavor and visual appeal.
- Serve immediately: Serve the wings immediately while they are hot and crispy. These are best enjoyed fresh!
Tips and Tricks for the Best Finger Lickin’ Wings:
- Don’t skip the drying step: As mentioned before, drying the wings thoroughly is essential for crispy skin.
- Use a wire rack: Whether you’re baking or air frying, using a wire rack allows air to circulate around the wings, resulting in even cooking and crisping.
- Don’t overcrowd: Avoid overcrowding the baking sheet or air fryer basket. Cook the wings in batches if necessary.
- Adjust the sauce to your liking: The sauce recipe is a guideline. Feel free to adjust the ingredients to suit your taste preferences.
- Make the sauce ahead of time: You can prepare the sauce a day or two in advance and store it in the refrigerator. Simply reheat it before tossing with the wings.
- Reheating leftovers: If you have any leftover wings (which is unlikely!), you can reheat them in the oven or air fryer to restore some of their crispiness.
- Experiment with different flavors: Once you’ve mastered this recipe, feel free to experiment with different sauces and seasonings. The possibilities are endless!
Variations:
- Spicy Wings: Increase the amount of gochujang or red pepper flakes in the sauce for a spicier kick. You can also add a pinch of cayenne pepper to the dry rub.
- Sweet and Tangy Wings: Add a tablespoon of orange juice or pineapple juice to the sauce for a sweet and tangy flavor.
- Garlic Parmesan Wings: Omit the gochujang and red pepper flakes from the sauce. Add 2 tablespoons of grated Parmesan cheese and an extra clove of minced garlic.
- Lemon Pepper Wings: Add 1 tablespoon of lemon zest and 1 teaspoon of black pepper to the dry rub. Serve with a squeeze of fresh lemon juice.
Serving Suggestions:
These Finger Lickin’ Chicken Wings are perfect as an appetizer, snack, or main course. Here are a few serving suggestions:
- Serve with a side of coleslaw or potato salad.
- Pair with your favorite dipping sauce, such as ranch dressing or blue cheese dressing.
- Serve with a side of rice or noodles for a complete meal.
- Enjoy them while watching your favorite sports game or movie.
Storage Instructions:
Store leftover wings in an airtight container in the refrigerator for up to 3 days. Reheat in the oven or air fryer for best results.
Nutritional Information (approximate, per serving):
Please note that the nutritional information is an estimate and may vary depending on the specific ingredients used.
- Calories: 450-550
- Protein: 30-40g
- Fat: 25-35g
- Carbohydrates: 20-30g
Enjoy your Finger Lickin’ Chicken Wings! I hope you love them as much as I do!
Conclusion:
So there you have it! This recipe for finger-lickin’ chicken wings is truly a must-try. I know, I know, everyone claims their chicken wing recipe is the best, but trust me on this one. The combination of the crispy skin, the juicy meat, and that incredible sauce its simply irresistible. Its the perfect balance of sweet, savory, and just a hint of spice that will have you reaching for wing after wing.
Why is this recipe a must-try? Because it’s easy, relatively quick, and delivers restaurant-quality results right in your own kitchen. Forget ordering takeout; you can whip up a batch of these wings in less time than it takes for the delivery driver to arrive! Plus, you have complete control over the ingredients, ensuring a healthier and tastier outcome.
But the best part? The flavor! The marinade penetrates deep into the chicken, ensuring every bite is bursting with deliciousness. And that glaze? Oh, that glaze! It’s the secret weapon that elevates these wings from ordinary to extraordinary. It caramelizes beautifully in the oven, creating a sticky, finger-licking coating that you won’t be able to get enough of.
Now, let’s talk serving suggestions and variations. These wings are fantastic on their own as an appetizer or snack. But they also pair perfectly with a variety of sides. Think classic coleslaw, crispy french fries, creamy potato salad, or even a simple green salad to balance out the richness.
For variations, the possibilities are endless! Want to kick up the heat? Add a pinch of cayenne pepper or a dash of hot sauce to the marinade. Prefer a sweeter flavor profile? Increase the amount of honey or brown sugar in the glaze. You could even experiment with different herbs and spices, such as smoked paprika, garlic powder, or onion powder, to create your own signature flavor.
Another great variation is to use different cuts of chicken. While this recipe is specifically designed for wings, you could easily adapt it for drumsticks or even boneless, skinless chicken thighs. Just adjust the cooking time accordingly to ensure the chicken is cooked through.
And don’t forget the dipping sauces! While these wings are delicious on their own, a complementary dipping sauce can take them to the next level. Ranch dressing, blue cheese dressing, honey mustard, or even a simple sriracha mayo are all great options.
I truly believe that this recipe for finger lickin’ chicken wings will become a staple in your household. It’s perfect for game day, parties, or even just a casual weeknight dinner. It’s a crowd-pleaser that everyone will love.
So, what are you waiting for? Gather your ingredients, preheat your oven, and get ready to experience the best chicken wings you’ve ever tasted. I’m confident that you’ll be amazed by the results.
I’m so excited for you to try this recipe! And I would absolutely love to hear about your experience. Did you make any variations? What dipping sauce did you choose? What did your family and friends think?
Please, please, please come back and leave a comment below to let me know how it turned out. Your feedback is invaluable, and it helps me to continue creating delicious and easy-to-follow recipes that you’ll love. Share your photos too! I can’t wait to see your creations. Happy cooking!
Chicken Wings Finger Lickin': The Ultimate Guide to Deliciousness
Crispy and flavorful chicken wings coated in a finger-licking good honey-gochujang sauce. Perfect for game day or any occasion!
Ingredients
- 2.5 lbs Chicken Wings, separated at the joints, tips removed
- 1/4 cup All-Purpose Flour
- 1 tbsp Cornstarch
- 1 tsp Baking Powder
- 1 tsp Garlic Powder
- 1 tsp Onion Powder
- 1/2 tsp Smoked Paprika
- 1/2 tsp Cayenne Pepper (optional, for extra heat)
- 1/2 tsp Salt
- 1/4 tsp Black Pepper
- 1 cup Honey
- 1/2 cup Soy Sauce (low sodium preferred)
- 1/4 cup Rice Vinegar
- 2 tbsp Gochujang (Korean Chili Paste) – adjust to taste
- 2 tbsp Brown Sugar, packed
- 1 tbsp Sesame Oil
- 2 cloves Garlic, minced
- 1 tsp Ginger, grated
- 1/2 tsp Red Pepper Flakes (optional)
- 1 tbsp Cornstarch mixed with 2 tbsp cold water (slurry)
- Sesame Seeds
- Chopped Green Onions
Instructions
- Prepare the Wings: Pat the chicken wings thoroughly dry with paper towels.
- Combine Dry Ingredients: In a large bowl, whisk together flour, cornstarch, baking powder, garlic powder, onion powder, smoked paprika, cayenne pepper (if using), salt, and black pepper.
- Coat the Wings: Add the dried wings to the bowl with the dry ingredients. Toss to coat evenly. Alternatively, use a large ziplock bag to shake and coat.
- Rest (Optional): Place coated wings on a wire rack over a baking sheet and refrigerate for at least 30 minutes (up to a few hours) for extra crispiness.
- Baking Method:
- Preheat oven to 400°F (200°C).
- Line a baking sheet with parchment paper or foil and place a wire rack on top.
- Arrange wings in a single layer on the rack, ensuring they are not overcrowded.
- Bake for 40-50 minutes, flipping halfway through, until golden brown, crispy, and the internal temperature reaches 165°F (74°C).
- Air Frying Method:
- Preheat air fryer to 380°F (190°C) if required.
- Arrange wings in a single layer in the air fryer basket, do not overcrowd. Cook in batches if needed.
- Air fry for 20-25 minutes, flipping halfway through, until golden brown, crispy, and the internal temperature reaches 165°F (74°C).
- Combine Sauce Ingredients: In a medium saucepan, whisk together honey, soy sauce, rice vinegar, gochujang, brown sugar, sesame oil, minced garlic, grated ginger, and red pepper flakes (if using).
- Simmer: Bring to a simmer over medium heat, stirring occasionally.
- Thicken: Gradually pour in cornstarch slurry, whisking constantly, until the sauce thickens (1-2 minutes).
- Taste and Adjust: Adjust seasonings to taste.
- Keep Warm: Remove from heat and keep warm.
- Toss with Sauce: Transfer cooked wings to a large bowl. Pour warm sauce over wings and toss to coat evenly.
- Garnish (Optional): Sprinkle with sesame seeds and chopped green onions.
- Serve Immediately: Serve hot and crispy.
Notes
- Drying the wings is crucial for crispy skin.
- Use a wire rack for even cooking.
- Don’t overcrowd the baking sheet or air fryer.
- Adjust the sauce to your liking.
- The sauce can be made ahead of time.
- Reheat leftovers in the oven or air fryer.
- Experiment with different flavors and sauces.


Leave a Comment