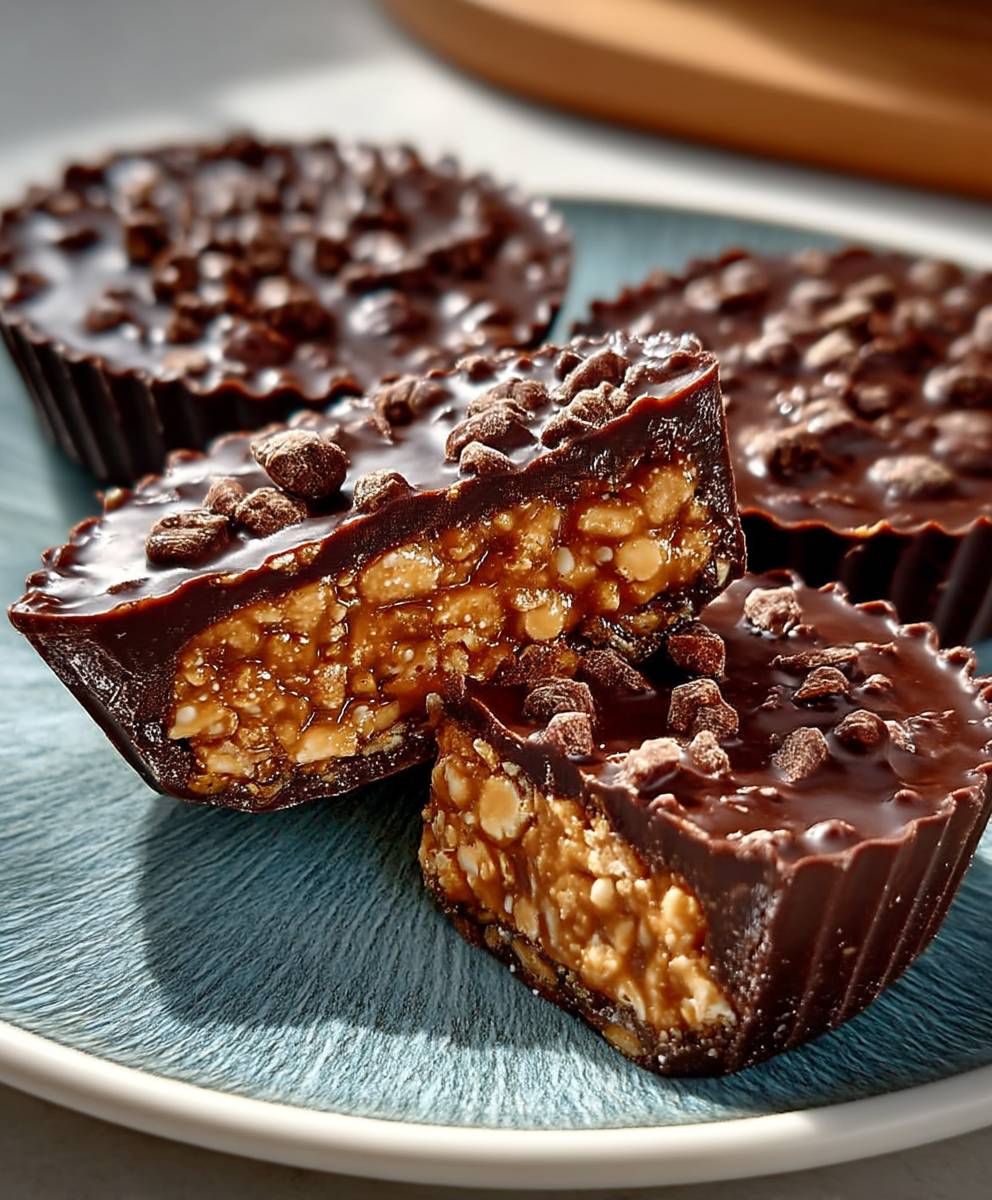
Chocolate peanut butter cups, those irresistible little bites of heaven, are a treat that transcends generations. Who can resist the perfect marriage of rich, dark chocolate and creamy, salty peanut butter? I know I certainly can’t! This recipe brings the iconic candy into your own kitchen, allowing you to customize every layer to your exact liking. Forget store-bought versions loaded with preservatives; with this simple guide, you’ll be whipping up homemade chocolate peanut butter cups that are far superior in taste and quality.
While the exact origins are debated, the modern chocolate peanut butter cup owes its popularity to H.B. Reese, a former Hershey employee who struck out on his own. His creation quickly became a beloved American classic, and its appeal has only grown over the years. The combination of sweet and salty, smooth and slightly crunchy, is simply addictive. Plus, they’re incredibly convenient a perfect grab-and-go snack or a satisfying dessert after a meal.
What makes these homemade cups so special? It’s the ability to control the ingredients. Use your favorite dark chocolate for an intense flavor, or opt for milk chocolate for a sweeter treat. Choose a natural peanut butter for a healthier option, or go for a classic creamy version for that nostalgic taste. The possibilities are endless! So, are you ready to embark on this delicious adventure? Let’s get started!
Ingredients:
- For the Chocolate Shell:
- 12 ounces semi-sweet chocolate chips
- 1 tablespoon coconut oil (optional, for shine)
- For the Peanut Butter Filling:
- 1 cup creamy peanut butter
- 1/2 cup powdered sugar
- 1/4 cup (4 tablespoons) unsalted butter, softened
- 1/4 teaspoon salt
- 1 teaspoon vanilla extract
Preparing the Chocolate Shell
Okay, let’s get started with the most important part the chocolate! We’re going to create a beautiful, glossy shell that will house our delicious peanut butter filling. Trust me, this is easier than it looks!
- Melt the Chocolate: In a heat-safe bowl set over a saucepan of simmering water (double boiler method), combine the chocolate chips and coconut oil (if using). Make sure the bottom of the bowl doesn’t touch the water. Stir frequently until the chocolate is completely melted and smooth. The coconut oil adds a lovely shine, but it’s totally optional if you don’t have any on hand. You can also melt the chocolate in the microwave in 30-second intervals, stirring in between, until melted and smooth. Be careful not to overheat it! Burnt chocolate is no fun.
- Prepare the Molds: While the chocolate is melting, prepare your molds. You can use silicone molds (mini muffin tins work great!) or paper liners in a muffin tin. Silicone molds are my personal favorite because the cups pop out so easily. If you’re using paper liners, lightly grease them with cooking spray to prevent sticking.
- First Layer of Chocolate: Once the chocolate is melted, spoon about 1-2 teaspoons of chocolate into each mold, enough to coat the bottom and sides. Use a small brush or the back of a spoon to spread the chocolate evenly up the sides of the mold. You want a nice, even layer that will hold the peanut butter filling.
- Chill the First Layer: Place the molds in the refrigerator or freezer for about 10-15 minutes, or until the chocolate is firm. This is crucial! You need a solid base before adding the peanut butter. If the chocolate isn’t firm enough, the peanut butter will mix with the chocolate, and we don’t want that.
Making the Peanut Butter Filling
Now for the star of the show the peanut butter filling! This is where the magic happens. We’re aiming for a creamy, slightly sweet, and perfectly peanut buttery filling that will complement the rich chocolate.
- Combine the Ingredients: In a medium bowl, combine the peanut butter, powdered sugar, softened butter, salt, and vanilla extract. Make sure your butter is truly softened; otherwise, you’ll end up with a lumpy filling.
- Mix Until Smooth: Use an electric mixer (handheld or stand mixer) to beat the ingredients together until smooth and creamy. Start on low speed to prevent the powdered sugar from flying everywhere, then increase the speed to medium. The mixture should be well combined and have a slightly stiff consistency. If it seems too dry, you can add a tiny splash of milk, but be careful not to add too much, or it will become too runny.
Assembling the Peanut Butter Cups
Alright, we’re in the home stretch! This is where we bring everything together to create those irresistible chocolate peanut butter cups. Get ready for some serious deliciousness!
- Add the Peanut Butter Filling: Remove the molds from the refrigerator or freezer. Spoon the peanut butter filling into each mold, on top of the hardened chocolate layer. Leave a little space at the top for the final layer of chocolate. You don’t want to overfill them!
- Second Layer of Chocolate: Re-melt the remaining chocolate if it has hardened. Spoon the melted chocolate over the peanut butter filling, spreading it evenly to cover the filling completely. Make sure the chocolate goes all the way to the edges of the mold to seal in the peanut butter.
- Final Chill: Place the molds back in the refrigerator or freezer for at least 30 minutes, or until the chocolate is completely firm. This is important to ensure the cups hold their shape and are easy to remove from the molds.
Removing and Storing the Cups
The moment we’ve all been waiting for! Time to unveil our homemade chocolate peanut butter cups. And don’t worry about storing them; they probably won’t last long!
- Remove from Molds: Once the chocolate is completely firm, gently remove the peanut butter cups from the molds. If you’re using silicone molds, they should pop out easily. If you’re using paper liners, carefully peel them away from the chocolate.
- Store Properly: Store the chocolate peanut butter cups in an airtight container in the refrigerator. They will keep for up to 2 weeks (if they last that long!). You can also freeze them for longer storage. Just wrap them individually in plastic wrap before placing them in a freezer-safe container.
Tips and Tricks for Perfect Peanut Butter Cups
Here are a few extra tips to ensure your chocolate peanut butter cups are absolutely perfect:
- Use High-Quality Chocolate: The quality of the chocolate will significantly impact the taste of the final product. Opt for a good-quality semi-sweet chocolate for the best flavor.
- Don’t Overheat the Chocolate: Overheated chocolate can become grainy and difficult to work with. Melt it slowly and carefully, stirring frequently.
- Adjust the Sweetness: If you prefer a less sweet filling, you can reduce the amount of powdered sugar.
- Add a Crunchy Element: For a little extra texture, you can add chopped peanuts or pretzels to the peanut butter filling.
- Get Creative with Flavors: Experiment with different flavors of chocolate and peanut butter. Try using dark chocolate, white chocolate, or even flavored peanut butter.
- Make Them Festive: Decorate the tops of the peanut butter cups with sprinkles, sea salt, or a drizzle of melted chocolate for a festive touch.
Troubleshooting
Sometimes things don’t go exactly as planned. Here are a few common issues and how to fix them:
- Chocolate is Seizing: If your chocolate seizes (becomes thick and grainy), it’s likely because it got too hot or came into contact with water. Try adding a tablespoon of vegetable oil or shortening and stirring vigorously. This can sometimes help to smooth it out.
- Peanut Butter Filling is Too Runny: If your peanut butter filling is too runny, add a little more powdered sugar, one tablespoon at a time, until it reaches the desired consistency.
- Peanut Butter Filling is Too Dry: If your peanut butter filling is too dry, add a tiny splash of milk, one teaspoon at a time, until it becomes smooth and creamy.
- Cups are Sticking to the Molds: If your cups are sticking to the molds, make sure you greased them well before adding the chocolate. You can also try running a thin knife around the edges of the cups to loosen them before removing them.
Variations
Want to mix things up? Here are a few fun variations to try:
- Dark Chocolate Peanut Butter Cups: Use dark chocolate instead of semi-sweet chocolate for a richer, more intense flavor.
- White Chocolate Peanut Butter Cups: Use white chocolate for a sweeter, creamier treat.
- Salted Caramel Peanut Butter Cups: Add a layer of salted caramel between the chocolate and peanut butter filling.
- Pretzel Peanut Butter Cups: Mix crushed pretzels into the peanut butter filling for a salty, crunchy twist.
- Cookie Butter Peanut Butter Cups: Use cookie butter instead of peanut butter for a unique and delicious flavor.
Enjoy your homemade chocolate peanut butter cups! They’re the perfect treat for any occasion.

Conclusion:
So, there you have it! These homemade chocolate peanut butter cups are truly a must-try for anyone who loves that perfect combination of sweet and salty. They’re ridiculously easy to make, require minimal ingredients, and deliver a flavor explosion that rivals anything you can buy in a store. Forget those mass-produced, overly sweet versions these are the real deal, made with love (and your own two hands!).
But why are they *really* a must-try? Because they’re completely customizable! Feeling adventurous? Try adding a sprinkle of sea salt on top for an extra layer of flavor. Or, for a bit of crunch, mix some chopped peanuts into the peanut butter filling. You could even swirl in a little caramel sauce before the chocolate sets for an even more decadent treat. The possibilities are endless!
Serving Suggestions and Variations
These little cups of joy are perfect for any occasion. Serve them as a simple dessert after dinner, bring them to a potluck, or package them up as a thoughtful homemade gift. They’re also fantastic frozen just pop them in the freezer for a few hours for a cool and refreshing treat on a hot day.
Here are a few more ideas to get your creative juices flowing:
* Dark Chocolate Delight: Use dark chocolate instead of milk chocolate for a richer, more intense flavor.
* White Chocolate Wonder: Swap the milk chocolate for white chocolate and add a few drops of peppermint extract to the peanut butter filling for a festive holiday treat.
* Nutella Dream: Replace some of the peanut butter with Nutella for a hazelnut twist.
* Espresso Buzz: Add a teaspoon of instant espresso powder to the melted chocolate for a coffee-infused kick.
* Vegan Version: Use dairy-free chocolate and peanut butter to create a vegan-friendly version that everyone can enjoy.
Honestly, once you make these chocolate peanut butter cups once, you’ll be hooked. They’re so much better than anything store-bought, and you’ll love knowing exactly what ingredients are going into them. Plus, they’re a fun and easy project to do with kids (or just for yourself!).
I truly believe that everyone deserves to experience the joy of homemade chocolate peanut butter cups. They’re a simple pleasure that can brighten any day. So, what are you waiting for? Get in the kitchen, gather your ingredients, and prepare to be amazed!
I’m so excited for you to try this recipe! And I’d absolutely love to hear about your experience. Did you try any of the variations? Did you add your own special touch? Please, share your thoughts and photos in the comments below! Let’s create a community of chocolate peanut butter cup enthusiasts! Happy baking (or, in this case, chilling)! I can’t wait to see what you create. Don’t forget to rate the recipe once you’ve tried it! Your feedback helps others discover this delicious treat.
Chocolate Peanut Butter Cups: The Ultimate Homemade Recipe
Homemade chocolate peanut butter cups with a rich chocolate shell and creamy peanut butter filling. Easy to make and even easier to devour!
Ingredients
- 12 ounces semi-sweet chocolate chips
- 1 tablespoon coconut oil (optional, for shine)
- 1 cup creamy peanut butter
- 1/2 cup powdered sugar
- 1/4 cup (4 tablespoons) unsalted butter, softened
- 1/4 teaspoon salt
- 1 teaspoon vanilla extract
Instructions
- Melt the Chocolate: In a heat-safe bowl set over a saucepan of simmering water (double boiler method), combine the chocolate chips and coconut oil (if using). Make sure the bottom of the bowl doesn’t touch the water. Stir frequently until the chocolate is completely melted and smooth. Alternatively, melt the chocolate in the microwave in 30-second intervals, stirring in between, until melted and smooth. Be careful not to overheat it.
- Prepare the Molds: Prepare your molds. You can use silicone molds (mini muffin tins work great!) or paper liners in a muffin tin. If you’re using paper liners, lightly grease them with cooking spray to prevent sticking.
- First Layer of Chocolate: Once the chocolate is melted, spoon about 1-2 teaspoons of chocolate into each mold, enough to coat the bottom and sides. Use a small brush or the back of a spoon to spread the chocolate evenly up the sides of the mold.
- Chill the First Layer: Place the molds in the refrigerator or freezer for about 10-15 minutes, or until the chocolate is firm.
- Combine the Ingredients (Filling): In a medium bowl, combine the peanut butter, powdered sugar, softened butter, salt, and vanilla extract. Make sure your butter is truly softened.
- Mix Until Smooth (Filling): Use an electric mixer (handheld or stand mixer) to beat the ingredients together until smooth and creamy. Start on low speed to prevent the powdered sugar from flying everywhere, then increase the speed to medium.
- Add the Peanut Butter Filling: Remove the molds from the refrigerator or freezer. Spoon the peanut butter filling into each mold, on top of the hardened chocolate layer. Leave a little space at the top for the final layer of chocolate.
- Second Layer of Chocolate: Re-melt the remaining chocolate if it has hardened. Spoon the melted chocolate over the peanut butter filling, spreading it evenly to cover the filling completely.
- Final Chill: Place the molds back in the refrigerator or freezer for at least 30 minutes, or until the chocolate is completely firm.
- Remove from Molds: Once the chocolate is completely firm, gently remove the peanut butter cups from the molds.
- Store Properly: Store the chocolate peanut butter cups in an airtight container in the refrigerator. They will keep for up to 2 weeks (if they last that long!). You can also freeze them for longer storage. Just wrap them individually in plastic wrap before placing them in a freezer-safe container.
Notes
- Use high-quality chocolate for the best flavor.
- Don’t overheat the chocolate.
- Adjust the sweetness of the filling to your preference.
- Add chopped peanuts or pretzels to the peanut butter filling for extra texture.
- Experiment with different flavors of chocolate and peanut butter.
- Decorate the tops of the peanut butter cups with sprinkles, sea salt, or a drizzle of melted chocolate for a festive touch.


Leave a Comment