
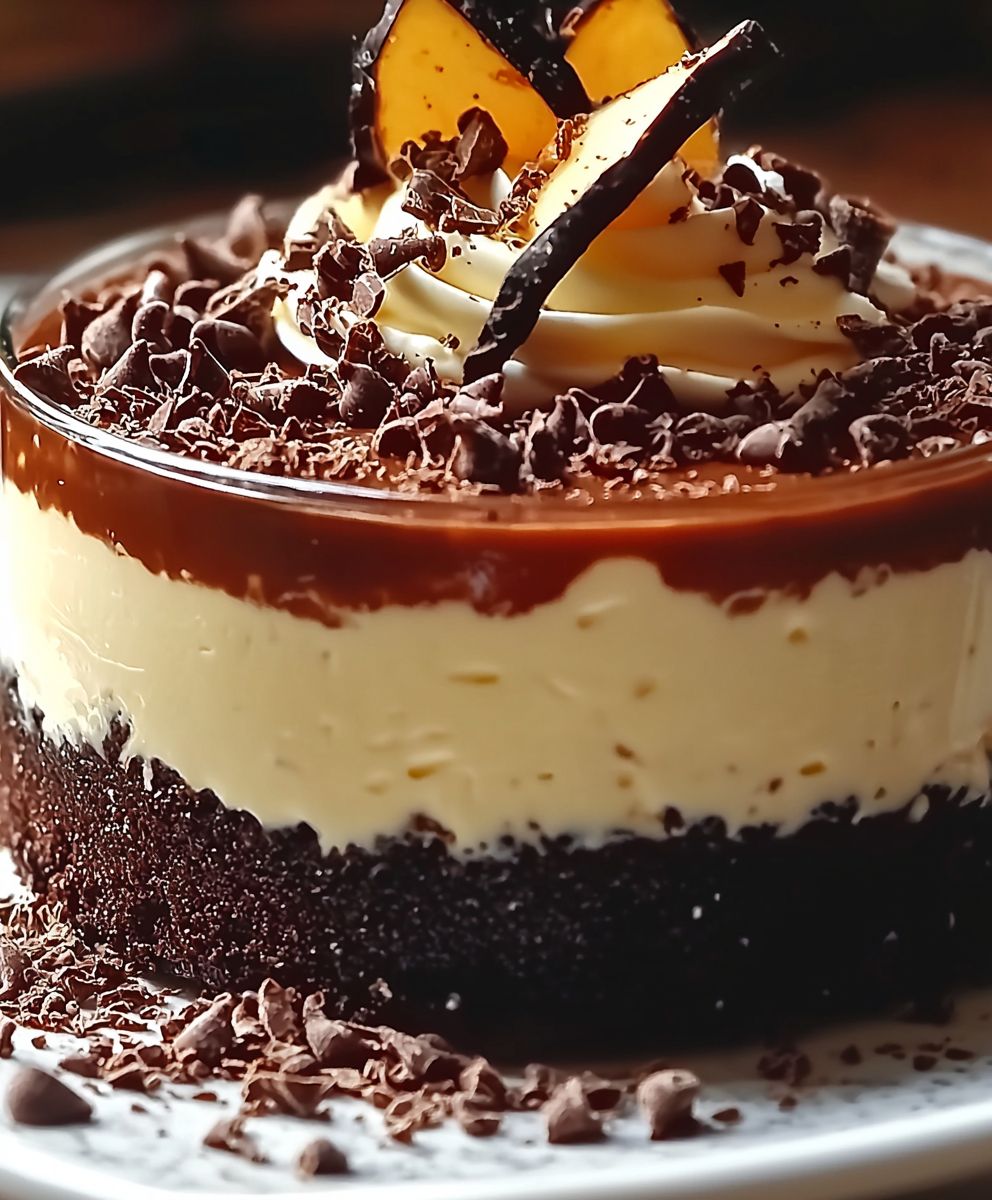
Chocolate Vanilla Cream: Prepare to be transported to dessert heaven with this decadent and surprisingly simple treat! Imagine layers of rich, dark chocolate meeting the smooth, delicate sweetness of vanilla a symphony of flavors that dance on your tongue. This isn’t just a dessert; it’s an experience.
While the exact origins of Chocolate Vanilla Cream are shrouded in a bit of mystery, the combination of chocolate and vanilla has been a beloved pairing for centuries. Both ingredients boast a rich history, with chocolate originating in ancient Mesoamerica and vanilla prized by the Totonac people of Mexico long before European colonization. Their union in desserts like this one represents a beautiful fusion of cultures and culinary traditions.
But what makes this particular dessert so irresistible? It’s the perfect balance of textures the velvety creaminess punctuated by the intense chocolate notes. It’s also incredibly versatile; enjoy it chilled straight from the fridge, use it as a filling for cakes or pastries, or even dollop it on top of fresh fruit. Plus, it’s surprisingly easy to make, requiring minimal ingredients and effort. Whether you’re a seasoned baker or a kitchen novice, this Chocolate Vanilla Cream recipe is guaranteed to impress. Get ready to indulge!

Ingredients:
- For the Chocolate Cake Layers:
- 2 cups all-purpose flour
- 2 cups granulated sugar
- ¾ cup unsweetened cocoa powder
- 1 ½ teaspoons baking powder
- 1 ½ teaspoons baking soda
- 1 teaspoon salt
- 1 cup buttermilk
- ½ cup vegetable oil
- 2 large eggs
- 2 teaspoons vanilla extract
- 1 cup boiling water
- For the Vanilla Cake Layers:
- 2 cups all-purpose flour
- 2 cups granulated sugar
- 2 ½ teaspoons baking powder
- ½ teaspoon salt
- 1 cup milk
- ½ cup (1 stick) unsalted butter, softened
- 2 large eggs
- 2 teaspoons vanilla extract
- For the Vanilla Cream Filling:
- 1 ½ cups heavy cream
- ½ cup powdered sugar
- 1 teaspoon vanilla extract
- For the Chocolate Cream Filling:
- 1 ½ cups heavy cream
- ½ cup powdered sugar
- ¼ cup unsweetened cocoa powder
- ½ teaspoon vanilla extract
- For the Chocolate Ganache (Optional):
- 8 ounces semi-sweet chocolate, chopped
- 1 cup heavy cream
Preparing the Chocolate Cake Layers:
- Preheat and Prepare: First things first, preheat your oven to 350°F (175°C). Grease and flour two 9-inch round cake pans. I like to use baking spray with flour already in it it makes life so much easier! You can also line the bottoms with parchment paper rounds for extra insurance against sticking.
- Combine Dry Ingredients: In a large bowl, whisk together the flour, sugar, cocoa powder, baking powder, baking soda, and salt. Make sure everything is evenly distributed. This step is crucial for a consistent rise and flavor.
- Add Wet Ingredients: In a separate bowl, whisk together the buttermilk, oil, eggs, and vanilla extract. Pour the wet ingredients into the dry ingredients and mix until just combined. Be careful not to overmix! Overmixing can lead to a tough cake.
- Incorporate Boiling Water: Gradually add the boiling water to the batter while mixing on low speed. The batter will be thin don’t worry, that’s normal! The hot water helps to bloom the cocoa powder and create a moist cake.
- Bake: Divide the batter evenly between the prepared cake pans. Bake for 30-35 minutes, or until a wooden skewer inserted into the center comes out clean.
- Cool: Let the cakes cool in the pans for 10 minutes before inverting them onto a wire rack to cool completely. This prevents them from sticking and allows them to cool evenly.
Preparing the Vanilla Cake Layers:
- Preheat and Prepare: Preheat your oven to 350°F (175°C). Grease and flour two 9-inch round cake pans, or line with parchment paper rounds.
- Cream Butter and Sugar: In a large bowl, cream together the softened butter and sugar until light and fluffy. This is best done with an electric mixer. Creaming the butter and sugar incorporates air, which helps create a light and tender cake.
- Add Eggs and Vanilla: Beat in the eggs one at a time, then stir in the vanilla extract. Make sure each egg is fully incorporated before adding the next.
- Combine Dry Ingredients: In a separate bowl, whisk together the flour, baking powder, and salt.
- Alternate Wet and Dry Ingredients: Gradually add the dry ingredients to the wet ingredients, alternating with the milk, beginning and ending with the dry ingredients. Mix until just combined. Again, avoid overmixing!
- Bake: Divide the batter evenly between the prepared cake pans. Bake for 25-30 minutes, or until a wooden skewer inserted into the center comes out clean.
- Cool: Let the cakes cool in the pans for 10 minutes before inverting them onto a wire rack to cool completely.
Making the Vanilla Cream Filling:
- Chill Bowl and Whisk: Place your mixing bowl and whisk attachment (or beaters) in the freezer for about 15-20 minutes. This helps the cream whip up faster and hold its shape better.
- Whip Cream: Pour the heavy cream into the chilled bowl and beat on medium speed until soft peaks form.
- Add Sugar and Vanilla: Gradually add the powdered sugar and vanilla extract, and continue to beat until stiff peaks form. Be careful not to overwhip, or the cream will turn grainy.
- Refrigerate: Cover the bowl and refrigerate the vanilla cream filling until ready to use. This helps it stay firm.
Making the Chocolate Cream Filling:
- Chill Bowl and Whisk: Just like with the vanilla cream, chill your mixing bowl and whisk attachment (or beaters) in the freezer for about 15-20 minutes.
- Whip Cream: Pour the heavy cream into the chilled bowl and beat on medium speed until soft peaks form.
- Add Sugar, Cocoa, and Vanilla: Gradually add the powdered sugar, cocoa powder, and vanilla extract, and continue to beat until stiff peaks form. Be careful not to overwhip!
- Refrigerate: Cover the bowl and refrigerate the chocolate cream filling until ready to use.
Assembling the Cake:
- Level the Cakes: Once the cakes are completely cool, use a serrated knife to level the tops of each cake layer. This ensures a flat and even cake.
- First Layer: Place one chocolate cake layer on a serving plate or cake stand.
- Vanilla Cream Filling: Spread a generous layer of the vanilla cream filling evenly over the chocolate cake layer.
- Second Layer: Place one vanilla cake layer on top of the vanilla cream filling.
- Chocolate Cream Filling: Spread a generous layer of the chocolate cream filling evenly over the vanilla cake layer.
- Third Layer: Place the second chocolate cake layer on top of the chocolate cream filling.
- Vanilla Cream Filling: Spread another layer of the vanilla cream filling evenly over the chocolate cake layer.
- Fourth Layer: Place the second vanilla cake layer on top of the vanilla cream filling.
- Frosting (Optional): You can frost the entire cake with either the vanilla or chocolate cream filling, or make a simple buttercream frosting. Alternatively, you can make a chocolate ganache (see instructions below).
- Chill: Refrigerate the cake for at least 30 minutes before serving. This allows the fillings to set and the flavors to meld together.
Making the Chocolate Ganache (Optional):
- Heat Cream: Place the heavy cream in a saucepan and heat over medium heat until it just begins to simmer. Do not boil!
- Pour Over Chocolate: Pour the hot cream over the chopped chocolate in a heatproof bowl.
- Let Sit: Let the mixture sit for 1 minute to allow the chocolate to melt.
- Stir: Gently stir the mixture until smooth and glossy.
- Cool Slightly: Let the ganache cool slightly before pouring it over the cake. This will help it thicken and create a beautiful drip effect.
- Pour Over Cake: Pour the ganache over the top of the cake, allowing it to drip down the sides. You can use a spatula to spread it evenly.
- Chill: Refrigerate the cake for at least 30 minutes to allow the ganache to set.
Conclusion:
And there you have it! This Chocolate Vanilla Cream recipe is truly a must-try for anyone who loves a decadent, yet surprisingly simple dessert. From the rich, intense chocolate layer to the light and airy vanilla cream, every spoonful is a symphony of textures and flavors that will leave you wanting more. I know I always do! But why is this recipe so special? It’s more than just a pretty dessert. It’s about the experience. It’s about the joy of creating something beautiful and delicious with your own hands. It’s about the satisfaction of knowing you’re serving something truly special to your loved ones (or just yourself no judgment here!). The balance between the bittersweet chocolate and the sweet vanilla is just perfect, making it a crowd-pleaser for all ages. Plus, it’s incredibly versatile! Think of this recipe as a starting point, a blank canvas for your culinary creativity. Feeling adventurous? Try adding a hint of espresso powder to the chocolate layer for a mocha twist. Or, swirl in some raspberry jam for a fruity and tangy variation. For a more sophisticated flavor profile, consider using dark chocolate with a higher cacao percentage. The possibilities are endless! Serving suggestions? Oh, where do I even begin? This Chocolate Vanilla Cream is divine on its own, served chilled in elegant glasses or small ramekins. But you can also elevate it with a few simple additions. A sprinkle of cocoa powder or chocolate shavings adds a touch of visual appeal and intensifies the chocolate flavor. Fresh berries, like raspberries or strawberries, provide a burst of freshness and acidity that complements the richness of the cream. A dollop of whipped cream or a scoop of vanilla ice cream takes it to the next level of indulgence. For a more casual presentation, try layering the chocolate and vanilla cream in parfait glasses with crushed cookies or granola. This makes a fun and easy dessert for parties or potlucks. You could even use it as a filling for cupcakes or a topping for brownies. Seriously, this recipe is so adaptable, you’ll find yourself using it in all sorts of creative ways. I truly believe that this recipe is a winner. It’s easy to make, requires minimal ingredients, and delivers maximum flavor. It’s the perfect dessert for any occasion, from a weeknight treat to a special celebration. It’s also a great way to impress your friends and family without spending hours in the kitchen. So, what are you waiting for? Gather your ingredients, put on your apron, and get ready to create some magic! I’m confident that you’ll love this Chocolate Vanilla Cream as much as I do. And most importantly, I want to hear about your experience! Did you try the recipe? Did you make any variations? What did your friends and family think? Share your photos and stories in the comments below. I can’t wait to see what you create! Happy baking (or should I say, chilling?)! I hope you enjoy this recipe as much as I do, and I look forward to hearing all about your delicious creations! PrintChocolate Vanilla Cream: A Delicious Dessert Recipe
Decadent layered cake with chocolate and vanilla cake, vanilla and chocolate cream fillings, and optional chocolate ganache.
- Prep Time: 1 hour
- Cook Time: 70 minutes
- Total Time: 130 minutes
- Yield: 12–16 servings 1x
Ingredients
- 2 cups all-purpose flour
- 2 cups granulated sugar
- ¾ cup unsweetened cocoa powder
- 1 ½ teaspoons baking powder
- 1 ½ teaspoons baking soda
- 1 teaspoon salt
- 1 cup buttermilk
- ½ cup vegetable oil
- 2 large eggs
- 2 teaspoons vanilla extract
- 1 cup boiling water
- 2 cups all-purpose flour
- 2 cups granulated sugar
- 2 ½ teaspoons baking powder
- ½ teaspoon salt
- 1 cup milk
- ½ cup (1 stick) unsalted butter, softened
- 2 large eggs
- 2 teaspoons vanilla extract
- 1 ½ cups heavy cream
- ½ cup powdered sugar
- 1 teaspoon vanilla extract
- 1 ½ cups heavy cream
- ½ cup powdered sugar
- ¼ cup unsweetened cocoa powder
- ½ teaspoon vanilla extract
- 8 ounces semi-sweet chocolate, chopped
- 1 cup heavy cream
Instructions
- Preheat your oven to 350°F (175°C). Grease and flour two 9-inch round cake pans. You can also line the bottoms with parchment paper rounds.
- In a large bowl, whisk together the flour, sugar, cocoa powder, baking powder, baking soda, and salt.
- In a separate bowl, whisk together the buttermilk, oil, eggs, and vanilla extract. Pour the wet ingredients into the dry ingredients and mix until just combined. Be careful not to overmix!
- Gradually add the boiling water to the batter while mixing on low speed. The batter will be thin don’t worry, that’s normal!
- Divide the batter evenly between the prepared cake pans. Bake for 30-35 minutes, or until a wooden skewer inserted into the center comes out clean.
- Let the cakes cool in the pans for 10 minutes before inverting them onto a wire rack to cool completely.
- Preheat your oven to 350°F (175°C). Grease and flour two 9-inch round cake pans, or line with parchment paper rounds.
- In a large bowl, cream together the softened butter and sugar until light and fluffy. This is best done with an electric mixer.
- Beat in the eggs one at a time, then stir in the vanilla extract. Make sure each egg is fully incorporated before adding the next.
- In a separate bowl, whisk together the flour, baking powder, and salt.
- Gradually add the dry ingredients to the wet ingredients, alternating with the milk, beginning and ending with the dry ingredients. Mix until just combined. Again, avoid overmixing!
- Divide the batter evenly between the prepared cake pans. Bake for 25-30 minutes, or until a wooden skewer inserted into the center comes out clean.
- Let the cakes cool in the pans for 10 minutes before inverting them onto a wire rack to cool completely.
- Place your mixing bowl and whisk attachment (or beaters) in the freezer for about 15-20 minutes.
- Pour the heavy cream into the chilled bowl and beat on medium speed until soft peaks form.
- Gradually add the powdered sugar and vanilla extract, and continue to beat until stiff peaks form. Be careful not to overwhip, or the cream will turn grainy.
- Cover the bowl and refrigerate the vanilla cream filling until ready to use.
- Just like with the vanilla cream, chill your mixing bowl and whisk attachment (or beaters) in the freezer for about 15-20 minutes.
- Pour the heavy cream into the chilled bowl and beat on medium speed until soft peaks form.
- Gradually add the powdered sugar, cocoa powder, and vanilla extract, and continue to beat until stiff peaks form. Be careful not to overwhip!
- Cover the bowl and refrigerate the chocolate cream filling until ready to use.
- Once the cakes are completely cool, use a serrated knife to level the tops of each cake layer. This ensures a flat and even cake.
- Place one chocolate cake layer on a serving plate or cake stand.
- Spread a generous layer of the vanilla cream filling evenly over the chocolate cake layer.
- Place one vanilla cake layer on top of the vanilla cream filling.
- Spread a generous layer of the chocolate cream filling evenly over the vanilla cake layer.
- Place the second chocolate cake layer on top of the chocolate cream filling.
- Spread another layer of the vanilla cream filling evenly over the chocolate cake layer.
- Place the second vanilla cake layer on top of the vanilla cream filling.
- You can frost the entire cake with either the vanilla or chocolate cream filling, or make a simple buttercream frosting. Alternatively, you can make a chocolate ganache (see instructions below).
- Refrigerate the cake for at least 30 minutes before serving. This allows the fillings to set and the flavors to meld together.
- Place the heavy cream in a saucepan and heat over medium heat until it just begins to simmer. Do not boil!
- Pour the hot cream over the chopped chocolate in a heatproof bowl.
- Let the mixture sit for 1 minute to allow the chocolate to melt.
- Gently stir the mixture until smooth and glossy.
- Let the ganache cool slightly before pouring it over the cake. This will help it thicken and create a beautiful drip effect.
- Pour the ganache over the top of the cake, allowing it to drip down the sides. You can use a spatula to spread it evenly.
- Refrigerate the cake for at least 30 minutes to allow the ganache to set.
Notes
- For best results, use high-quality cocoa powder and chocolate.
- Don’t overmix the cake batters, as this can lead to a tough cake.
- Make sure the cakes are completely cool before frosting to prevent the frosting from melting.
- Chilling the cake before serving allows the flavors to meld together and the frosting to set.
- You can substitute the vanilla and chocolate cream fillings with your favorite buttercream frosting.
- The ganache is optional, but it adds a beautiful and decadent touch to the cake.

Leave a Comment