
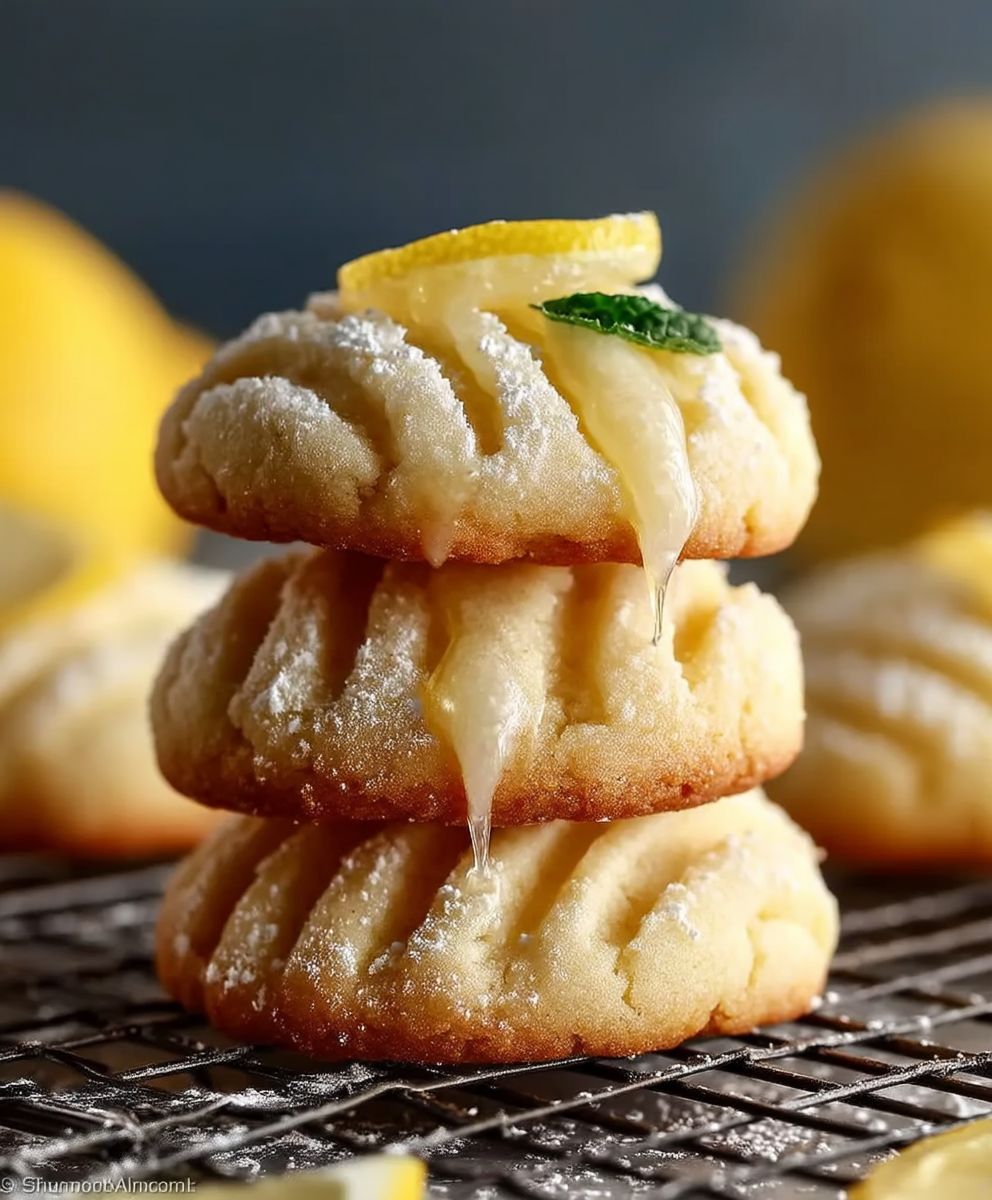
Christmas Lemon Cookies: the very words conjure up images of twinkling lights, cozy fireplaces, and the sweet, tangy aroma of citrus mingling with holiday cheer. Forget the same old gingerbread this year, let’s elevate your festive baking with a burst of sunshine! Are you ready to discover a cookie that’s both refreshingly different and utterly irresistible?
While the exact origins of lemon cookies are shrouded in a bit of mystery, citrus fruits have long been associated with celebrations and special occasions across various cultures. Lemons, in particular, were prized for their vibrant flavor and perceived medicinal properties. Incorporating them into cookies, especially around the holidays, was a way to bring a touch of brightness to the darker, colder months.
What makes Christmas Lemon Cookies so universally loved? It’s the perfect balance of sweet and tart, the delicate crumb that melts in your mouth, and the invigorating lemon zest that awakens your senses. They’re also incredibly versatile! Whether you prefer a simple glaze, a dusting of powdered sugar, or even a decadent cream cheese frosting, these cookies are a blank canvas for your creativity. Plus, they’re surprisingly easy to make, making them a perfect project for bakers of all skill levels. So, gather your ingredients, preheat your oven, and let’s embark on a baking adventure that will fill your home with the delightful scent of Christmas and lemon!

Ingredients:
- 1 cup (2 sticks) unsalted butter, softened
- 1 ½ cups granulated sugar
- 2 large eggs
- ¼ cup lemon juice, freshly squeezed
- 2 tablespoons lemon zest, finely grated
- 1 teaspoon vanilla extract
- 3 cups all-purpose flour, plus more for dusting
- 1 teaspoon baking powder
- ½ teaspoon baking soda
- ¼ teaspoon salt
Lemon Glaze:
- 2 cups powdered sugar
- ¼ cup lemon juice, freshly squeezed (more if needed)
- 1 tablespoon milk (optional, for thinner glaze)
- ½ teaspoon lemon zest, finely grated (optional)
Instructions:
Preparing the Cookie Dough:
- Cream the Butter and Sugar: In a large bowl, or in the bowl of a stand mixer fitted with the paddle attachment, cream together the softened butter and granulated sugar until light and fluffy. This usually takes about 3-5 minutes on medium speed. Make sure to scrape down the sides of the bowl occasionally to ensure everything is evenly mixed. You want the mixture to be pale and airy, which is key to a tender cookie.
- Incorporate the Eggs: Beat in the eggs one at a time, mixing well after each addition. Again, scrape down the sides of the bowl to ensure everything is fully incorporated. If the mixture looks slightly curdled, don’t worry! It will come together once the dry ingredients are added.
- Add the Lemon Flavor: Stir in the lemon juice, lemon zest, and vanilla extract. The lemon zest is crucial for that bright, citrusy flavor, so don’t skip it! Make sure the zest is finely grated to avoid any bitter pieces in your cookies.
- Combine Dry Ingredients: In a separate medium bowl, whisk together the all-purpose flour, baking powder, baking soda, and salt. Whisking ensures that the baking powder and baking soda are evenly distributed throughout the flour, which will help the cookies rise properly.
- Gradually Add Dry Ingredients to Wet Ingredients: Gradually add the dry ingredients to the wet ingredients, mixing on low speed until just combined. Be careful not to overmix the dough, as this can lead to tough cookies. Mix until the flour is just incorporated, and then stop. A few streaks of flour are okay.
- Chill the Dough: Wrap the dough in plastic wrap and flatten it into a disc. This helps it chill more evenly. Refrigerate for at least 2 hours, or preferably overnight. Chilling the dough is essential because it allows the gluten to relax, which results in a more tender cookie. It also prevents the cookies from spreading too much during baking.
Baking the Cookies:
- Preheat the Oven: Preheat your oven to 375°F (190°C). Line baking sheets with parchment paper or silicone baking mats. Parchment paper prevents the cookies from sticking and makes cleanup a breeze.
- Roll Out the Dough: On a lightly floured surface, roll out the chilled dough to about ¼ inch thickness. If the dough is sticking, add a little more flour to the surface.
- Cut Out the Cookies: Use cookie cutters to cut out your desired shapes. I love using Christmas-themed cookie cutters for these, like stars, trees, and snowflakes!
- Place on Baking Sheets: Place the cut-out cookies onto the prepared baking sheets, leaving about 1 inch of space between each cookie. This allows for even baking and prevents the cookies from sticking together.
- Bake: Bake for 8-10 minutes, or until the edges are lightly golden brown. Keep a close eye on them, as they can burn easily. The baking time will depend on the size and thickness of your cookies.
- Cool: Remove the baking sheets from the oven and let the cookies cool on the baking sheets for a few minutes before transferring them to a wire rack to cool completely.
Preparing the Lemon Glaze:
- Whisk Together Ingredients: In a medium bowl, whisk together the powdered sugar, lemon juice, milk (if using), and lemon zest (if using) until smooth. Start with the smaller amount of lemon juice and add more as needed to reach your desired consistency. The glaze should be thick enough to coat the cookies but thin enough to spread easily.
- Adjust Consistency: If the glaze is too thick, add a little more lemon juice or milk, one teaspoon at a time, until it reaches the desired consistency. If the glaze is too thin, add a little more powdered sugar, one tablespoon at a time, until it thickens up.
Glazing the Cookies:
- Glaze the Cookies: Once the cookies are completely cool, dip the tops of the cookies into the lemon glaze, or spread the glaze evenly over the tops of the cookies using a small offset spatula or spoon.
- Decorate (Optional): If desired, decorate the glazed cookies with sprinkles, sanding sugar, or other festive decorations. Do this while the glaze is still wet so the decorations will adhere properly.
- Let the Glaze Set: Let the glaze set completely before serving or storing the cookies. This usually takes about 30 minutes to an hour.
Tips for Success:
- Use Room Temperature Butter: Softened butter is crucial for creaming properly with the sugar. If your butter is too cold, it won’t cream properly, and your cookies may be dense. If your butter is too melted, the cookies may spread too much.
- Don’t Overmix the Dough: Overmixing the dough develops the gluten, which can result in tough cookies. Mix until the flour is just incorporated, and then stop.
- Chill the Dough: Chilling the dough is essential for preventing the cookies from spreading too much during baking and for developing the flavor.
- Bake Evenly: Rotate the baking sheets halfway through baking to ensure that the cookies bake evenly.
- Cool Completely Before Glazing: Make sure the cookies are completely cool before glazing, or the glaze will melt.
- Store Properly: Store the glazed cookies in an airtight container at room temperature for up to 3-5 days.
Variations:
- Add Almond Extract: For a slightly different flavor, add ½ teaspoon of almond extract to the cookie dough along with the vanilla extract.
- Use Different Citrus: You can substitute the lemon juice and zest with orange juice and zest for a delicious orange-flavored cookie.
- Add Poppy Seeds: Add 1-2 tablespoons of poppy seeds to the cookie dough for a subtle crunch and visual appeal.
- Make Sandwich Cookies: Sandwich two cookies together with a layer of lemon buttercream frosting for an extra-special treat.
- Use Different Decorations: Get creative with your decorations! Use different colors of sprinkles, edible glitter, or even royal icing to create festive designs.
Troubleshooting:
- Cookies Spreading Too Much: If your cookies are spreading too much, make sure your oven temperature is accurate, and that you are using the correct amount of flour. Also, make sure your butter is not too melted. Chilling the dough for a longer period of time can also help.
- Cookies Are Too Dry: If your cookies are too dry, try adding a little more butter or lemon juice to the dough. Also, be careful not to overbake them.
- Glaze Is Too Thick: If your glaze is too thick, add a little more lemon juice or milk, one teaspoon at a time, until it reaches the desired consistency.
- Glaze Is Too Thin: If your glaze is too thin, add a little more powdered sugar, one tablespoon at a time, until it thickens up.
Conclusion:
And there you have it! These Christmas Lemon Cookies are more than just a treat; they’re a burst of sunshine in the middle of winter, a delightful combination of tangy and sweet that will leave you wanting more. I truly believe this recipe is a must-try for anyone looking to add a little zest to their holiday baking. The bright lemon flavor cuts through the richness of the season, offering a refreshing change of pace from the usual gingerbread and peppermint.
But why are these cookies so special? It’s the perfect balance of textures a slightly crisp edge giving way to a soft, chewy center. It’s the vibrant lemon aroma that fills your kitchen as they bake, instantly creating a festive and inviting atmosphere. And it’s the simple elegance of the cookie itself, requiring no complicated decorating skills, yet still looking beautiful enough to grace any holiday dessert platter.
Beyond their inherent deliciousness, these cookies are incredibly versatile. Serve them alongside a steaming mug of hot chocolate for a cozy evening treat. Pair them with a scoop of vanilla ice cream for a simple yet satisfying dessert. Or, package them up in decorative tins and give them as homemade gifts to friends and family they’re guaranteed to be a hit!
Looking for variations? You could add a sprinkle of poppy seeds to the dough for a subtle nutty flavor and visual appeal. Experiment with different citrus fruits lime or orange would also work beautifully. For an extra touch of indulgence, dip half of each cookie in melted white chocolate and sprinkle with festive sprinkles. If you’re feeling adventurous, try adding a teaspoon of lemon extract to the dough for an even more intense lemon flavor. You can also add a pinch of cardamom or ginger to the dough for a warm, spicy note that complements the lemon perfectly.
Serving Suggestions:
* Enjoy with a cup of tea or coffee.
* Serve as part of a holiday dessert buffet.
* Package them as gifts for friends and family.
* Crumble them over yogurt or ice cream.
* Use them as a base for mini lemon tarts.
Variations:
* Add poppy seeds to the dough.
* Substitute lime or orange for lemon.
* Dip in melted white chocolate.
* Add a teaspoon of lemon extract.
* Incorporate a pinch of cardamom or ginger.
I’m so excited for you to try this recipe and experience the joy of baking these delightful Christmas Lemon Cookies for yourself. I know you’ll love them as much as I do!
So, gather your ingredients, preheat your oven, and get ready to create some magic in the kitchen. Don’t be afraid to experiment with different variations and make the recipe your own. And most importantly, have fun!
Once you’ve baked your batch of these amazing cookies, I’d love to hear about your experience. Did you make any modifications? What did your family and friends think? Share your photos and stories in the comments below I can’t wait to see your creations! Happy baking, and happy holidays! I hope these cookies bring a little bit of sunshine and sweetness to your celebrations.
Christmas Lemon Cookies: A Festive & Zesty Recipe
Bright and cheerful lemon cookies, perfect for any occasion! These tender cut-out cookies are bursting with fresh lemon flavor and topped with a tangy lemon glaze.
Ingredients
- 1 cup (2 sticks) unsalted butter, softened
- 1 1/2 cups granulated sugar
- 2 large eggs
- 1/4 cup lemon juice, freshly squeezed
- 2 tablespoons lemon zest, finely grated
- 1 teaspoon vanilla extract
- 3 cups all-purpose flour, plus more for dusting
- 1 teaspoon baking powder
- 1/2 teaspoon baking soda
- 1/4 teaspoon salt
- 2 cups powdered sugar
- 1/4 cup lemon juice, freshly squeezed (more if needed)
- 1 tablespoon milk (optional, for thinner glaze)
- 1/2 teaspoon lemon zest, finely grated (optional)
Instructions
- In a large bowl, or in the bowl of a stand mixer fitted with the paddle attachment, cream together the softened butter and granulated sugar until light and fluffy. This usually takes about 3-5 minutes on medium speed. Make sure to scrape down the sides of the bowl occasionally to ensure everything is evenly mixed. You want the mixture to be pale and airy, which is key to a tender cookie.
- Beat in the eggs one at a time, mixing well after each addition. Again, scrape down the sides of the bowl to ensure everything is fully incorporated. If the mixture looks slightly curdled, don’t worry! It will come together once the dry ingredients are added.
- Stir in the lemon juice, lemon zest, and vanilla extract. The lemon zest is crucial for that bright, citrusy flavor, so don’t skip it! Make sure the zest is finely grated to avoid any bitter pieces in your cookies.
- In a separate medium bowl, whisk together the all-purpose flour, baking powder, baking soda, and salt. Whisking ensures that the baking powder and baking soda are evenly distributed throughout the flour, which will help the cookies rise properly.
- Gradually add the dry ingredients to the wet ingredients, mixing on low speed until just combined. Be careful not to overmix the dough, as this can lead to tough cookies. Mix until the flour is just incorporated, and then stop. A few streaks of flour are okay.
- Wrap the dough in plastic wrap and flatten it into a disc. This helps it chill more evenly. Refrigerate for at least 2 hours, or preferably overnight. Chilling the dough is essential because it allows the gluten to relax, which results in a more tender cookie. It also prevents the cookies from spreading too much during baking.
- Preheat your oven to 375°F (190°C). Line baking sheets with parchment paper or silicone baking mats. Parchment paper prevents the cookies from sticking and makes cleanup a breeze.
- On a lightly floured surface, roll out the chilled dough to about ¼ inch thickness. If the dough is sticking, add a little more flour to the surface.
- Use cookie cutters to cut out your desired shapes. I love using Christmas-themed cookie cutters for these, like stars, trees, and snowflakes!
- Place the cut-out cookies onto the prepared baking sheets, leaving about 1 inch of space between each cookie. This allows for even baking and prevents the cookies from sticking together.
- Bake for 8-10 minutes, or until the edges are lightly golden brown. Keep a close eye on them, as they can burn easily. The baking time will depend on the size and thickness of your cookies.
- Remove the baking sheets from the oven and let the cookies cool on the baking sheets for a few minutes before transferring them to a wire rack to cool completely.
- In a medium bowl, whisk together the powdered sugar, lemon juice, milk (if using), and lemon zest (if using) until smooth. Start with the smaller amount of lemon juice and add more as needed to reach your desired consistency. The glaze should be thick enough to coat the cookies but thin enough to spread easily.
- If the glaze is too thick, add a little more lemon juice or milk, one teaspoon at a time, until it reaches the desired consistency. If the glaze is too thin, add a little more powdered sugar, one tablespoon at a time, until it thickens up.
- Once the cookies are completely cool, dip the tops of the cookies into the lemon glaze, or spread the glaze evenly over the tops of the cookies using a small offset spatula or spoon.
- If desired, decorate the glazed cookies with sprinkles, sanding sugar, or other festive decorations. Do this while the glaze is still wet so the decorations will adhere properly.
- Let the glaze set completely before serving or storing the cookies. This usually takes about 30 minutes to an hour.
Notes
- Use Room Temperature Butter: Softened butter is crucial for creaming properly with the sugar. If your butter is too cold, it won’t cream properly, and your cookies may be dense. If your butter is too melted, the cookies may spread too much.
- Don’t Overmix the Dough: Overmixing the dough develops the gluten, which can result in tough cookies. Mix until the flour is just incorporated, and then stop.
- Chill the Dough: Chilling the dough is essential for preventing the cookies from spreading too much during baking and for developing the flavor.
- Bake Evenly: Rotate the baking sheets halfway through baking to ensure that the cookies bake evenly.
- Cool Completely Before Glazing: Make sure the cookies are completely cool before glazing, or the glaze will melt.
- Store Properly: Store the glazed cookies in an airtight container at room temperature for up to 3-5 days.


Leave a Comment