
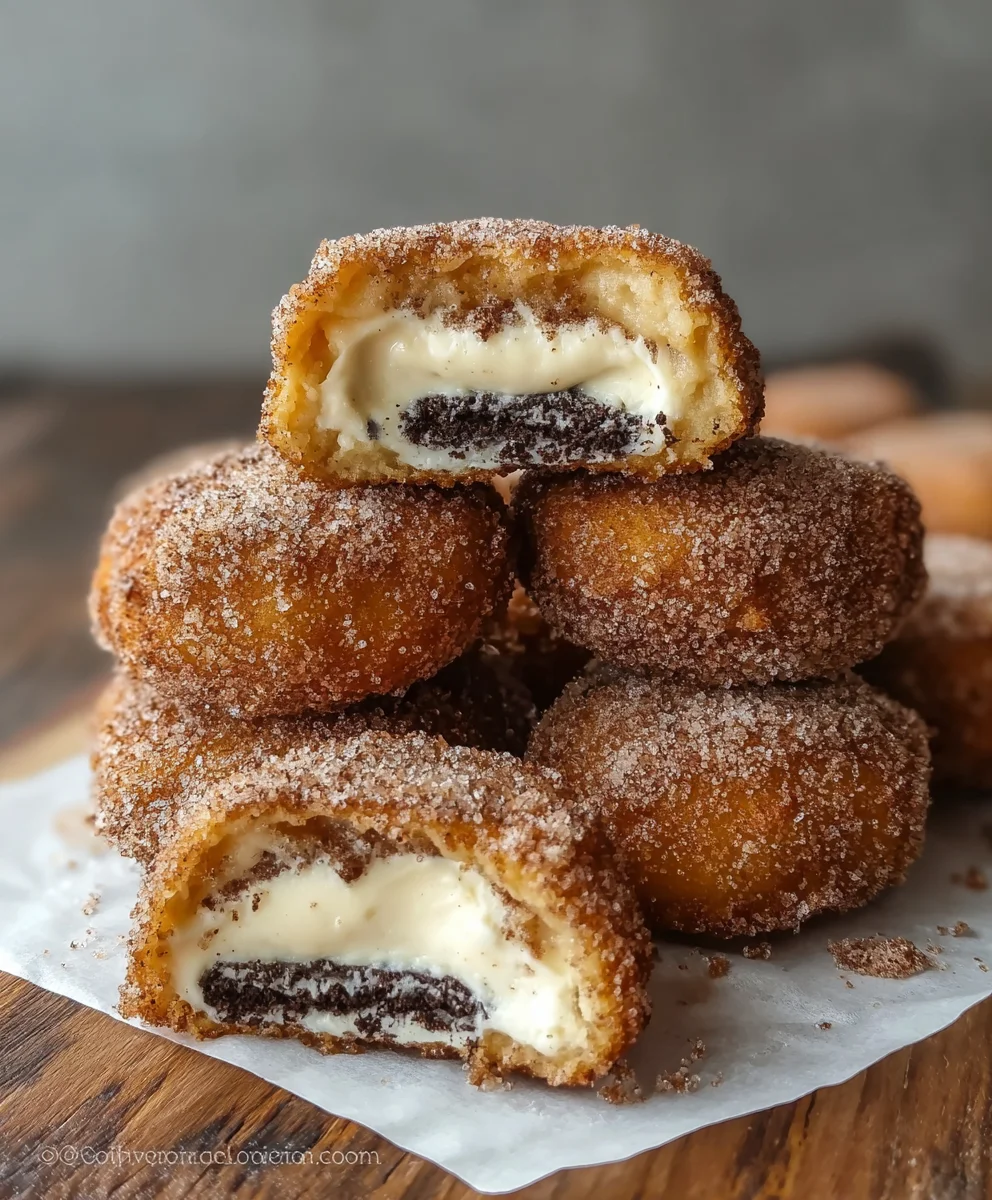
Churro Cheesecake Deep Fried Oreos – just reading those words probably sparks a curious delight, doesn’t it? I am absolutely thrilled to share a recipe with you that takes the concept of dessert fusion to an entirely new, exhilarating level. Imagine the iconic crunch and warmth of a cinnamon-sugar churro, the irresistible creaminess and tang of a classic cheesecake, and the beloved chocolatey goodness of a deep-fried Oreo, all magically combined into one incredible bite. This isn’t just a dessert; it’s a carnival of flavors and textures that promises to be the showstopper at any gathering.
While deep-fried Oreos are a quintessential treat from American fairs and carnivals, embodying pure, unadulterated indulgence, the churro cheesecake concept itself is a celebration of global culinary creativity, marrying the comforting spice of Spanish and Mexican churros with the rich elegance of American cheesecake. Our rendition elevates this spirit of delicious innovation even further. You’re about to discover why people absolutely adore this audacious combination. It’s the delightful contrast of the crispy, golden-fried exterior coated in fragrant cinnamon sugar, giving way to the molten chocolate and creamy filling of the Oreo, with an unexpected hint of cheesecake magic woven throughout. Every bite of these Churro Cheesecake Deep Fried Oreos offers an unparalleled explosion of taste and texture, guaranteeing a truly memorable and utterly irresistible experience. Prepare for applause!

Ingredients:
-
For the No-Bake Cheesecake Filling:
- 8 ounces (about 1 cup) full-fat cream cheese, softened to room temperature
- ½ cup powdered sugar (confectioners’ sugar), sifted
- 1 teaspoon pure vanilla extract
- 2 tablespoons heavy cream, chilled
-
For the Cheesecake-Stuffed Oreo Foundation:
- 24 regular Oreo cookies (not Double Stuf or Thins)
- Another 12-16 regular Oreo cookies, for capping (we’ll be using the halves)
-
For the Churro Batter (Choux Pastry Style):
- 1 cup water
- ½ cup (1 stick) unsalted butter, cut into cubes
- 2 tablespoons granulated sugar
- ¼ teaspoon salt
- 1 cup all-purpose flour, sifted
- 1 teaspoon ground cinnamon, plus extra for the sugar coating
- 3 large eggs, at room temperature
-
For Deep Frying:
- 6-8 cups vegetable oil, canola oil, or peanut oil, for deep frying (enough to submerge the Oreos)
-
For the Cinnamon Sugar Coating:
- ½ cup granulated sugar
- 2 tablespoons ground cinnamon
-
Optional Dipping Sauces (Highly Recommended!):
- Caramel sauce
- Chocolate fudge sauce
- Dulce de leche
Preparing the Decadent Cheesecake Filling and Oreo Foundations
My absolute favorite part of this recipe is how we infuse that creamy cheesecake goodness right into the heart of a classic Oreo. It’s like magic, and the result is truly mind-blowing. Let’s get started on this foundational step, as it requires a little chilling time, which is crucial for success!
- Softening the Cream Cheese: First things first, you’ll want to ensure your cream cheese is perfectly softened to room temperature. I usually take it out of the fridge at least an hour before I plan to start. This is vital for achieving a smooth, lump-free filling. If you try to mix cold cream cheese, you’ll end up with frustrating lumps, and nobody wants that!
- Whipping the Filling: In a medium-sized mixing bowl, combine your softened cream cheese, sifted powdered sugar, and vanilla extract. Using an electric mixer (either a hand-held one or a stand mixer with the paddle attachment), beat these ingredients on medium speed until they are light, fluffy, and completely smooth. Scrape down the sides of the bowl frequently to ensure everything is incorporated evenly. This should take about 2-3 minutes.
- Adding the Heavy Cream: Next, pour in the chilled heavy cream. Increase the mixer speed to medium-high and continue to beat for another 1-2 minutes, until the mixture thickens slightly and holds soft peaks. Don’t overmix here; we want it creamy but not separating. This heavy cream is our secret weapon for a stable, pipeable filling that holds its shape beautifully once chilled.
- Preparing for Piping: Transfer this luscious cheesecake filling into a piping bag fitted with a large round tip (like an Ateco 808 or a Wilton 1A) or, if you don’t have a tip, just snip off a good-sized corner of the bag. Set this aside for a moment, making sure the opening is sealed or pointed upwards to prevent any escape.
- Disassembling the Oreos: Now, for the fun part: the Oreos! Carefully twist open 24 of your regular Oreo cookies. You want to try and keep the cream filling mostly on one side of the cookie wafer, but it’s okay if some splits. We’re actually going to scrape out the original cream filling from all the halves. Yes, I know, it feels a little sacrilegious, but trust me, the cheesecake is a worthy replacement! You should now have 48 single Oreo wafers, completely free of their original cream.
- Piping the Cheesecake: Take one half of an Oreo wafer (the side that originally had the cream, or just a plain wafer if the cream came off unevenly). Pipe a generous dollop – about 1 to 1.5 tablespoons – of your cheesecake filling onto the center of the wafer. Make sure it’s a nice, high mound.
- Capping with Another Oreo: Take a second clean Oreo wafer (from your set of 24 original cookies) and gently place it on top of the cheesecake filling, pressing down lightly until the cheesecake filling spreads to the edges, creating a delightful cheesecake sandwich. Don’t press too hard, or the filling will squish out excessively. Repeat this process for all 24 cheesecake-stuffed Oreos. You will use 48 Oreo wafers in total to make 24 stuffed Oreos.
- The Crucial Freeze: This step is non-negotiable for success. Arrange your 24 cheesecake-stuffed Oreos in a single layer on a parchment-lined baking sheet or a large plate. Place them in the freezer for at least 2-3 hours, or even better, overnight. They need to be absolutely solid. This intense chilling prevents the cheesecake from melting out when they hit the hot oil and helps them maintain their structural integrity during the deep-frying process. Do not skip this!
Crafting the Perfect Churro Batter
The “churro” in Churro Cheesecake Deep Fried Oreos comes from this incredible batter – it’s a classic choux pastry, infused with cinnamon, that fries up incredibly light, crispy, and golden brown. Getting this right is key to achieving that authentic churro texture.
- Preparing the Wet Base: In a medium-sized, heavy-bottomed saucepan, combine the water, cubed unsalted butter, granulated sugar, and salt. Place the saucepan over medium-high heat. Stir occasionally until the butter is completely melted and the mixture comes to a rolling boil. Make sure it’s a vigorous boil before moving to the next step.
- Adding the Flour and Cinnamon: As soon as the mixture reaches that rolling boil, remove the saucepan from the heat. Immediately add the sifted all-purpose flour and ground cinnamon all at once. Stir vigorously with a sturdy wooden spoon or heat-proof spatula. Keep stirring until the mixture comes together to form a smooth ball of dough that pulls away cleanly from the sides of the pan. This process is called “drying out” the dough and is super important for a light, airy churro.
- Drying Out the Dough: Return the saucepan to medium heat. Continue to cook and stir the dough for another 1-2 minutes. You’ll notice a thin film forming on the bottom of the pan, and the dough will become a bit stiffer. This step is crucial as it evaporates excess moisture from the dough, which is what gives choux pastry its characteristic crispness when fried.
- Cooling the Dough: Transfer the hot dough ball to a large mixing bowl. Spread it out a bit and let it cool for about 5-10 minutes. It doesn’t need to be cold, but it should be cool enough that it won’t cook the eggs when you add them. You should be able to touch it comfortably.
- Incorporating the Eggs: Now for the eggs! This is where the magic happens for the texture. Add the eggs one at a time, beating well after each addition with your electric mixer (using the paddle attachment if a stand mixer, or beaters if a hand mixer) on medium speed. It might look like a mess after the first egg, separating and looking clumpy, but don’t worry! Keep beating until each egg is fully incorporated and the dough comes back together smoothly before adding the next one.
- Achieving the Right Consistency: After all three eggs have been added and thoroughly mixed, the batter should be thick, smooth, and glossy. It should have a consistency that slowly falls from the spoon in a “V” shape or a thick ribbon. If it’s too thin, it won’t adhere well to the Oreos; if it’s too thick, it will be hard to coat evenly. This final consistency is key for the churro coating to be perfect.
Assembling and Deep Frying Your Churro Cheesecake Deep Fried Oreos
This is where all our hard work comes together! Deep frying requires a bit of attention and safety, but the reward of a hot, crispy, and utterly delicious Churro Cheesecake Deep Fried Oreo is well worth it. Always exercise caution when working with hot oil.
- Setting Up Your Frying Station: Pour your chosen frying oil into a large, heavy-bottomed pot or a deep fryer. You need enough oil to completely submerge the Oreos, typically 3-4 inches deep. Attach a deep-fry or candy thermometer to the side of the pot. Line a large plate or baking sheet with several layers of paper towels, and place a wire rack on top of it. This will be where your fried Oreos drain.
- Preheating the Oil: Heat the oil over medium-high heat until it reaches a consistent temperature of 350°F (175°C). It’s crucial to maintain this temperature as closely as possible. If the oil is too cool, the Oreos will become greasy; if it’s too hot, they will burn on the outside before the churro batter is cooked through.
- Preparing the Cinnamon Sugar: While the oil heats, in a shallow dish or pie plate, whisk together the ½ cup granulated sugar and 2 tablespoons ground cinnamon for your coating. This mixture will be rolled onto the hot fried Oreos.
- Coating the Frozen Oreos: Once your oil is at temperature and your cinnamon sugar is ready, retrieve your frozen cheesecake-stuffed Oreos from the freezer. Working with frozen Oreos is essential as it prevents the cheesecake from melting out too quickly in the hot oil. Dip each frozen Oreo into the prepared churro batter. Use a fork or tongs to completely coat the Oreo, allowing any excess batter to drip back into the bowl. You want a nice, even layer of batter all around.
- Careful Frying: Gently lower 2-3 coated Oreos into the hot oil using tongs or a slotted spoon. Do not overcrowd the pot, as this will drop the oil temperature and lead to soggy Oreos. Fry for about 2-3 minutes per side, or until the churro coating is a beautiful golden brown and appears crispy. You might need to gently turn them with your tongs to ensure even cooking.
- Draining and Coating: Once perfectly golden, carefully remove the fried Oreos from the oil using tongs or a slotted spoon. Hold them over the pot for a few seconds to allow excess oil to drip off, then immediately transfer them to your paper towel-lined wire rack to drain briefly. While still hot – and I mean hot – immediately transfer them to the cinnamon sugar mixture. Roll them gently but thoroughly to coat every inch. The heat from the fried Oreo will help the cinnamon sugar adhere beautifully.
- Repeat the Process: Continue frying the remaining Oreos in batches, ensuring the oil returns to 350°F (175°C) between each batch. This step-by-step approach guarantees consistent results for all your Churro Cheesecake Deep Fried Oreos. Patience is a virtue here!
Finishing Touches and Serving Your Masterpiece
You’ve done it! The aroma filling your kitchen right now must be absolutely divine – a blend of sweet cinnamon, rich cheesecake, and fried goodness. Now comes the moment of truth: enjoying your culinary creation!
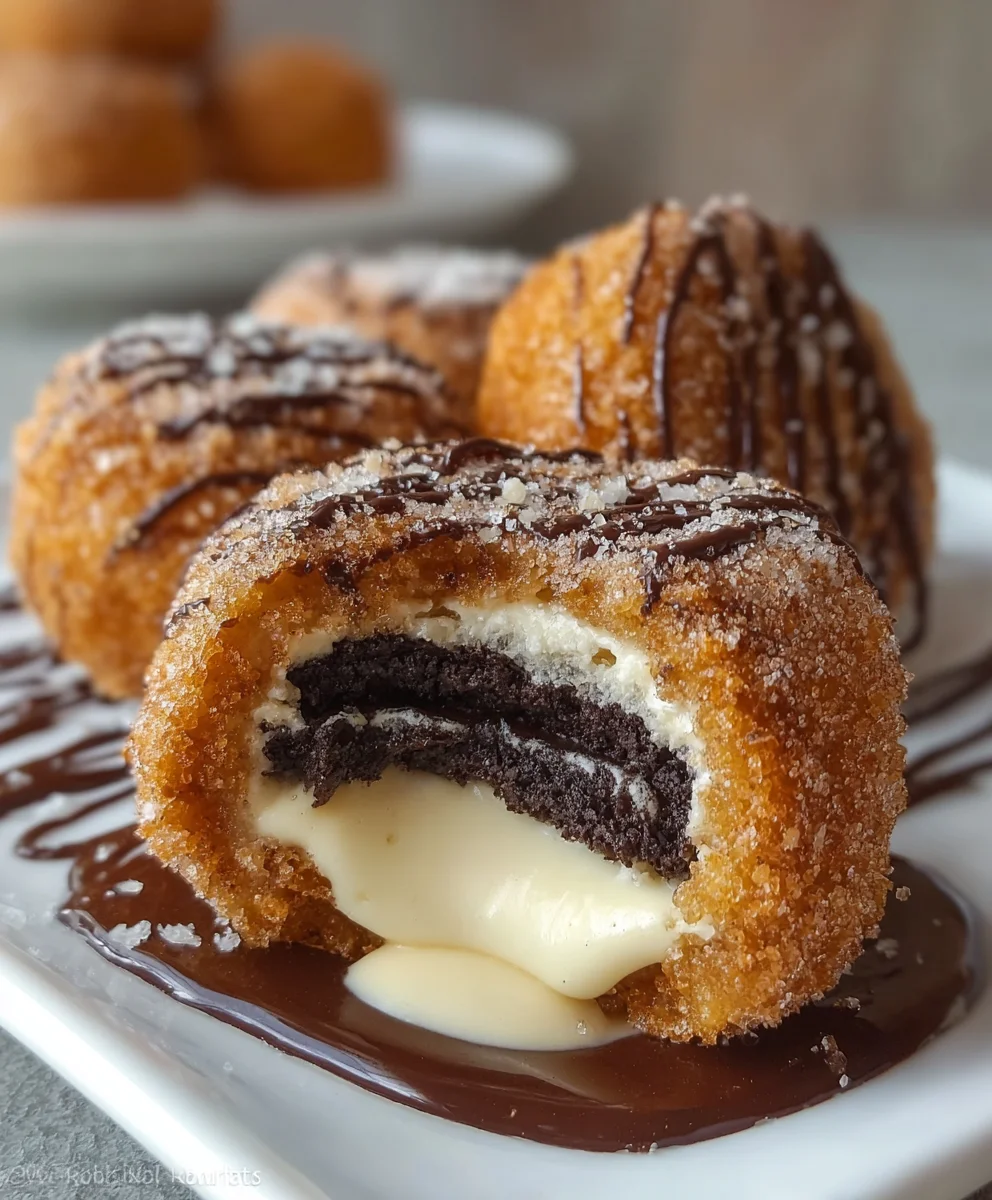
- Serve Immediately: These Churro Cheesecake Deep Fried Oreos are at their absolute peak when served warm, fresh out of the fryer and coated in that glorious cinnamon sugar. The exterior is wonderfully crispy, giving way to a soft, warm churro batter, and then finally, that luscious, warm cheesecake and a tender Oreo within. The contrast of textures and temperatures is simply magical.
- Embrace the Sauces: While incredibly delicious on their own, I highly, highly recommend serving these with a selection of dipping sauces. A warm caramel sauce adds a buttery sweetness, a rich chocolate fudge sauce offers a decadent contrast, and dulce de leche brings a creamy, caramelized depth that is just irresistible. Arrange a small bowl of each sauce alongside your fried Oreos for an extra touch of indulgence.
- Presentation Matters: Even though they’re a fun, playful treat, a little presentation goes a long way. Arrange your Churro Cheesecake Deep Fried Oreos artfully on a serving platter, perhaps garnished with a sprinkle of extra cinnamon sugar or a light dusting of powdered sugar if you’re feeling fancy.
- Enjoying the Moment: Take a moment to appreciate your hard work. This isn’t just a dessert; it’s an experience. Sharing these with friends and family makes them even better, as the oohs and aahs of delight are the best reward for your efforts. Be prepared for requests for the recipe – and maybe even a few demands for you to make them again very soon!
There you have it – a truly unforgettable treat that combines the best of churros, cheesecake, and deep-fried Oreos into one sensational bite. I promise you, these will be the star of any gathering, or simply a magnificent indulgence for yourself!
Conclusion:
And there you have it, dear friends! We’ve journeyed together through the creation of what I truly believe is not just a dessert, but an experience – a moment of pure, unadulterated culinary joy that you absolutely deserve to bring into your life. This isn’t merely about assembling ingredients; it’s about crafting an edible masterpiece that delights every sense. Imagine that first bite: the irresistible, golden crunch of the perfectly fried exterior, giving way to the familiar, comforting snap of a classic Oreo cookie. But then, the real magic unfolds – a soft, luscious center of tangy, creamy cheesecake, perfectly complementing the chocolatey base. And finally, the grand finale, that sweet, cinnamon-spiced churro sugar dusting, adding an extra layer of warmth and nostalgia. It’s a symphony of textures and flavors: warm, crispy, soft, sweet, and a delightful hint of tang all in one glorious package. I genuinely believe that our special Churro Cheesecake Deep Fried Oreos recipe is destined to become a legendary treat in your kitchen, a conversation starter, and a delightful indulgence that elevates any occasion from ordinary to truly extraordinary.
This dessert takes familiar comfort foods and transforms them into something spectacular, a testament to how a little creativity can yield astonishing results. Forget ordinary desserts; this one delivers on every single promise of indulgence, offering a unique blend of carnival whimsy and gourmet sophistication. It’s a guaranteed showstopper, perfect for impressing guests at your next gathering, or simply for treating yourself to something truly extraordinary after a long week. The delightful contrast between the warm, crispy shell and the cool, creamy filling is simply unparalleled, making it a dessert that leaves a lasting impression long after the last bite is savored.
Serving Suggestions & Delightful Variations:
Now, while these treats are absolutely divine on their own, served warm right after frying (that’s when the exterior is perfectly crisp and the interior is melt-in-your-mouth soft), there are so many ways to elevate their presentation and flavor. For a truly decadent experience, I love to add a generous dollop of high-quality vanilla bean ice cream right alongside, letting it gently melt and mingle with the warm churro sugar. A drizzle of rich chocolate fudge sauce or a swirl of buttery salted caramel would also be absolutely exquisite, adding an extra layer of sweetness and depth. Don’t forget a cloud of freshly whipped cream, perhaps infused with a hint of vanilla or a dash of cinnamon, or even some fresh berries like raspberries or strawberries for a delightful pop of color and a touch of refreshing tartness that cuts through the richness beautifully.
As for drink pairings, a tall, frosty glass of cold milk is a classic and comforting companion, but a steaming mug of your favorite coffee, a robust espresso, or even a luxurious hot chocolate would also create a truly harmonious pairing. And for those of you who love to experiment, the possibilities for variations are truly endless!
Unleash Your Creativity:
- Change up the Oreos! Don’t feel limited to the original. Imagine the possibilities with Golden Oreos for a vanilla-centric flavor, Mint Oreos for a refreshing twist, or even Peanut Butter Oreos for an extra layer of nutty indulgence. Each variation will bring its own unique character to the cheesecake center, keeping things exciting.
- Spice it up: For a more complex flavor profile, try adding a pinch of nutmeg, cardamom, or even a tiny bit of cayenne pepper (if you’re feeling adventurous!) to your churro sugar mix. This can create an autumnal warmth or an exotic intrigue that will surprise and delight.
- Cheesecake filling experiments: While my recipe provides a fantastic base, consider seasonal twists. A pumpkin spice cheesecake filling would be incredible for fall gatherings, or a lemon zest cheesecake could offer a brighter, lighter feel for spring and summer. You could even swirl in a fruit compote before freezing for a hidden burst of flavor.
- Make ahead magic: If you’re planning to entertain, you can prepare the cheesecake-stuffed Oreos and freeze them solid well in advance. This makes them incredibly convenient for party day; simply bread and fry them up fresh right before serving. They maintain their perfect texture and flavor, allowing you to enjoy your guests without stress.
Your Culinary Adventure Awaits!
Now that you’ve explored every delicious detail of this recipe, I truly hope you feel inspired and ready to dive into your kitchen. This recipe, while appearing incredibly decadent and impressive, is surprisingly approachable, and the results are immensely rewarding. Please, don’t be intimidated by the deep-frying aspect; with the right oil temperature and a little care, it’s a breeze! The effort, I promise you, is more than worth it for the sheer delight these treats bring. I genuinely can’t wait for you to experience the magic of these delightful creations firsthand. Imagine the smiles, the gasps of delight, and the satisfied murmurs when you present these to your friends and family. This isn’t just about eating dessert; it’s about creating wonderful memories, sharing joy, and indulging in something truly special that you crafted with your own hands.
When you make these, I would absolutely love to hear all about your experience. Did you try any of the variations? What did your loved ones think? Did you discover a new favorite topping or serving suggestion? Please, share your photos, your tips, and your triumphs! Your feedback truly helps our community grow, inspires others to step out of their comfort zones, and continues to fuel our shared passion for delicious food. So, gather your ingredients, put on your apron, and prepare to make some seriously delicious magic. You won’t regret embarking on this sweet, crispy, creamy adventure!
Churro Cheesecake Deep Fried Oreos: Mind-Blowing Treat
Experience a carnival of flavors with Churro Cheesecake Deep Fried Oreos! This recipe combines the crunch of a churro, the creaminess of cheesecake, and the beloved chocolatey goodness of a deep-fried Oreo into one sensational bite. Expect a crispy, cinnamon-sugar exterior, warm cheesecake, and a tender Oreo within. A truly unforgettable treat and a guaranteed showstopper.
Ingredients
-
8 oz (1 cup) full-fat cream cheese, softened
-
½ cup powdered sugar, sifted
-
1 tsp pure vanilla extract
-
2 tbsp heavy cream, chilled
-
24 regular Oreo cookies
-
1 cup water
-
½ cup (1 stick) unsalted butter, cubed
-
2 tbsp granulated sugar
-
¼ tsp salt
-
1 cup all-purpose flour, sifted
-
1 tsp ground cinnamon (plus extra for coating)
-
3 large eggs, room temp
-
6-8 cups vegetable oil (for deep frying)
-
½ cup granulated sugar (for coating)
-
2 tbsp ground cinnamon (for coating)
-
Caramel sauce (optional)
-
Chocolate fudge sauce (optional)
-
Dulce de leche (optional)
Instructions
-
Step 1
Prepare cheesecake filling: Beat softened cream cheese, ½ cup powdered sugar, and vanilla until smooth. Add chilled heavy cream; beat until slightly thickened. Transfer to a piping bag. -
Step 2
Prep Oreos: Twist open 24 regular Oreos and scrape out original cream. Pipe 1-1.5 tbsp cheesecake filling onto one wafer, then cap with another wafer. Repeat for all 24 Oreos. -
Step 3
Freeze stuffed Oreos on a parchment-lined baking sheet for 2-3 hours or overnight until solid. This is crucial for successful frying. -
Step 4
Make churro batter: In a saucepan, combine 1 cup water, ½ cup butter, 2 tbsp granulated sugar, and salt. Bring to a vigorous boil. Remove from heat; immediately stir in 1 cup sifted flour and 1 tsp cinnamon until a smooth dough ball forms. -
Step 5
Return dough to medium heat; cook and stir for 1-2 mins to dry out. Transfer to a bowl and cool for 5-10 mins. -
Step 6
Beat in 3 large eggs one at a time until the batter is thick, smooth, and glossy, slowly falling from the spoon in a ‘V’ shape. -
Step 7
Prepare frying station: Heat 6-8 cups vegetable, canola, or peanut oil in a deep pot to a consistent temperature of 350°F (175°C). Set up a draining rack lined with paper towels. -
Step 8
Prepare cinnamon sugar coating: In a shallow dish, mix ½ cup granulated sugar and 2 tbsp ground cinnamon. -
Step 9
Fry Oreos: Dip each frozen cheesecake-stuffed Oreo into the churro batter, ensuring an even coating. Gently lower 2-3 coated Oreos into the hot oil (do not overcrowd). Fry for 2-3 minutes per side, or until golden brown and crispy. -
Step 10
Coat and serve: Remove fried Oreos, hold over the pot to drain excess oil, then immediately transfer and roll thoroughly in the cinnamon sugar mixture while still hot. Repeat with remaining Oreos, ensuring oil returns to 350°F (175°C) between batches. Serve warm, optionally with dipping sauces like caramel, chocolate fudge, or dulce de leche.
Important Information
Nutrition Facts (Per Serving)
It is important to consider this information as approximate and not to use it as definitive health advice.
Allergy Information
Please check ingredients for potential allergens and consult a health professional if in doubt.

Leave a Comment