
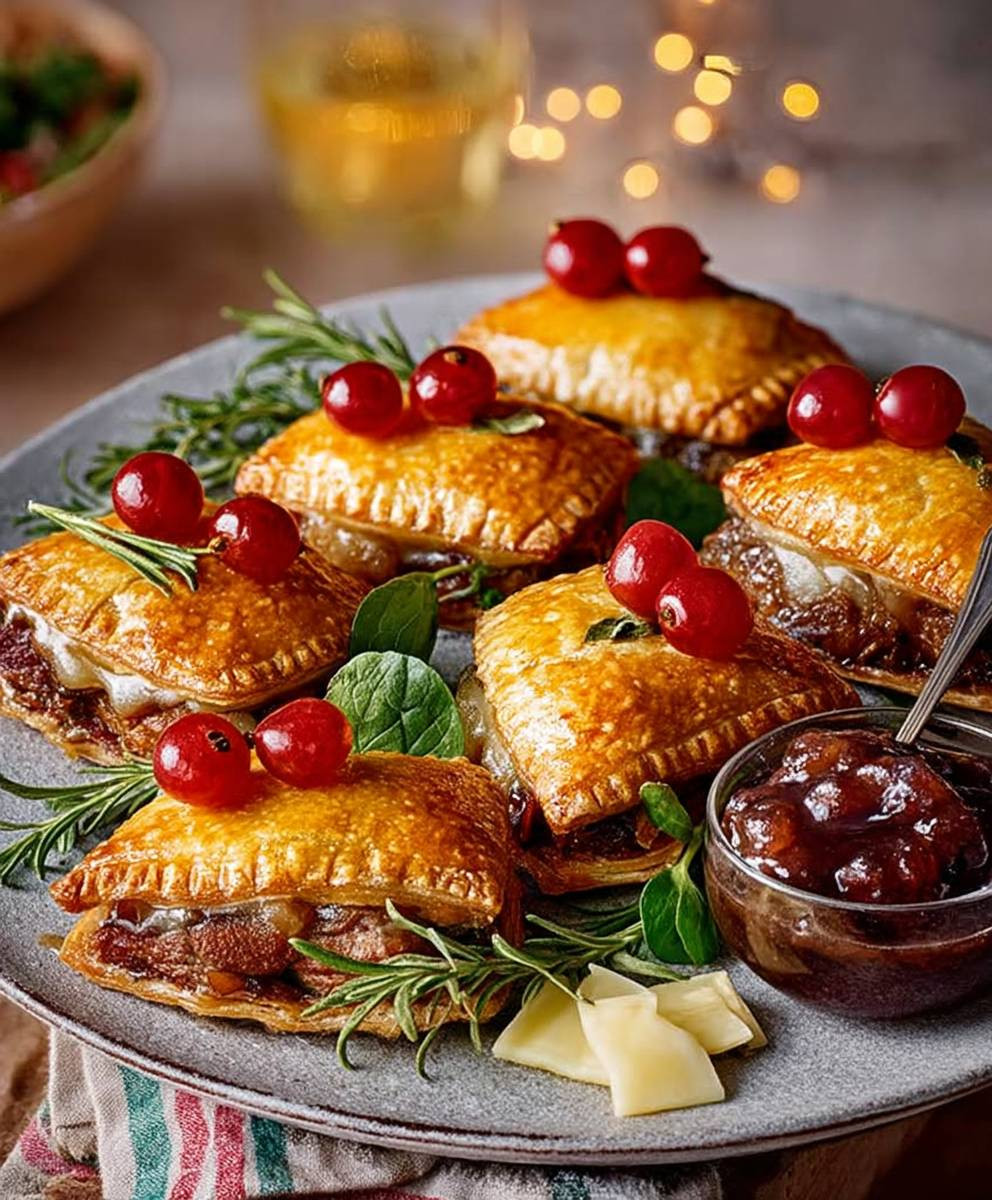
Confit duck stockings might sound like a whimsical holiday decoration, but trust me, they’re so much more! Imagine sinking your teeth into a crispy, golden-brown pastry filled with succulent, melt-in-your-mouth duck confit. It’s an explosion of flavor and texture that will have you reaching for seconds (and thirds!).
While the exact origins of stuffing duck confit into pastry “stockings” are a bit murky, the concept draws heavily from classic French charcuterie and baking traditions. Duck confit itself, a method of preserving duck legs in their own fat, dates back centuries in Gascony, France. This technique not only extended the shelf life of the duck but also imbued it with an incredibly rich and savory flavor. The idea of encasing this delicacy in a flaky pastry, shaped like a festive stocking, is a delightful modern twist that elevates the confit to a whole new level of deliciousness.
People adore this dish for several reasons. First, the combination of textures is simply irresistible: the crisp, buttery pastry gives way to the tender, intensely flavorful duck. Second, it’s surprisingly versatile. Confit duck stockings make an elegant appetizer for holiday gatherings, a satisfying main course for a special occasion, or even a decadent snack when you’re feeling indulgent. Finally, while it may seem fancy, it’s actually quite manageable to prepare, especially if you use pre-made puff pastry. So, are you ready to embark on this culinary adventure with me? Let’s get cooking!

Ingredients:
- 4 duck legs, skin on
- 2 tablespoons kosher salt
- 1 tablespoon freshly ground black pepper
- 1 teaspoon dried thyme
- 1 teaspoon dried rosemary
- 4 cloves garlic, minced
- 4 cups duck fat, rendered (or enough to completely submerge the duck legs)
- 1 large onion, quartered
- 2 carrots, roughly chopped
- 2 celery stalks, roughly chopped
- 2 bay leaves
- 1 sprig fresh thyme
- 1 sprig fresh rosemary
- For the “Stockings”:
- 1 package (1 lb) phyllo dough, thawed
- 1/2 cup melted butter
- 1/4 cup finely chopped fresh parsley
- 1/4 cup finely grated Parmesan cheese
- Optional Garnishes:
- Fresh parsley sprigs
- Cranberry sauce
- Orange zest
Preparing the Duck Confit:
- Curing the Duck: In a small bowl, combine the salt, pepper, dried thyme, dried rosemary, and minced garlic. Rub this mixture generously all over the duck legs, ensuring every part of the skin and meat is covered. This curing process is crucial for drawing out moisture and intensifying the flavor.
- Refrigerating the Duck: Place the seasoned duck legs in a resealable plastic bag or a non-reactive dish. Refrigerate for at least 24 hours, and preferably 48 hours. The longer the duck cures, the more flavorful and tender it will become. Turn the duck legs over in the bag or dish at least once during the curing process to ensure even curing.
- Rinsing the Duck: After the curing period, remove the duck legs from the refrigerator and rinse them thoroughly under cold water to remove the excess salt. Pat them completely dry with paper towels. This step is important to prevent the confit from being overly salty.
- Preparing the Confit: In a large, heavy-bottomed pot or Dutch oven, combine the duck fat, quartered onion, chopped carrots, chopped celery, bay leaves, fresh thyme sprig, and fresh rosemary sprig. Heat the duck fat over medium-low heat until it is completely melted.
- Submerging the Duck: Carefully place the duck legs into the melted duck fat, ensuring they are completely submerged. If necessary, add more duck fat to ensure complete coverage. The duck legs should be snug in the pot, but not overcrowded.
- Simmering the Duck: Bring the duck fat to a very gentle simmer. The fat should barely be bubbling. Reduce the heat to the lowest setting possible and cook the duck legs for 3-4 hours, or until the meat is incredibly tender and easily pulls away from the bone. The cooking time will depend on the size of the duck legs and the temperature of your stove. Check the duck legs periodically to ensure the fat is not boiling. If it is, reduce the heat further.
- Cooling the Duck: Once the duck legs are cooked, remove the pot from the heat and allow the duck legs to cool completely in the duck fat. This allows the flavors to meld and the duck to become even more tender. This can take several hours, or even overnight.
- Storing the Duck: Once cooled, carefully remove the duck legs from the duck fat. Strain the duck fat through a fine-mesh sieve to remove any solids. Store the duck legs in an airtight container, covered with the strained duck fat, in the refrigerator for up to 2 weeks. The duck fat acts as a preservative and helps to keep the duck moist and flavorful.
Preparing the “Stockings”:
- Preheating the Oven: Preheat your oven to 375°F (190°C). Line a baking sheet with parchment paper.
- Preparing the Phyllo Dough: Gently unroll the phyllo dough on a clean, dry surface. Keep the stack of phyllo dough covered with a damp towel to prevent it from drying out and becoming brittle.
- Shredding the Duck: Remove the duck legs from the refrigerator. Using your fingers or two forks, shred the duck meat, discarding the skin and bones. Be sure to remove any small bones or cartilage.
- Butter and Herb Mixture: In a small bowl, combine the melted butter, finely chopped fresh parsley, and finely grated Parmesan cheese. Mix well.
- Assembling the Stockings: Take one sheet of phyllo dough and brush it lightly with the butter mixture. Top with a second sheet of phyllo dough and brush again with the butter mixture. Repeat with a third sheet of phyllo dough and brush with the butter mixture one last time.
- Adding the Duck: Spread a portion of the shredded duck meat evenly over the top sheet of phyllo dough, leaving a 1-inch border around the edges.
- Rolling the Stockings: Starting from one long edge, carefully roll the phyllo dough up tightly, like a jelly roll.
- Cutting the Stockings: Using a sharp knife, cut the roll into individual “stockings” about 2-3 inches long.
- Baking the Stockings: Place the “stockings” seam-side down on the prepared baking sheet. Brush the tops of the “stockings” with the remaining butter mixture.
- Baking Time: Bake in the preheated oven for 15-20 minutes, or until the “stockings” are golden brown and crispy.
- Cooling and Serving: Remove the “stockings” from the oven and let them cool slightly on the baking sheet before serving.
Serving Suggestions:
These Confit Duck “Stockings” are delicious served as an appetizer or a light meal. They pair well with a variety of accompaniments.
- Cranberry Sauce: The tartness of cranberry sauce complements the richness of the duck confit perfectly.
- Orange Zest: A sprinkle of fresh orange zest adds a bright, citrusy note.
- Fresh Parsley: Garnish with fresh parsley sprigs for a pop of color and freshness.
- Salad: Serve with a simple green salad with a light vinaigrette to balance the richness of the duck.
- Roasted Vegetables: Roasted root vegetables, such as carrots, parsnips, and sweet potatoes, are a great side dish.
Tips and Tricks:
- Duck Fat: Rendering your own duck fat is the best way to ensure the highest quality confit. However, you can also purchase rendered duck fat from specialty food stores or online.
- Phyllo Dough: Phyllo dough can be tricky to work with, as it dries out quickly. Keep it covered with a damp towel at all times to prevent it from becoming brittle.
- Variations: Feel free to experiment with different herbs and spices in the duck confit. Garlic, juniper berries, and peppercorns are all great additions. You can also add different cheeses to the filling, such as Gruyere or Fontina.
- Make Ahead: The duck confit can be made several days in advance and stored in the refrigerator. The “stockings” can also be assembled ahead of time and baked just before serving.
- Reheating: If you have leftover “stockings,” you can reheat them in a 350°F (175°C) oven for about 10 minutes, or until heated through.
- Crispy Skin: If you prefer crispier duck skin, you can pan-fry the confit duck legs skin-side down in a hot skillet for a few minutes before shredding the meat.
- Don’t Overcrowd the Pot: When confiting the duck, make sure the legs are not overcrowded in the pot. This will ensure that they cook evenly.
- Low and Slow: The key to perfect duck confit is to cook it low and slow. This will result in incredibly tender and flavorful meat.
- Salt: Don’t be afraid to use a generous amount of salt when curing the duck. The salt is essential for drawing out moisture and preserving the meat.
Troubleshooting:
- Duck is too salty: If the duck is too salty after curing, soak it in cold water for 30 minutes before cooking.
- Phyllo dough is tearing: If the phyllo dough is tearing, it is likely too dry. Make sure to keep it covered with a damp towel.
- Stockings are not browning: If the “stockings” are not browning, increase the oven temperature slightly or broil them for a minute or two at the end of the baking time. Watch them carefully to prevent burning.
- Duck fat is smoking: If
Conclusion:
And there you have it! I truly believe this confit duck stockings recipe is a game-changer, a must-try for anyone looking to elevate their holiday appetizer game or simply impress their loved ones with a unique and unforgettable culinary experience. The combination of the rich, savory confit duck, the delicate pastry, and the burst of flavor from the optional cranberry sauce creates a symphony of tastes and textures that will leave everyone wanting more.
But why is this recipe so special? It’s more than just a delicious snack; it’s an experience. The process of making the confit duck, while requiring some patience, is incredibly rewarding. The aroma that fills your kitchen as the duck slowly renders its fat is simply intoxicating. And the satisfaction of seeing those golden-brown, perfectly crisp stockings emerge from the oven is unparalleled. This isn’t just cooking; it’s creating a memory.
Beyond the incredible flavor, this recipe is surprisingly versatile. While I’ve presented it with a classic cranberry sauce, feel free to experiment with other accompaniments. A dollop of fig jam would add a touch of sweetness and sophistication, while a spicy chutney would provide a delightful kick. You could even try a simple apple cider reduction for a more autumnal flavor profile.
Serving suggestions are equally flexible. These confit duck stockings make an elegant appetizer for holiday gatherings, cocktail parties, or even a sophisticated brunch. They can be served warm or at room temperature, making them perfect for entertaining. For a more substantial meal, consider pairing them with a side salad or a bowl of creamy soup. Imagine serving these alongside a butternut squash bisque the combination of flavors would be divine!
Don’t be afraid to get creative with the presentation, too. Arrange the stockings artfully on a platter, garnish with fresh herbs, and add a small bowl of your chosen dipping sauce. A sprinkle of flaky sea salt just before serving will enhance the flavors and add a touch of elegance.
And speaking of variations, consider using different types of pastry. While puff pastry is my go-to choice for its light and flaky texture, you could also try using phyllo dough for an even crispier result. Or, for a more rustic approach, use a homemade shortcrust pastry. The possibilities are endless!
Another variation to consider is adding a layer of something creamy inside the stocking before adding the duck confit. A thin layer of brie or goat cheese would melt beautifully and add a wonderful richness to the overall flavor. You could even try a layer of caramelized onions for a touch of sweetness and depth.
I know that trying a new recipe can sometimes feel daunting, but I promise you, this one is worth the effort. The steps are straightforward, and the results are truly spectacular. So, gather your ingredients, put on some music, and get ready to embark on a culinary adventure.
I’m so excited for you to try this recipe and experience the magic of confit duck stockings for yourself. Once you do, I would absolutely love to hear about your experience! Did you make any variations? What dipping sauce did you choose? What was the reaction of your guests? Please share your photos and stories in the comments below. Your feedback is invaluable, and it helps me to continue creating recipes that you’ll love. Happy cooking!
Confit Duck Stockings: The Ultimate Guide to Gourmet Comfort
Rich duck confit shredded, wrapped in flaky phyllo with herbs and Parmesan, then baked to golden perfection. Delightful appetizer or light meal.
Ingredients
- 4 duck legs, skin on
- 2 tablespoons kosher salt
- 1 tablespoon freshly ground black pepper
- 1 teaspoon dried thyme
- 1 teaspoon dried rosemary
- 4 cloves garlic, minced
- 4 cups duck fat, rendered (or enough to completely submerge the duck legs)
- 1 large onion, quartered
- 2 carrots, roughly chopped
- 2 celery stalks, roughly chopped
- 2 bay leaves
- 1 sprig fresh thyme
- 1 sprig fresh rosemary
- 1 package (1 lb) phyllo dough, thawed
- 1/2 cup melted butter
- 1/4 cup finely chopped fresh parsley
- 1/4 cup finely grated Parmesan cheese
- Fresh parsley sprigs
- Cranberry sauce
- Orange zest
Instructions
- Curing the Duck: In a small bowl, combine the salt, pepper, dried thyme, dried rosemary, and minced garlic. Rub this mixture generously all over the duck legs, ensuring every part of the skin and meat is covered.
- Refrigerating the Duck: Place the seasoned duck legs in a resealable plastic bag or a non-reactive dish. Refrigerate for at least 24 hours, and preferably 48 hours. Turn the duck legs over in the bag or dish at least once during the curing process to ensure even curing.
- Rinsing the Duck: After the curing period, remove the duck legs from the refrigerator and rinse them thoroughly under cold water to remove the excess salt. Pat them completely dry with paper towels.
- Preparing the Confit: In a large, heavy-bottomed pot or Dutch oven, combine the duck fat, quartered onion, chopped carrots, chopped celery, bay leaves, fresh thyme sprig, and fresh rosemary sprig. Heat the duck fat over medium-low heat until it is completely melted.
- Submerging the Duck: Carefully place the duck legs into the melted duck fat, ensuring they are completely submerged. If necessary, add more duck fat to ensure complete coverage.
- Simmering the Duck: Bring the duck fat to a very gentle simmer. Reduce the heat to the lowest setting possible and cook the duck legs for 3-4 hours, or until the meat is incredibly tender and easily pulls away from the bone. Check the duck legs periodically to ensure the fat is not boiling.
- Cooling the Duck: Once the duck legs are cooked, remove the pot from the heat and allow the duck legs to cool completely in the duck fat. This can take several hours, or even overnight.
- Storing the Duck: Once cooled, carefully remove the duck legs from the duck fat. Strain the duck fat through a fine-mesh sieve to remove any solids. Store the duck legs in an airtight container, covered with the strained duck fat, in the refrigerator for up to 2 weeks.
- Preheating the Oven: Preheat your oven to 375°F (190°C). Line a baking sheet with parchment paper.
- Preparing the Phyllo Dough: Gently unroll the phyllo dough on a clean, dry surface. Keep the stack of phyllo dough covered with a damp towel to prevent it from drying out and becoming brittle.
- Shredding the Duck: Remove the duck legs from the refrigerator. Using your fingers or two forks, shred the duck meat, discarding the skin and bones. Be sure to remove any small bones or cartilage.
- Butter and Herb Mixture: In a small bowl, combine the melted butter, finely chopped fresh parsley, and finely grated Parmesan cheese. Mix well.
- Assembling the Stockings: Take one sheet of phyllo dough and brush it lightly with the butter mixture. Top with a second sheet of phyllo dough and brush again with the butter mixture. Repeat with a third sheet of phyllo dough and brush with the butter mixture one last time.
- Adding the Duck: Spread a portion of the shredded duck meat evenly over the top sheet of phyllo dough, leaving a 1-inch border around the edges.
- Rolling the Stockings: Starting from one long edge, carefully roll the phyllo dough up tightly, like a jelly roll.
- Cutting the Stockings: Using a sharp knife, cut the roll into individual “stockings” about 2-3 inches long.
- Baking the Stockings: Place the “stockings” seam-side down on the prepared baking sheet. Brush the tops of the “stockings” with the remaining butter mixture.
- Baking Time: Bake in the preheated oven for 15-20 minutes, or until the “stockings” are golden brown and crispy.
- Cooling and Serving: Remove the “stockings” from the oven and let them cool slightly on the baking sheet before serving.
Notes
- Rendering your own duck fat is the best way to ensure the highest quality confit. However, you can also purchase rendered duck fat from specialty food stores or online.
- Phyllo dough can be tricky to work with, as it dries out quickly. Keep it covered with a damp towel at all times to prevent it from becoming brittle.
- Feel free to experiment with different herbs and spices in the duck confit. Garlic, juniper berries, and peppercorns are all great additions. You can also add different cheeses to the filling, such as Gruyere or Fontina.
- The duck confit can be made several days in advance and stored in the refrigerator. The “stockings” can also be assembled ahead of time and baked just before serving.
- If you have leftover “stockings,” you can reheat them in a 350°F (175°C) oven for about 10 minutes, or until heated through.
- If you prefer crispier duck skin, you can pan-fry the confit duck legs skin-side down in a hot skillet for a few minutes before shredding the meat.
- When confiting the duck, make sure the legs are not overcrowded in the pot. This will ensure that they cook evenly.
- The key to perfect duck confit is to cook it low and slow. This will result in incredibly tender and flavorful meat.
- Don’t be afraid to use a generous amount of salt when curing the duck. The salt is essential for drawing out moisture and preserving the meat.
- If the duck is too salty after curing, soak it in cold water for 30 minutes before cooking.
- If the phyllo dough is tearing, it is likely too dry. Make sure to keep it covered with a damp towel.
- If the “stockings” are not browning, increase the oven temperature slightly or broil them for a minute or two at the end of the baking time. Watch them carefully to prevent burning.

Leave a Comment