
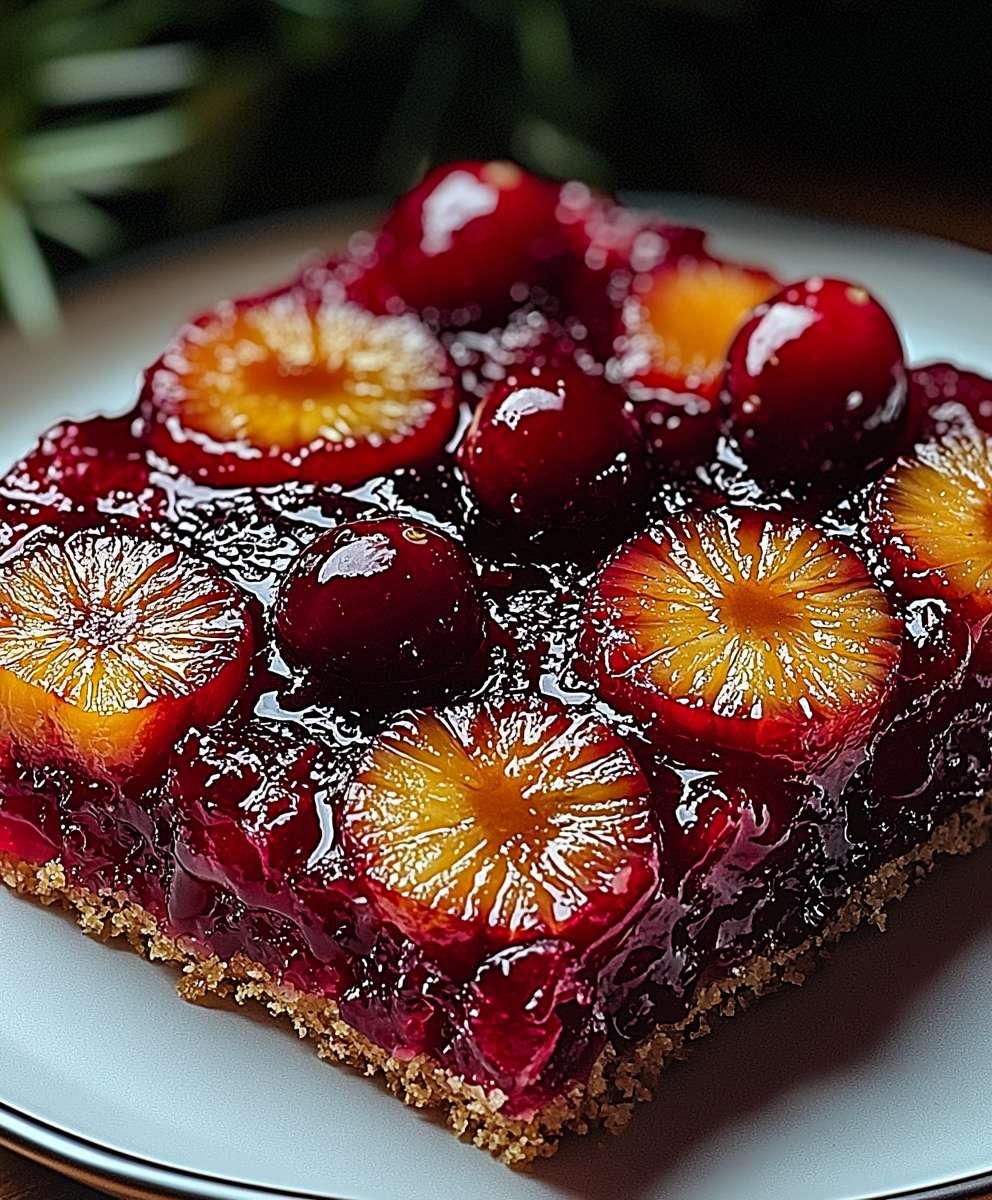
Cranberry Pineapple Upside Down Cake: Prepare to be amazed by a delightful twist on a classic dessert! Forget everything you thought you knew about upside-down cake because this recipe is about to redefine your expectations. Imagine the tangy sweetness of pineapple mingling with the tart burst of cranberries, all nestled atop a moist, buttery cake. It’s a flavor explosion that will have everyone begging for seconds.
The traditional pineapple upside-down cake has a charming history, dating back to the early 20th century when canned pineapple became widely available. It was a simple yet elegant way to showcase this exotic fruit. Our version, the Cranberry Pineapple Upside Down Cake, adds a festive and unexpected element, making it perfect for holiday gatherings or any occasion that calls for a touch of sweetness and sophistication.
What makes this cake so irresistible? It’s the perfect balance of flavors and textures. The caramelized pineapple and cranberries create a sticky, sweet, and slightly tart topping that contrasts beautifully with the soft, tender cake beneath. Plus, it’s surprisingly easy to make! The vibrant colors and unique taste make this Cranberry Pineapple Upside Down Cake a guaranteed crowd-pleaser. Get ready to impress your friends and family with this show-stopping dessert!

Ingredients:
- For the Topping:
- 1/2 cup (1 stick) unsalted butter, melted
- 1 cup packed light brown sugar
- 1 (20 ounce) can crushed pineapple, well drained
- 1 cup fresh or frozen cranberries
- 1/2 cup chopped pecans or walnuts (optional)
- For the Cake:
- 1 1/2 cups all-purpose flour
- 1 1/2 teaspoons baking powder
- 1/4 teaspoon baking soda
- 1/4 teaspoon salt
- 1/2 cup (1 stick) unsalted butter, softened
- 3/4 cup granulated sugar
- 2 large eggs
- 1 teaspoon vanilla extract
- 3/4 cup buttermilk
Preparing the Topping:
- Melt the butter: In a microwave-safe bowl or in a saucepan over low heat, melt the butter completely. Be careful not to burn it.
- Prepare the pan: Pour the melted butter into the bottom of a 9-inch round cake pan. Make sure the entire bottom of the pan is coated evenly.
- Add the brown sugar: Sprinkle the brown sugar evenly over the melted butter. This will create a delicious, caramelized layer when the cake is flipped.
- Arrange the pineapple: Spread the drained crushed pineapple evenly over the brown sugar layer. Ensure there are no large clumps and that it’s distributed nicely.
- Add the cranberries: Scatter the cranberries evenly over the pineapple. If using frozen cranberries, there’s no need to thaw them first. They’ll cook perfectly in the oven.
- Add nuts (optional): If you’re using nuts, sprinkle them evenly over the cranberries. Pecans or walnuts add a lovely crunch and flavor to the topping.
Making the Cake Batter:
- Preheat the oven: Preheat your oven to 350°F (175°C). This is crucial for even baking.
- Combine dry ingredients: In a medium bowl, whisk together the flour, baking powder, baking soda, and salt. Whisking ensures that the baking powder and baking soda are evenly distributed, which is essential for a light and fluffy cake.
- Cream butter and sugar: In a large bowl, cream together the softened butter and granulated sugar until light and fluffy. You can use an electric mixer (stand mixer or hand mixer) for this. Creaming the butter and sugar incorporates air, which contributes to the cake’s texture. This usually takes about 3-5 minutes.
- Add eggs: Beat in the eggs one at a time, mixing well after each addition. Make sure each egg is fully incorporated before adding the next.
- Stir in vanilla: Stir in the vanilla extract. Vanilla enhances the overall flavor of the cake.
- Alternate adding dry and wet ingredients: Gradually add the dry ingredients to the wet ingredients, alternating with the buttermilk. Begin and end with the dry ingredients. So, add about 1/3 of the dry ingredients, then 1/2 of the buttermilk, then another 1/3 of the dry ingredients, then the remaining buttermilk, and finally the remaining dry ingredients. Mix until just combined. Be careful not to overmix, as this can result in a tough cake. Overmixing develops the gluten in the flour, leading to a denser texture.
Baking the Cake:
- Pour batter over topping: Gently pour the cake batter over the prepared topping in the cake pan. Spread the batter evenly to ensure it bakes uniformly.
- Bake: Bake in the preheated oven for 35-45 minutes, or until a wooden skewer inserted into the center comes out clean. The baking time may vary depending on your oven, so start checking for doneness around 35 minutes.
- Cool slightly: Let the cake cool in the pan for about 10-15 minutes. This allows the topping to settle slightly and makes it easier to invert the cake without it falling apart.
- Invert the cake: Place a serving plate over the top of the cake pan. Carefully and confidently invert the cake onto the plate. Be cautious, as the pan will be hot, and some of the topping might stick to the pan. If any topping remains in the pan, gently scrape it out and arrange it on top of the cake.
- Serve: Serve the cake warm or at room temperature. It’s delicious on its own, but you can also serve it with a dollop of whipped cream or a scoop of vanilla ice cream.
Tips for Success:
- Don’t overmix the batter: Overmixing develops the gluten in the flour, resulting in a tough cake. Mix until just combined.
- Use room temperature ingredients: Room temperature butter and eggs emulsify better, creating a smoother batter and a more tender cake.
- Drain the pineapple well: Excess moisture from the pineapple can make the topping soggy. Make sure to drain it thoroughly.
- Check for doneness: Use a wooden skewer to check for doneness. If it comes out clean, the cake is ready. If it has wet batter on it, continue baking for a few more minutes and check again.
- Cool slightly before inverting: Cooling the cake slightly helps the topping to set and prevents it from sticking to the pan.
- If the topping sticks: If the topping sticks to the pan, you can gently warm the bottom of the pan over a low flame on the stovetop for a few seconds to loosen it. Be careful not to burn the topping.
- Variations: Feel free to experiment with different fruits and nuts. You could try using peaches, apples, or cherries instead of pineapple and cranberries. You could also use different types of nuts, such as almonds or macadamia nuts.
Serving Suggestions:
- Whipped Cream: A dollop of freshly whipped cream complements the sweetness of the cake perfectly.
- Vanilla Ice Cream: A scoop of vanilla ice cream adds a cool and creamy contrast to the warm cake.
- Caramel Sauce: Drizzle with caramel sauce for an extra touch of indulgence.
- Powdered Sugar: Dust with powdered sugar for a simple and elegant presentation.
- Fresh Berries: Serve with a side of fresh berries for a burst of freshness and color.
Storage Instructions:
- Room Temperature: Store the cake at room temperature in an airtight container for up to 2 days.
- Refrigerator: Store the cake in the refrigerator in an airtight container for up to 5 days. Let it come to room temperature before serving.
- Freezer: You can freeze the cake for up to 2 months. Wrap it tightly in plastic wrap and then in aluminum foil. Thaw it in the refrigerator overnight before serving.
Troubleshooting:
- Cake is dry: Make sure you’re not overbaking the cake. Check for doneness with a wooden skewer. Also, ensure you’re using the correct amount of buttermilk and that your oven temperature is accurate.
- Cake is soggy: Make sure you’re draining the pineapple well. Also, avoid overmixing the batter.
- Topping is sticking to the pan: Cool the cake slightly before inverting. If the topping still sticks, gently warm the bottom of the pan over a low flame on the stovetop for a few seconds.
- Cake is sinking in the middle: This could be due to overmixing the batter or opening the oven door too frequently during baking. Also, make sure your oven temperature is accurate.
- Cake is not rising: Make sure your baking powder and baking soda are fresh. Also, avoid overmixing the batter.
Nutritional Information (Approximate):
(Note: Nutritional information is an estimate and may vary based on specific ingredients and portion sizes.)
- Calories: 350-450 per serving
- Fat: 15-25g
- Saturated Fat: 8-12g
- Cholesterol: 50-70mg
- Sodium: 150-250mg
- Carbohydrates: 45-60g
- Sugar: 30-40g
- Protein: 3-5g
Enjoy!
Conclusion:
This Cranberry Pineapple Upside Down Cake isn’t just a dessert; it’s a vibrant, flavorful experience that’s guaranteed to brighten any occasion. The tangy cranberries perfectly complement the sweetness of the pineapple, creating a delightful dance of flavors that will have everyone reaching for seconds. The moist, buttery cake base provides the perfect foundation for this explosion of fruity goodness, making it a truly unforgettable treat. I truly believe this is a must-try recipe, and here’s why: it’s surprisingly easy to make, incredibly delicious, and visually stunning. But the best part? It’s incredibly versatile! Serve it warm with a scoop of vanilla ice cream for a classic dessert experience. Or, for a more sophisticated touch, try pairing it with a dollop of lightly sweetened whipped cream and a sprinkle of toasted coconut flakes. If you’re feeling adventurous, a drizzle of caramel sauce adds a decadent layer of richness. For variations, consider swapping out the pineapple for other fruits like peaches or apricots for a different flavor profile. You could also add a hint of spice to the batter with a pinch of cinnamon or nutmeg for a warm, comforting twist, especially during the fall and winter months. Chopped pecans or walnuts sprinkled over the fruit before baking would add a delightful crunch. And for a truly festive touch, consider adding a splash of rum or brandy to the batter for an extra layer of flavor. Don’t be intimidated by the “upside down” aspect it’s much simpler than it looks! Just follow the instructions carefully, and you’ll be rewarded with a beautiful and delicious cake that will impress your friends and family. The key is to ensure the fruit is arranged evenly in the pan and that the cake is fully baked before inverting it. A little patience goes a long way in achieving that perfect golden-brown crust and a moist, tender crumb. I’m so confident that you’ll love this Cranberry Pineapple Upside Down Cake that I urge you to give it a try. It’s the perfect dessert for holidays, potlucks, or even just a special weeknight treat. It’s a guaranteed crowd-pleaser, and I promise you’ll be making it again and again. So, what are you waiting for? Gather your ingredients, preheat your oven, and get ready to bake up a little slice of heaven. I can’t wait to hear about your experience! Please, share your photos and stories in the comments below. Let me know what variations you tried and how they turned out. Did you add a secret ingredient? Did you serve it with a special topping? I’m eager to learn from your culinary adventures and see your own unique spin on this delightful recipe. Happy baking, and enjoy every delicious bite! I am sure that this will become a family favorite. PrintCranberry Pineapple Upside Down Cake: A Delicious Twist on a Classic
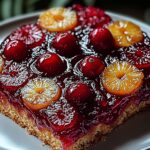
Moist Cranberry Pineapple Upside-Down Cake with a sweet, caramelized topping. Perfect for holidays or any special occasion!
- Prep Time: 20 minutes
- Cook Time: 35
- Total Time: 55-65 minutes
- Yield: 8–10 servings 1x
Ingredients
- 1/2 cup (1 stick) unsalted butter, melted
- 1 cup packed light brown sugar
- 1 (20 ounce) can crushed pineapple, well drained
- 1 cup fresh or frozen cranberries
- 1/2 cup chopped pecans or walnuts (optional)
- 1 1/2 cups all-purpose flour
- 1 1/2 teaspoons baking powder
- 1/4 teaspoon baking soda
- 1/4 teaspoon salt
- 1/2 cup (1 stick) unsalted butter, softened
- 3/4 cup granulated sugar
- 2 large eggs
- 1 teaspoon vanilla extract
- 3/4 cup buttermilk
Instructions
- In a microwave-safe bowl or in a saucepan over low heat, melt the butter completely. Be careful not to burn it.
- Pour the melted butter into the bottom of a 9-inch round cake pan. Make sure the entire bottom of the pan is coated evenly.
- Sprinkle the brown sugar evenly over the melted butter. This will create a delicious, caramelized layer when the cake is flipped.
- Spread the drained crushed pineapple evenly over the brown sugar layer. Ensure there are no large clumps and that it’s distributed nicely.
- Scatter the cranberries evenly over the pineapple. If using frozen cranberries, there’s no need to thaw them first. They’ll cook perfectly in the oven.
- If you’re using nuts, sprinkle them evenly over the cranberries. Pecans or walnuts add a lovely crunch and flavor to the topping.
- Preheat your oven to 350°F (175°C). This is crucial for even baking.
- In a medium bowl, whisk together the flour, baking powder, baking soda, and salt. Whisking ensures that the baking powder and baking soda are evenly distributed, which is essential for a light and fluffy cake.
- In a large bowl, cream together the softened butter and granulated sugar until light and fluffy. You can use an electric mixer (stand mixer or hand mixer) for this. Creaming the butter and sugar incorporates air, which contributes to the cake’s texture. This usually takes about 3-5 minutes.
- Beat in the eggs one at a time, mixing well after each addition. Make sure each egg is fully incorporated before adding the next.
- Stir in the vanilla extract. Vanilla enhances the overall flavor of the cake.
- Gradually add the dry ingredients to the wet ingredients, alternating with the buttermilk. Begin and end with the dry ingredients. So, add about 1/3 of the dry ingredients, then 1/2 of the buttermilk, then another 1/3 of the dry ingredients, then the remaining buttermilk, and finally the remaining dry ingredients. Mix until just combined. Be careful not to overmix, as this can result in a tough cake. Overmixing develops the gluten in the flour, leading to a denser texture.
- Gently pour the cake batter over the prepared topping in the cake pan. Spread the batter evenly to ensure it bakes uniformly.
- Bake in the preheated oven for 35-45 minutes, or until a wooden skewer inserted into the center comes out clean. The baking time may vary depending on your oven, so start checking for doneness around 35 minutes.
- Let the cake cool in the pan for about 10-15 minutes. This allows the topping to settle slightly and makes it easier to invert the cake without it falling apart.
- Place a serving plate over the top of the cake pan. Carefully and confidently invert the cake onto the plate. Be cautious, as the pan will be hot, and some of the topping might stick to the pan. If any topping remains in the pan, gently scrape it out and arrange it on top of the cake.
- Serve the cake warm or at room temperature. It’s delicious on its own, but you can also serve it with a dollop of whipped cream or a scoop of vanilla ice cream.
Notes
- Don’t overmix the batter.
- Use room temperature ingredients for best results.
- Drain the pineapple well to prevent a soggy topping.
- Check for doneness with a wooden skewer.
- Cool slightly before inverting.
- If the topping sticks, gently warm the bottom of the pan.
- Feel free to experiment with different fruits and nuts.

Leave a Comment