
Peanut Butter Spider Cookies Halloween isn’t just a treat; it’s a delightful, spooky sensation that perfectly encapsulates the spirit of the season! As the leaves turn vibrant shades and a crisp chill fills the air, our thoughts inevitably drift to all things ghoulishly fun and, of course, delicious. This cherished holiday is a time for crafting memorable moments, and what better way to do so than with a batch of homemade cookies that are as charmingly creepy as they are irresistibly tasty?
I find immense joy in seeing the smiles these unique cookies bring, especially to little faces, and even the “big kids” at heart. There’s something truly special about the combination of rich, chewy peanut butter, a hint of sweet chocolate, and those iconic, watchful candy eyes peering out from an eight-legged friend. These aren’t just any ordinary cookies; they are an experience, offering that perfect balance of salty and sweet that makes them utterly addictive. They are incredibly easy to make, making them a fantastic activity for families looking to add a touch of homemade magic to their Halloween festivities. From school parties to trick-or-treat gatherings, these Peanut Butter Spider Cookies Halloween creations are guaranteed to be the star of any spooky spread.

Ingredients:
-
2 ¼ cups All-Purpose Flour: I always recommend using a good quality, unbleached flour. Sifting it isn’t strictly necessary for these cookies, but it can make for an even lighter texture if you have the time!
-
1 teaspoon Baking Soda: This is our leavening agent, helping the cookies puff up beautifully. Make sure yours isn’t expired!
-
½ teaspoon Salt: A little bit of salt goes a long way in balancing the sweetness and enhancing all those lovely peanut butter flavors.
-
1 cup (2 sticks) Unsalted Butter: Make sure this is softened to room temperature. This is crucial for creaming properly with the sugars, creating that wonderfully airy base for our dough.
-
1 cup Granulated Sugar: For sweetness and that classic crisp-chewy cookie texture.
-
1 cup Packed Light Brown Sugar: The molasses in brown sugar adds moisture, chewiness, and a deeper, richer flavor to our peanut butter cookies.
-
2 large Eggs: Also at room temperature! Room temperature eggs incorporate more easily into the butter mixture, leading to a smoother, more emulsified dough.
-
1 teaspoon Pure Vanilla Extract: Don’t skimp on the vanilla! It truly elevates the flavor profile of any cookie.
-
1 cup Creamy Peanut Butter: I prefer creamy for a smoother dough and consistent texture, but if you love a little crunch, a natural crunchy peanut butter can work too. Just be aware of oil separation if using natural – stir it very well first!
-
For the Spider Decorations:
-
Approximately 36 Mini Peanut Butter Cups: These will form the “body” of our spiders. Make sure they’re unwrapped and ready to go!
-
72 Candy Eyeballs: These are available in most baking aisles, especially around Halloween. They bring so much character to our little spiders!
-
½ cup Chocolate Frosting: You can use store-bought or your favorite homemade recipe. I like to put mine in a piping bag fitted with a small round tip (or just snip the corner off a Ziploc bag) for neat spider legs. Melted semi-sweet chocolate chips also work wonderfully if you prefer a harder ‘leg’ that sets quickly.
-
Mixing Our Spooktacular Peanut Butter Cookie Dough
-
Prepare Your Dry Ingredients: In a medium bowl, whisk together the 2 ¼ cups of all-purpose flour, 1 teaspoon of baking soda, and ½ teaspoon of salt. I always give it a good whisk to ensure everything is evenly distributed. This way, every bite of your
Peanut Butter Spider Cookies Halloween
will have that perfect lift and seasoning. Set this bowl aside for a moment.
-
Cream the Butter and Sugars: In a large mixing bowl, preferably with an electric mixer (stand mixer or hand mixer works great!), beat your 1 cup of softened unsalted butter on medium speed until it’s light and fluffy. This usually takes about 1-2 minutes. Then, add the 1 cup of granulated sugar and 1 cup of packed light brown sugar. Continue beating on medium speed for another 2-3 minutes, until the mixture is truly light in color and airy in texture. You’ll notice it gets considerably paler and fluffier – this is a key step for tender cookies!
-
Incorporate Eggs and Vanilla: Scrape down the sides of the bowl with a rubber spatula. Add the 2 large room-temperature eggs, one at a time, beating well after each addition until fully incorporated. Follow this with the 1 teaspoon of pure vanilla extract, mixing until just combined. Don’t forget to scrape down the bowl again to ensure everything is evenly mixed.
-
Add the Peanut Butter: Now it’s time for the star flavor! Add the 1 cup of creamy peanut butter to the wet ingredients. Beat on medium speed until the peanut butter is completely blended into the mixture, resulting in a smooth, uniform consistency. The aroma at this stage is absolutely heavenly!
-
Combine Wet and Dry Ingredients: With the mixer on low speed, gradually add the dry ingredient mixture (flour, baking soda, salt) to the wet ingredients. Mix just until no streaks of flour remain. It’s super important not to overmix the dough at this stage! Overmixing develops the gluten in the flour too much, which can lead to tough, rather than tender, cookies. As soon as the flour disappears, stop the mixer. A few small lumps are perfectly fine.
-
Chill the Dough (Optional but Recommended!): While not strictly mandatory, I find that chilling the dough for at least 30 minutes (or even up to 2 hours) yields a better cookie. Chilling helps the flavors meld, and more importantly, it prevents the cookies from spreading too much in the oven, giving them a thicker, chewier texture. If you’re in a hurry for your
Peanut Butter Spider Cookies Halloween
, you can skip this, but you might get slightly flatter cookies. Cover the bowl with plastic wrap and pop it in the fridge.
Baking Our Golden Cookie Bases
-
Preheat Your Oven and Prepare Baking Sheets: While your dough is chilling (or right after mixing if you skipped chilling), preheat your oven to 375°F (190°C). Line two large baking sheets with parchment paper or silicone baking mats. This ensures your cookies won’t stick and makes for easier cleanup – a win-win!
-
Scoop the Dough: Using a 1 ½ to 2-tablespoon cookie scoop (or just two spoons), scoop rounded balls of dough and place them about 2 inches apart on your prepared baking sheets. I find a consistent scoop size is crucial for even baking. If the dough is a bit sticky from the chilling, you can lightly flour your hands to roll them into neat balls, but usually, a scoop works perfectly.
-
Bake to Perfection: Bake the cookies, one sheet at a time if your oven tends to have hot spots, for 8-10 minutes. You’ll know they’re ready when the edges are set and lightly golden, but the centers still look slightly soft. Don’t overbake them if you want that classic soft and chewy peanut butter cookie texture! I always keep a close eye on them during the last few minutes. Each oven is a little different, so yours might need a minute more or less.
-
Cooling Down: Once baked, remove the baking sheets from the oven and let the cookies cool on the sheets for about 5 minutes. This allows them to firm up a bit before you move them. After 5 minutes, carefully transfer the cookies to a wire rack to cool completely.
Allowing them to cool entirely is important before decorating, otherwise, your chocolate spider bodies will melt!
Transforming Cookies into Creepy-Crawly Spiders: The Halloween Fun Begins!
This is where the real fun begins and our cookies truly transform into delightful
Peanut Butter Spider Cookies Halloween
treats! Gather all your spider decoration ingredients and get ready to create some spooky edible art.
-
Prepare Your Frosting: If you’re using chocolate frosting from a can, give it a good stir to ensure it’s smooth. If you’re making homemade, make sure it’s at a good piping consistency. If you’re using melted chocolate, melt your semi-sweet chocolate chips gently in a microwave-safe bowl in 30-second intervals, stirring in between, until smooth. Let it cool slightly so it’s still pourable but not piping hot.
-
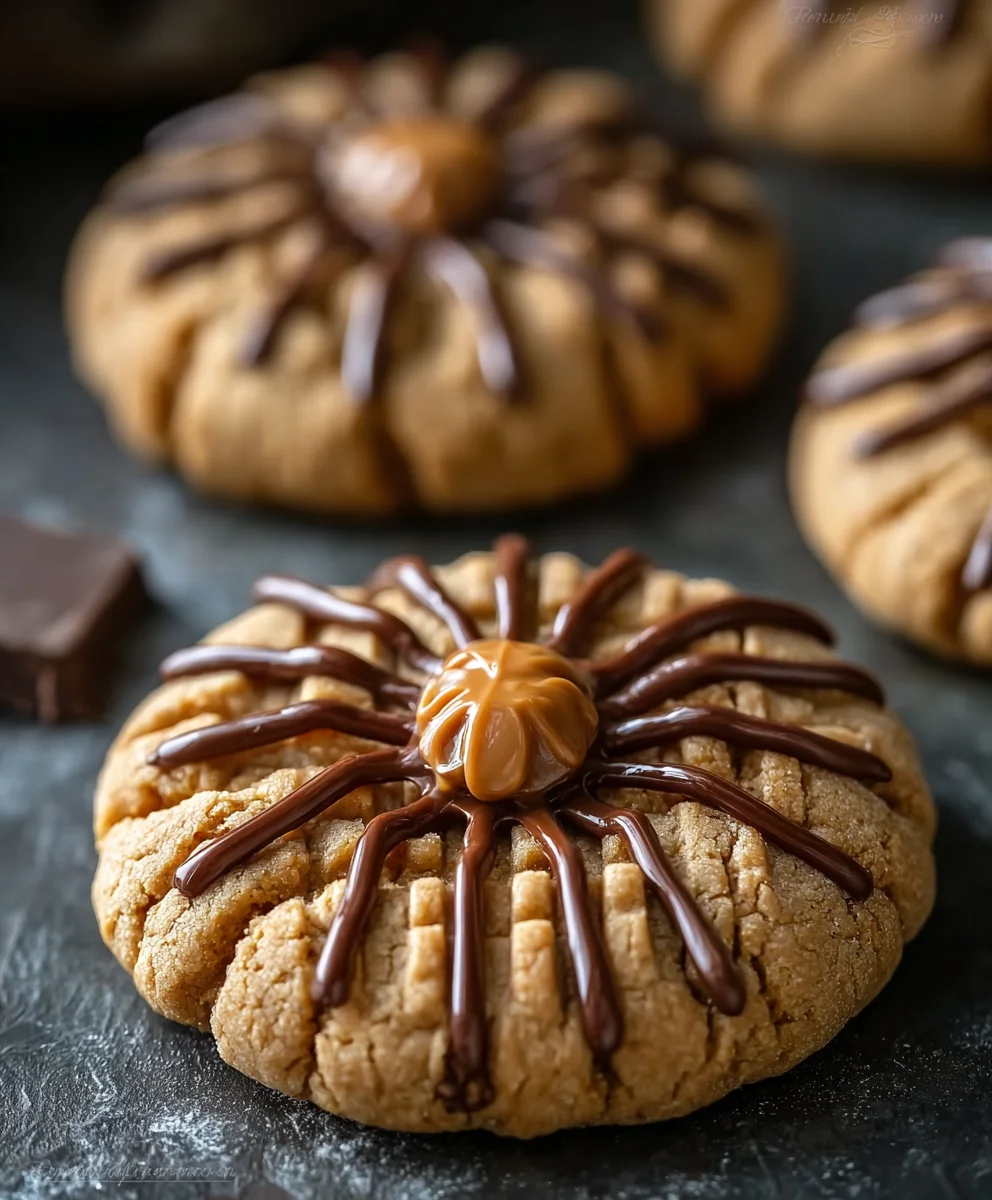
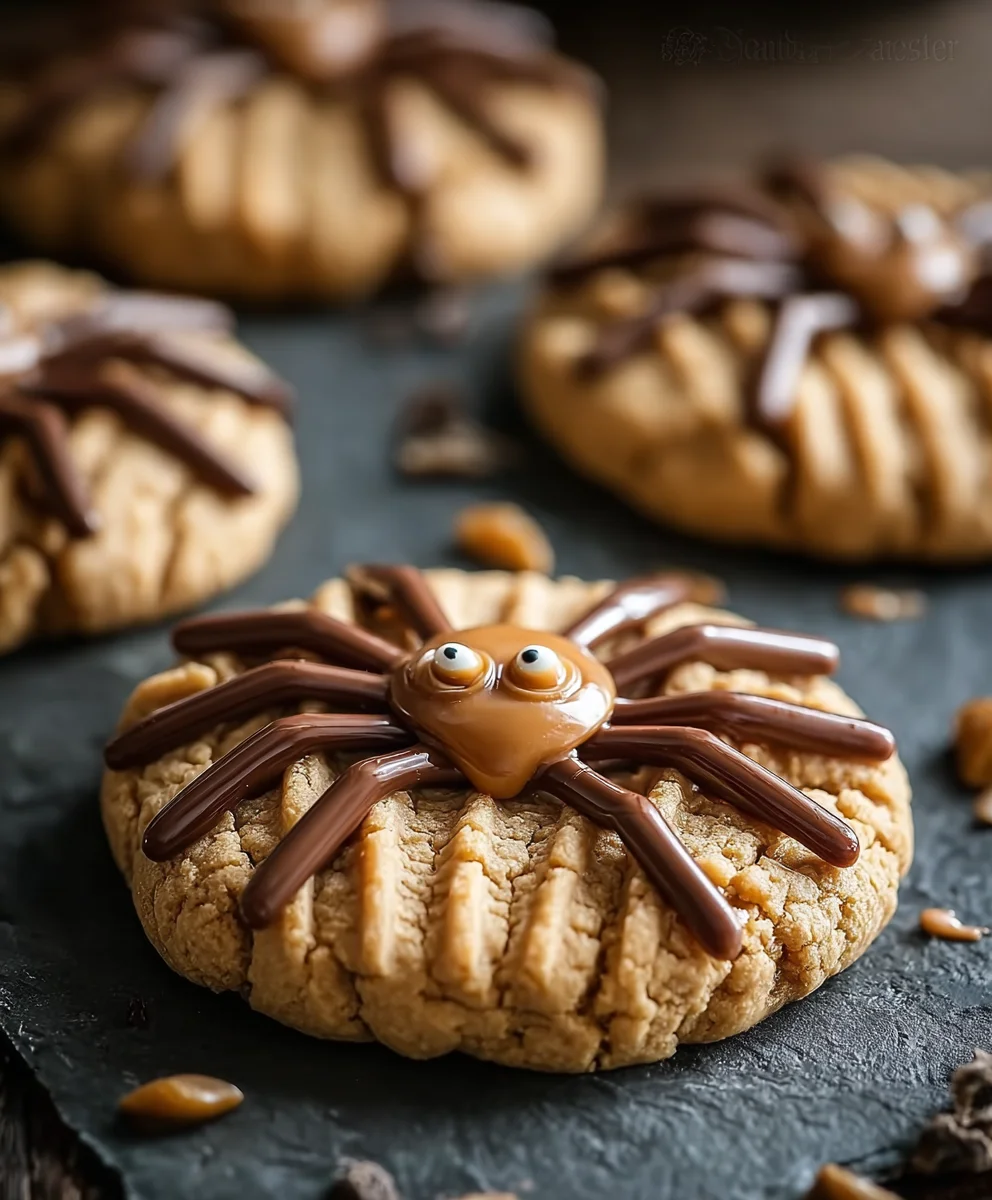
Create the Spider Body: While the cookies are still warm from the oven (but not hot enough to melt chocolate instantly – just slightly warm to help the peanut butter cup adhere), gently press one unwrapped mini peanut butter cup into the center of each peanut butter cookie. The warmth helps the base of the cup slightly melt and stick, ensuring it stays put. If your cookies are completely cool, you can add a tiny dab of frosting to the bottom of the peanut butter cup before pressing it onto the cookie.
-
Add the Eyes: Once the peanut butter cups are firmly in place, it’s time for the candy eyeballs! Using a tiny dot of chocolate frosting (or melted chocolate) as “glue” on the back of each eyeball, gently press two candy eyeballs onto the front of each mini peanut butter cup. Position them so they look like they’re peering out at you – a little bit of character makes all the difference for these
Peanut Butter Spider Cookies Halloween
treats!
-
Pipe the Spooky Legs: Now for the most fun part – piping the spider legs! Transfer your chocolate frosting (or melted chocolate) to a piping bag fitted with a small round tip (like an Ateco #3 or #4), or simply snip a very small corner off a Ziploc bag. Starting from the edge of the mini peanut butter cup (the “body”), pipe four short, slightly curved lines on each side of the peanut butter cup, extending out onto the cookie, to create eight “legs” in total for each spider. Try to make them relatively thin and delicate for a more realistic (and less clunky!) spider look. Work quickly if using melted chocolate, as it will set up fast.
Tips for Perfect Spider Legs:
-
Consistency is Key: If your frosting is too stiff, warm it slightly. If it’s too runny, chill it briefly. You want it to hold its shape but be easy to pipe.
-
Practice Makes Perfect: If you’re new to piping, try a few practice legs on a piece of parchment paper first. You’ll quickly get the hang of the pressure and movement needed.
-
Symmetry Isn’t Everything: Remember, these are homemade, charmingly spooky spiders! A little asymmetry just adds to their character. Don’t stress about making every single leg absolutely identical.
-
-
Let Them Set: Once all your
Peanut Butter Spider Cookies Halloween
are decorated, allow the chocolate frosting or melted chocolate to set completely. This can take anywhere from 30 minutes at room temperature to 15-20 minutes in the refrigerator. Once set, the legs and eyes will be firm and less likely to smudge.
-
Serving and Storage: These adorable and delicious Peanut Butter Spider Cookies are best enjoyed fresh! They’re perfect for Halloween parties, school treats, or just a fun baking project with the family. Store any leftover cookies in an airtight container at room temperature for up to 3-4 days. While they are still delicious, the peanut butter cups might soften a bit over time. I promise you, they won’t last long once your family and friends discover these festive and tasty Halloween treats!
Conclusion:
Well, there you have it! I truly hope you’ve enjoyed diving into this delightful recipe with me. When all is said and done, what makes these cookies an absolute must-try isn’t just their incredible taste, but the sheer joy and creativity they spark. We’re talking about a classic flavor combination – the rich, creamy goodness of peanut butter perfectly balanced with a touch of sweetness – but elevated with a whimsical, playful twist. These aren’t just cookies; they’re conversation starters, edible art, and a guaranteed smile-inducer for anyone who sees them, let alone tastes them. I find that the buttery, tender cookie base, with its comforting chew, creates the perfect foundation for that melt-in-your-mouth chocolate body and those wonderfully expressive candy eyes. It’s an approachable recipe that delivers truly spectacular results, making you feel like a baking wizard without needing any advanced skills. You’re not just baking; you’re crafting memories, and that’s a powerful thing, especially when it comes to shared moments around a treat.
Now, let’s talk about how to make these incredible treats even more special. Serving these cookies is an art in itself! They make a show-stopping centerpiece on any dessert platter, especially when arranged on a vibrant, autumn-themed spread alongside other spooky delights like candy corn or ghostly meringues. Imagine a beautiful ceramic dish overflowing with these charming spiders, each one looking back at you with its own unique personality. They pair wonderfully with a tall, frosty glass of milk, making them an irresistible after-school snack for the kids, or a comforting late-night indulgence for the adults. For a more grown-up gathering, consider serving them with a hot cup of coffee or a spiced chai latte; the flavors truly complement each other.
But don’t stop there! The beauty of this recipe lies in its adaptability. Feeling adventurous? Try swapping out the chocolate kisses for other small, rounded candies like mini Reese’s peanut butter cups for an extra layer of peanut butter decadence, or even some mini chocolate-covered caramels for a different textural contrast. You could experiment with different colors of candy eyes – perhaps neon green or vibrant orange – to truly make them pop, or use various sizes to give your spiders even more character. For those looking for a different kind of “leg,” thin pretzel sticks snapped into smaller pieces can add a fantastic salty crunch and a more rustic, twig-like appearance. Another fun variation involves rolling the cookie dough balls in coarse sugar before baking for an extra sparkly finish, or even a sprinkle of cocoa powder if you want to deepen the cookie’s base flavor slightly. If you’re catering to dietary needs, exploring gluten-free peanut butter cookie recipes as a base or dairy-free chocolate options can open up this fun treat to even more friends and family. Really, the sky’s the limit when it comes to personalizing these little arachnid-inspired marvels!
So, my dear fellow bakers, I genuinely encourage you to roll up your sleeves and give these fantastic cookies a try. You’ll be amazed at how simple it is to bring such joy and creativity to your kitchen. Don’t hesitate; gather your ingredients this weekend! They are perfect for a family baking project, a school treat, or just because you deserve something wonderfully sweet and fun. And when you do, please, please share your experience with me! I absolutely adore seeing your creations and hearing about your baking adventures. Did you try a fun variation? Did your kids have a blast decorating them? Which spider ended up being the cutest (or creepiest!)? I’m eagerly anticipating seeing all your magnificent Peanut Butter Spider Cookies Halloween renditions. Tag me in your photos or drop a comment below – let’s celebrate these delightful cookies together! Happy baking, and enjoy every single bite!
Peanut Butter Spider Cookies for Halloween
Fun and delicious Peanut Butter Spider Cookies, perfect for Halloween! Easy to make and decorate with peanut butter cups, chocolate legs, and candy eyes. These adorable cookies are not only easy to make but also so much fun to decorate, making them a delightful, spooky sensation for all ages.
Ingredients
-
2 ¼ cups All-Purpose Flour
-
1 teaspoon Baking Soda
-
½ teaspoon Salt
-
1 cup (2 sticks) Unsalted Butter, softened
-
1 cup Granulated Sugar
-
1 cup Packed Light Brown Sugar
-
2 large Eggs, room temperature
-
1 teaspoon Pure Vanilla Extract
-
1 cup Creamy Peanut Butter
-
Approximately 36 Mini Peanut Butter Cups, unwrapped
-
72 Candy Eyeballs
-
½ cup Chocolate Frosting (or melted semi-sweet chocolate chips)
Instructions
-
Step 1
In a medium bowl, whisk together 2 ¼ cups all-purpose flour, 1 teaspoon baking soda, and ½ teaspoon salt. Set aside. -
Step 2
In a large mixing bowl with an electric mixer, beat 1 cup softened unsalted butter until light and fluffy (1-2 minutes). Add 1 cup granulated sugar and 1 cup packed light brown sugar; beat 2-3 minutes until light in color and airy. -
Step 3
Scrape down the bowl. Add 2 large room-temperature eggs one at a time, beating well after each. Stir in 1 teaspoon pure vanilla extract until just combined. Scrape again. -
Step 4
Add 1 cup creamy peanut butter to the wet ingredients. Beat on medium speed until completely blended and smooth. -
Step 5
With the mixer on low speed, gradually add the dry ingredient mixture to the wet. Mix just until no streaks of flour remain; do not overmix. Cover the bowl and chill the dough for at least 30 minutes (up to 2 hours recommended) to prevent spreading and enhance texture. -
Step 6
Preheat oven to 375°F (190°C). Line two large baking sheets with parchment paper. Scoop 1 ½ to 2-tablespoon rounded balls of dough and place them 2 inches apart on prepared sheets. Bake for 8-10 minutes until edges are set and lightly golden, but centers still look slightly soft. -
Step 7
Remove baking sheets from the oven and let cookies cool on the sheets for about 5 minutes. Then, carefully transfer them to a wire rack to cool completely before decorating. -
Step 8
While cookies are still slightly warm (but not hot enough to melt chocolate instantly), gently press one unwrapped mini peanut butter cup into the center of each peanut butter cookie. If cookies are completely cool, use a tiny dab of frosting as ‘glue’. -
Step 9
Using a tiny dot of chocolate frosting (or melted chocolate) as ‘glue’, press two candy eyeballs onto the front of each mini peanut butter cup. Transfer remaining chocolate frosting or melted chocolate to a piping bag fitted with a small round tip (or snip a small corner off a Ziploc bag). Pipe four short, slightly curved lines on each side of the peanut butter cup, extending onto the cookie, to create eight ‘legs’ for each spider. -
Step 10
Allow the chocolate frosting or melted chocolate decorations to set completely at room temperature (about 30 minutes) or in the refrigerator (15-20 minutes). Once set, serve these adorable and delicious Peanut Butter Spider Cookies. Store leftovers in an airtight container at room temperature for up to 3-4 days.
Important Information
Nutrition Facts (Per Serving)
It is important to consider this information as approximate and not to use it as definitive health advice.
Allergy Information
Please check ingredients for potential allergens and consult a health professional if in doubt.


Leave a Comment