
Creme brulee vanilla custard: just the name itself evokes images of elegant desserts and sophisticated dining. But don’t let the fancy name intimidate you! I’m here to show you that creating this classic treat at home is surprisingly simple and incredibly rewarding.
Imagine the satisfying crack of your spoon as it breaks through the brittle, caramelized sugar crust, revealing the smooth, creamy vanilla custard underneath. That delightful contrast in textures and temperatures is what makes creme brulee so irresistible. While its exact origins are debated, with claims from France, England, and Spain, one thing is certain: this dessert has been captivating palates for centuries. Some food historians trace its roots back to the medieval “creme brulee” recipes found in French cookbooks.
What is it about creme brulee vanilla custard that makes it such a beloved dessert? Beyond the textural delight, it’s the rich, comforting flavor of vanilla that truly shines. The custard itself is luxuriously smooth and creamy, thanks to the combination of heavy cream, egg yolks, and a touch of sugar. And let’s not forget the convenience factor! While it may seem like a restaurant-only indulgence, this recipe requires minimal ingredients and can be prepared ahead of time, making it perfect for dinner parties or a special treat for yourself. So, are you ready to embark on this culinary adventure with me? Let’s get started!

Ingredients:
- 1 quart (4 cups) heavy cream
- 1 vanilla bean, split lengthwise and seeds scraped
- 6 large egg yolks
- 1/2 cup granulated sugar, plus more for brûléeing
- Pinch of salt
Preparing the Vanilla Infused Cream:
Okay, let’s start with the heart of our crème brûlée the vanilla-infused cream. This step is crucial because it’s where we build that incredible vanilla flavor that makes this dessert so special. Don’t skip it!
- Combine Cream and Vanilla: In a medium saucepan, pour in the heavy cream. Add the split vanilla bean pod and the vanilla bean seeds. Make sure you scrape all those precious seeds out! The pod itself has tons of flavor, so don’t throw it away.
- Heat Gently: Place the saucepan over medium heat. We’re not looking to boil the cream, just to gently heat it. You want to see small bubbles forming around the edges of the pan. This usually takes about 5-7 minutes. The goal here is to infuse the cream with the vanilla flavor.
- Infuse and Cool: Once the cream is heated, remove the saucepan from the heat. Cover the pan and let it steep for at least 30 minutes, or even better, an hour. This allows the vanilla flavor to really penetrate the cream. The longer it steeps, the more intense the vanilla flavor will be. After steeping, remove the vanilla bean pod. You can rinse and dry the pod and save it to infuse sugar or other liquids later!
Preparing the Custard Base:
Now that our cream is infused with vanilla goodness, let’s move on to creating the custard base. This part requires a little attention to detail, but don’t worry, I’ll guide you through it.
- Whisk Egg Yolks and Sugar: In a medium bowl, whisk together the egg yolks, granulated sugar, and a pinch of salt until the mixture is pale yellow and slightly thickened. This usually takes about 2-3 minutes. The sugar helps to break down the egg yolks, preventing them from scrambling later.
- Temper the Egg Yolks: This is a crucial step to prevent scrambled eggs! Slowly drizzle a small amount of the warm vanilla cream into the egg yolk mixture while whisking constantly. This is called tempering. The goal is to gradually raise the temperature of the egg yolks so they don’t cook too quickly when added to the hot cream. Continue adding the warm cream in a slow, steady stream, whisking constantly until about half of the cream has been incorporated.
- Combine and Strain: Pour the tempered egg yolk mixture into the saucepan with the remaining warm vanilla cream. Whisk to combine everything thoroughly. Now, strain the mixture through a fine-mesh sieve into a clean bowl or pitcher. This step is essential for removing any cooked egg bits or vanilla bean particles, resulting in a silky smooth custard.
Baking the Crème Brûlée:
Time to bake! This is where the magic happens. We’ll be using a water bath to ensure the custards bake evenly and stay creamy.
- Prepare the Baking Dish: Preheat your oven to 325°F (160°C). Arrange your ramekins (usually 6-8, depending on size) in a baking dish with sides at least 2 inches high.
- Pour the Custard: Carefully pour the custard mixture into the ramekins, filling them almost to the top.
- Create the Water Bath: Carefully pour hot water into the baking dish, filling it about halfway up the sides of the ramekins. The water bath helps to regulate the temperature and prevent the custards from curdling or cracking.
- Bake: Gently place the baking dish in the preheated oven and bake for 40-50 minutes, or until the custards are set around the edges but still slightly wobbly in the center. They should jiggle like jelly.
- Cool and Chill: Remove the baking dish from the oven and carefully remove the ramekins from the water bath. Let the custards cool to room temperature, then cover them with plastic wrap and refrigerate for at least 4 hours, or preferably overnight. This allows the custards to fully set and develop their flavor.
Brûléeing the Tops:
This is the fun part! The crackling sugar crust is what makes crème brûlée so irresistible. You’ll need a kitchen torch for this step. If you don’t have one, you can use your oven’s broiler, but be very careful not to burn the custards.
- Prepare for Brûléeing: Remove the custards from the refrigerator and let them sit at room temperature for about 15-20 minutes. This will help the sugar melt evenly. Pat the tops of the custards dry with a paper towel to remove any condensation. This will help the sugar caramelize better.
- Sprinkle with Sugar: Sprinkle a thin, even layer of granulated sugar over the top of each custard. You want enough sugar to create a good crust, but not so much that it becomes too thick or bitter.
- Brûlée the Sugar: Using a kitchen torch, hold the flame about 2-3 inches away from the sugar and move it in a circular motion until the sugar melts and caramelizes to a deep golden brown color. Be careful not to hold the torch in one spot for too long, as this can burn the sugar. If using a broiler, place the custards on a baking sheet and broil for 1-2 minutes, or until the sugar is caramelized. Watch them very closely to prevent burning!
- Let the Sugar Harden: Let the brûléed sugar crust harden for a few minutes before serving. This will create that satisfying crack when you tap it with a spoon.
Serving and Enjoying:
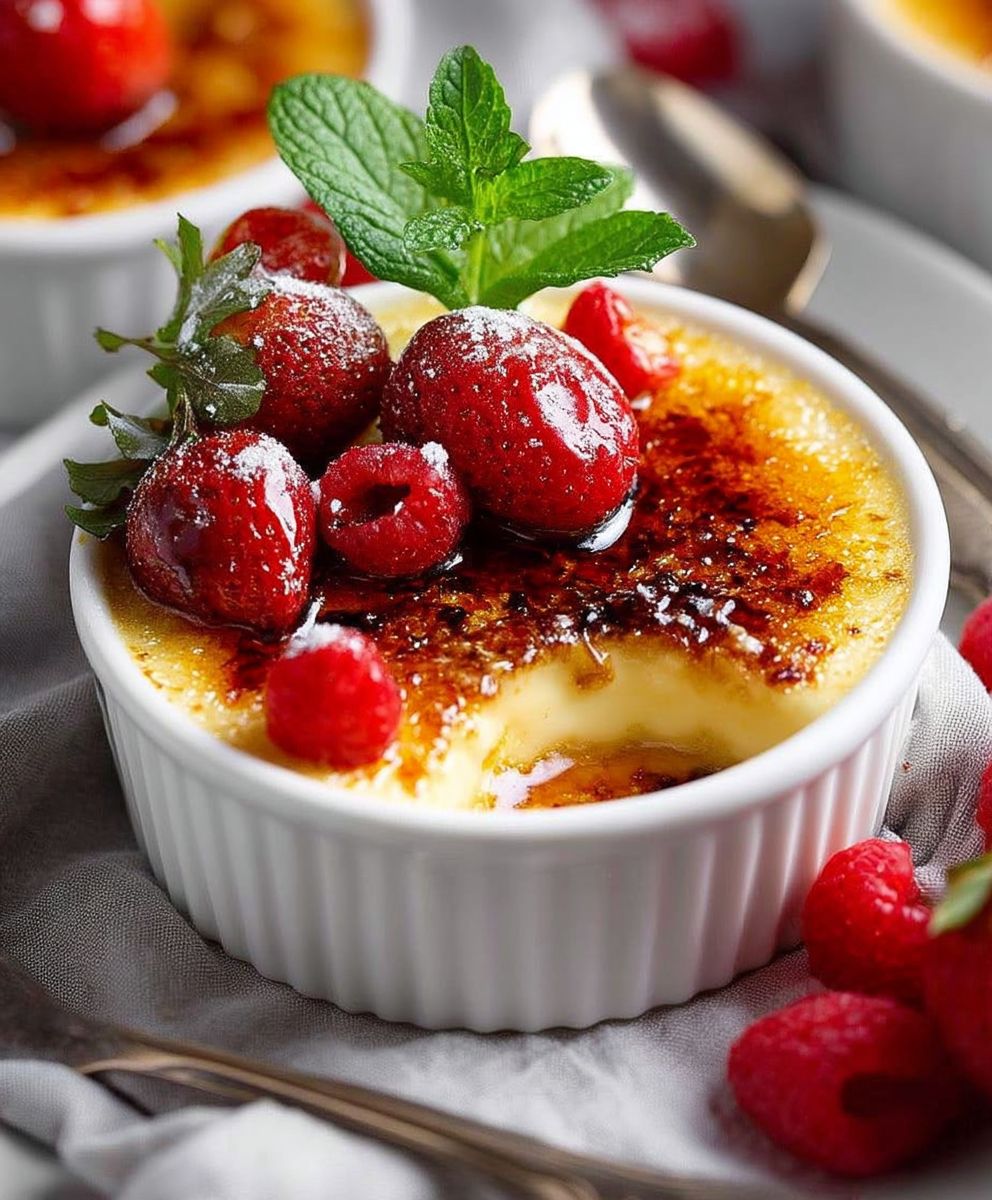
Finally, the moment we’ve all been waiting for! Serve your crème brûlée immediately after brûléeing for the best experience. The contrast between the cold, creamy custard and the warm, crunchy sugar crust is simply divine.
Optional Garnishes: You can garnish your crème brûlée with fresh berries, a sprig of mint, or a dusting of cocoa powder for an extra touch of elegance.
Storage: If you have any leftover crème brûlée (which is unlikely!), store it in the refrigerator for up to 2 days. However, the sugar crust will soften over time, so it’s best to brûlée them just before serving.
Tips for Success:
- Use high-quality ingredients: The better the ingredients, the better the crème brûlée will taste. Use fresh, heavy cream and a good quality vanilla bean.
- Don’t overbake the custards: Overbaked custards will be tough and rubbery. They should be set around the edges but still slightly wobbly in the center.
- Use a fine-mesh sieve: Straining the custard mixture will remove any cooked egg bits or vanilla bean particles, resulting in a silky smooth custard.
- Don’t skip the water bath: The water bath helps to regulate the temperature and prevent the custards from curdling or cracking.
- Brûlée just before serving: The sugar crust will soften over time, so it’s best to brûlée them just before serving.
Enjoy your homemade crème brûlée! I hope you found this recipe helpful and easy to follow. Let me know in the comments if you have any questions or if you try the recipe!
Conclusion:
And there you have it! This crème brûlée vanilla custard recipe is more than just a dessert; it’s an experience. From the satisfying crack of the caramelized sugar to the smooth, creamy custard underneath, every spoonful is a little piece of heaven. I truly believe this is a must-try recipe for anyone who appreciates classic desserts with a touch of elegance. It’s surprisingly simple to make, yet delivers a restaurant-quality result that will impress your family and friends.
But why is this recipe a must-try? Beyond the incredible taste and texture, it’s about the joy of creating something special. It’s about the satisfaction of mastering a technique and sharing it with loved ones. It’s about elevating an ordinary evening into something memorable. And let’s be honest, who can resist that irresistible sugary crust?
Now, let’s talk about serving suggestions and variations. While this crème brûlée vanilla custard is absolutely divine on its own, there are plenty of ways to customize it to your liking. For a truly decadent experience, try serving it with fresh berries like raspberries, strawberries, or blueberries. The tartness of the berries perfectly complements the sweetness of the custard. A sprig of mint adds a touch of freshness and visual appeal.
If you’re feeling adventurous, you can experiment with different flavor infusions. Try adding a teaspoon of citrus zest (lemon, orange, or lime) to the custard base for a bright and zesty twist. A splash of your favorite liqueur, such as Grand Marnier or Frangelico, can also add a sophisticated touch. For a more subtle flavor, infuse the cream with vanilla bean, lavender, or even Earl Grey tea. Just remember to strain the cream before adding it to the egg yolks.
Another fun variation is to add a layer of fruit compote to the bottom of the ramekins before pouring in the custard. Apple compote, cherry compote, or even a simple berry compote would all work beautifully. This adds another layer of flavor and texture to the dessert.
For a truly impressive presentation, consider using different shaped ramekins. Heart-shaped ramekins are perfect for Valentine’s Day or anniversaries, while square or rectangular ramekins can add a modern touch. You can also experiment with different types of sugar for the caramelized topping. Turbinado sugar, with its larger crystals, will create a slightly coarser and more rustic crust.
I urge you to give this recipe a try. Don’t be intimidated by the name; it’s much easier than you might think. And trust me, the results are well worth the effort. Once you’ve mastered the basic technique, you can start experimenting with different flavors and variations to create your own signature crème brûlée vanilla custard.
I’m so excited for you to try this recipe and experience the magic of crème brûlée vanilla custard for yourself. Please, don’t hesitate to share your experience with me! Let me know how it turned out, what variations you tried, and any tips or tricks you discovered along the way. You can leave a comment below, tag me on social media, or send me an email. I can’t wait to hear from you! Happy brûlée-ing!
Creme Brulee Vanilla Custard: The Ultimate Guide to Making It Perfectly
Rich, creamy vanilla custard with a crisp, caramelized sugar crust.
Ingredients
- 1 quart (4 cups) heavy cream
- 1 vanilla bean, split lengthwise and seeds scraped
- 6 large egg yolks
- 1/2 cup granulated sugar, plus more for brûléeing
- Pinch of salt
Instructions
- Vanilla Infused Cream: In a medium saucepan, combine heavy cream, vanilla bean pod, and vanilla bean seeds. Heat gently over medium heat until small bubbles form around the edges (5-7 minutes). Remove from heat, cover, and steep for at least 30 minutes (or up to 1 hour) to infuse vanilla flavor. Remove vanilla bean pod.
- Custard Base: In a medium bowl, whisk together egg yolks, granulated sugar, and salt until pale yellow and slightly thickened (2-3 minutes).
- Temper Egg Yolks: Slowly drizzle a small amount of the warm vanilla cream into the egg yolk mixture while whisking constantly. Continue adding the warm cream in a slow, steady stream, whisking constantly until about half of the cream has been incorporated.
- Combine and Strain: Pour the tempered egg yolk mixture into the saucepan with the remaining warm vanilla cream. Whisk to combine thoroughly. Strain the mixture through a fine-mesh sieve into a clean bowl or pitcher.
- Baking: Preheat oven to 325°F (160°C). Arrange ramekins in a baking dish with sides at least 2 inches high. Carefully pour custard mixture into ramekins, filling them almost to the top.
- Water Bath: Carefully pour hot water into the baking dish, filling it about halfway up the sides of the ramekins.
- Bake: Gently place the baking dish in the preheated oven and bake for 40-50 minutes, or until the custards are set around the edges but still slightly wobbly in the center.
- Cool and Chill: Remove the baking dish from the oven and carefully remove the ramekins from the water bath. Let the custards cool to room temperature, then cover them with plastic wrap and refrigerate for at least 4 hours, or preferably overnight.
- Brûléeing: Remove custards from the refrigerator and let them sit at room temperature for about 15-20 minutes. Pat the tops of the custards dry with a paper towel to remove any condensation.
- Sprinkle with Sugar: Sprinkle a thin, even layer of granulated sugar over the top of each custard.
- Brûlée the Sugar: Using a kitchen torch, hold the flame about 2-3 inches away from the sugar and move it in a circular motion until the sugar melts and caramelizes to a deep golden brown color. If using a broiler, place the custards on a baking sheet and broil for 1-2 minutes, or until the sugar is caramelized. Watch them very closely to prevent burning!
- Harden: Let the brûléed sugar crust harden for a few minutes before serving.
- Serve: Serve immediately.
Notes
- Use high-quality ingredients for the best flavor.
- Don’t overbake the custards; they should be slightly wobbly in the center.
- Straining the custard ensures a silky smooth texture.
- The water bath is crucial for even baking and preventing cracking.
- Brûlée the sugar just before serving for the best texture.
- Optional garnishes: fresh berries, mint sprig, cocoa powder.
- Leftovers can be stored in the refrigerator for up to 2 days, but the sugar crust will soften.


Leave a Comment