
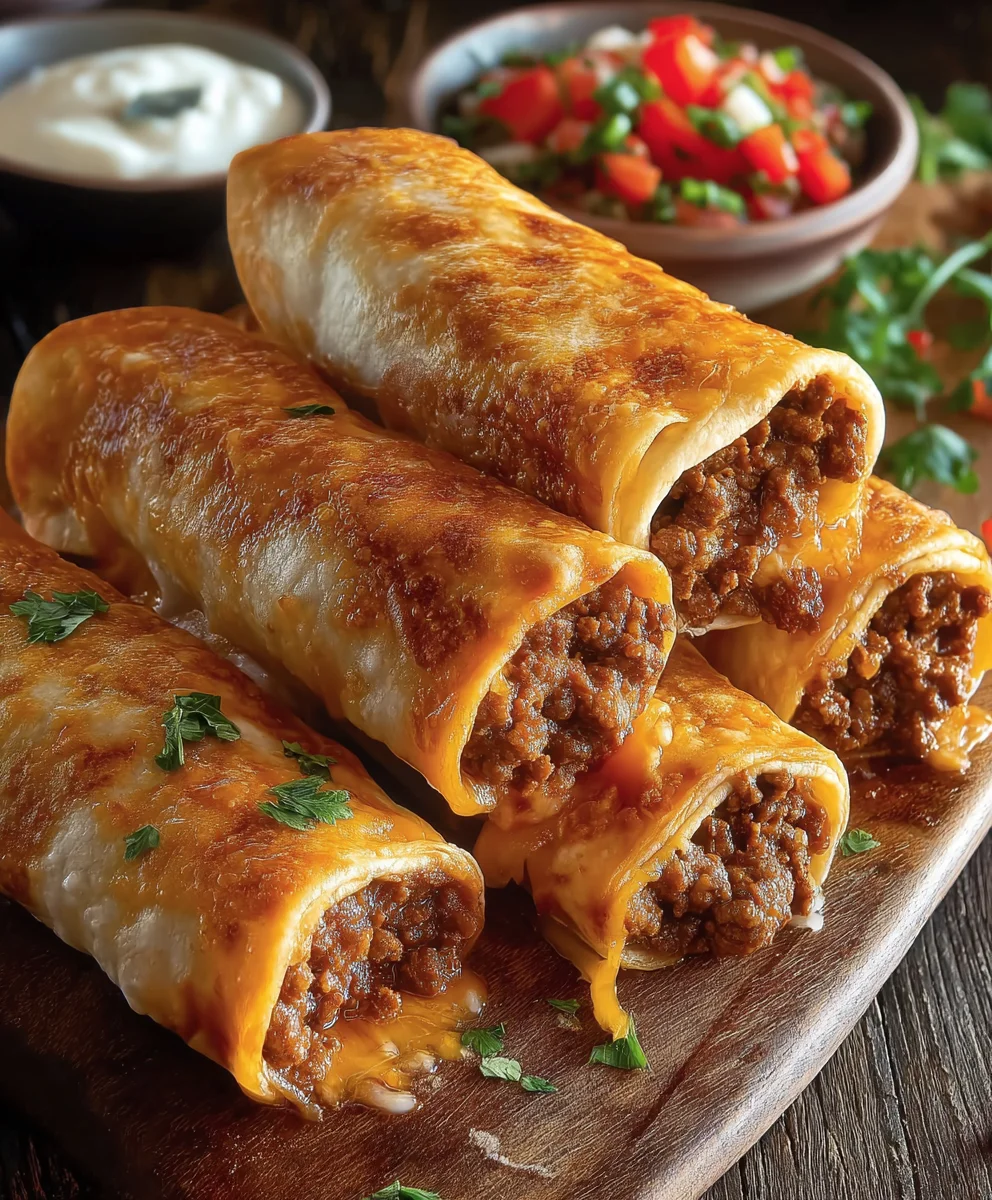
Crispy Beef Cheese Chimichangas are more than just a meal; they’re an experience waiting to unfold in your kitchen. Imagine that satisfying crunch as your teeth break through a perfectly golden, fried tortilla, giving way to a rich, savory filling of seasoned ground beef and an abundance of gooey, melted cheese. This isn’t merely a dish; it’s a celebration of flavor and texture, a culinary adventure I am delighted to guide you through today.
While its exact origins are shrouded in delightful mystery, many stories trace the chimichanga’s delectable existence to the Southwestern United States, particularly Arizona, or across the border in Sonora, Mexico, often described as a happy accident where a burrito mistakenly took a plunge into hot oil. Regardless of its precise birth, this deep-fried delight quickly captured hearts and palates, evolving into a beloved staple of Tex-Mex and regional American cuisine.
People adore this dish for its incredible versatility and the sheer comfort it brings. The unique combination of an undeniably crispy exterior, contrasting beautifully with the tender, flavor-packed beef and creamy, molten cheese within, creates a symphony of sensations that is truly irresistible. Preparing these homemade Crispy Beef Cheese Chimichangas allows you to customize every aspect, ensuring an unforgettable dining experience that far surpasses any restaurant version. I truly believe you’ll find immense joy in crafting and savoring every single bite.

Ingredients:
- For the Beef Filling:
- 1 ½ pounds ground beef (80/20 lean is ideal for flavor, but drain well)
- 1 large yellow onion, finely chopped
- 3 cloves garlic, minced
- 1 bell pepper (any color), finely diced
- 1 (14.5-ounce) can diced tomatoes, undrained
- 1 cup beef broth
- 2 tablespoons chili powder
- 1 teaspoon ground cumin
- ½ teaspoon dried oregano
- ½ teaspoon smoked paprika
- ¼ teaspoon cayenne pepper (optional, for a kick)
- Salt and freshly ground black pepper to taste
- 2 tablespoons olive oil
- For Assembling:
- 12 large (10-inch) flour tortillas
- 3 cups shredded Monterey Jack cheese, or a Mexican blend cheese
- ¼ cup all-purpose flour
- 3 tablespoons cold water (for flour paste)
- For Frying:
- 4-6 cups vegetable oil, canola oil, or peanut oil (for deep frying)
- Optional Toppings:
- Sour cream or Greek yogurt
- Salsa (verde or roja)
- Guacamole or sliced avocado
- Shredded lettuce
- Chopped fresh cilantro
- Pico de gallo
Preparing the Flavorful Beef Filling
-
Brown the Beef: In a large, heavy-bottomed skillet or Dutch oven, heat 1 tablespoon of olive oil over medium-high heat. Add the ground beef and break it apart with a wooden spoon. Cook, stirring occasionally, until the beef is fully browned and no pink remains. This typically takes about 7-10 minutes.
Pro Tip: Browning the beef thoroughly is crucial for developing deep, rich flavors. Don’t rush this step!
- Drain Excess Fat: Once the beef is browned, carefully tilt the skillet and drain off any excess fat. You can use a spoon to hold the beef back or pour it through a fine-mesh sieve set over a heatproof bowl. We want the flavor, not the greasiness, for our ultimate “Crispy Beef Cheese Chimichangas.”
- Sauté Aromatics: Return the skillet to medium heat. Add the remaining 1 tablespoon of olive oil, then toss in the chopped yellow onion and diced bell pepper. Cook, stirring occasionally, for 5-7 minutes until the vegetables have softened and the onion is translucent.
- Add Garlic and Spices: Stir in the minced garlic, chili powder, ground cumin, dried oregano, smoked paprika, and cayenne pepper (if using). Cook for another 1-2 minutes, stirring constantly. This step is vital as it toasts the spices, intensifying their aromatic compounds and creating a more complex flavor profile for our “Crispy Beef Cheese Chimichangas” filling. You’ll notice a wonderfully fragrant aroma filling your kitchen!
- Simmer with Liquids: Pour in the can of undrained diced tomatoes and the beef broth. Bring the mixture to a gentle simmer, scraping up any browned bits from the bottom of the pan – those are flavor bombs! Reduce the heat to low, cover the skillet, and let it simmer for at least 20-25 minutes. This allows all the flavors to meld beautifully and the liquid to reduce, creating a rich, thick, and incredibly delicious beef filling that won’t make our tortillas soggy. For an even deeper flavor, you can let it simmer longer, up to an hour, stirring occasionally.
- Season to Perfection: Taste the beef filling and season generously with salt and freshly ground black pepper. Adjust any other seasonings as needed. You want the filling to be robust and flavorful, as it’s the heart of our “Crispy Beef Cheese Chimichangas.” Remove the skillet from the heat and set aside to cool slightly. A slightly cooled filling is easier to handle when assembling and prevents the cheese from melting too prematurely.
Preparing for Assembly
-
Prepare the Tortillas: While the beef filling is cooling, it’s a good idea to warm your flour tortillas. Warming them makes them more pliable and less prone to tearing when you roll them, which is absolutely essential for perfectly sealed “Crispy Beef Cheese Chimichangas.” You can do this in a few ways:
- Microwave: Stack a few tortillas at a time, wrap them in a damp paper towel, and microwave for 20-30 seconds until warm and flexible.
- Steamer: Place them in a steamer basket over simmering water for a few minutes.
- Dry Skillet: Heat a dry skillet over medium-high heat and warm each tortilla for about 15-20 seconds per side until soft.
- Shred the Cheese: If you haven’t already, shred your Monterey Jack or Mexican blend cheese. Freshly shredded cheese melts much better and tastes superior to pre-shredded varieties, which often contain anti-caking agents.
- Make the Flour Paste: In a small bowl, whisk together the ¼ cup all-purpose flour and 3 tablespoons of cold water until a smooth, thick paste forms. This paste will act as our “glue” to seal the “Crispy Beef Cheese Chimichangas” shut before frying, ensuring none of our precious filling escapes during cooking. A good seal is key to maintaining their structural integrity and crispiness.
Assembling the Crispy Beef Cheese Chimichangas
- Set Up Your Workstation: Lay out a warm tortilla on a clean, flat surface. Ensure your beef filling, shredded cheese, and flour paste are all within easy reach. Efficiency here will make the assembly process much smoother.
- Add Filling: Spoon approximately ½ cup of the prepared beef filling onto the center of the tortilla, shaping it into a log. Leave about a 1-inch border on the top and bottom, and generous space on the sides. Don’t overfill! While tempting, overfilling makes it very difficult to roll a tight, secure “Crispy Beef Cheese Chimichanga” and increases the risk of it bursting open during frying.
- Add Cheese: Sprinkle about ¼ cup of shredded cheese evenly over the beef filling. The cheese not only adds incredible flavor and gooeyness but also helps bind the filling together.
- Fold the Sides: Fold the left and right sides of the tortilla inward, over the filling, by about 1 to 1 ½ inches. This creates neat, enclosed ends, much like wrapping a present.
- Roll Tightly: Starting from the bottom (the edge closest to you), tightly roll the tortilla upwards, encasing the filling. Roll it as snugly as you can. A tight roll is paramount for achieving a truly “Crispy Beef Cheese Chimichanga” that holds its shape. Loose rolls tend to unravel and absorb too much oil.
- Seal the Chimichanga: Just before you complete the roll, dab a small amount of the flour paste along the top edge of the tortilla. Finish rolling to seal the “Crispy Beef Cheese Chimichanga” completely. Press gently to ensure it’s securely closed. Repeat this process for all remaining tortillas and filling. Place the assembled chimichangas seam-side down on a baking sheet while you work on the rest.
Frying the Crispy Beef Cheese Chimichangas
- Heat the Frying Oil: Pour the vegetable, canola, or peanut oil into a large, heavy-bottomed pot or Dutch oven. You’ll need enough oil to submerge the chimichangas at least halfway, ideally fully. Heat the oil over medium-high heat until it reaches a temperature of 350-375°F (175-190°C). Using a deep-fry thermometer is highly recommended for accuracy and safety. Maintaining a consistent oil temperature is the secret to achieving that perfect golden-brown crispiness without making them greasy. If the oil is too cold, the chimichangas will soak up oil; if it’s too hot, they’ll burn on the outside before the inside is thoroughly heated.
- Prepare for Draining: While the oil is heating, line a large plate or baking sheet with several layers of paper towels. This will be used to drain the excess oil from your “Crispy Beef Cheese Chimichangas” after frying, ensuring they stay delightfully crisp.
- Fry in Batches: Carefully lower 2-3 chimichangas into the hot oil, seam-side down first. Do not overcrowd the pot! Overcrowding will drastically drop the oil temperature, leading to soggy rather than “Crispy Beef Cheese Chimichangas.” Fry the chimichangas for 3-5 minutes, turning occasionally with tongs, until they are beautifully golden brown and crispy on all sides. The exact time will depend on your oil temperature and the thickness of your chimichangas. You’re looking for an even, deep golden hue.
- Drain Excess Oil: Once golden and crispy, carefully remove the “Crispy Beef Cheese Chimichangas” from the oil using tongs and transfer them to the paper towel-lined plate to drain. Allow them to rest for a few minutes. You’ll hear that satisfying crackle as they cool slightly.
- Repeat and Serve: Continue frying the remaining chimichangas in batches, making sure the oil returns to the correct temperature between each batch. It’s important to monitor the oil temperature constantly, adjusting the heat as necessary. Once all your “Crispy Beef Cheese Chimichangas” are fried, serve them immediately while they are still hot and wonderfully crispy.
Serving Suggestions and Enjoyment
- Embrace the Toppings: “Crispy Beef Cheese Chimichangas” are fantastic on their own, but they truly shine when paired with your favorite Tex-Mex toppings. Offer a selection of cool, creamy sour cream or Greek yogurt, fresh chunky salsa (whether mild or spicy), luscious homemade guacamole or simple sliced avocado, a scattering of crisp shredded lettuce, and a sprinkle of vibrant chopped fresh cilantro or pico de gallo. These toppings provide a wonderful contrast in texture and temperature to the hot, crispy chimichangas.
- Immediate Enjoyment: For the absolute best experience, serve these “Crispy Beef Cheese Chimichangas” as soon as they come out of the fryer. That immediate crunch and warm, cheesy, flavorful beef filling is truly unbeatable. They make an incredible main course for a family dinner or a fantastic, crowd-pleasing appetizer for a gathering.
- Leftovers and Reheating: If you happen to have any leftover “Crispy Beef Cheese Chimichangas,” store them in an airtight container in the refrigerator for up to 2-3 days. To reheat and restore some of their crispiness, I recommend warming them in an oven or air fryer at 375°F (190°C) for 10-15 minutes, or until heated through and the exterior is crisp again. Microwaving them will heat them, but they will lose their signature crunch, and we worked so hard for that “Crispy Beef Cheese Chimichangas” texture!

Conclusion:
So, we’ve journeyed together through the exciting process of creating what I truly believe is one of the most satisfying and crave-worthy dishes you can make right in your own kitchen. The magic of these homemade delights lies in their incredible texture and flavor profile, meticulously crafted to deliver an unforgettable experience. There’s just something inherently irresistible about biting into something that’s perfectly crisp and golden on the outside, yielding effortlessly to a warm, savory, and richly seasoned filling on the inside. This isn’t just another meal to put on the table; it’s an event, a symphony of delightful textures and tastes that will undoubtedly leave you and your loved ones craving more. I promise you, mastering this recipe for
Crispy Beef Cheese Chimichangas will not only elevate your culinary game but also bring immense joy and a touch of Tex-Mex festivity to your home. It’s a dish that truly excites the senses, from the sizzling sound as it cooks to the incredible aroma that fills your kitchen.
Why These Chimichangas Are a Game-Changer in Your Kitchen
What truly sets these chimichangas apart from anything you might pick up from a takeout menu or even a frozen aisle is the unparalleled freshness, quality, and personalized touch you bring to each and every step. We’re talking about that glorious, golden-brown, shattering exterior that gives way to a truly succulent, perfectly seasoned beef mixture, expertly blended with a generous amount of gooey, melted cheese. It’s that harmonious balance of savory, tender beef, the tangy, comforting embrace of the cheese, and the ultimate satisfying crunch of a perfectly fried tortilla that makes them an absolute sensation. Every single bite is a revelation, a comforting explosion of flavor that speaks directly to the soul and promises a moment of pure culinary bliss. I’ve found that the care taken in browning the beef to perfection, seasoning it just right with a thoughtful blend of spices, and then achieving that ideal crispness on the tortilla transforms simple, humble ingredients into something truly extraordinary and restaurant-worthy. This dish isn’t merely filling; it’s deeply satisfying, offering a complex yet approachable flavor that appeals to nearly everyone, making it a perfect family meal or a fantastic option for entertaining guests. Imagine the smiles and compliments as you serve these at your next gathering; the aroma alone as they cook is enough to gather everyone in the kitchen, eagerly anticipating the first delicious taste. It’s a testament to good, honest, homemade food – elevated by a simple frying technique that locks in all the goodness and delivers that coveted, irresistible crunch.
Perfect Pairings and Serving Suggestions to Elevate Your Meal
Now that you’ve got these magnificent chimichangas ready, glistening and golden, let’s talk about how to truly make them shine on your plate and complete the dining experience. While they are absolutely divine on their own, piping hot and fresh from the pan, a few simple additions can effortlessly take your meal to the next level. I always, always recommend serving them with a generous dollop of cool, creamy sour cream or a vibrant, homemade guacamole. The creamy coolness provides a wonderful, refreshing contrast to the warm, crispy chimichangas, balancing the richness beautifully. A fresh pico de gallo, bursting with ripe tomatoes, onions, cilantro, and a hint of lime, or a zesty salsa verde also adds an incredible burst of freshness and acidity that cuts through the richness wonderfully. For a more complete and traditional meal, consider serving them alongside a bed of fluffy Mexican rice and a hearty side of seasoned black beans. Don’t forget that final squeeze of fresh lime juice over everything; it adds that extra zing and brightens all the flavors! And for those who adore a bit of heat, a sprinkle of fresh cilantro and a few dashes of your favorite hot sauce can really amplify the experience, adding a kick that chili lovers will appreciate.
Exciting Variations to Explore and Make It Your Own
One of the truly beautiful and exciting things about this
Crispy Beef Cheese Chimichangas recipe is its incredible versatility and adaptability. Once you’ve mastered the basic technique, which I promise is simpler than it seems, feel absolutely free to experiment and make it truly your own! If you’re not a fan of beef, or perhaps looking for a change, you could easily substitute it with seasoned ground chicken, ground turkey, or even succulent shredded pork. For a fantastic vegetarian option, a robust mixture of seasoned black beans, sweet corn, vibrant bell peppers, and sautéed onions makes an incredibly flavorful and satisfying filling. You could also play around with the cheese blend – a mix of Monterey Jack and cheddar is a classic for a reason, but a touch of smoky provolone, a sharper aged cheddar, or even some crumbly queso fresco could add an interesting and unique twist to the flavor profile. Don’t shy away from adding finely diced jalapeños to the beef mixture for an extra kick of spice, or incorporating some sautéed onions and bell peppers for added texture, sweetness, and vegetable goodness. You could even try different spice blends beyond the basic chili powder; think a smoky chipotle powder for depth, a dash of cumin for an earthier flavor, or even a hint of smoked paprika. The possibilities are truly endless, allowing you to tailor this recipe to your family’s specific preferences, dietary needs, and what you have on hand. This fantastic adaptability ensures that these chimichangas can easily become a beloved and regular staple in your culinary repertoire, never growing tiresome.
Your Turn: Give Them a Try and Share Your Experience!
So, there you have it! My comprehensive guide to creating these utterly delectable and deeply satisfying
Crispy Beef Cheese Chimichangas. I’ve poured my heart into sharing all the tips, tricks, and insights I’ve learned over countless batches, hoping to empower you to create something truly special and memorable in your own kitchen. I genuinely believe that once you taste the homemade difference – that unparalleled crispness, the rich, savory filling, and the sheer satisfaction of creating it yourself – there will be no going back to store-bought versions. Please, don’t be intimidated by the frying aspect; it’s much simpler than you might think, and the reward of that perfect crunch is absolutely, unequivocally worth it. Take the plunge, gather your ingredients, and set aside some joyful time this week to bring this fantastic dish to life. I am incredibly eager and excited to hear all about your culinary adventures! Please, when you make these, come back and share your experience with me and our community. What variations did you try? Who did you share them with? Did they become an instant hit and a new family favorite? Your feedback, stories, and photos inspire me and our entire community of food lovers. Happy cooking, and get ready to impress yourself, your family, and everyone around you with these incredible, homemade delights that taste like pure joy!
Crispy Beef Cheese Chimichangas
Experience the ultimate comfort food with these Crispy Beef Cheese Chimichangas. Golden, fried tortillas encase a rich, savory filling of seasoned ground beef and gooey, melted cheese. A beloved Tex-Mex classic, perfect for a satisfying meal that’s easy to make at home.
Ingredients
-
1 ½ pounds ground beef
-
1 large yellow onion, chopped
-
3 cloves garlic, minced
-
1 bell pepper, diced
-
1 (14.5-ounce) can diced tomatoes
-
1 cup beef broth
-
2 tablespoons chili powder
-
1 teaspoon ground cumin
-
½ teaspoon dried oregano
-
½ teaspoon smoked paprika
-
¼ teaspoon cayenne pepper (optional)
-
Salt and black pepper to taste
-
2 tablespoons olive oil
-
12 large (10-inch) flour tortillas
-
3 cups shredded Monterey Jack or Mexican blend cheese
-
¼ cup all-purpose flour
-
3 tablespoons cold water
-
4-6 cups vegetable, canola, or peanut oil, for deep frying
Instructions
-
Step 1
In a large skillet, heat 1 tbsp olive oil over medium-high heat. Brown ground beef for 7-10 minutes, breaking it apart. Drain excess fat. -
Step 2
Return skillet to medium heat. Add remaining 1 tbsp olive oil, chopped onion, and diced bell pepper. Sauté for 5-7 minutes until softened. Stir in minced garlic, chili powder, ground cumin, dried oregano, smoked paprika, and optional cayenne pepper. Cook for 1-2 minutes until fragrant. -
Step 3
Add diced tomatoes and beef broth. Bring to a simmer, then reduce heat to low, cover, and simmer for 20-25 minutes, or up to an hour, until thickened. Season with salt and black pepper to taste. Remove from heat and let cool slightly. -
Step 4
Warm flour tortillas to make them pliable (microwave, steamer, or dry skillet). Shred cheese if not already done. Whisk ¼ cup all-purpose flour and 3 tablespoons cold water to form a smooth paste for sealing. -
Step 5
Lay a warm tortilla flat. Spoon about ½ cup beef filling onto the center, shaping into a log. Sprinkle with ¼ cup shredded cheese. Fold the left and right sides of the tortilla inward (1-1 ½ inches). Starting from the bottom, roll the tortilla tightly upwards. Dab flour paste on the top edge and finish rolling to seal securely. Place seam-side down. Repeat for all chimichangas. -
Step 6
Heat 4-6 cups frying oil in a heavy pot to 350-375°F (175-190°C). Line a plate with paper towels for draining. Carefully fry 2-3 chimichangas at a time, seam-side down first, for 3-5 minutes, turning until golden brown and crispy. Do not overcrowd. -
Step 7
Remove fried chimichangas and place on paper towels to drain. Repeat for remaining batches, ensuring oil temperature is maintained. Serve immediately with desired toppings such as sour cream, salsa, guacamole, shredded lettuce, cilantro, or pico de gallo. Store leftovers in an airtight container for 2-3 days; reheat in oven or air fryer at 375°F (190°C) for 10-15 minutes to restore crispiness.
Important Information
Nutrition Facts (Per Serving)
It is important to consider this information as approximate and not to use it as definitive health advice.
Allergy Information
Please check ingredients for potential allergens and consult a health professional if in doubt.


Leave a Comment