
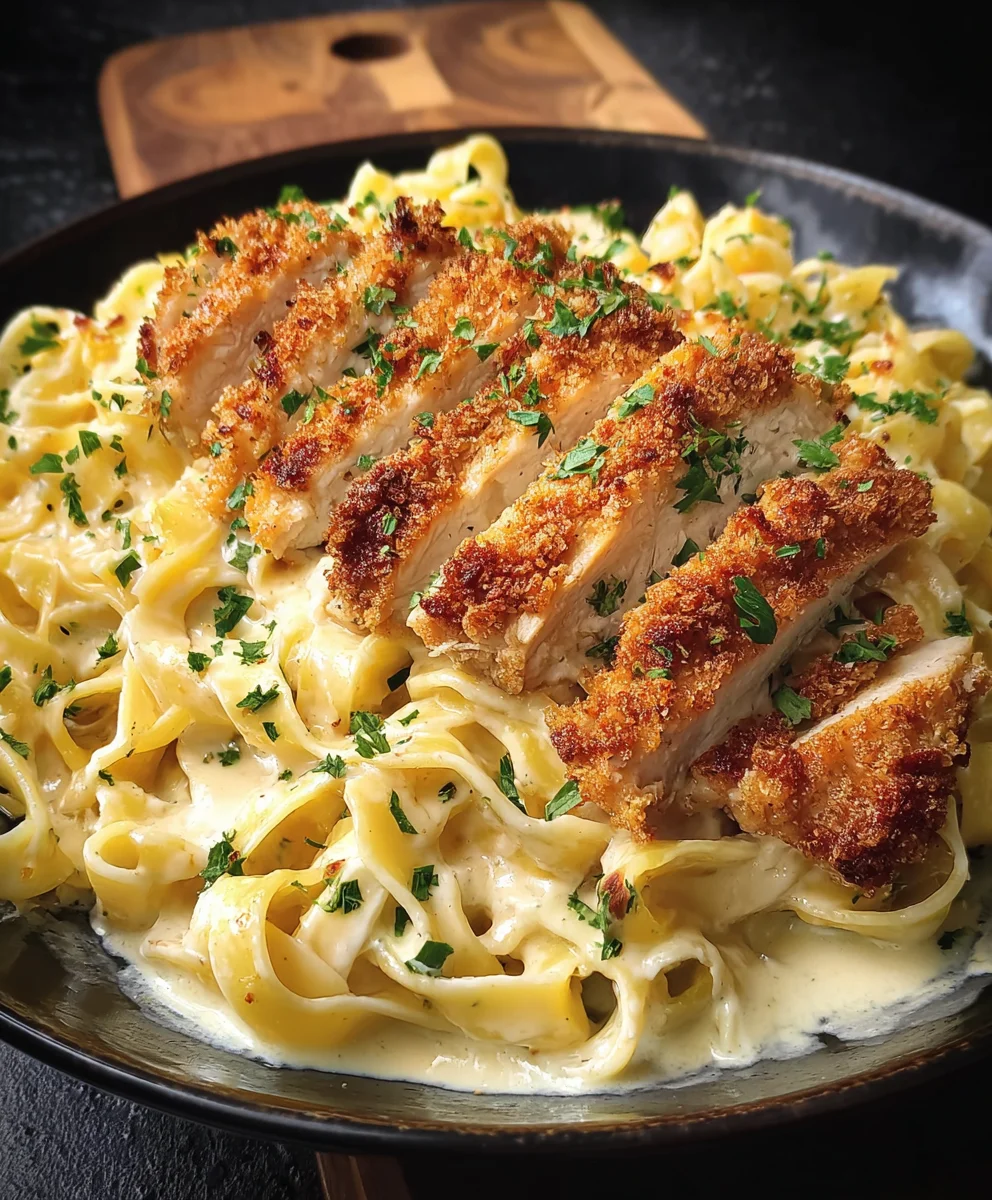
Crispy Chicken Fettuccine Alfredo. Ah, the very sound of it conjures up images of creamy indulgence and satisfying crunch. If you’re searching for that perfect weeknight meal that feels utterly luxurious yet surprisingly achievable, you’ve landed in the right place. This isn’t just any pasta dish; it’s a symphony of textures and flavors that has captured the hearts (and stomachs) of food lovers everywhere. What is it about this particular combination that makes it so universally beloved? It’s the masterful interplay of perfectly al dente fettuccine, bathed in a velvety, rich Alfredo sauce, all elevated by the star of the show: golden, shatteringly crispy pan-fried chicken. The contrast between the tender pasta, the decadent sauce, and the savory, crunchy chicken is pure culinary magic.
Why You’ll Adore This Crispy Chicken Fettuccine Alfredo
People adore Crispy Chicken Fettuccine Alfredo because it hits all the right notes. It’s comforting, it’s elegant, and it’s ridiculously delicious. The creamy sauce, made with butter, heavy cream, and Parmesan cheese, is pure decadence. But what truly sets this recipe apart is the preparation of the chicken. Instead of simply tossing cooked chicken into the sauce, we’re going to take the extra step to make it incredibly crispy. This adds an exciting textural dimension that transforms a classic into something truly extraordinary. Get ready to impress yourself and anyone lucky enough to share this incredible meal with you.

Ingredients:
- 4-6 thinly sliced chicken breasts (cutlets)
- ½ cup all-purpose flour
- 2 large eggs, whisked
- 2 cups panko bread crumbs
- ¼ cup freshly grated Parmesan cheese
- 1½ teaspoons garlic powder
- 1½ teaspoons onion powder
- 1½ teaspoons Italian seasoning
- Salt and freshly ground black pepper, to taste
- Vegetable oil, for frying (about 1 cup)
- 1 pound fettuccine pasta
- 2 cups heavy cream
- 2 tablespoons unsalted butter
- 3 garlic cloves, finely minced
- ½ cup freshly grated Parmesan cheese
Preparing the Crispy Chicken
Step 1: Set Up Your Breading Station
First things first, let’s get our chicken ready for that irresistible crispiness. You’ll need three shallow dishes or plates for this. In the first dish, add your ½ cup of all-purpose flour. Season the flour generously with salt and freshly ground black pepper. Give it a quick whisk to distribute the seasonings. In the second dish, pour in your 2 large eggs and whisk them until they’re nice and frothy – this will act as our binder. In the third and final dish, combine your 2 cups of panko bread crumbs with the ¼ cup of freshly grated Parmesan cheese, 1½ teaspoons of garlic powder, 1½ teaspoons of onion powder, and 1½ teaspoons of Italian seasoning. Add a pinch more salt and pepper to the panko mixture and stir everything together thoroughly. Having your breading station set up before you start breading the chicken will make the process much smoother and prevent your hands from getting messy too early.
Step 2: Bread the Chicken
Now, take each of your thinly sliced chicken breasts. Pat them dry with a paper towel; this helps the breading adhere better. Dredge one chicken cutlet in the seasoned flour, making sure to coat both sides evenly. Gently shake off any excess flour. Next, dip the floured chicken into the whisked eggs, letting any excess drip back into the dish. Finally, press the egg-coated chicken into the panko and Parmesan mixture, ensuring it’s completely covered. Press down gently to help the bread crumbs stick. Place the breaded chicken on a clean plate or wire rack and repeat this process for all the chicken cutlets. For an extra-thick, crunchy coating, you can double-dip the chicken: after the first egg dip, return it to the panko mixture, then dip it in the egg again, and then back into the panko. This extra step is key for achieving that truly “crispy” texture.
Step 3: Fry the Chicken
In a large, heavy-bottomed skillet or Dutch oven, pour in your vegetable oil. You’ll need enough oil to generously coat the bottom and come up about ½ inch the sides. Heat the oil over medium-high heat until it reaches about 350°F (175°C). You can test if the oil is ready by dropping a few panko crumbs into it; they should sizzle immediately. Carefully place 2-3 breaded chicken cutlets into the hot oil, being careful not to overcrowd the pan. Overcrowding will lower the oil temperature and result in soggy chicken instead of crispy chicken. Fry for about 3-4 minutes per side, or until golden brown and cooked through. The internal temperature of the chicken should reach 165°F (74°C). Use tongs to carefully remove the cooked chicken from the oil and place it on a wire rack set over a baking sheet to drain any excess oil. Repeat with the remaining chicken, ensuring the oil returns to temperature between batches.
Crafting the Creamy Alfredo Sauce
Step 4: Prepare the Alfredo Base
While your chicken is draining, let’s get started on the luscious Alfredo sauce. Bring a large pot of salted water to a rolling boil for your fettuccine. In a separate large skillet or saucepan, melt the 2 tablespoons of unsalted butter over medium heat. Once the butter is melted and begins to foam slightly, add your 3 finely minced garlic cloves. Sauté the garlic for about 1 minute, until it’s fragrant and just beginning to soften. Be careful not to burn the garlic, as this will make the sauce bitter. Immediately after, pour in the 2 cups of heavy cream. Stir the cream into the garlic butter and let it come to a gentle simmer. Keep the heat on low to medium-low; you want the cream to be warm and slightly thickened, not boiling vigorously.
Step 5: Emulsify and Thicken the Sauce
Once the cream is simmering gently, it’s time to make it wonderfully cheesy. Gradually whisk in the ½ cup of freshly grated Parmesan cheese, a little at a time. Continue whisking constantly until the cheese is completely melted and incorporated into the cream. This gradual addition and constant whisking is crucial for achieving a smooth, emulsified sauce without any clumps. Season the Alfredo sauce with salt and freshly ground black pepper to your taste. Remember that Parmesan cheese is salty, so start with a smaller amount of salt and adjust as needed. Allow the sauce to simmer gently for another 2-3 minutes, stirring occasionally, until it has thickened to your desired consistency. It should be thick enough to coat the back of a spoon but still fluid enough to mix easily with the pasta. If the sauce becomes too thick, you can always add a splash more cream or some of the pasta cooking water to loosen it.
Bringing it all Together
Step 6: Cook the Fettuccine and Combine
While the Alfredo sauce is gently simmering and thickening, cook your 1 pound of fettuccine pasta according to the package directions in the boiling salted water. It’s important to cook the pasta until it’s perfectly al dente – tender but still with a slight bite. Before draining the pasta, reserve about 1 cup of the starchy pasta water. Drain the fettuccine and immediately add it to the skillet with the Alfredo sauce. Toss the pasta gently to coat every strand with the creamy sauce. If the sauce seems a little too thick to coat the pasta evenly, add a splash of the reserved pasta water, a tablespoon at a time, and toss again until you reach your desired sauce consistency. The starch in the pasta water will help the sauce cling beautifully to the fettuccine. Once the pasta is well-coated, divide it among serving plates. Top each plate generously with your perfectly crispy fried chicken cutlets. Garnish with a little extra freshly grated Parmesan cheese and a sprinkle of fresh parsley, if desired, for a pop of color and freshness. Enjoy your delicious Crispy Chicken Fettuccine Alfredo!
Conclusion:
And there you have it – your guide to making truly exceptional Crispy Chicken Fettuccine Alfredo right in your own kitchen! We’ve walked through each step, from achieving that perfect golden-brown crust on your chicken to creating a luxuriously creamy and flavorful Alfredo sauce that coats every strand of fettuccine. This dish is a winner for weeknight dinners, special occasions, or whenever you’re craving a comforting and satisfying meal. Don’t be intimidated by making Alfredo sauce from scratch; it’s surprisingly simple and the results are leagues beyond any store-bought alternative.
For serving, I love to garnish this delightful pasta with a generous sprinkle of fresh parsley, a crack of black pepper, and a dusting of grated Parmesan cheese. A simple side salad with a light vinaigrette or some steamed asparagus makes a wonderful accompaniment to balance the richness. Feeling adventurous? Consider adding sautéed mushrooms or sun-dried tomatoes to the sauce for an extra layer of flavor, or try swapping out the chicken for shrimp or even pan-fried tofu for a vegetarian twist. The beauty of this Crispy Chicken Fettuccine Alfredo is its versatility. I encourage you to give it a try and discover just how rewarding homemade comfort food can be!
Frequently Asked Questions:
Can I make the Alfredo sauce ahead of time?
Yes, you can certainly make the Alfredo sauce ahead of time. Store it in an airtight container in the refrigerator for up to 2-3 days. When you’re ready to serve, gently reheat it over low heat on the stovetop, stirring constantly. You may need to add a splash of milk or cream to achieve the desired consistency, as it can thicken significantly when chilled.
How do I prevent the chicken from becoming soggy after frying?
To ensure your chicken stays crispy, it’s crucial to drain it well after frying. Place the fried chicken pieces on a wire rack set over a baking sheet instead of paper towels, which can trap steam and make the bottom soggy. Add the crispy chicken to the pasta just before serving to maintain its texture.

Crispy Chicken Fettuccine Alfredo-Creamy Pasta Delight
A delightful recipe featuring crispy fried chicken served over a bed of creamy fettuccine Alfredo.
Ingredients
-
4-6 thinly sliced beef breasts (cutlets)
-
½ cup all-purpose flour
-
2 large eggs, whisked
-
2 cups panko bread crumbs
-
¼ cup freshly grated Parmesan cheese
-
1½ teaspoons garlic powder
-
1½ teaspoons onion powder
-
1½ teaspoons Italian seasoning
-
Salt and freshly ground black pepper, to taste
-
Vegetable oil, for frying (about 1 cup)
-
1 pound fettuccine pasta
-
2 cups heavy cream
-
2 tablespoons unsalted butter
-
3 garlic cloves, finely minced
-
½ cup freshly grated Parmesan cheese
Instructions
-
Step 1
Prepare three shallow dishes: one with seasoned flour (all-purpose flour, salt, pepper), one with whisked eggs, and one with panko bread crumbs mixed with Parmesan cheese, garlic powder, onion powder, and Italian seasoning. This organized setup ensures a smooth breading process. -
Step 2
Pat beef cutlets dry. Dredge each cutlet in seasoned flour, then dip in whisked eggs, and finally coat thoroughly with the panko mixture, pressing gently. For extra crispiness, double-dip the chicken. -
Step 3
Heat vegetable oil in a skillet to 350°F (175°C). Fry 2-3 breaded beef cutlets at a time for 3-4 minutes per side until golden brown and cooked through (internal temperature 165°F/74°C). Drain on a wire rack. -
Step 4
Melt butter in a skillet over medium heat. Sauté minced garlic for about 1 minute until fragrant. Pour in heavy cream and bring to a gentle simmer, stirring into the garlic butter. -
Step 5
Gradually whisk in ½ cup of Parmesan cheese until melted and smooth. Season with salt and pepper. Simmer gently for 2-3 minutes until thickened to coat the back of a spoon. Add more cream or pasta water if needed to reach desired consistency. -
Step 6
Cook fettuccine pasta according to package directions until al dente. Reserve about 1 cup of pasta water. Drain pasta and add it to the Alfredo sauce, tossing to coat. Add reserved pasta water as needed to achieve the perfect sauce consistency. Serve pasta topped with crispy beef cutlets, garnished with extra Parmesan and parsley if desired.
Important Information
Nutrition Facts (Per Serving)
It is important to consider this information as approximate and not to use it as definitive health advice.
Allergy Information
Please check ingredients for potential allergens and consult a health professional if in doubt.


Leave a Comment