
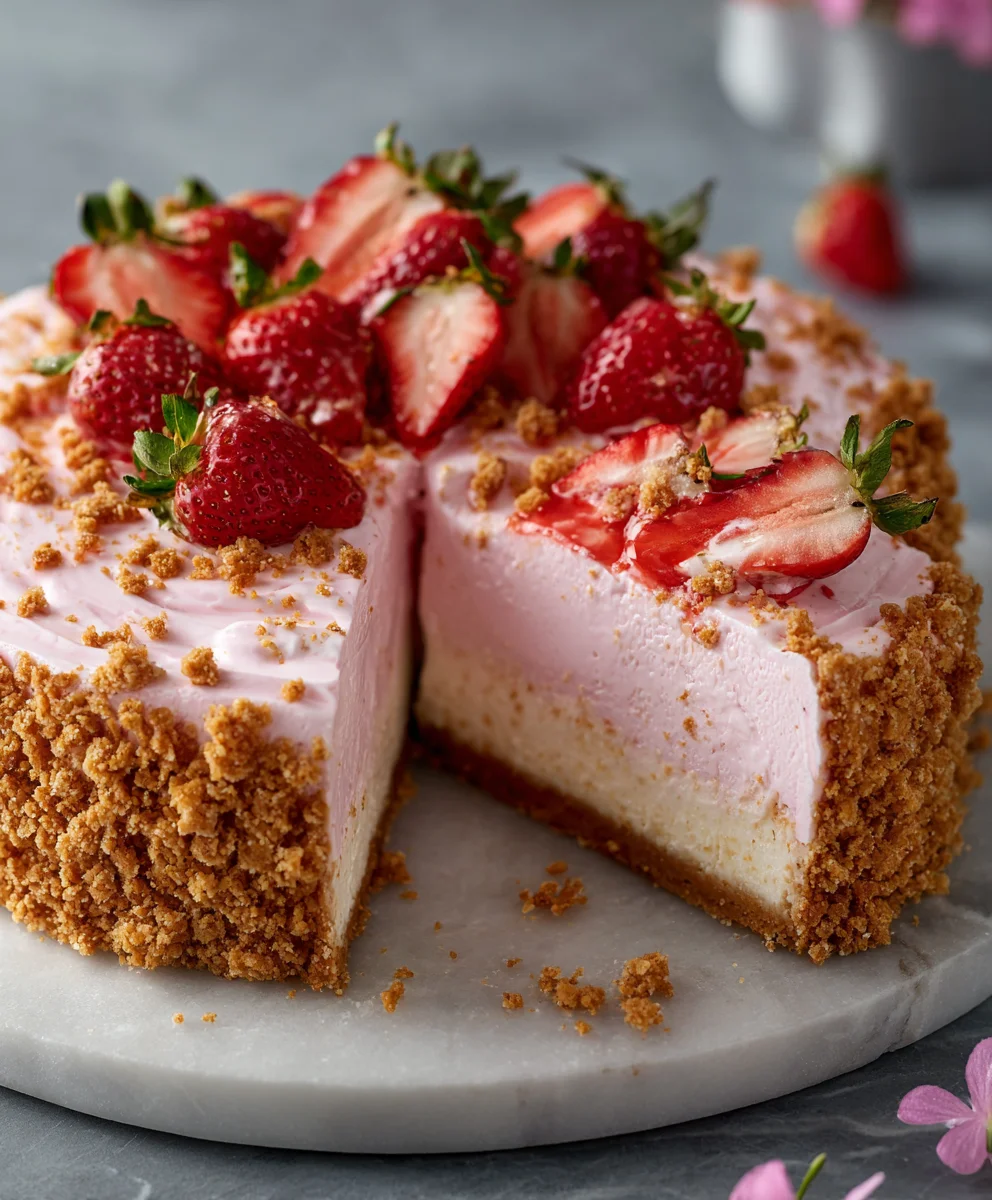
Pink Strawberry Crunch Cheesecake is not merely a dessert; it’s an edible masterpiece that promises to captivate your senses from the very first glance. Imagine a vibrant, rosy hue that hints at the sweet, tangy strawberry essence within, crowned with an irresistible, golden, crunchy topping that delivers a delightful textural contrast. I’ve always been captivated by desserts that offer both beauty and an unforgettable taste experience, and this cheesecake truly embodies that.
While the history of cheesecake dates back to ancient Greece, this particular rendition is a delightful, modern evolution, drawing sweet inspiration from a beloved childhood classic: the strawberry crunch ice cream bar. It transforms those nostalgic flavors into a sophisticated, yet wonderfully approachable, dessert. People utterly adore this dish because it masterfully blends a luxuriously smooth, rich cheesecake base with the bright, fruity burst of strawberries, all uplifted by that satisfyingly crisp, buttery crumble. It’s a symphony of textures and flavors – creamy, fruity, and delightfully crunchy – making every single bite a pure moment of bliss.
Preparing your own Pink Strawberry Crunch Cheesecake is an incredibly rewarding experience, resulting in a show-stopping centerpiece perfect for any celebration or simply to elevate an ordinary day into something extraordinary. Its vibrant appearance and layered flavors guarantee it will be the talk of any gathering.

Ingredients:
- For the Graham Cracker Crust:
- 1 ½ cups (about 180g) graham cracker crumbs (from about 12-14 full sheets). I find finely crushed crumbs create the most stable and delicious crust.
- ¼ cup (50g) granulated sugar. Just a touch to sweeten the base.
- ½ cup (113g) unsalted butter, melted. This binds everything together beautifully.
- Pinch of salt. A tiny bit enhances all the flavors.
- For the Strawberry Crunch Topping:
- 2 ½ cups (about 250g) vanilla sandwich cookies (like Golden Oreos or Nilla Wafers), crushed. These provide the iconic vanilla base for our crunch.
- 1 cup (approx. 50g) freeze-dried strawberries, finely crushed (can use a food processor). These are the heart of our “Pink Strawberry Crunch Cheesecake,” giving that intense strawberry flavor and natural pink color!
- ¼ cup (56g) unsalted butter, melted. Helps the crunch ingredients clump and crisp.
- 1-2 drops red or pink gel food coloring (optional, for extra vibrancy). For that truly irresistible pink hue.
- For the Pink Strawberry Cheesecake Filling:
- 3 (8-ounce) blocks (678g total) full-fat cream cheese, softened at room temperature. This is absolutely essential for a smooth, lump-free cheesecake.
- 1 ½ cups (300g) granulated sugar. The perfect amount of sweetness to balance the tang.
- ¼ cup (60ml) sour cream or full-fat Greek yogurt, room temperature. Adds moisture, a slight tang, and contributes to the creamy texture.
- 2 teaspoons vanilla extract. A classic complement to strawberry and cream cheese.
- ½ teaspoon lemon zest (optional, but highly recommended for brightness). It really lifts the strawberry flavor.
- Pinch of salt. Crucial for balancing sweetness.
- 3 large eggs, room temperature. Binds the filling and adds richness.
- ¼ cup (approx. 60g) strawberry puree (from about 5-6 fresh or frozen strawberries, blended and strained). For natural strawberry flavor and moisture.
- 1-2 drops pink or red gel food coloring (optional, to enhance the pink hue). To make our “Pink Strawberry Crunch Cheesecake” truly pop!
- For the Strawberry Swirl (Optional, for an extra burst of strawberry and visual appeal):
- ½ cup (approx. 120g) fresh or frozen strawberries, finely diced.
- 2 tablespoons granulated sugar.
- 1 tablespoon water.
- ½ teaspoon lemon juice.
Preparing Your Workspace and Ingredients
- Preheat your oven and prepare your pan: We’re aiming for a perfectly baked cheesecake, so precision matters! Preheat your oven to 325°F (160°C). Grab a 9-inch springform pan. If you don’t have a springform pan, a regular 9-inch round cake pan will work, but lining it with parchment paper (extending over the edges for handles) for easy removal will be key. For cheesecakes, I always recommend wrapping the outside of your springform pan with a double layer of heavy-duty aluminum foil. This is crucial if you plan to use a water bath, which I absolutely do for the creamiest, crack-free cheesecake. It acts as a waterproof barrier, preventing any water from seeping into the crust and making it soggy – a common cheesecake woe!
- Bring ingredients to room temperature: For the smoothest cheesecake batter without any lumps, it’s absolutely vital that your full-fat cream cheese, large eggs, and sour cream (or Greek yogurt) are at room temperature. This can take anywhere from 1-2 hours for cream cheese and eggs to soften properly on the counter, sometimes longer if your kitchen is cool. Cold ingredients simply do not emulsify well, leading to a lumpy, inconsistent batter texture that can result in a grainy cheesecake. Plan ahead for this step – it truly makes all the difference in achieving that signature creamy texture of your “Pink Strawberry Crunch Cheesecake.”
- Prepare your strawberry puree: If you’re using fresh strawberries, hull them and roughly chop them. If using frozen, ensure they are thawed first. Place them in a small food processor or blender and blend until completely smooth. Then, pass the puree through a fine-mesh sieve into a small bowl, using the back of a spoon to press out all the liquid, leaving behind any seeds or fibrous bits. This ensures a silky-smooth texture for your cheesecake filling. You should have about ¼ cup of vibrant, strained strawberry puree. Set this aside.
Crafting the Crunchy Graham Cracker Crust
- Crush the graham crackers: In a food processor, pulse the graham crackers until they form very fine, even crumbs. We want them uniform for a sturdy crust. If you don’t have a food processor, place them in a large zip-top bag and crush them meticulously with a rolling pin until no large pieces remain. The finer the crumbs, the more cohesive and sturdy your crust will be, which is important for holding up to the creamy filling and crunchy topping of our “Pink Strawberry Crunch Cheesecake.”
- Combine crust ingredients: In a medium bowl, combine the finely crushed graham cracker crumbs, the granulated sugar, and a pinch of salt. Pour in the melted unsalted butter. Mix thoroughly with a fork or your hands. Ensure that every crumb is evenly moistened and coated by the butter; the mixture should resemble wet sand and hold together when pressed. This is where the magic happens for a cohesive, sturdy crust! A well-mixed crust means no crumbling when you slice your beautiful cheesecake.
- Press into the pan: Transfer the buttered crumb mixture to your prepared 9-inch springform pan. Using the bottom of a flat glass or a measuring cup, firmly and evenly press the crumb mixture into an even layer on the bottom of the pan. Pay special attention to packing it tightly, especially around the edges, to create a solid, leak-proof foundation for your cheesecake. A flat, even base ensures a beautiful presentation and even baking.
- Pre-bake the crust: Place the pan with the pressed crust in the preheated 325°F (160°C) oven and bake for 8-10 minutes. This crucial pre-baking step helps to set the crust, making it less likely to get soggy once the moist cheesecake filling is added. It also enhances the nutty, toasted flavor of the graham crackers, giving your “Pink Strawberry Crunch Cheesecake” an extra layer of deliciousness right from the base. Once baked, remove from the oven and set aside to cool slightly while you prepare the filling. Keep the oven on, as we’ll be baking soon!
Creating the Irresistible Strawberry Crunch Topping
- Crush the vanilla cookies: In a food processor, pulse the vanilla sandwich cookies (like Golden Oreos or Nilla Wafers) until they are finely crushed but still have some texture – we’re looking for crumbs, not powder. You want a pleasant crunch, not a sandy texture. If using a bag and rolling pin, aim for a similar consistency with small, discernible pieces. This provides the bulk and the base crunch for our topping.
- Process the freeze-dried strawberries: In a separate, clean food processor (or after cleaning the first one thoroughly), pulse the freeze-dried strawberries until they are finely ground into a powder. They should have a vibrant, powdery pink consistency. These are the stars of the “Pink Strawberry Crunch Cheesecake” topping, delivering that intense, concentrated strawberry flavor and a beautiful natural pink color! Their dryness also contributes to the desired crispy texture.
- Combine for the crunch: In a medium bowl, combine the crushed vanilla cookies and the finely ground freeze-dried strawberries. Pour in the melted unsalted butter. If you desire an even more intense, eye-catching pink color, now is the time to add 1-2 drops of red or pink gel food coloring and mix thoroughly. Stir everything together with a fork until all the crumbs are evenly coated with butter. They should clump together slightly when pressed. Set this mixture aside; it will be used later to crown our magnificent “Pink Strawberry Crunch Cheesecake.”
Preparing the Velvety Pink Strawberry Cheesecake Filling
- Cream the cream cheese and sugar: In the bowl of a stand mixer fitted with the paddle attachment (or using a large bowl and a hand mixer), beat the softened full-fat cream cheese on medium-low speed for about 2-3 minutes. Beat until it’s completely smooth and creamy, with absolutely no lumps visible. Then, gradually add the granulated sugar, beating on low speed until just combined. Scrape down the sides and bottom of the bowl frequently with a rubber spatula to ensure everything is incorporated evenly. Over-mixing at this stage can incorporate too much air, which is the primary culprit behind cracks in your finished cheesecake. We want smooth, dense creaminess!
- Incorporate remaining wet ingredients (except eggs): Add the room temperature sour cream (or Greek yogurt), vanilla extract, the optional lemon zest, and the pinch of salt to the cream cheese mixture. Beat on the lowest speed until just combined and smooth. Again, scrape down the bowl to ensure uniform mixing. Each addition should be just mixed until incorporated, minimizing air.
- Add the strawberry puree and color: Gently fold in the prepared ¼ cup of strained strawberry puree. The puree adds a lovely natural strawberry flavor and moisture. If you want a more vibrant, pronounced pink color for your “Pink Strawberry Crunch Cheesecake,” now is the time to add 1-2 drops of pink or red gel food coloring. Mix on the absolute lowest speed, or fold in by hand, until the color is uniform and the puree is fully incorporated without overworking the batter.
- Mix in the eggs, one at a time: Add the eggs one at a time, mixing on the absolute lowest speed possible. Beat just until each egg is incorporated into the batter, then stop. Do not overmix! Each egg should just disappear into the batter before you add the next. Over-mixing eggs creates excessive air bubbles within the batter, which can cause your cheesecake to puff up dramatically in the oven and then shrink and crack as it cools. Patience and gentle mixing here are paramount for that perfect smooth, crack-free top.
- Prepare the optional strawberry swirl (if desired): In a small saucepan, combine the finely diced strawberries, 2 tablespoons granulated sugar, 1 tablespoon water, and ½ teaspoon lemon juice. Bring this mixture to a gentle simmer over medium-low heat, stirring occasionally, until the strawberries soften and the mixture thickens slightly, about 5-7 minutes. If you prefer a less chunky swirl, you can mash the strawberries lightly with a fork or potato masher. Let this strawberry swirl cool completely before using. A warm swirl can affect the cheesecake batter.
Baking the Pink Strawberry Crunch Cheesecake
- Pour the filling: Carefully pour the smooth, vibrant pink strawberry cheesecake filling over the pre-baked graham cracker crust in the springform pan. Gently tap the pan on the counter a few times to release any large air bubbles that might be trapped.
- Add the optional swirl: If you’re adding the strawberry swirl, dollop spoonfuls of the cooled strawberry mixture randomly over the top of the cheesecake batter. Take a skewer or a butter knife and gently swirl through the batter to create beautiful, artistic patterns. Be careful not to over-swirl, or the colors will just blend into a uniform pink, losing the distinct swirl effect.
- Prepare the water bath: Place the foil-wrapped springform pan inside a larger roasting pan. Carefully pour hot (not boiling) water into the roasting pan, ensuring the water level comes about halfway up the sides of the springform pan. The water bath is your secret weapon for a perfectly even, crack-free, and incredibly creamy cheesecake! It provides a moist, gentle, and even heat environment, preventing the edges from baking faster and drying out before the center is cooked through. This slow, steady cooking ensures a consistently creamy texture throughout your “Pink Strawberry Crunch Cheesecake.”
- Bake the cheesecake: Carefully transfer the roasting pan with the cheesecake to the preheated 325°F (160°C) oven. Bake for 60-75 minutes, or until the edges are set but the center 2-3 inches still jiggle slightly when gently nudged. The center should look mostly set but not completely firm. The internal temperature, checked with an instant-read thermometer, should register around 150°F (65°C). Do not overbake! The cheesecake will continue to set as it cools, and overbaking is a common cause of dry, cracked cheesecakes.
- Cooling process: Once baked, turn off the oven but leave the cheesecake in the water bath inside the oven with the door propped open slightly (you can use a wooden spoon to hold it ajar) for 1 hour. This slow, gradual cooling prevents drastic temperature changes that can cause cracks and ensures a smooth, even texture. After 1 hour, carefully remove the cheesecake from the water bath and the roasting pan. Remove the aluminum foil from around the springform pan. Let it cool completely on a wire rack at room temperature for another 2-3 hours.
- Chill thoroughly: Once cooled completely to room temperature, cover the springform pan loosely with plastic wrap (avoiding direct contact with the cheesecake surface) and transfer the cheesecake to the refrigerator. Chill for at least 6-8 hours, or preferably overnight. This chilling step is absolutely non-negotiable! It allows the cheesecake to firm up properly, develop its full, rich flavor, and makes it much easier to slice neatly without crumbling. Patience truly pays off for the perfect “Pink Strawberry Crunch Cheesecake.”
Assembling Your “Pink Strawberry Crunch Cheesecake” Masterpiece
- Unmold the cheesecake: Once thoroughly chilled, carefully run a thin, sharp knife around the inner edge of the cheesecake before releasing the springform pan collar. This helps ensure a clean, smooth release without tearing the sides of your beautiful cheesecake. Gently lift the collar away.
- Add the Strawberry Crunch Topping: Gently sprinkle the prepared strawberry crunch mixture evenly over the top of the chilled cheesecake. You can leave a small border around the edge uncovered for a clean look, or cover the entire top right up to the edges, depending on your preference. I personally love a generous, thick layer of crunch for maximum texture and flavor! You can also press some gently onto the sides if you’re feeling ambitious.
- Final chill and serve: If you’re not serving your “Pink Strawberry Crunch Cheesecake” immediately, place the assembled dessert back in the refrigerator for at least another 30 minutes to allow the topping to settle slightly. When ready to serve, for the cleanest, most beautiful slices, use a hot, dry knife. Dip your knife in hot water and wipe it clean and dry between each cut. This will ensure that the creamy cheesecake and crunchy topping remain pristine.
Tips for the Perfect Pink Strawberry Crunch Cheesecake:
- Don’t overmix! This is the golden rule for any cheesecake. Overmixing incorporates too much air, leading to a cracked top and a less dense texture. Mix on low speed, and only until ingredients are just combined.
- Room temperature ingredients: I cannot stress this enough. Cold cream cheese leads to lumpy batter, and cold eggs don’t emulsify properly, leading to an inconsistent texture. Plan ahead!
- The water bath is your friend: It’s truly the best way to achieve a creamy, evenly baked, and crack-free cheesecake. Don’t skip it; the extra effort is worth it.
- Slow cooling: Letting the cheesecake cool slowly in the oven helps prevent temperature shock and subsequent cracks from forming.
- Chill thoroughly: Patience is rewarded! A well-chilled cheesecake is firm, flavorful, and a joy to slice cleanly. Rushing this step will compromise texture and presentation.
- Cleaning your knife: For beautiful, professional-looking slices, dip your knife in hot water and wipe it clean and dry between each cut. This prevents the cheesecake from sticking and dragging.
There you have it! A truly stunning and delicious “Pink Strawberry Crunch Cheesecake” that’s sure to impress everyone who takes a bite. The layers of buttery graham cracker crust, luscious pink strawberry cheesecake, and the vibrant, crunchy strawberry topping create an unforgettable dessert experience. Enjoy every sweet, creamy, and crunchy spoonful!
Conclusion:
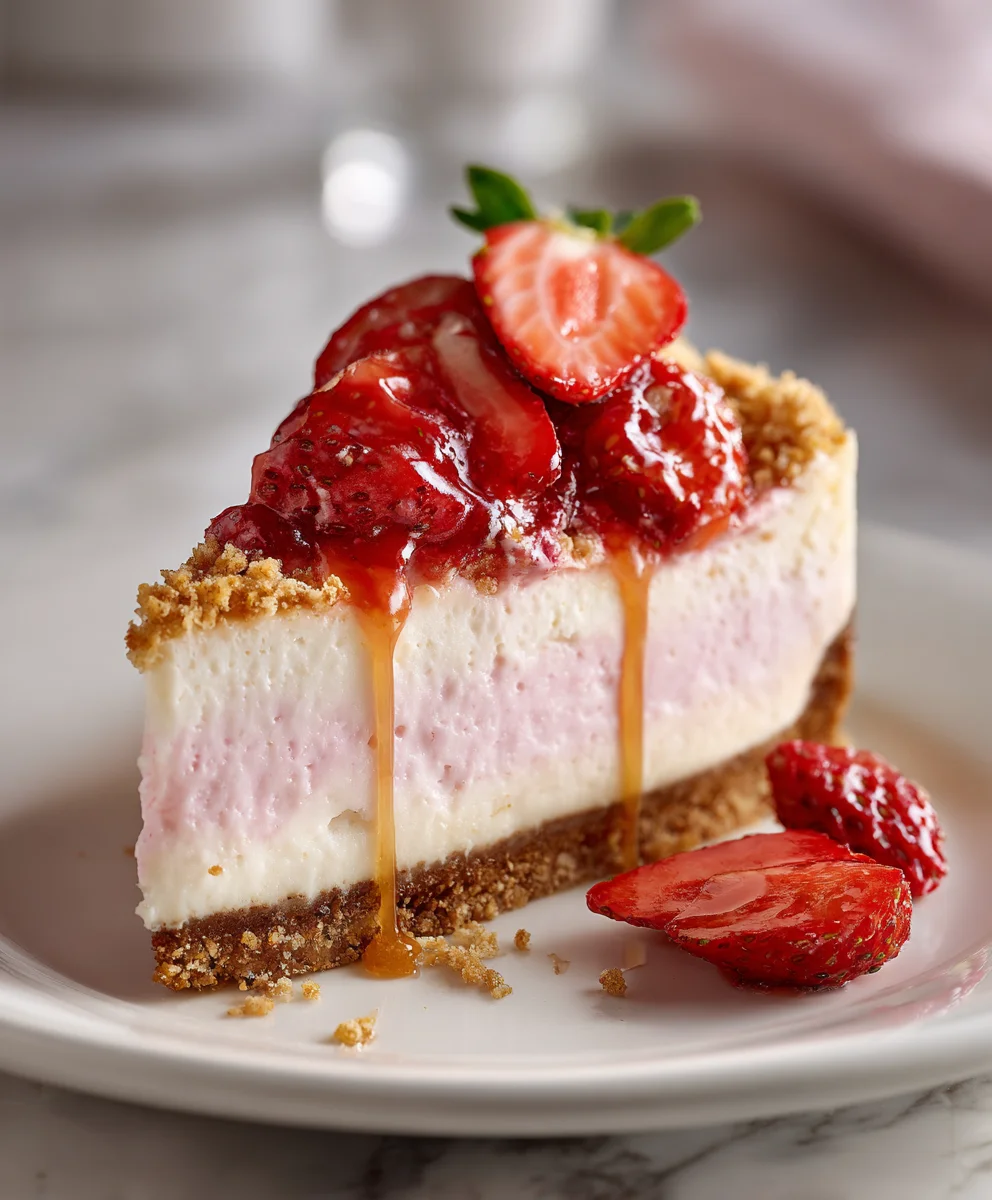
And there you have it, my friends! We’ve journeyed through the creation of what I genuinely believe will become your new favorite dessert, a showstopper that truly embodies joy and deliciousness in every single bite. This isn’t just another cheesecake recipe; it’s an experience, a symphony of textures and flavors that captivates from the first glance to the last crumb. I’ve poured my heart into perfecting this, and I can’t wait for you to discover the magic for yourself. The delightful contrast between the silky-smooth, creamy strawberry cheesecake layer and the irresistible, buttery crunch topping is simply divine. It’s a harmonious blend of sweet, tangy, and rich, all brought together with that iconic, satisfying crunch that makes this dessert utterly unforgettable.
I find immense satisfaction in presenting a dessert that not only tastes incredible but also looks absolutely stunning. The vibrant pink hue of the cheesecake, kissed by fresh strawberries, makes for a truly picturesque creation that’s perfect for any occasion, from an intimate dinner party to a grand celebratory feast. Imagine the admiring gasps as you unveil this beauty! It’s the kind of dessert that sparks conversations and creates lasting memories. It’s more than just a sweet treat; it’s a centerpiece, a talking point, and a testament to the joy of homemade goodness. The subtle sweetness of the graham cracker crust provides the perfect foundation, sturdy yet delicate, holding up against the luxurious layers above. Every component has been carefully considered to contribute to an overall dessert experience that is nothing short of spectacular. This is why I insist that this
Pink Strawberry Crunch Cheesecake
is an absolute must-try for anyone who loves baking, dessert, or simply experiencing pure culinary delight.
Now, let’s talk about enhancing your experience even further with some serving suggestions and delightful variations. While this cheesecake is undeniably perfect on its own, a little extra flair never hurts! For a simple yet elegant presentation, I love to garnish each slice with a few fresh, vibrant strawberry halves and a sprig of fresh mint – the green against the pink is simply gorgeous. A light dusting of powdered sugar adds a touch of sophistication. If you’re feeling a bit indulgent, a dollop of freshly whipped cream or a scoop of vanilla bean ice cream on the side can elevate the experience, adding another layer of creamy texture. For those who enjoy a bit more tang, a drizzle of homemade strawberry coulis (just blend some fresh strawberries with a touch of sugar and lemon juice, then strain) can beautifully complement the richness of the cheesecake. Don’t be afraid to experiment!
When it comes to variations, the possibilities are almost endless, allowing you to truly make this recipe your own. You could experiment with different fruit purees in the cheesecake layer; imagine a raspberry crunch cheesecake or even a mixed berry version for a different flavor profile. For the crunch topping, while I adore the strawberry crunch, you could certainly try a vanilla wafer crunch, or even a chocolate cookie crunch for a darker, richer contrast. Adding a layer of white chocolate ganache over the cheesecake before adding the crunch topping would be a decadent touch for special occasions, creating an even more luxurious dessert. Another fantastic idea is to transform this recipe into individual mini cheesecakes, perfect for parties or portion control. Simply use a muffin tin lined with paper liners and adjust baking times accordingly. This also makes for a charming presentation, allowing each guest to enjoy their own perfectly proportioned dessert. Feel free to play with the spices in the graham cracker crust too – a pinch of cinnamon or nutmeg can add a wonderful warmth. The beauty of this recipe lies in its versatility, allowing you to adapt it to your taste preferences and the ingredients you have on hand.
I truly hope I’ve inspired you to roll up your sleeves and dive into making this incredible dessert. There’s an undeniable sense of accomplishment that comes with creating something so beautiful and delicious from scratch. I promise you, the effort is well worth the reward. So, go ahead, gather your ingredients, turn on your favorite baking playlist, and prepare to create something truly magical. Once you’ve baked your own
Pink Strawberry Crunch Cheesecake
, I would absolutely love to hear all about your experience! Please share your thoughts in the comments below, tell me about any variations you tried, and don’t forget to snap a picture and tag me on social media. Your culinary adventures inspire me, and I can’t wait to see your stunning creations. Happy baking!
People Also Ask:
-
How long does Pink Strawberry Crunch Cheesecake last?
-
When stored properly in an airtight container in the refrigerator, your
Pink Strawberry Crunch Cheesecake
will typically last for about 3-5 days. The crunch topping might soften slightly over time, but the cheesecake itself will remain delicious.
-
Can I make Pink Strawberry Crunch Cheesecake ahead of time?
-
Absolutely! This cheesecake is an excellent dessert to prepare in advance. You can make the entire cheesecake (without the crunch topping) 1-2 days before you plan to serve it. The crunch topping is best added a few hours before serving or right before, to ensure it stays as crisp as possible. Chilling the cheesecake for at least 6-8 hours, or preferably overnight, is crucial for a perfectly set and sliceable dessert.
-
What if I don’t have fresh strawberries? Can I use frozen?
-
While fresh strawberries offer the best flavor and color, you can certainly use frozen strawberries as a substitute, especially for the purée in the cheesecake layer. Just be sure to thaw them completely and drain any excess liquid before blending. For garnish, I still recommend trying to find fresh if possible, but thawed frozen berries can work in a pinch.
-
Can I freeze Pink Strawberry Crunch Cheesecake?
-
Yes, you can! Cheesecake freezes surprisingly well. For best results, freeze the cheesecake without the crunch topping. Wrap the whole cheesecake (or individual slices) tightly in plastic wrap, then in aluminum foil. It can be frozen for up to 1-2 months. To thaw, simply transfer it to the refrigerator overnight. Add the crunch topping just before serving.
-
Why did my cheesecake crack?
-
Cheesecake cracks are a common occurrence, but often purely cosmetic! The most frequent culprits are overbaking (which dries out the cheesecake), sudden temperature changes (which cause rapid contraction), or opening the oven door too soon. To prevent cracks, ensure you don’t overbake, let the cheesecake cool gradually in the turned-off oven with the door slightly ajar, and use a water bath during baking (though this recipe doesn’t strictly require one, it helps with even baking).
-
Can I make this Pink Strawberry Crunch Cheesecake recipe gluten-free?
-
Yes, it’s quite simple! For the crust, simply use gluten-free graham crackers. For the crunch topping, ensure your vanilla wafers or Golden Oreos are gluten-free versions. The rest of the cheesecake ingredients are typically naturally gluten-free.
-
What kind of crunch topping can I use if I don’t want to make my own?
-
While I highly recommend making the homemade crunch for the best flavor and texture, if you’re short on time, you could use store-bought strawberry shortcake crumbles (often found near ice cream toppings) or even finely crushed freeze-dried strawberries mixed with some melted white chocolate and crushed vanilla wafers for a quicker version. However, my homemade crunch really makes this
Pink Strawberry Crunch Cheesecake
shine!
Pink Strawberry Crunch Cheesecake
A vibrant, decadent Pink Strawberry Crunch Cheesecake inspired by the classic ice cream bar. This recipe features a buttery graham cracker crust, a luscious pink strawberry cheesecake filling, and an irresistible crunchy topping made from vanilla cookies and freeze-dried strawberries. It’s a symphony of creamy, fruity, and crunchy textures, perfect for any celebration.
Ingredients
-
1 ½ cups (180g) graham cracker crumbs
-
¼ cup (50g) granulated sugar
-
½ cup (113g) unsalted butter, melted
-
Pinch of salt
-
2 ½ cups (250g) vanilla sandwich cookies, crushed
-
1 cup (50g) freeze-dried strawberries, finely crushed
-
¼ cup (56g) unsalted butter, melted
-
1-2 drops red or pink gel food coloring (optional)
-
3 (8-ounce) blocks (678g total) full-fat cream cheese, softened
-
1 ½ cups (300g) granulated sugar
-
¼ cup (60ml) sour cream or full-fat Greek yogurt, room temperature
-
2 teaspoons vanilla extract
-
½ teaspoon lemon zest (optional)
-
Pinch of salt
-
3 large eggs, room temperature
-
¼ cup (60g) strawberry puree (from 5-6 fresh or frozen strawberries, blended and strained)
-
1-2 drops pink or red gel food coloring (optional)
-
½ cup (120g) fresh or frozen strawberries, finely diced (for optional swirl)
-
2 tablespoons granulated sugar (for optional swirl)
-
1 tablespoon water (for optional swirl)
-
½ teaspoon lemon juice (for optional swirl)
Instructions
-
Step 1
Preheat oven to 325°F (160°C). Prepare a 9-inch springform pan by wrapping it in a double layer of heavy-duty aluminum foil. -
Step 2
Ensure full-fat cream cheese, eggs, and sour cream/Greek yogurt are at room temperature. -
Step 3
Prepare strawberry puree: Blend 5-6 fresh or thawed frozen strawberries until smooth. Strain through a fine-mesh sieve to yield ¼ cup puree; set aside. -
Step 4
For the crust: Finely crush graham crackers. In a medium bowl, combine crumbs, ¼ cup granulated sugar, a pinch of salt, and ½ cup melted unsalted butter. -
Step 5
Press crumb mixture firmly and evenly into the bottom of the prepared pan. Pre-bake for 8-10 minutes at 325°F (160°C), then cool slightly. Keep oven on. -
Step 6
For the crunch topping: Crush vanilla sandwich cookies to fine crumbs. Process freeze-dried strawberries into a fine powder. -
Step 7
In a medium bowl, combine crushed cookies, strawberry powder, ¼ cup melted unsalted butter, and optional 1-2 drops red/pink gel food coloring. Mix well until crumbs are coated and clump slightly. Set aside. -
Step 8
For the filling: In a stand mixer, beat softened cream cheese until completely smooth. Gradually add 1 ½ cups granulated sugar, beating on low speed until just combined. Scrape down the bowl. -
Step 9
Add room temperature sour cream/Greek yogurt, vanilla extract, optional lemon zest, and a pinch of salt; beat on the lowest speed until just combined. Scrape down the bowl. -
Step 10
Gently fold in ¼ cup strained strawberry puree. Add optional 1-2 drops pink/red gel food coloring; mix on the absolute lowest speed until the color is uniform. -
Step 11
Add eggs one at a time, mixing on the absolute lowest speed possible just until each egg is incorporated. Do not overmix. -
Step 12
(Optional strawberry swirl): In a small saucepan, combine ½ cup finely diced strawberries, 2 tablespoons granulated sugar, 1 tablespoon water, and ½ teaspoon lemon juice. Bring to a gentle simmer for 5-7 minutes until thickened. Cool completely. -
Step 13
Pour the filling over the pre-baked graham cracker crust. If using the optional swirl, dollop spoonfuls of the cooled strawberry mixture randomly over the top and gently swirl with a skewer or butter knife. -
Step 14
Place the foil-wrapped springform pan inside a larger roasting pan. Carefully pour hot water into the roasting pan to come halfway up the sides of the springform pan. -
Step 15
Bake at 325°F (160°C) for 60-75 minutes, or until the edges are set but the center 2-3 inches still jiggle slightly. Do not overbake. -
Step 16
Turn off the oven, prop the door open slightly, and leave the cheesecake in the water bath inside the oven for 1 hour. This allows for slow, gradual cooling. -
Step 17
Carefully remove the cheesecake from the water bath and roasting pan. Remove the aluminum foil. Let it cool completely on a wire rack at room temperature for 2-3 hours. -
Step 18
Once cooled, cover the springform pan loosely with plastic wrap and transfer to the refrigerator. Chill for at least 6-8 hours, or preferably overnight. -
Step 19
Once thoroughly chilled, carefully run a thin, sharp knife around the inner edge of the cheesecake before releasing the springform pan collar. Gently lift the collar away. -
Step 20
Gently sprinkle the prepared strawberry crunch mixture evenly over the top of the chilled cheesecake. -
Step 21
If not serving immediately, place the assembled dessert back in the refrigerator for at least another 30 minutes. For clean slices, dip your knife in hot water and wipe it clean and dry between each cut.
Important Information
Nutrition Facts (Per Serving)
It is important to consider this information as approximate and not to use it as definitive health advice.
Allergy Information
Please check ingredients for potential allergens and consult a health professional if in doubt.
Leave a Comment