
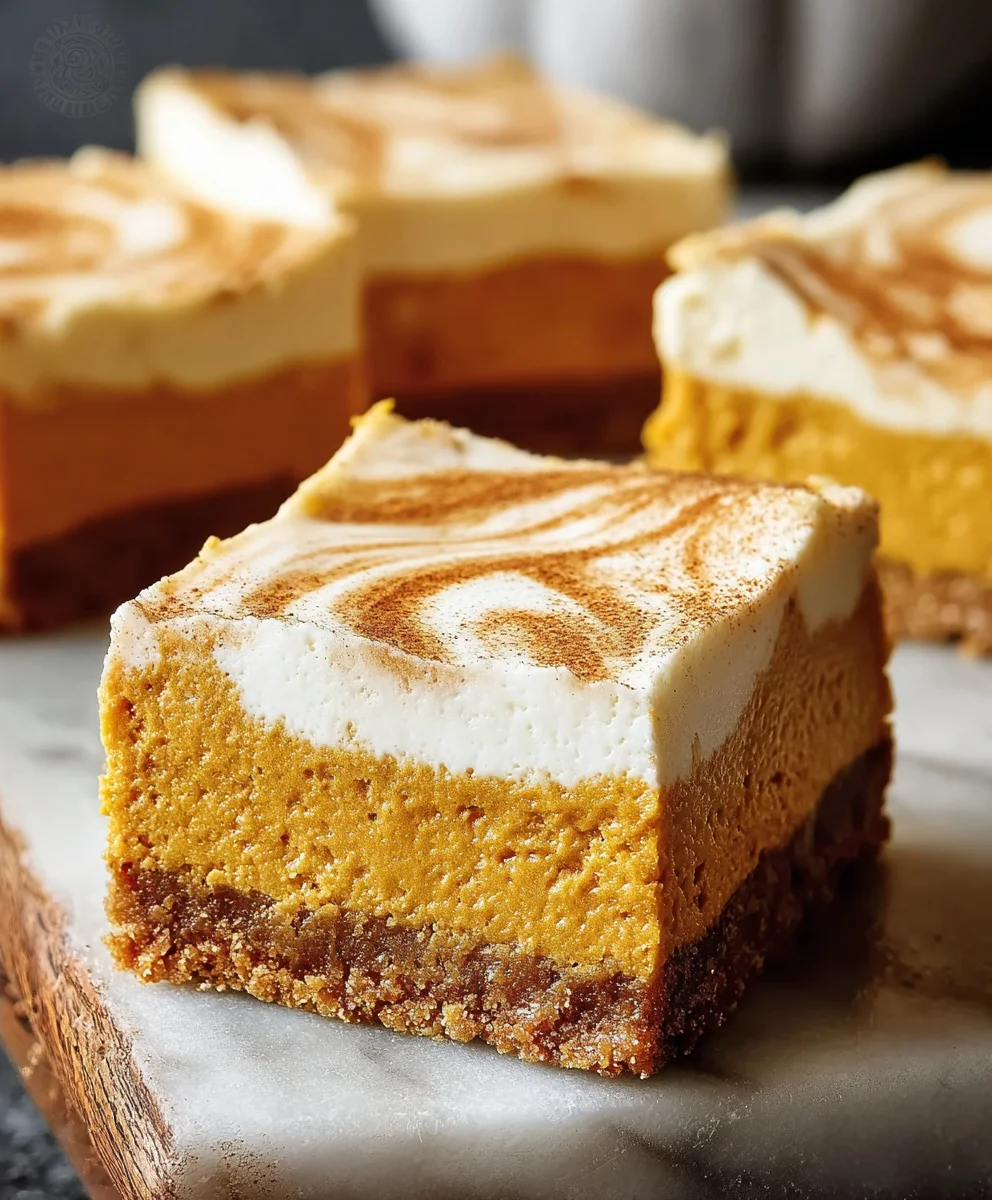
Pumpkin Cheesecake Bars are, without a doubt, one of my absolute favorite autumnal treats. They offer the perfect symphony of creamy, tangy cheesecake intertwined with the warm, comforting spices of pumpkin pie, all resting on a delightful, buttery graham cracker crust. While the concept of cheesecake dates back to ancient Greece, and pumpkin has been a staple of North American harvest celebrations for centuries, this particular fusion truly captures the essence of modern fall indulgence. It’s a celebration of cozy evenings and festive gatherings, embodying the spirit of the season in every single bite.
What I particularly adore about these bars is their ingenious design. Unlike a traditional full-sized cheesecake or pie, Pumpkin Cheesecake Bars are inherently portion-controlled and incredibly easy to serve, making them a fantastic addition to potlucks, holiday dessert tables, or simply a convenient treat for an afternoon pick-me-up. The exquisite balance of rich, spiced pumpkin and light, tangy cream cheese creates a dessert that is both decadent and refreshingly familiar. Prepare to fall in love with these delightful Pumpkin Cheesecake Bars – they’re guaranteed to become a cherished part of your fall baking repertoire.

Ingredients:
For the Graham Cracker Crust:
- 1 ½ cups (approximately 200g) Graham Cracker Crumbs: I always make sure these are finely crushed for a smooth, uniform crust. You can achieve this using a food processor or by placing crackers in a Ziploc bag and crushing with a rolling pin.
- ¼ cup (50g) Granulated Sugar: This adds just the right touch of sweetness to balance the buttery goodness of the crust.
- ½ cup (113g) Unsalted Butter, melted: I always use unsalted butter so I can control the salt content myself. Make sure it’s fully melted but not boiling hot, as this helps bind the crumbs perfectly.
For the Pumpkin Cheesecake Filling:
- 24 ounces (680g) Full-Fat Cream Cheese, softened to room temperature: This is absolutely crucial for a smooth, lump-free cheesecake. Take it out of the fridge at least 2-3 hours before you plan to bake. Trust me, it makes a world of difference!
- 1 cup (200g) Granulated Sugar: For that perfect level of sweetness in our rich pumpkin cheesecake filling.
- ½ cup (100g) Packed Light Brown Sugar: The molasses in brown sugar adds a wonderful depth of flavor and moisture that complements the pumpkin beautifully.
- 1 (15-ounce / 425g) can Pumpkin Puree: Ensure this is 100% pure pumpkin puree, not pumpkin pie filling. Pie filling already has spices and sugar, and we want to control our own flavor profile for these delectable Pumpkin Cheesecake Bars.
- 2 large Eggs, softened to room temperature: Room temperature eggs incorporate much better into the cream cheese mixture, preventing overmixing and ensuring a smooth texture.
- 1 large Egg Yolk, softened to room temperature: This extra yolk adds richness and helps create an even silkier, more luscious texture for our Pumpkin Cheesecake Bars.
- 1 teaspoon Pure Vanilla Extract: A good quality vanilla extract is essential for rounding out all the flavors.
- 1 teaspoon Ground Cinnamon: The quintessential spice for anything pumpkin!
- ½ teaspoon Ground Ginger: Adds a warm, slightly peppery note that pairs wonderfully with the pumpkin.
- ¼ teaspoon Ground Nutmeg: Just a pinch for that classic autumnal spice blend.
- ⅛ teaspoon Ground Cloves: A little goes a long way with cloves, adding a deep, aromatic warmth.
- 2 tablespoons All-Purpose Flour: This small amount of flour acts as a stabilizer, helping to prevent cracks in the cheesecake and giving it a slightly firmer, sliceable texture perfect for bars.
- Pinch of Salt: Always a good idea to enhance all the other sweet and spicy flavors.
For the Sour Cream Topping (Optional but Recommended):
- 1 cup (240g) Full-Fat Sour Cream, softened to room temperature: Just like the cream cheese, room temperature sour cream will mix smoothly. This topping adds a fantastic tangy counterpoint to the sweet pumpkin cheesecake.
- ¼ cup (50g) Granulated Sugar: To sweeten the sour cream just enough.
- ½ teaspoon Pure Vanilla Extract: Enhances the flavor of the topping.
Equipment You’ll Need:
- 9×13 inch baking pan: I prefer a light-colored metal pan for even baking.
- Parchment paper: Absolutely essential for easy removal of the bars! I like to leave an overhang on the sides to use as “handles.”
- Aluminum foil: For covering the pan if needed during baking to prevent over-browning.
- Large mixing bowls: At least two, one for the crust and one for the filling.
- Electric mixer (stand or hand-held): A stand mixer with a paddle attachment makes this process incredibly easy, but a hand mixer works perfectly fine too.
- Rubber spatula: For scraping down the sides of the bowl and folding ingredients gently.
- Measuring cups and spoons: Precision is key in baking!
Instructions:
Phase 1: Preparing the Graham Cracker Crust
- Preheat your oven and prepare the pan: First things first, preheat your oven to 350°F (175°C). While the oven warms up, line a 9×13 inch baking pan with parchment paper, leaving an overhang on the long sides. This overhang will act as little “handles” later, making it incredibly easy to lift the entire batch of Pumpkin Cheesecake Bars out of the pan once they’re cooled and ready to cut. A little spray of non-stick cooking spray under the parchment paper can help it adhere to the pan, preventing it from sliding around while you’re pressing in the crust.
- Combine dry ingredients for the crust: In a medium-sized mixing bowl, combine the 1 ½ cups of finely crushed graham cracker crumbs with the ¼ cup of granulated sugar. Use a whisk or a fork to mix them thoroughly. You want to ensure the sugar is evenly distributed throughout the crumbs so every bite of the crust is perfectly sweet.
- Add the melted butter: Pour the ½ cup of melted unsalted butter over the graham cracker and sugar mixture. Using a rubber spatula or a fork, stir the mixture until all of the graham cracker crumbs are thoroughly moistened and coated with butter. It should resemble wet sand and hold together when you pinch a small amount between your fingers. If it feels too dry, you might need another tablespoon of melted butter, but this recipe usually gets it just right.
- Press the crust into the pan: Transfer the buttered graham cracker mixture into your prepared 9×13 inch baking pan. Using the bottom of a flat-bottomed measuring cup, your clean hands, or a tart tamper, press the mixture firmly and evenly into the bottom of the pan. Pay special attention to the corners and edges to ensure a compact and uniform crust. A well-pressed crust is crucial; it prevents crumbling when you slice your Pumpkin Cheesecake Bars.
- Pre-bake the crust: Place the pan with the pressed crust into your preheated oven and bake for 10-12 minutes, or until the edges are lightly golden and you can smell the delicious aroma of toasted graham crackers. This pre-baking step helps to set the crust, making it crispier and less likely to get soggy under the creamy cheesecake filling. Once baked, remove the pan from the oven and set it aside to cool slightly while you prepare the filling. It’s important for the crust to be at least somewhat cooled, or even completely cool, before adding the filling.
Phase 2: Crafting the Silky Pumpkin Cheesecake Filling
- Cream the cream cheese: In a large mixing bowl, using an electric mixer fitted with a paddle attachment (or a hand mixer), beat the 24 ounces of softened full-fat cream cheese on medium speed for about 2-3 minutes. You want to beat it until it’s completely smooth, light, and airy, with no lumps whatsoever. This is a critical step for a silky cheesecake; don’t rush it! Scrape down the sides of the bowl occasionally to ensure everything is incorporated.
- Add the sugars: To the smooth cream cheese, add the 1 cup of granulated sugar and ½ cup of packed light brown sugar. Continue beating on medium speed for another 2-3 minutes, or until the mixture is light and fluffy and the sugars are fully dissolved. Again, scrape down the sides and bottom of the bowl frequently to ensure even mixing. The mixture should become even lighter in color and texture.
- Incorporate the pumpkin puree: Add the 15-ounce can of 100% pumpkin puree (remember, not pie filling!) to the cream cheese mixture. Beat on low speed until just combined. You don’t want to overmix at this stage; simply ensure the pumpkin is evenly distributed throughout the mixture. The color will transform into a beautiful, vibrant orange.
- Mix in the spices and vanilla: Now, add the 1 teaspoon pure vanilla extract, 1 teaspoon ground cinnamon, ½ teaspoon ground ginger, ¼ teaspoon ground nutmeg, ⅛ teaspoon ground cloves, and a pinch of salt. Beat on low speed until the spices are fully incorporated and the mixture is fragrant. The aroma alone will make your kitchen smell incredible!
- Whisk in the flour: Sprinkle the 2 tablespoons of all-purpose flour over the pumpkin mixture. Beat on low speed until just combined, being careful not to overmix. The flour helps to stabilize the cheesecake and prevent cracking, contributing to a perfect bar-like texture.
- Add the eggs and egg yolk: This is a delicate step. Add the two large room temperature eggs and the one large room temperature egg yolk, one at a time, beating on very low speed after each addition just until combined. The key here is not to overmix! Overmixing once the eggs are added can incorporate too much air, which can lead to cracks in your cheesecake as it bakes and cools. A few seconds of mixing after each egg is sufficient. Scrape down the bowl one final time to ensure everything is thoroughly mixed without overworking the batter. The filling should be smooth, thick, and perfectly creamy.
Phase 3: Baking Your Pumpkin Cheesecake Bars to Perfection
- Pour the filling over the crust: Carefully pour the prepared pumpkin cheesecake filling evenly over the slightly cooled, pre-baked graham cracker crust in the 9×13 inch pan. Use your rubber spatula to gently spread the filling to the edges, ensuring an even layer. Gently tap the pan on your counter a few times to release any large air bubbles that might be trapped within the filling. This also helps to ensure an even top surface.
- Bake the cheesecake: Place the pan into your preheated 350°F (175°C) oven. Bake for approximately 35-45 minutes. The baking time can vary slightly depending on your oven. You’ll know the cheesecake is done when the edges are set, but the center still has a slight jiggle to it when you gently shake the pan. Do not overbake! Overbaking is a common cause of cracks in cheesecakes. The residual heat will continue to cook the center as it cools. If you notice the edges browning too quickly, you can loosely tent the pan with aluminum foil.
- Cool partially in the oven: Once baked, turn off the oven, but leave the cheesecake inside with the oven door ajar for about 30-60 minutes. This gradual cooling process is another secret to preventing cracks and ensuring a smooth, beautiful surface. Drastic temperature changes can shock the cheesecake, leading to unsightly fissures. This slow transition helps the Pumpkin Cheesecake Bars to set gently.
Phase 4: Adding the Tangy Sour Cream Topping (Optional but Highly Recommended)
- Prepare the sour cream topping: While the cheesecake is partially cooling in the oven, you can prepare the optional sour cream topping. In a small bowl, whisk together the 1 cup of full-fat sour cream (remember, room temperature!), ¼ cup of granulated sugar, and ½ teaspoon of pure vanilla extract until completely smooth and well combined. This topping adds a wonderful tang and a beautiful finish to the Pumpkin Cheesecake Bars.
- Spread the topping: Once the cheesecake has completed its initial cooling in the oven (after the 30-60 minutes), carefully remove it from the oven. Gently and evenly spread the sour cream topping over the warm, but not piping hot, cheesecake. The warmth helps the topping spread easily.
- Return to the oven (briefly): Place the pan with the topped cheesecake back into the still-off, slightly ajar oven, or if your oven has cooled too much, you can briefly bake it at 275°F (135°C) for just 5-7 minutes, or until the sour cream topping is just set and no longer appears wet. This brief bake sets the topping perfectly without disturbing the cheesecake underneath.
Phase 5: Cooling and Slicing Your Irresistible Pumpkin Cheesecake Bars
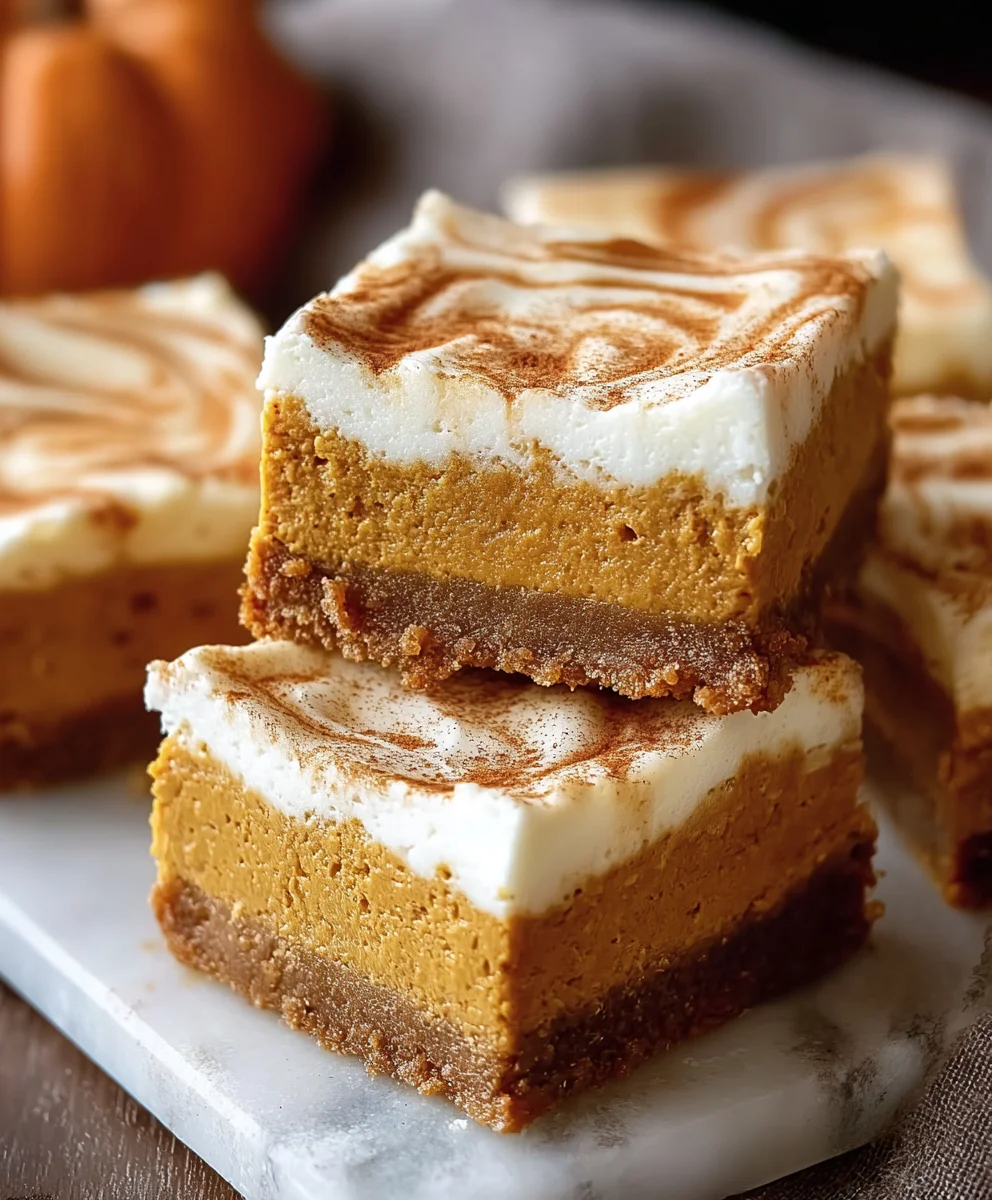
- Cool completely at room temperature: After the sour cream topping has set, remove the Pumpkin Cheesecake Bars from the oven completely. Place the pan on a wire cooling rack and allow it to cool at room temperature for at least 1 to 2 hours. Resist the urge to move it to the fridge too soon, as rapid cooling can also contribute to cracking. This gradual cooling is essential for the cheesecake to fully set and achieve its perfect texture.
- Chill thoroughly: Once cooled to room temperature, cover the pan loosely with plastic wrap or aluminum foil. Transfer the Pumpkin Cheesecake Bars to the refrigerator and chill for a minimum of 4 hours, but preferably overnight. Chilling is the most important step for a perfectly set cheesecake bar that holds its shape when sliced. Don’t skip this step! The flavors will also deepen and meld beautifully during this chilling period.
- Slice and serve: Once fully chilled, use the parchment paper overhangs as “handles” to carefully lift the entire cheesecake slab out of the pan and onto a cutting board. For clean, neat slices of your Pumpkin Cheesecake Bars, I recommend using a long, sharp knife. For each cut, dip the knife in hot water and wipe it clean before slicing. This will create incredibly smooth edges on each bar. You can cut them into 16 large bars (4×4) or 24 smaller, more bite-sized squares (4×6), depending on your preference.
Storage and Serving Tips for Your Pumpkin Cheesecake Bars
- Storage: Store any leftover Pumpkin Cheesecake Bars in an airtight container in the refrigerator for up to 5-7 days. The flavors often become even more pronounced on the second day!
- Freezing: These Pumpkin Cheesecake Bars freeze beautifully! Once chilled and sliced, you can arrange individual bars on a baking sheet lined with parchment paper and freeze until solid (about 2 hours). Then, transfer the frozen bars to a freezer-safe airtight container or freezer bag, separating layers with parchment paper to prevent sticking. They will keep well in the freezer for up to 1-2 months. Thaw them in the refrigerator overnight or at room temperature for a couple of hours before serving.
- Serving suggestions: While these Pumpkin Cheesecake Bars are absolutely divine on their own, you can elevate them even further with a dollop of fresh whipped cream, a sprinkle of extra cinnamon or nutmeg, or even a light drizzle of caramel sauce. They make a fantastic dessert for any autumn gathering, Thanksgiving, or simply as a comforting treat during the cooler months. The rich, creamy texture and warm spices truly make these Pumpkin Cheesecake Bars a seasonal favorite!
Conclusion:
Well, my dear friends, we’ve journeyed through the delightful process of creating what I truly believe is one of the most irresistible seasonal treats out there. I’ve shared all my tips and tricks, and now it’s time for the grand finale – the part where I try my best to convince you (though I suspect you’re already convinced!) that this recipe absolutely deserves a prime spot in your autumn and winter baking repertoire.
There’s something truly magical about the combination of flavors and textures in these bars. Think about it: a perfectly spiced, tender pumpkin layer, a rich, velvety smooth cheesecake swirl, all sitting atop a crisp, buttery graham cracker crust. It’s not just a dessert; it’s an experience. Every bite is a harmonious blend of creamy, sweet, and spiced, hitting all those comforting notes we crave when the leaves start to turn and the air gets a little crisper. These Pumpkin Cheesecake Bars aren’t just a fleeting trend; they are a timeless classic, reimagined in a convenient, shareable bar form that makes them infinitely more appealing for gatherings or even just a quiet evening at home. I promise you, the aroma alone as they bake will fill your home with an inviting warmth that’s simply unmatched, setting the stage for a truly memorable dessert experience.
Why this recipe stands out:
What sets this specific recipe apart, in my humble opinion, is the careful balance we strike between the distinct pumpkin spice notes and the classic tang of cheesecake. We’re not letting one overpower the other; instead, they dance together beautifully, creating a symphony of fall flavors. Plus, the ease of cutting and serving bars versus a traditional round cheesecake makes it an absolute winner for potlucks, holiday feasts, or even just a casual get-together with friends. No fuss, just pure, unadulterated deliciousness that everyone will rave about. It’s a dessert that manages to feel both incredibly special and delightfully approachable at the same time.
Now, let’s talk about taking your dessert game to the next level. While these bars are absolutely sublime on their own, a little extra flourish can transform them into an even more extravagant treat. For a truly decadent experience, I love serving them ever-so-slightly warm, perhaps with a generous dollop of freshly whipped cream. You could even sprinkle a pinch of cinnamon or a tiny grating of nutmeg over the cream for an added aromatic touch. A drizzle of warm caramel sauce or a sprinkle of toasted pecans also works wonders, adding another layer of texture and flavor that complements the creamy base perfectly. Imagine pairing a square of these bars with a steaming mug of chai tea or a rich, dark coffee – pure bliss!
Creative Twists for Your Pumpkin Cheesecake Bars:
But don’t stop there! This recipe is incredibly versatile, inviting you to put your own creative spin on it. If you’re feeling adventurous, consider swapping out the graham cracker crust for a gingersnap crust – the spicy kick of the ginger would be an absolutely divine complement to the pumpkin and cream cheese. Or, for a more intense chocolate experience, you could press a layer of crushed chocolate wafer cookies into the crust before adding the filling. For toppings, think beyond the classic. A sprinkle of candied ginger, a handful of mini chocolate chips swirled into the batter, or even a light dusting of cocoa powder before serving could add fascinating new dimensions. If you’re a spice fiend like me, feel free to amp up the pumpkin pie spice blend a little bit, or add a pinch of ground cloves or allspice for an even deeper, warmer flavor profile. The beauty of baking is in experimentation, and I wholeheartedly encourage you to make these bars truly your own.
They are not just for autumn either! While they perfectly embody the spirit of fall, their comforting richness makes them a fantastic dessert for winter holidays, cozy Sunday brunches, or even a thoughtful homemade gift. They transport incredibly well, making them ideal for sharing at work or school events. Just imagine the smiles they’ll bring!
So, what are you waiting for? I’ve laid out the roadmap for creating these absolutely stunning and utterly delicious bars. I truly believe that once you try this recipe, it will become a cherished part of your seasonal baking traditions. Don’t be intimidated; the steps are straightforward, and the reward is immense. You’ll be amazed at how easily you can create something so impressive and incredibly tasty right in your own kitchen.
Your Turn to Bake and Share!
I am absolutely thrilled for you to give this recipe a whirl. When you do, please, please, please come back and share your experience with me! I love hearing about your baking adventures. Did you add a unique twist? Did your family go wild for them? What was your favorite part of making them? Share your thoughts in the comments below, or even better, snap a photo of your magnificent creation and share it! Your feedback and stories are what truly inspire me and make this whole recipe-sharing journey so incredibly rewarding. Let’s build a community of enthusiastic bakers, one delicious bar at a time. Happy baking, my friends!
Decadent Pumpkin Cheesecake Bars
These Decadent Pumpkin Cheesecake Bars offer the perfect symphony of creamy, tangy cheesecake intertwined with the warm, comforting spices of pumpkin pie, all resting on a delightful, buttery graham cracker crust. A straightforward recipe balancing rich, spiced pumpkin and light, tangy cream cheese, they are portion-controlled and incredibly easy to serve. Best served chilled, they’re a must-try for any autumnal celebration, from Thanksgiving to a cozy night with family.
Ingredients
-
1 ½ cups Graham Cracker Crumbs
-
¼ cup Granulated Sugar (for crust)
-
½ cup Unsalted Butter, melted
-
24 ounces Full-Fat Cream Cheese, softened to room temperature
-
1 cup Granulated Sugar (for filling)
-
½ cup Packed Light Brown Sugar
-
1 (15-ounce) can Pumpkin Puree (100% pure)
-
2 large Eggs, room temperature
-
1 large Egg Yolk, room temperature
-
1 teaspoon Pure Vanilla Extract
-
1 teaspoon Ground Cinnamon
-
½ teaspoon Ground Ginger
-
¼ teaspoon Ground Nutmeg
-
⅛ teaspoon Ground Cloves
-
2 tablespoons All-Purpose Flour
-
Pinch of Salt
-
1 cup Full-Fat Sour Cream, softened to room temperature (optional for topping)
-
¼ cup Granulated Sugar (for topping, optional)
-
½ teaspoon Pure Vanilla Extract (for topping, optional)
Instructions
-
Step 1
Preheat oven to 350°F (175°C). Line a 9×13 inch baking pan with parchment paper, leaving an overhang on the long sides. In a medium bowl, combine 1 ½ cups graham cracker crumbs with ¼ cup granulated sugar. Stir in ½ cup melted unsalted butter until crumbs are thoroughly moistened. -
Step 2
Transfer the crumb mixture to the prepared pan and press firmly and evenly into the bottom. Bake for 10-12 minutes, or until edges are lightly golden. Remove from oven and cool slightly. -
Step 3
In a large bowl, beat 24 ounces softened cream cheese on medium speed for 2-3 minutes until smooth and airy. Add 1 cup granulated sugar and ½ cup packed light brown sugar; beat for another 2-3 minutes until light, fluffy, and sugars are dissolved. Scrape down bowl sides. -
Step 4
Mix in the 15-ounce can of pumpkin puree on low speed until just combined. Add 1 teaspoon vanilla extract, 1 teaspoon cinnamon, ½ teaspoon ginger, ¼ teaspoon nutmeg, ⅛ teaspoon cloves, and a pinch of salt; beat on low speed until fully incorporated and fragrant. -
Step 5
Sprinkle 2 tablespoons all-purpose flour over the mixture and beat on low speed until just combined, do not overmix. Add the two large eggs and one large egg yolk, one at a time, beating on very low speed *just* until combined after each addition. Do not overmix. Scrape down the bowl one final time. -
Step 6
Carefully pour the pumpkin cheesecake filling evenly over the slightly cooled crust. Gently tap the pan on the counter to release air bubbles. Bake for 35-45 minutes, or until the edges are set and the center has a slight jiggle. Do not overbake. -
Step 7
Turn off the oven, but leave the cheesecake inside with the oven door ajar for 30-60 minutes. This gradual cooling prevents cracks. -
Step 8
While cooling, whisk together 1 cup softened full-fat sour cream, ¼ cup granulated sugar, and ½ teaspoon vanilla extract until smooth. Once the cheesecake has partially cooled, remove it from the oven and gently spread the sour cream topping evenly over the warm cheesecake. Return to the still-off, ajar oven, or briefly bake at 275°F (135°C) for 5-7 minutes until the topping is just set. -
Step 9
Remove the pan from the oven. Cool completely at room temperature for 1-2 hours. Once cooled, cover loosely and transfer to the refrigerator to chill for a minimum of 4 hours, preferably overnight, for best setting and flavor. -
Step 10
Use the parchment paper overhangs to carefully lift the entire cheesecake slab onto a cutting board. For clean slices, dip a long, sharp knife in hot water and wipe clean before each cut. Slice into 16 large bars (4×4) or 24 smaller squares (4×6).
Important Information
Nutrition Facts (Per Serving)
It is important to consider this information as approximate and not to use it as definitive health advice.
Allergy Information
Please check ingredients for potential allergens and consult a health professional if in doubt.
Leave a Comment