
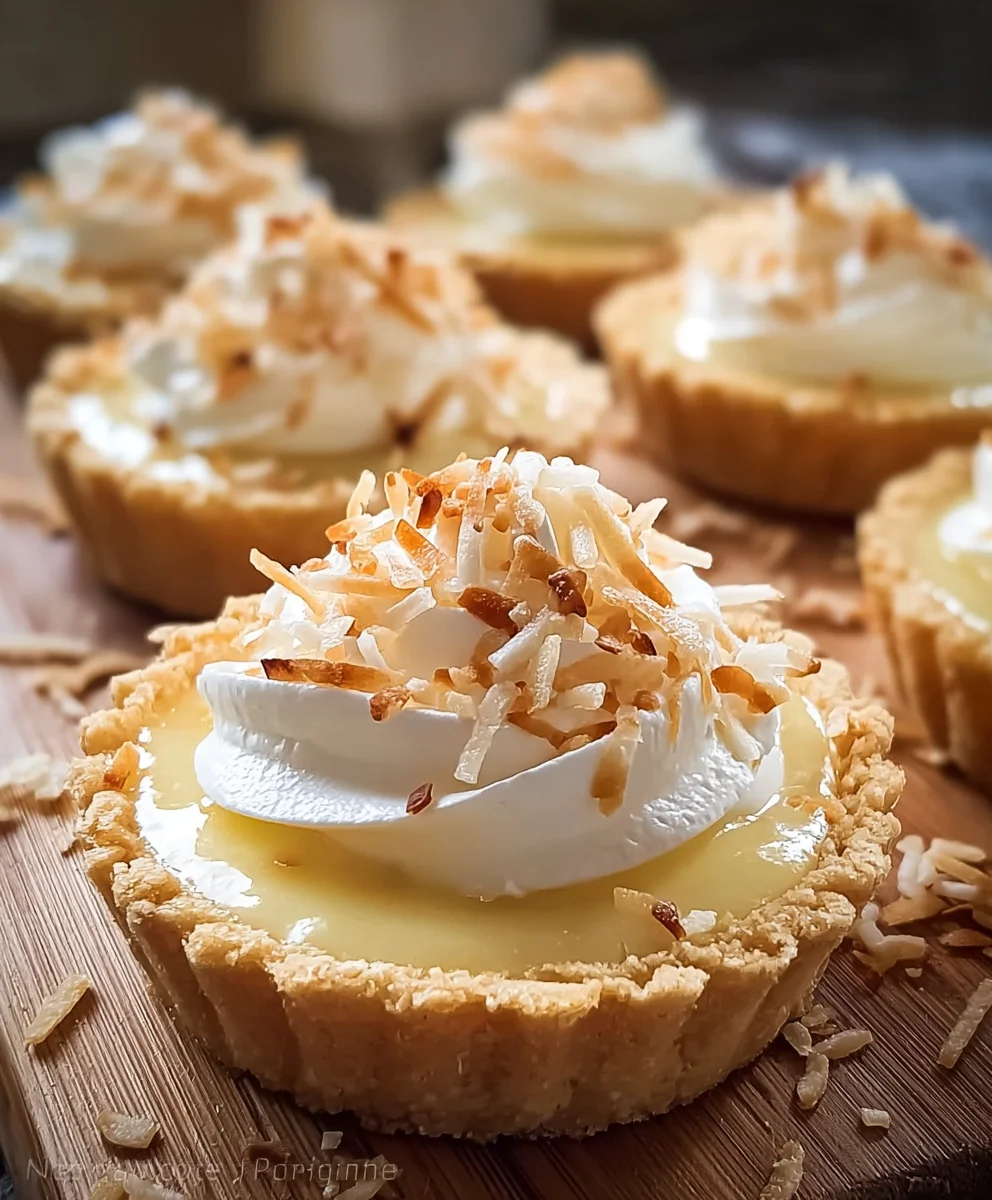
Mini Coconut Cream Pies – what a delightful phrase that instantly conjures images of tropical paradise and a symphony of textures! I’m absolutely thrilled to share with you a recipe that transforms a classic dessert into an elegant, individual treat. Forget the hassle of slicing a large pie; these adorable, perfectly portioned delights are designed for pure enjoyment and effortless serving.
While the exact origin of coconut cream pie is often debated, it’s widely recognized as a beloved American classic, a staple on many Southern tables and a comforting dessert that evokes memories of home. Taking this timeless tradition and shrinking it down, we unlock a new level of convenience and charm. People adore these Mini Coconut Cream Pies not just for their undeniably luscious, creamy coconut filling – a velvety smooth cloud of tropical flavor – but also for their perfectly flaky crust and the satisfying crunch of toasted coconut on top. Each bite offers a harmonious blend of sweetness and a hint of the exotic, making them an ideal showstopper for any gathering or a special indulgence for yourself. They are the epitome of elegant simplicity, offering all the beloved taste of a full-sized pie without any of the fuss.

Ingredients:
For the Crusts:
- 1 ½ cups (180g) all-purpose flour: I always make sure it’s unbleached for the best flavor and texture.
- ½ teaspoon salt: Just a touch to enhance all those wonderful flavors.
- ½ cup (113g) unsalted butter: This is crucial. It needs to be very cold, cut into small ½-inch cubes. Cold butter is the secret to a flaky crust for your Mini Coconut Cream Pies.
- ¼ cup (56g) vegetable shortening: Also very cold and cut into small pieces. Shortening contributes to tenderness and flakiness.
- 4-6 tablespoons ice water: Absolutely essential. Make sure it’s truly ice water, as the cold temperature prevents the butter from melting too soon.
For the Coconut Cream Filling:
- 1 ½ cups (360ml) whole milk: Full-fat milk creates a richer, creamier filling.
- 1 ½ cups (360ml) full-fat canned coconut milk: Don’t use the light version here! We want that deep coconut flavor and luxurious texture for our Mini Coconut Cream Pies. Make sure to shake the can well before opening.
- ¾ cup (150g) granulated sugar: For the perfect amount of sweetness.
- ½ cup (60g) cornstarch: Our thickening agent. It ensures a silky smooth, firm filling.
- ½ teaspoon salt: Balances the sweetness and amplifies the coconut notes.
- 4 large egg yolks: These add richness, color, and contribute to the filling’s custardy texture. Save the whites for another recipe!
- 3 tablespoons (42g) unsalted butter: Cut into small pieces, to be stirred in at the end for extra richness and a beautiful sheen.
- 1 ½ teaspoons pure vanilla extract: A classic complement to coconut.
- 1 ½ cups (approx. 120g) sweetened shredded coconut: This is where the magic happens! It provides texture and an intense coconut flavor.
For the Whipped Cream Topping:
- 1 ½ cups (360ml) heavy cream (or heavy whipping cream): Ensure it’s very cold for optimal whipping.
- ¼ cup (30g) powdered sugar (confectioners’ sugar): Sweetens the cream without adding graininess.
- 1 teaspoon pure vanilla extract: Enhances the cream’s flavor.
For Garnish (Optional):
- Toasted coconut flakes or shredded coconut: Adds a lovely visual appeal and extra crunch.
- White chocolate shavings: A touch of elegance and complementary sweetness.
Equipment You’ll Need:
- Mini pie pans or muffin tins (12-cup): I prefer using a 12-cup muffin tin for convenience, allowing me to make perfect individual servings of these Mini Coconut Cream Pies. If using mini pie pans, you might need about 6-8 depending on their size.
- Large mixing bowl(s): For the crust and filling.
- Pastry blender or food processor: For cutting butter into the flour.
- Rolling pin: Essential for rolling out the pie dough.
- Small round cookie cutter or glass (approx. 3.5-4 inches diameter): To cut out your pie crust rounds.
- Small saucepan or medium heavy-bottomed saucepan: For cooking the coconut cream filling.
- Whisk: Absolutely crucial for making a smooth, lump-free filling.
- Heatproof spatula or wooden spoon: For stirring.
- Fine-mesh sieve: For straining the filling if you desire an extra silky texture.
- Plastic wrap: For chilling dough and covering the filling.
- Electric mixer (handheld or stand mixer with whisk attachment): For whipping the cream.
- Piping bag with a star tip (optional): For a professional-looking whipped cream topping.
Instructions:
Phase 1: Preparing Your Perfect Pie Crusts for Mini Coconut Cream Pies
- Combine Dry Ingredients: In a large mixing bowl, whisk together the all-purpose flour and salt. I always give it a good whisk to ensure everything is evenly distributed before adding the fats.
- Cut in the Butter and Shortening: Add the very cold, cubed unsalted butter and cold shortening to the flour mixture. Using a pastry blender, two knives, or your fingertips, cut the fats into the flour until the mixture resembles coarse meal with some pea-sized pieces of butter remaining. This step is vital for flakiness; don’t overwork the dough! You want those distinct pieces of fat that will create steam pockets during baking.
- Add Ice Water: Gradually add the ice water, one tablespoon at a time, mixing lightly with your hands or a fork after each addition. The exact amount of water can vary depending on the humidity and your flour, so add just enough until the dough barely comes together when pressed. I usually find 4 to 5 tablespoons is perfect. Be careful not to add too much, as that can make your crust tough.
- Form and Chill the Dough: Turn the dough out onto a lightly floured surface. Gently gather it into a cohesive ball, then flatten it into a disc. Wrap the disc tightly in plastic wrap and refrigerate for at least 30 minutes, or preferably an hour. This chilling period allows the gluten to relax, making the dough easier to roll, and also firms up the butter, which prevents it from melting too quickly when baking your Mini Coconut Cream Pies.
- Roll and Cut Crusts: Once chilled, unwrap the dough and place it on a lightly floured surface. Roll the dough out to about ⅛-inch thickness. Using a 3.5 to 4-inch round cookie cutter or the rim of a small glass, cut out rounds of dough. You should get about 12-14 rounds, depending on the size of your cutter. Gather the scraps, re-roll them once, and cut out more rounds if needed.
- Shape into Muffin Tins: Gently press each dough round into the cups of your muffin tin. Make sure the dough fits snugly against the bottom and up the sides. Prick the bottom of each crust several times with a fork. This prevents the crust from puffing up excessively during baking.
- Blind Bake the Crusts: Line each crust with a small piece of parchment paper or foil, then fill with pie weights, dried beans, or rice. This step, called blind baking, helps prevent the crusts from shrinking or bubbling. Bake in a preheated oven at 375°F (190°C) for 10-12 minutes, or until the edges are lightly golden. Remove the weights and parchment/foil, then continue baking for another 5-7 minutes, or until the bottoms are lightly golden and cooked through. Let them cool completely in the muffin tin on a wire rack before attempting to remove them. Properly baked crusts are the foundation of amazing Mini Coconut Cream Pies!
Phase 2: Crafting the Silky Coconut Cream Filling
- Prepare the Wet Base: In a medium heavy-bottomed saucepan, combine the whole milk and full-fat canned coconut milk. Heat over medium heat until the mixture is simmering gently, just starting to steam around the edges. Do not boil vigorously.
- Whisk Dry Ingredients: While the milk mixture is heating, in a separate large bowl, whisk together the granulated sugar, cornstarch, and salt. Make sure there are no lumps in the cornstarch.
- Add Egg Yolks: To the sugar and cornstarch mixture, add the four large egg yolks. Whisk vigorously until the mixture is pale yellow, thick, and smooth. This creates what we call a “slurry.”
- Temper the Egg Yolks: This is a crucial step to prevent scrambling the eggs! Once the milk mixture is simmering, slowly, in a thin stream, pour about half of the hot milk into the egg yolk mixture while whisking constantly and vigorously. This gradually brings the temperature of the egg yolks up.
- Return to Pan: Pour the tempered egg yolk mixture back into the saucepan with the remaining hot milk.
- Cook the Filling: Return the saucepan to medium heat. Whisk constantly and vigorously for 5-8 minutes, or until the filling thickens considerably. It should become very thick, resembling a pudding, and should slowly bubble, making a “plop” sound as it thickens. Continue to whisk for another minute after it starts to bubble to ensure the cornstarch is fully cooked out, preventing a starchy taste. Constant whisking is key to prevent scorching and lumps!
- Finish the Filling: Remove the saucepan from the heat. Stir in the 3 tablespoons of cold unsalted butter until fully melted and incorporated. Then, stir in the pure vanilla extract and the sweetened shredded coconut.
- Strain for Extra Smoothness (Optional but Recommended): For an extra silky smooth filling, I often press the hot filling through a fine-mesh sieve into a clean bowl. This removes any potential small lumps or cooked egg bits.
- Cool the Filling: Place a piece of plastic wrap directly on the surface of the filling to prevent a skin from forming. Allow it to cool at room temperature for about 30 minutes, then transfer to the refrigerator to chill completely, for at least 2-3 hours, or preferably overnight. The filling needs to be thoroughly cold and firm before assembling your Mini Coconut Cream Pies.
Phase 3: Assembling Your Delicious Mini Coconut Cream Pies
- Carefully Remove Crusts: Once your pie crusts are completely cool, gently run a thin knife around the edges of each crust in the muffin tin to loosen them. Carefully lift each crust out and place them on a clean work surface or a platter. Handle them gently as they can be delicate.
- Fill the Crusts: Spoon or pipe the thoroughly chilled coconut cream filling into each cooled mini pie crust. I like to use a small cookie scoop or a piping bag without a tip to ensure even portions. Fill each crust almost to the brim, creating a nice mound. Aim for consistency across all your Mini Coconut Cream Pies.
- Chill Again: Once all the crusts are filled, place the filled pies back into the refrigerator for at least 30 minutes to an hour. This allows the filling to firm up a bit more and ensures the pies are perfectly chilled before adding the whipped topping. This step is important for stability.
Phase 4: Whipping Up the Fluffy Topping and Finishing Touches
- Prepare Whipped Cream: In a very cold mixing bowl (I like to chill my bowl and whisk attachment in the freezer for 10-15 minutes beforehand), combine the very cold heavy cream, powdered sugar, and vanilla extract.
- Whip the Cream: Using an electric mixer on medium-high speed, whip the cream until soft peaks form. Then increase the speed to high and continue whipping until stiff peaks form. Be careful not to over-whip, or it will turn grainy or even into butter! Perfectly whipped cream is light, airy, and holds its shape beautifully.
- Top the Pies: Spoon or pipe the whipped cream generously onto each chilled Mini Coconut Cream Pie. If using a piping bag with a star tip, you can create beautiful swirls. I often use an offset spatula to create a rustic, lovely swirl on top.
- Garnish (Optional): If desired, sprinkle the tops with toasted coconut flakes, shredded coconut, or white chocolate shavings for an extra touch of elegance and texture. To toast coconut, spread it in a single layer on a baking sheet and bake at 325°F (160°C) for 5-8 minutes, stirring occasionally, until golden brown and fragrant.
- Final Chill: For the best results and stability, place the finished Mini Coconut Cream Pies back into the refrigerator for at least another 30 minutes before serving. This allows the topping to set slightly and ensures the pies are perfectly chilled.
Storage and Serving Tips for Your Mini Coconut Cream Pies:
- Immediate Enjoyment: While these pies are absolutely delightful when freshly assembled, I find they taste even better after an hour or two in the refrigerator, allowing all the flavors to meld beautifully and the filling to reach optimal firmness.
- Refrigeration is Key: Due to the dairy and egg-based filling, these Mini Coconut Cream Pies must be stored in the refrigerator. Cover them loosely with plastic wrap or place them in an airtight container to prevent them from absorbing odors from other foods.
- Shelf Life: When properly stored in the refrigerator, these pies will remain fresh and delicious for 2-3 days. The crust might soften slightly over time, but the filling will remain wonderful. I honestly doubt they’ll last that long, though!
- Serving Temperature: Serve these pies chilled straight from the refrigerator. The cool, creamy texture is part of their irresistible charm.
- Preventing a Soggy Crust: A properly blind-baked crust is your best defense against a soggy bottom. Chilling the dough thoroughly and baking until golden brown and firm will create a barrier against the moist filling. If you’re making them in advance, you can even brush the inside of the baked crusts with a very thin layer of melted white chocolate and let it set before filling – this creates an extra waterproof layer, ensuring your Mini Coconut Cream Pies stay delightful!
- Transporting: If you need to transport these pies, keep them in a chilled cooler or an insulated bag. They are best served cold.
- Make-Ahead Tip: You can prepare the pie crusts a day in advance and store them in an airtight container at room temperature. The coconut cream filling can also be made a day ahead and stored, covered, in the refrigerator. Whip the cream and assemble the pies just a few hours before serving for the freshest taste and best texture. This makes hosting a breeze!
- A Note on Freshness: While the components can be prepared in advance, for the absolute best texture, I recommend assembling the Mini Coconut Cream Pies with the whipped cream topping no more than 4-6 hours before serving. The whipped cream is at its peak freshness and fluffiness when recently made.
Conclusion:
So there you have it, my dear fellow dessert enthusiasts! We’ve journeyed through the creation of what I truly believe is one of the most delightful and surprisingly simple treats you can whip up in your own kitchen. These weren’t just any old pies; these were a labor of love, a testament to the power of a few simple ingredients coming together to create something truly magical. I can honestly say, with my hand on my heart, that once you experience the creamy, tropical bliss of these desserts, you’ll understand exactly why they’re a must-try for anyone who appreciates a good sweet ending to a meal, or even just a little pick-me-up during the day.
What makes this recipe stand out, you ask? Well, it’s a symphony of textures and flavors. Imagine the crisp, buttery crust providing the perfect counterpoint to a filling that’s so lusciously smooth it practically melts on your tongue. Then comes that unmistakable, sweet kiss of coconut, rich and fragrant, carrying you away to a sunny beach with every bite. It’s not just a dessert; it’s an experience, a mini escape in every single pie. And let’s not forget their utterly adorable size! The individual portions make them not only incredibly charming but also perfectly manageable, ensuring everyone gets their own little slice of heaven without the fuss of cutting a large pie. They’re elegant, they’re decadent, and they’re surprisingly easy to make, making them the perfect candidate for your next baking adventure.
Now, let’s talk about how to make these beauties even more special, or how to enjoy them in various settings. For serving suggestions, these are truly versatile. They shine brightly as the grand finale to a casual brunch or a sophisticated dinner party. Imagine serving them alongside a steaming cup of your favorite coffee or a delicate herbal tea – a match made in heaven! They also make a fantastic addition to any dessert bar, where their petite size encourages guests to sample a little bit of everything. For a refreshing twist, try chilling them for an extra hour or two before serving; the cold intensifies their creamy texture and makes them even more invigorating on a warm day. You can garnish them simply with a sprinkle of toasted coconut flakes for added texture and visual appeal, or a delicate curl of white chocolate. A tiny sprig of fresh mint can also add a pop of color and a hint of freshness that beautifully complements the coconut.
Creative Variations to Explore:
If you’re feeling adventurous (and I always encourage a little culinary exploration!), there are so many delightful ways you can adapt this recipe to suit your taste or occasion.
- Citrus Infusion: For a brighter, tangier note, consider adding a teaspoon of lime zest or lemon zest to the coconut filling. The citrus cuts through the richness beautifully and adds another layer of complexity.
- Nutty Crusts: While the classic crust is perfect, you could experiment with a graham cracker crust for a different texture, or even a crushed shortbread cookie crust for an extra buttery base. A sprinkle of finely chopped pecans or macadamia nuts mixed into the crust ingredients could also elevate the flavor profile.
- Chocolate Drizzle: A light drizzle of melted dark or milk chocolate over the top, just before serving, can transform these into an even more decadent treat. Coconut and chocolate are an iconic pairing for a reason!
- Boozy Boost: For an adult-only version, a tiny splash of rum or coconut liqueur (think Malibu!) could be folded into the cooled coconut filling. Start with a quarter teaspoon and add more to taste, being careful not to thin the filling too much.
- Tropical Toppings: Instead of just plain whipped cream, you could fold in some finely diced mango or pineapple into your whipped cream topping for an extra burst of tropical flavor. Just ensure the fruit is very well-drained to prevent sogginess.
These Mini Coconut Cream Pies are more than just a recipe; they are an invitation to create, to share, and to savor. I genuinely hope that I’ve inspired you to roll up your sleeves, gather your ingredients, and give these incredible treats a try. They are surprisingly forgiving, incredibly rewarding, and will undoubtedly bring smiles to the faces of everyone who tastes them, including your own.
Your Turn to Bake and Share!
I absolutely love hearing from you all and seeing your culinary creations. Once you’ve made these pies, please don’t hesitate to share your experiences with me! Did you try a fun variation? Do you have a special serving suggestion? Did they disappear in minutes at your gathering? I want to know all about it! Tag me on social media, leave a comment below, or just send a message. Your feedback and photos truly make my day and inspire me to keep sharing delicious recipes with you. Happy baking, my friends, and get ready to fall in love with these delightful little coconut dreams!
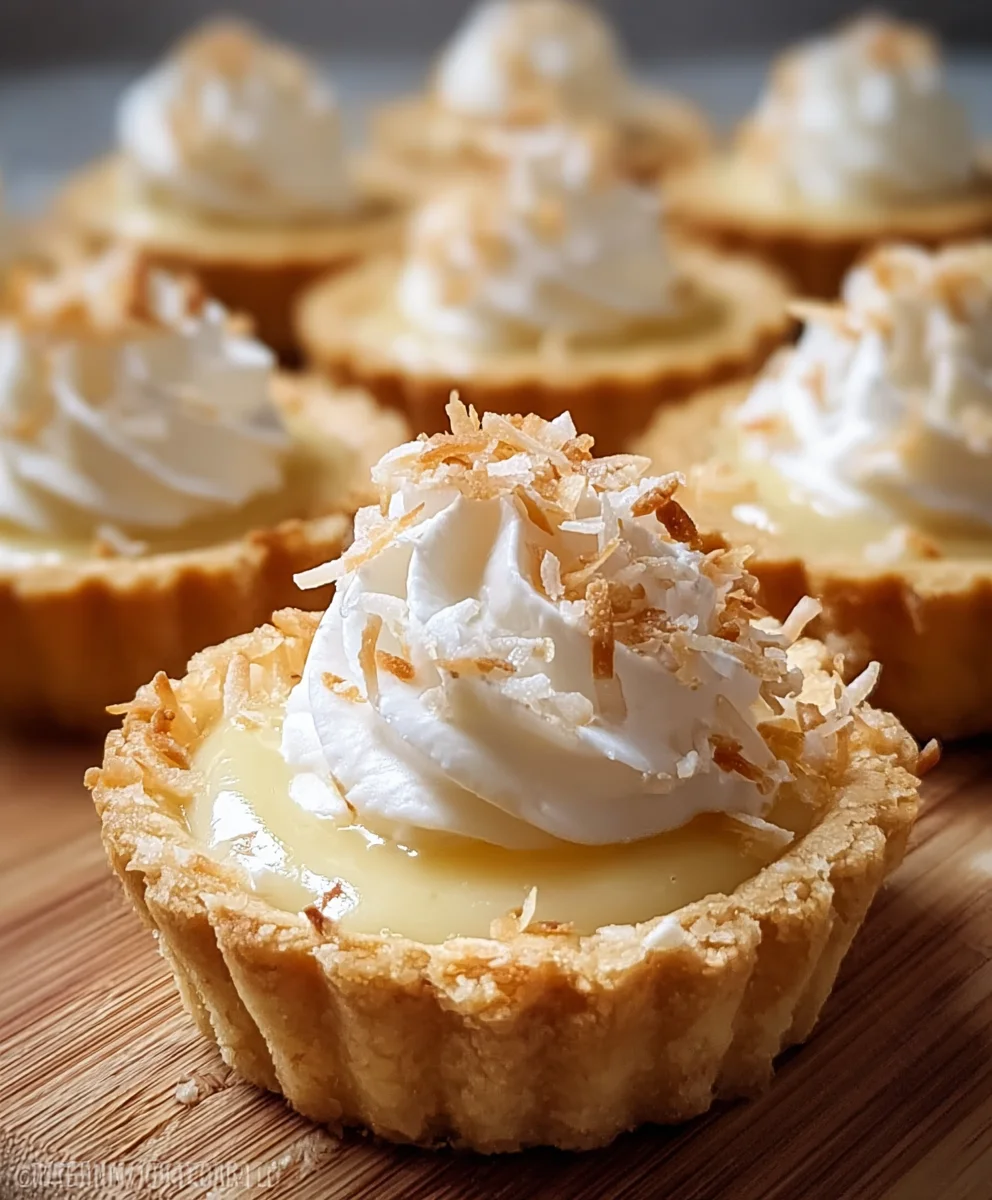
Mini Coconut Cream Pies
These Mini Coconut Cream Pies are adorable, perfectly portioned delights with a luscious, creamy coconut filling, flaky crust, and satisfying crunch of toasted coconut. Effortless to serve, they offer all the beloved taste of a full-sized pie without the fuss.
Ingredients
-
1 ½ cups (180g) all-purpose flour
-
½ teaspoon salt
-
½ cup (113g) cold unsalted butter, cut into ½-inch cubes
-
¼ cup (56g) cold vegetable shortening, cut into pieces
-
4-6 tablespoons ice water
-
1 ½ cups (360ml) whole milk
-
1 ½ cups (360ml) full-fat canned coconut milk
-
¾ cup (150g) granulated sugar
-
½ cup (60g) cornstarch
-
½ teaspoon salt
-
4 large egg yolks
-
3 tablespoons (42g) unsalted butter, cut into pieces
-
1 ½ teaspoons pure vanilla extract (non-alcohol alternative if preferred)
-
1 ½ cups (approx. 120g) sweetened shredded coconut
-
1 ½ cups (360ml) cold heavy cream
-
¼ cup (30g) powdered sugar
-
1 teaspoon pure vanilla extract (non-alcohol alternative if preferred)
-
Toasted coconut flakes or shredded coconut (for garnish, optional)
-
White chocolate shavings (for garnish, optional)
Instructions
-
Step 1
Whisk 1 ½ cups flour and ½ tsp salt. Cut ½ cup cold butter and ¼ cup cold shortening into flour until pea-sized pieces. Gradually add 4-6 tbsp ice water, mixing lightly until dough forms a cohesive ball. Form into a disc, wrap, and refrigerate for 30-60 minutes. -
Step 2
Roll dough to ⅛-inch thickness. Cut 12-14 rounds (3.5-4 inches diameter). Gently press each dough round into the cups of your muffin tin. Prick bottoms with a fork. Line with parchment/foil, fill with pie weights. Bake at 375°F (190°C) for 10-12 minutes. Remove weights/parchment, then bake another 5-7 minutes until golden. Cool completely in muffin tin. -
Step 3
In a medium saucepan, combine 1 ½ cups whole milk and 1 ½ cups full-fat canned coconut milk. Heat over medium until gently simmering, just steaming around the edges. -
Step 4
In a separate bowl, whisk ¾ cup granulated sugar, ½ cup cornstarch, and ½ tsp salt. Add 4 large egg yolks and whisk vigorously until pale and smooth. Slowly pour about ½ cup of the warm milk mixture into the egg yolk mixture, whisking constantly to temper the yolks. Pour the tempered egg mixture back into the saucepan with the remaining hot milk. -
Step 5
Return saucepan to medium heat. Whisk constantly and vigorously for 5-8 minutes until the filling thickens considerably and bubbles. Remove from heat. Stir in 3 tbsp unsalted butter, 1 ½ tsp pure vanilla extract, and 1 ½ cups sweetened shredded coconut. (Optional: Press hot filling through a fine-mesh sieve for extra smoothness.) Place plastic wrap directly on surface to prevent a skin. Cool at room temperature for 30 minutes, then chill completely in refrigerator for at least 2-3 hours or preferably overnight. -
Step 6
Once crusts are completely cool, gently remove them from the muffin tin. Spoon or pipe the thoroughly chilled coconut cream filling into each cooled mini pie crust, filling almost to the brim. Refrigerate the filled pies for at least 30-60 minutes for stability. -
Step 7
In a very cold mixing bowl, combine 1 ½ cups cold heavy cream, ¼ cup powdered sugar, and 1 tsp pure vanilla extract. Using an electric mixer, whip cream on medium-high until soft peaks form, then high until stiff peaks form. Generously spoon or pipe whipped cream onto each chilled pie. -
Step 8
If desired, garnish with toasted coconut flakes, shredded coconut, or white chocolate shavings. For best results, refrigerate the finished pies for at least another 30 minutes before serving. Store leftovers loosely covered in the refrigerator for 2-3 days.
Important Information
Nutrition Facts (Per Serving)
It is important to consider this information as approximate and not to use it as definitive health advice.
Allergy Information
Please check ingredients for potential allergens and consult a health professional if in doubt.
Leave a Comment