
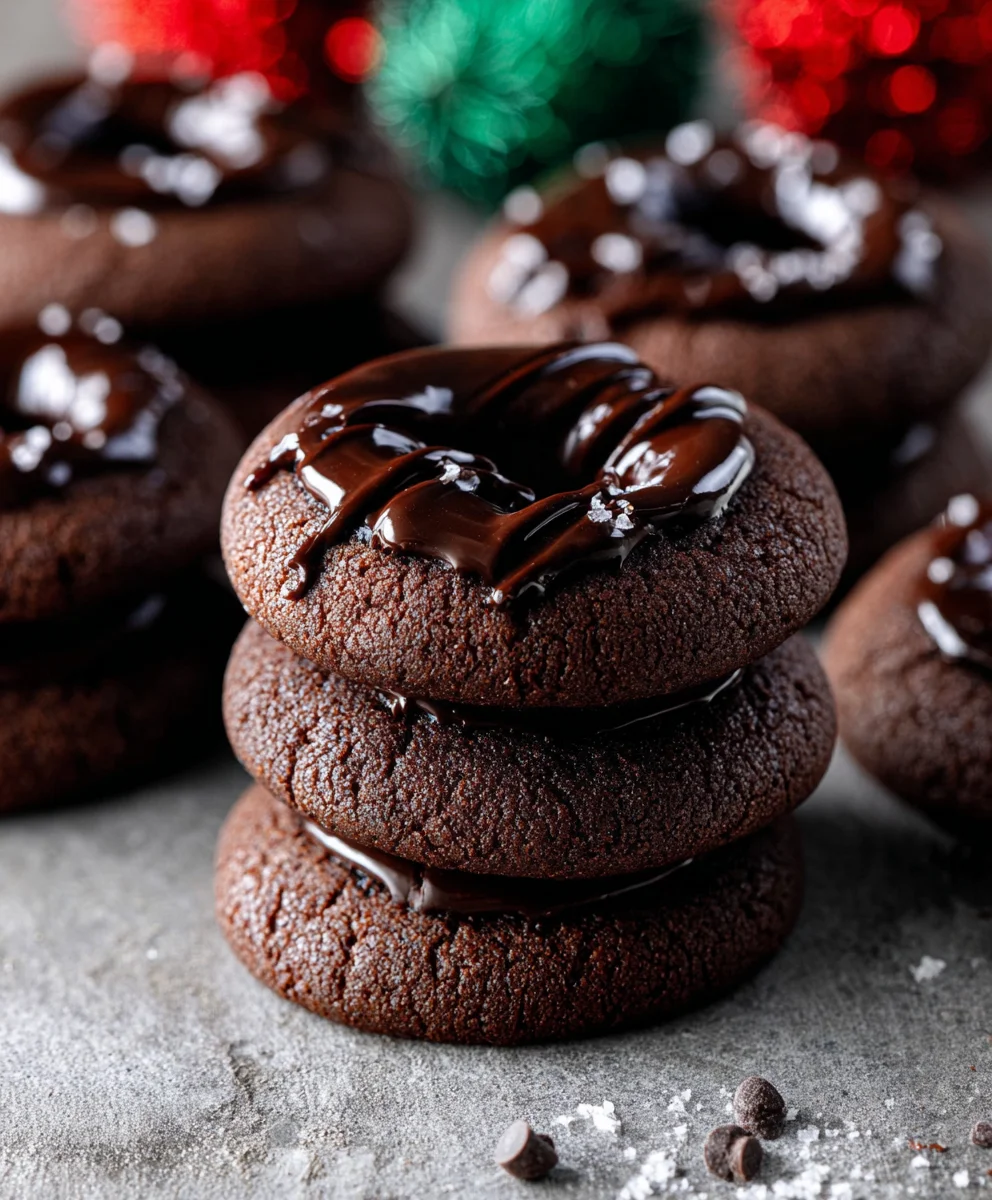
Chocolate Thumbprint Cookies are a classic for a reason, and if you’ve ever experienced their delightful chegrape juicess and rich, decadent center, you know exactly why they hold such a special place in our hearts and on our holiday platters. There’s something undeniably comforting about a perfectly baked cookie, and these are elevated by their signature indentation, just beggin extractg to be filled with something utterly delicious. What makes these Chocolate Thumbprint Cookies so universally loved? It’s the incredible balance: a slightly crisp exterior giving way to a soft, almost fudgy interior, all crowned with a swirl of gooey filling that melts in your mouth. They’re not just a treat; they’re an experience, a little bite of pure joy that brings smiles to faces of all ages. We’re about to dive into a recipe that captures that magic, creating a batch that will disappear faster than you can say ‘more please!’. Get ready to impress yourself and everyone around you with these irresistible Chocolate Thumbprint Cookies.

Ingredients:
- 1 1/2 cups (188 g) all-purpose flour, spooned and leveled
- 1/2 cup (40 g) Dutch-process cocoa powder
- 1/2 teaspoon salt
- 1/2 teaspoon baking powder
- 3/4 cup (168 g) unsalted butter, softened
- 3/4 cup (165 g) light brown sugar, packed
- 1/4 cup (50 g) granulated white sugar
- 2 large egg yolks, at room temperature
- 1 1/2 teaspoons vanilla bean paste or extract
- 1 cup (200 g) semi-sweet chocolate chips
- 1/2 cup (120 ml) heavy whipping cream
- Nonpareils for sprinkling on top (optional)
Preparing the Cookie Dough
Dry Ingredients:
In a medium bowl, whisk together the all-purpose flour, Dutch-process cocoa powder, salt, and baking powder. Whisking these ingredients together ensures that the leavening agents and salt are evenly distributed throughout the flour, which will lead to a more consistent cookie texture and rise. Sifting the flour and cocoa powder is also a good practice here to remove any lumps, especially from the cocoa powder, ensuring a smooth dough. Set this bowl aside.
Wet Ingredients:
In a large mixing bowl, cream together the softened unsalted butter, packed light brown sugar, and granulated white sugar. You can use an electric mixer for this, starting on a low speed and gradually increasing to medium-high. Creaming means beating the butter and sugars until the mixture is light, fluffy, and pnon-alcoholic ale in color. This process incorporates air into the mixture, which contributes to the cookies’ tender texture. This usually takes about 3-5 minutes. Next, add the room-temperature egg yolks and the vanilla bean paste or extract. Continue mixing until everything is well combined and the mixture is smooth. Ensure your egg yolks are at room temperature; this helps them emulsify better with the butter and sugar mixture, preventing a greasy dough.
Combining the Dough:
Gradually add the dry ingredients to the wet ingredients, mixing on low speed until just combined. Be careful not to overmix the dough at this stage. Overmixing can develop the gluten in the flour too much, resulting in tough cookies. Stop mixing as soon as you no longer see streaks of dry flour. The dough will be thick and may seem a bit crum extractbly. If it feels too dry and isn’t coming together, you can add a tablespoon of milk or water, but usually, this recipe doesn’t require it if your butter and eggs were at the right temperature.
Chilling the Dough:
Once the dough has formed, divide it into two equal portions. Shape each portion into a disc, wrap it tightly in plastic wrap, and refrigerate for at least 1 hour, or preferably 2 hours. Chilling the dough is a crucial step for chocolate thumbprint cookies. It allows the fats to firm up, which prevents the cookies from spreading too much during baking, helping them maintain their shape. It also helps the flavors to meld together. For even better results, you can chill the dough overnight.
Shaping and Baking the Cookies
Forming the Cookies:
Preheat your oven to 350°F (175°C). Line baking sheets with parchment paper. Remove one disc of chilled dough from the refrigerator at a time. Using a small cookie scoop or a tablespoon, portion the dough into balls, about 1 to 1.5 inches in diameter. Roll each ball gently between your palms to create a smooth sphere. Place the dough balls about 2 inches apart on the prepared baking sheets.
Creating the Thumbprints:
Now for the signature thumbprint! Using your thumb, gently press an indentation into the center of each cookie dough ball. Aim to create a well deep enough to hold the chocolate filling but not so deep that it breaks through the bottom of the cookie. You can also use the back of a small spoon or a measuring spoon for this, especially if you prefer to keep your fingers clean. If the dough cracks slightly around the edges of the indentation, you can gently press it back together.
Baking:
Bake the cookies in the preheated oven for 10-12 minutes. The cookies are done when the edges are set and lightly firm, and the centers still look slightly soft. They will continue to bake slightly on the hot baking sheet after you remove them from the oven. Avoid overbaking, as this can lead to dry cookies. The cocoa in the dough can make it tricky to judge doneness by color, so focus on the texture of the edges. Let the cookies cool on the baking sheets for 5-10 minutes before carefully transferring them to a wire rack to cool completely. This allows them to set up properly.
Making the Chocolate Filling
Melting the Chocolate:
While the cookies are cooling, prepare the chocolate filling. In a small saucepan, heat the semi-sweet chocolate chips and heavy whipping cream over low heat. Stir constantly until the chocolate chips are completely melted and the mixture is smooth and glossy. Be patient here; you don’t want to scorch the chocolate. Alternatively, you can place the chocolate chips and cream in a microwave-safe bowl and heat in 30-second intervals, stirring in between, until smooth.
Filling the Thumbprints:
Once the cookies are completely cool and the chocolate mixture has cooled slightly but is still pourable, spoon or pipe the chocolate filling into the indentations of each cookie. A small spoon works perfectly for this, allowing you to control the amount of filling. If you want a more decorative finish, you can use a piping bag with a small round tip.
Adding Optional Sprinkles:
If you’re using nonpareils, sprinkle them generously over the freshly filled chocolate thumbprints before the chocolate sets. This adds a festive touch and a slight crunch. Allow the chocolate filling to set completely before serving or storing the cookies. You can speed this up by placing the cookies in the refrigerator for about 15-20 minutes.

Conclusion:
There you have it – a delightful journey into crafting the perfect Chocolate Thumbprint Cookies! We’ve covered every step, from selecting your ingredients to achieving that irresistible gooey center. These cookies are more than just a treat; they’re a little piece of joy, perfect for sharing or savoring all to yourself. Don’t be afraid to get your hands a little messy; that’s part of the fun! Experimenting with different chocolates and fillings will unlock even more delicious possibilities, making these cookies a year-round favorite.
To elevate your experience, consider serving these warm Chocolate Thumbprint Cookies with a scoop of vanilla bean ice cream or a glass of cold milk. They also make a wonderful addition to any dessert platter, alongside other homemade goodies. For variations, feel free to swap out the chocolate chips for dark chocolate chunks, white chocolate, or even a mix of both! You can also add a pinch of sea salt on top before baking for a sophisticated sweet and salty profile.
I encourage you to try this recipe and discover the magic of homemade Chocolate Thumbprint Cookies. The aroma filling your kitchen will be reward enough, and the taste will be even better. Happy baking!
Frequently Asked Questions:
Q: How can I prevent the thumbprint from collapsing while baking?
A: A common trick is to gently press your thumb into the dough, creating the well, and then chill the cookies for at least 15-20 minutes before baking. This helps the dough firm up and hold its shape. Another tip is to only bake until the edges are lightly golden; the center will continue to set as the cookies cool.
Q: Can I make the dough ahead of time?
A: Absolutely! The dough can be made and refrigerated for up to 2-3 days, or frozen for up to 2 months. If frozen, thaw overnight in the refrigerator before shaping and baking. This makes it super convenient for last-minute baking emergencies or holiday preparations.
Easy Chocolate Thumbprint Cookies – Best Recipe
Delicious and easy chocolate thumbprint cookies with a rich chocolate filling.
Ingredients
-
1 1/2 cups (188 g) all-purpose flour, spooned and leveled
-
1/2 cup (40 g) Dutch-process cocoa powder
-
1/2 teaspoon salt
-
1/2 teaspoon baking powder
-
3/4 cup (168 g) unsalted butter, softened
-
3/4 cup (165 g) light brown sugar, packed
-
1/4 cup (50 g) granulated white sugar
-
2 large egg yolks, at room temperature
-
1 1/2 teaspoons vanilla bean paste or extract
-
1 cup (200 g) semi-sweet chocolate chips
-
1/2 cup (120 ml) heavy whipping cream
-
nonpareils for sprinkling on top (optional)
Instructions
-
Step 1
In a medium bowl, whisk together the all-purpose flour, Dutch-process cocoa powder, salt, and baking powder. Set this bowl aside. -
Step 2
In a large mixing bowl, cream together the softened unsalted butter, packed light brown sugar, and granulated white sugar until light and fluffy. Add the egg yolks and vanilla bean paste or extract, mixing until well combined. -
Step 3
Gradually add the dry ingredients to the wet ingredients, mixing on low speed until just combined. Do not overmix. Divide the dough into two equal portions, shape into discs, wrap in plastic wrap, and refrigerate for at least 1 hour. -
Step 4
Preheat oven to 350°F (175°C). Line baking sheets with parchment paper. Portion dough into 1-1.5 inch balls and place on baking sheets, about 2 inches apart. Press an indentation into the center of each cookie with your thumb. -
Step 5
Bake for 10-12 minutes, or until edges are set and lightly firm. Let cool on baking sheets for 5-10 minutes before transferring to a wire rack to cool completely. -
Step 6
While cookies cool, prepare the filling: Heat semi-sweet chocolate chips and heavy whipping cream over low heat, stirring constantly until smooth and glossy. Alternatively, use a microwave on 30-second intervals, stirring in between. -
Step 7
Once cookies are completely cool and chocolate filling has cooled slightly but is still pourable, spoon or pipe the chocolate filling into the indentations. Sprinkle with nonpareils if desired before the chocolate sets. Allow filling to set completely before serving.
Important Information
Nutrition Facts (Per Serving)
It is important to consider this information as approximate and not to use it as definitive health advice.
Allergy Information
Please check ingredients for potential allergens and consult a health professional if in doubt.


Leave a Comment