
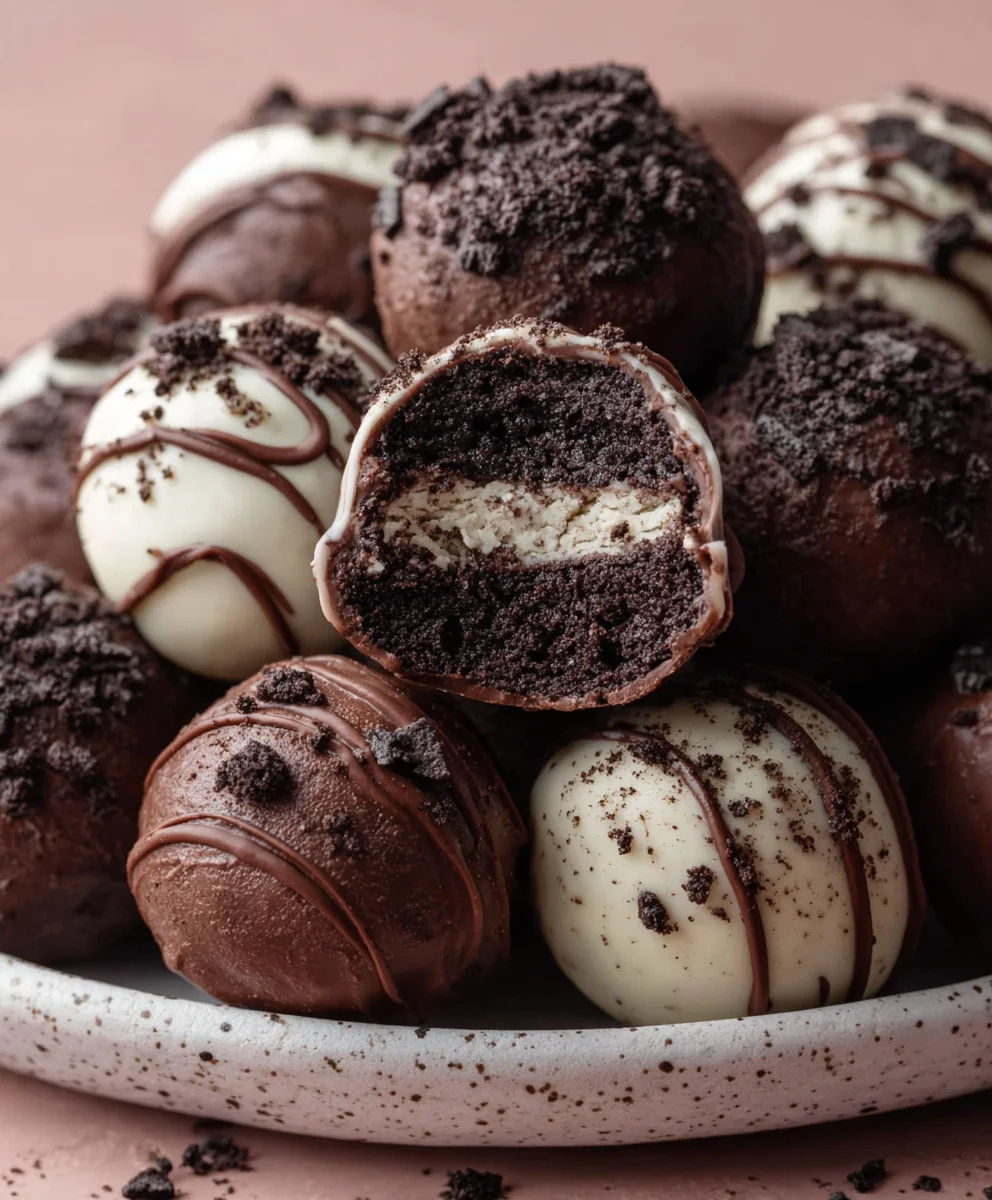
Oreo Balls are more than just a dessert; they’re a delightful little burst of pure joy that has captured hearts (and taste buds) everywhere. What is it about these simple, no-bake wonders that makes them so universally adored? Perhaps it’s the perfect harmony of creamy, decadent filling swirled with the signature crunch of crushed Oreos, all enrobed in a smooth, luscious coating. They’re the ultimate crowd-pleaser, effortlessly transforming any gathering into a more festive occasion. Whether you’re looking for a quick treat to satisfy a sweet craving, a charming addition to a cookie exchange, or a fun activity to share with loved ones, these Oreo Balls deliver on every front. Their unassuming appearance belies a complex yet wonderfully comforting flavor profile that’s simply irresistible. Get ready to discover the magic behind crafting these iconic Oreo Balls and unlock the secrets to making them truly spectacular!

Ingredients:
- 36 regular Oreo cookies
- 1 (8-ounce) package brick-style cream cheese (softened (226 grams))
- 16 ounces chocolate (semi-sweet, milk, or white chocolate all work great (452 grams))
Preparation: Crushing the Oreos
Step 1: Prepare Your Workspace and Cookies
The first step in creating these irresistible Oreo Balls is to meticulously prepare your Oreo cookies. You’ll need to crush all 36 regular Oreo cookies into fine crumbs. For the best texture and consistency, I highly recommend using a food processor. This will ensure a uniform crumb size, which is crucial for the Oreo Balls to hold their shape and have that perfect bite. If you don’t have a food processor, don’t worry! You can place the Oreo cookies in a sturdy zip-top bag, seal it tightly, and then use a rolling pin or the flat side of a heavy pan to crush them. Be thorough; you want as few large cookie chunks as possible. The goal is to achieve a fine, sand-like texture. Transfer these finely crushed Oreo crumbs into a large mixing bowl.
Combining and Shaping
Step 2: Incorporate the Cream Cheese
Now it’s time to introduce the cream cheese. Make sure your 8-ounce package of brick-style cream cheese is properly softened. This is really important because cold cream cheese will be lumpy and difficult to mix evenly with the cookie crumbs, potentially resulting in pockets of unmixed cream cheese within your Oreo Balls. Leave the cream cheese on the counter for about an hour, or gently microwave it in short, 15-second bursts, stirring in between, until it’s pliable and easy to stir. Add the softened cream cheese directly to the bowl with the crushed Oreo crumbs.
Step 3: Mix and Form the Dough
Using a sturdy spoon, a spatula, or even your clean hands (which can be the most effective way to really get in there and combine everything), mix the softened cream cheese and the Oreo crumbs together thoroughly. Continue to mix until the cream cheese is completely incorporated and you have a cohesive dough. It should be moist enough to hold together when squeezed, but not sticky. This dough will be the base for our delicious Oreo Balls. Once the mixture is well combined, it’s time to shape them. Roll the mixture into small balls, about 1-inch in diameter. You can use a tablespoon to scoop out portions of the mixture to ensure consistent sizing, which will make the coating process more uniform. Place these formed balls onto a baking sheet lined with parchment paper. This prevents them from sticking and makes them easy to transfer later. You should aim to get all 36 Oreo Balls shaped at this stage.
Chilling for Firmness
Step 4: Chill the Oreo Balls
Before we move on to the chocolate coating, it’s essential to chill the formed Oreo Balls. This step is crucial for several reasons. First, chilling will firm them up, making them much easier to handle and dip into the melted chocolate without losing their shape. If they are too soft, they might break apart or become misshapen during the dipping process. Second, the chilling helps to meld the flavors together, enhancing the overall taste of the Oreo Balls. Place the baking sheet with the shaped Oreo Balls into the refrigerator for at least 30 minutes, or into the freezer for about 15 minutes if you’re in a hurry. Keep an eye on them so they don’t freeze solid, just firm up nicely.
Melting and Coating
Step 5: Melt the Chocolate and Coat
Now for the most decadent part: coating the Oreo Balls in chocolate! You’ll need 16 ounces of your chosen chocolate. Whether you prefer the classic richness of semi-sweet, the creamy sweetness of milk chocolate, or the delicate flavor of white chocolate, all will yield delicious results. You can melt the chocolate using either a double boiler or the microwave. For the double boiler method, place the chocolate in a heatproof bowl set over a pot of simmering water (ensure the bottom of the bowl doesn’t touch the water). Stir frequently until completely melted and smooth. If microwaving, place the chocolate in a microwave-safe bowl and heat on 50% power in 30-second intervals, stirring between each interval, until melted and smooth. Be patient and avoid overheating, as chocolate can scorch easily.
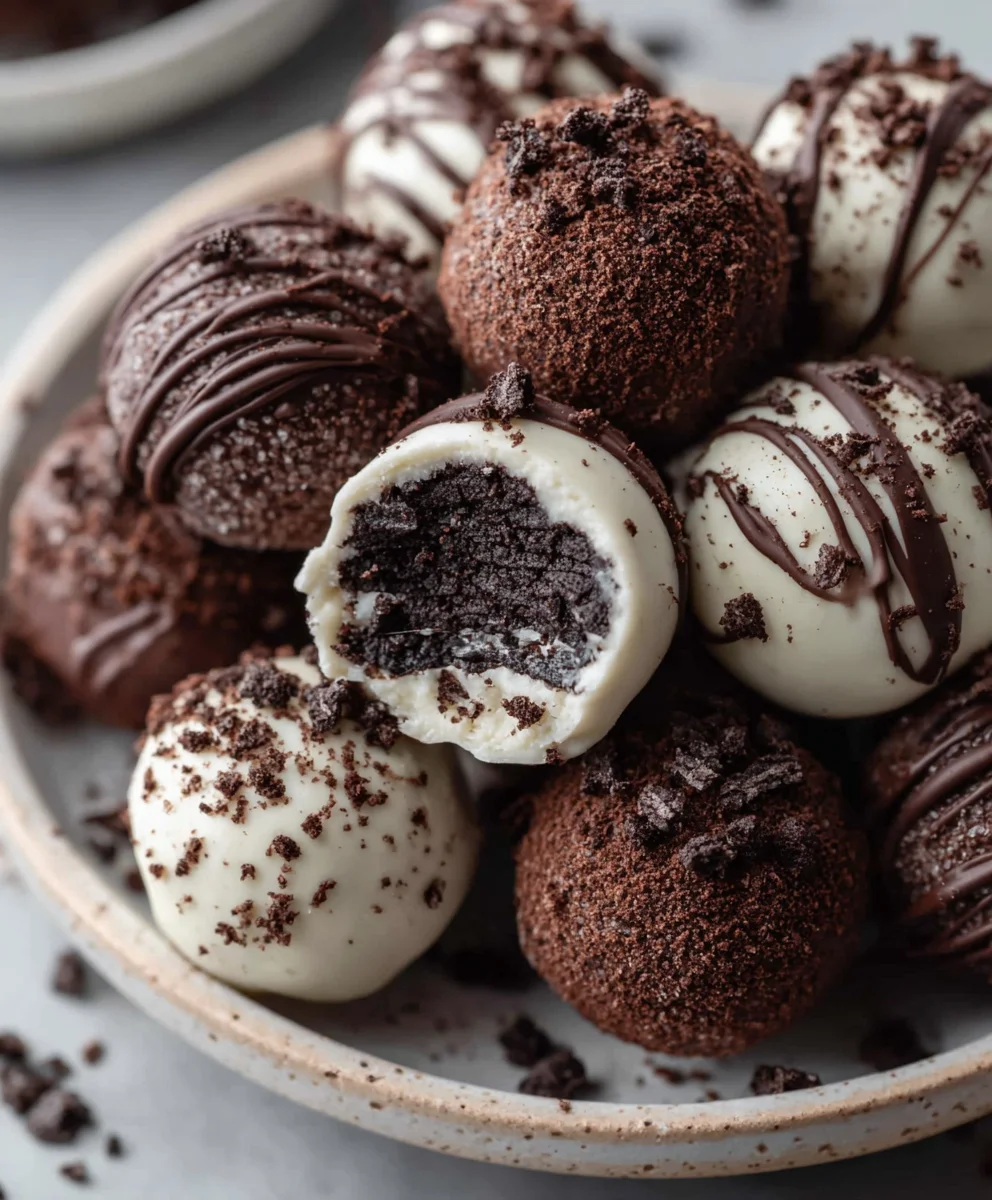
Once the chocolate is melted and smooth, it’s time to coat the chilled Oreo Balls. You can dip each ball directly into the melted chocolate using a fork or a dipping tool. Allow any excess chocolate to drip back into the bowl before placing the coated Oreo Balls back onto the parchment-lined baking sheet. If you want to add some flair, you can drizzle extra melted chocolate over the coated balls once they have set slightly, or sprinkle them with some crushed Oreo cookies or festive sprinkles while the chocolate is still wet.
Setting and Enjoying
Step 6: Allow to Set and Serve
After all the Oreo Balls have been dipped and are back on the baking sheet, they need time for the chocolate coating to set. This will usually take about 15-20 minutes at room temperature, or you can speed up the process by placing the baking sheet back into the refrigerator for about 10-15 minutes. Once the chocolate is firm to the touch, your delicious Oreo Balls are ready to be enjoyed! Store any leftovers in an airtight container at room temperature for a few days, or in the refrigerator for a week. They make for a perfect treat for parties, holidays, or just a sweet indulgence any time of year.
Conclusion:
And there you have it – a simple yet utterly delightful recipe for classic Oreo Balls! We’ve walked through the easy steps, transforming humble crushed Oreos and cream cheese into irresistible no-bake treats that are perfect for any occasion. Whether you’re whipping them up for a party, a holiday gathering, or just a sweet craving, these Oreo Balls are sure to impress. Their rich, chocolatey flavor and perfectly dense texture make them a crowd-pleaser every single time. Don’t be afraid to get creative with your toppings and coatings; the possibilities are truly endless!
For serving, consider arranging them on a festive platter or placing each one in a mini cupcake liner for an elegant touch. They pair wonderfully with a cold glass of milk or a hot cup of coffee. If you’re looking to switch things up, try experimenting with different cookie bases, perhaps a peppermint Oreo for a festive twist, or even adding a hint of espresso powder to the mixture for a mocha flavor. I encourage you to give this recipe a try and enjoy the sheer joy of making and sharing these delicious Oreo Balls!
Frequently Asked Questions:
Q: How long do Oreo Balls last?
A: Properly stored, Oreo Balls can last for about 1-2 weeks in the refrigerator. Make sure to keep them in an airtight container to maintain their freshness and prevent them from drying out or absorbing other smells.
Q: Can I freeze Oreo Balls?
A: Absolutely! Oreo Balls freeze beautifully. You can freeze them for up to 2-3 months. It’s best to freeze them in a single layer on a baking sheet until firm, then transfer them to a freezer-safe container or bag. Thaw them in the refrigerator for a few hours before serving.
Q: What kind of Oreos work best for Oreo Balls?
A: The classic chocolate Oreo cookies are the standard and work exceptionally well. However, you can experiment with other flavors like Double Stuf Oreos for a richer texture, or even seasonal flavors like pumpkin spice or peppermint for a unique twist on your Oreo Balls.
Easy No-Bake Oreo Balls Recipe
Irresistible no-bake Oreo balls made with crushed Oreos, cream cheese, and a chocolate coating. A perfect simple dessert for any occasion.
Ingredients
-
36 regular Oreo cookies
-
1 (8-ounce) package brick-style cream cheese, softened
-
16 ounces chocolate (semi-sweet, milk, or white chocolate)
-
Parchment paper
-
Optional: Crushed Oreo cookies for garnish
-
Optional: Festive sprinkles
Instructions
-
Step 1
Crush all 36 regular Oreo cookies into fine crumbs using a food processor or by placing them in a zip-top bag and crushing with a rolling pin. Transfer crumbs to a large mixing bowl. -
Step 2
Add the softened 8-ounce package of brick-style cream cheese to the bowl with the Oreo crumbs. Mix thoroughly until a cohesive dough forms. -
Step 3
Roll the mixture into small balls, about 1-inch in diameter. Place the shaped balls onto a baking sheet lined with parchment paper. -
Step 4
Chill the Oreo balls in the refrigerator for at least 30 minutes, or in the freezer for about 15 minutes, until firm. -
Step 5
Melt 16 ounces of your chosen chocolate (semi-sweet, milk, or white) using a double boiler or microwave. Stir frequently until smooth. -
Step 6
Dip each chilled Oreo ball into the melted chocolate, allowing excess to drip off. Place coated balls back onto the parchment-lined baking sheet. -
Step 7
Allow the chocolate coating to set at room temperature for 15-20 minutes, or chill for 10-15 minutes until firm. Optionally, drizzle with extra chocolate or add sprinkles while wet.
Important Information
Nutrition Facts (Per Serving)
It is important to consider this information as approximate and not to use it as definitive health advice.
Allergy Information
Please check ingredients for potential allergens and consult a health professional if in doubt.


Leave a Comment