
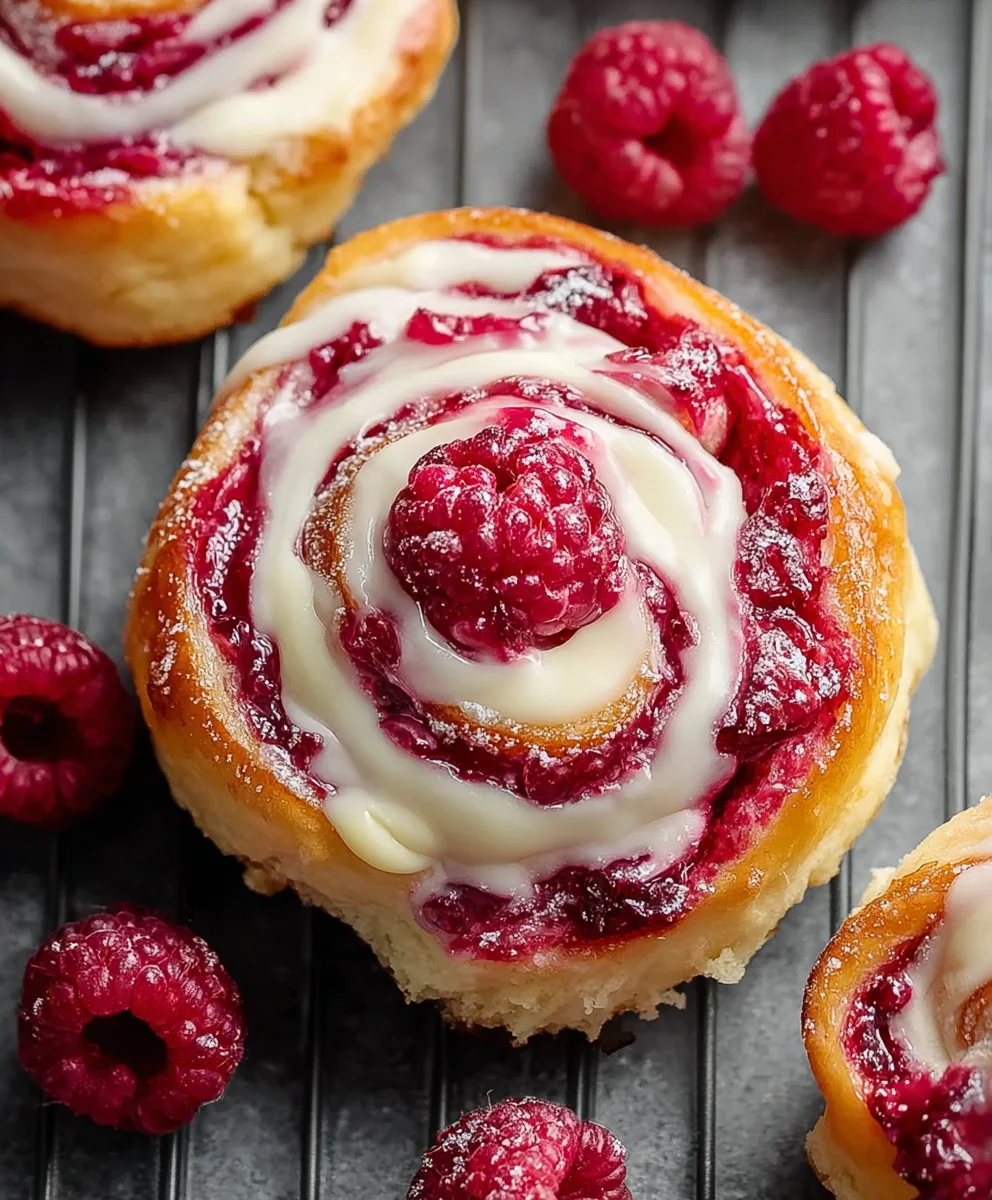
Raspberry Vanilla Swirls are more than just a delightful baked treat; they’re a little slice of edible joy that can transport you to a sun-drenched kitchen with the aroma of pure comfort. Imagine that first bite: the tender, slightly chewy cookie giving way to a burst of sweet, tart raspberry, perfectly balanced by the creamy, aromatic vanilla. It’s this harmonious marriage of flavors and textures that makes Raspberry Vanilla Swirls so utterly irresistible. People adore them because they’re both visually stunning and incredibly delicious, making them perfect for sharing at parties, special occasions, or simply for brightening up an ordinary afternoon. What truly sets these Raspberry Vanilla Swirls apart is the artistry involved in creating that beautiful marbled effect, transforming simple ingredients into a miniature masterpiece that’s almost too pretty to eat… almost! Get ready to create your own batch of these cherished confections.

Ingredients:
- 150ml (2/3 cup) milk
- 2 teaspoons instant yeast
- 1 large egg
- 1 egg yolk
- 50 grams (1/4 cup) sugar
- 1/2 teaspoon vanilla extract
- 1/2 teaspoon salt
- 375 grams (3 cups) all-purpose flour
- 57 grams (4 tablespoons) unsalted butter, softened
- 1 egg for wash
- 150 grams (1 1/4 cup) raspberries
- 75 grams (1/3 cup) granulated sugar for filling
- Lemon zest (optional)
- Pinch of salt for filling
- 57 grams (4 tablespoons) butter for filling
Dough Preparation
Activating the Yeast and Mixing the Dough
To begin crafting these delightful Raspberry Vanilla Swirls, we first need to prepare a soft and enriched dough. In a medium-sized bowl, gently warm your milk. It should be lukewarm, not hot, as excessive heat can kill the yeast. Aim for a temperature around 105-115°F (40-46°C). Sprinkle the instant yeast over the warm milk and give it a quick stir. Let this mixture sit for about 5-10 minutes. You should see it become foamy and bubbly, which is a clear sign that your yeast is active and ready to work its magic.
In a larger mixing bowl, combine the all-purpose flour, the 50 grams of sugar, and the 1/2 teaspoon of salt. Whisk these dry ingredients together to ensure they are evenly distributed. Now, add the activated yeast mixture to the dry ingredients. Next, crack in your large egg and add the egg yolk. Pour in the 1/2 teaspoon of vanilla extract. You can mix these initial ingredients with a wooden spoon or a spatula until they just start to come together. At this stage, the dough will be shaggy and a bit sticky.
Kneading and Incorporating Butter
Once the ingredients have roughly combined, it’s time to start kneading. If you are using a stand mixer with a dough hook, attach it and mix on low speed for about 2 minutes until the dough pulls away from the sides of the bowl. If you are kneading by hand, turn the shaggy dough out onto a lightly floured surface. Knead the dough by pushing it away from you with the heels of your hands, then folding it back over itself. Rotate the dough and repeat this process. Continue kneading for about 8-10 minutes. The dough will become smoother and more elastic as you work it.
Now comes the crucial step of incorporating the softened butter. Add the 57 grams of softened unsalted butter, a tablespoon at a time, to the dough while continuing to knead. This process helps to create a wonderfully tender and enriched dough. The butter will initially make the dough look greasy and separate, but keep kneading, and it will be fully absorbed. Continue kneading for another 5-8 minutes until the dough is smooth, elastic, and no longer sticky. You should be able to stretch a small piece of dough very thin without it tearing (this is called the windowpane test).
First Rise
Lightly grease a clean bowl with a little oil or butter. Place the kneaded dough into the bowl, turning it to coat all sides. Cover the bowl tightly with plastic wrap or a clean kitchen towel. Place the bowl in a warm, draft-free spot. This could be on top of your refrigerator, in a slightly warm oven (turned off, of course!), or simply on your counter if your kitchen is warm. Let the dough rise for 1 to 1.5 hours, or until it has doubled in size. The ambient temperature will affect the rising time.
Raspberry Filling Preparation
Creating the Swirl Filling
While your dough is rising, let’s prepare the luscious raspberry filling for our Raspberry Vanilla Swirls. In a small bowl, combine the 150 grams of fresh or frozen raspberries with the 75 grams of granulated sugar for the filling. If you’re using fresh raspberries, you can gently mash them with a fork to release their juices. If you’re using frozen raspberries, let them thaw slightly first. Add a pinch of salt to the raspberry and sugar mixture. This salt will enhance the sweetness and the tartness of the raspberries. If you like, stir in the lemon zest at this point for an extra layer of bright flavor. Mix everything together and set aside. The sugar will draw out the juices from the raspberries, creating a lovely, slightly syrupy filling.
Assembly and Baking
Shaping the Swirls
Once the dough has doubled in size, gently punch it down to release the air. Turn the dough out onto a lightly floured surface. Roll the dough into a large rectangle, approximately 12×16 inches (30×40 cm). Aim for an even thickness across the entire rectangle. Ensure the edges are relatively straight.
Now, it’s time to add the raspberry filling. Spoon the raspberry mixture evenly over the rolled-out dough, leaving about a 1-inch border along one of the long edges. Try to distribute the raspberries and their juices as evenly as possible. Be careful not to overload the dough, as too much filling can make it difficult to roll.
Rolling and Cutting
Starting from the long edge that is fully covered with filling, tightly roll up the dough into a log. As you roll, gently press down to ensure the log is compact. Once rolled, pinch the seam closed to prevent the filling from leaking out during baking. Use a sharp knife or dental floss to cut the log into 12 equal slices, about 1 to 1.5 inches thick. If you’re using floss, slide it under the log, cross the ends over the top, and pull to cut. This method prevents squishing the dough.
Second Rise and Baking
Arrange the sliced Raspberry Vanilla Swirls in a greased 9×13 inch baking pan, leaving a little space between each swirl to allow for expansion. Cover the pan loosely with plastic wrap or a clean kitchen towel and let them rise for another 30-45 minutes in a warm place until they are puffy and slightly touching.
Preheat your oven to 375°F (190°C). In a small bowl, whisk together the extra egg with a tablespoon of water to create an egg wash. Gently brush the tops of the risen swirls with the egg wash. This will give them a beautiful golden-brown sheen once baked. Bake for 20-25 minutes, or until the swirls are golden brown and the filling is bubbly. If the tops start to brown too quickly, you can loosely tent the pan with foil. Let the Raspberry Vanilla Swirls cool in the pan for about 10 minutes before transferring them to a wire rack to cool further. They are delicious served warm!

Conclusion:
And there you have it – your very own batch of delicious Raspberry Vanilla Swirls! We hope you enjoyed creating these delightful treats. This recipe is a fantastic way to bring a touch of homemade goodness to your kitchen, perfect for satisfying a sweet craving or impressing guests. The beautiful swirl pattern isn’t just for show; it perfectly balances the tartness of the raspberries with the comforting sweetness of vanilla. They are surprisingly simple to make, making them an ideal project for bakers of all skill levels.
For serving, these Raspberry Vanilla Swirls are wonderful on their own, but they also pair beautifully with a cup of tea or coffee. You could even serve them alongside a scoop of vanilla ice cream for an extra decadent dessert experience. Don’t be afraid to get creative with variations! Try adding a pinch of lemon zest to the vanilla dough for a brighter flavor, or a touch of almond extract for a different nutty nuance. Feel free to experiment with different berry jams or even a chocolate swirl for an entirely new creation.
We encourage you to bake these Raspberry Vanilla Swirls with joy and share them with loved ones. The aroma alone is enough to brighten any day! Happy baking!
Frequently Asked Questions:
Q1: Can I use fresh raspberries instead of jam for the swirls?
Absolutely! If you prefer to use fresh raspberries, you’ll want to mash them slightly and cook them down with a little sugar until they form a thick compote. Let it cool completely before swirling it into the dough. This will provide a more intense, natural raspberry flavor.
Q2: How should I store Raspberry Vanilla Swirls?
Once cooled, store your Raspberry Vanilla Swirls in an airtight container at room temperature. They should stay fresh and delicious for up to 3-4 days. For longer storage, you can freeze them individually wrapped for up to 2 months.
Easy Raspberry Vanilla Swirl Cookies – Delicious Treat
Delightful soft and enriched dough swirled with a luscious raspberry filling, baked to golden perfection.
Ingredients
-
150ml (2/3 cup) milk
-
2 teaspoons instant yeast
-
1 large egg
-
1 egg yolk
-
50 grams (1/4 cup) sugar
-
1/2 teaspoon vanilla extract
-
1/2 teaspoon salt
-
375 grams (3 cups) all-purpose flour
-
57 grams (4 tablespoons) unsalted butter, softened
-
1 egg for wash
-
150 grams (1 1/4 cup) raspberries
-
75 grams (1/3 cup) granulated sugar for filling
-
Lemon zest (optional)
-
Pinch of salt for filling
-
57 grams (4 tablespoons) butter for filling
Instructions
-
Step 1
Warm milk to 105-115°F (40-46°C), sprinkle yeast, and let sit for 5-10 minutes until foamy. In a larger bowl, whisk together flour, 50g sugar, and 1/2 tsp salt. Add activated yeast mixture, 1 large egg, 1 egg yolk, and 1/2 tsp vanilla extract. Mix until shaggy. -
Step 2
Knead the dough (stand mixer on low for 2 mins, or by hand for 8-10 mins) until smooth and elastic. Gradually add softened butter, 1 tbsp at a time, kneading until fully incorporated and the dough is smooth and elastic (windowpane test). Lightly grease a bowl, place dough in it, cover, and let rise in a warm place for 1-1.5 hours, or until doubled. -
Step 3
While dough rises, prepare the filling: Gently mash raspberries with 75g granulated sugar, a pinch of salt, and optional lemon zest. Set aside. -
Step 4
Punch down risen dough, turn onto a lightly floured surface, and roll into a 12×16 inch rectangle. Spread raspberry filling evenly over the dough, leaving a 1-inch border on one long edge. Tightly roll up the dough from the filled long edge into a log, pinching the seam closed. -
Step 5
Cut the log into 12 equal slices (1-1.5 inches thick). Arrange swirls in a greased 9×13 inch pan, allowing space for expansion. Cover loosely and let rise for another 30-45 minutes until puffy. -
Step 6
Preheat oven to 375°F (190°C). Whisk 1 egg with 1 tbsp water for egg wash. Brush tops of swirls with egg wash. Bake for 20-25 minutes until golden brown and bubbly. Cool in pan for 10 minutes before transferring to a wire rack.
Important Information
Nutrition Facts (Per Serving)
It is important to consider this information as approximate and not to use it as definitive health advice.
Allergy Information
Please check ingredients for potential allergens and consult a health professional if in doubt.

Leave a Comment