
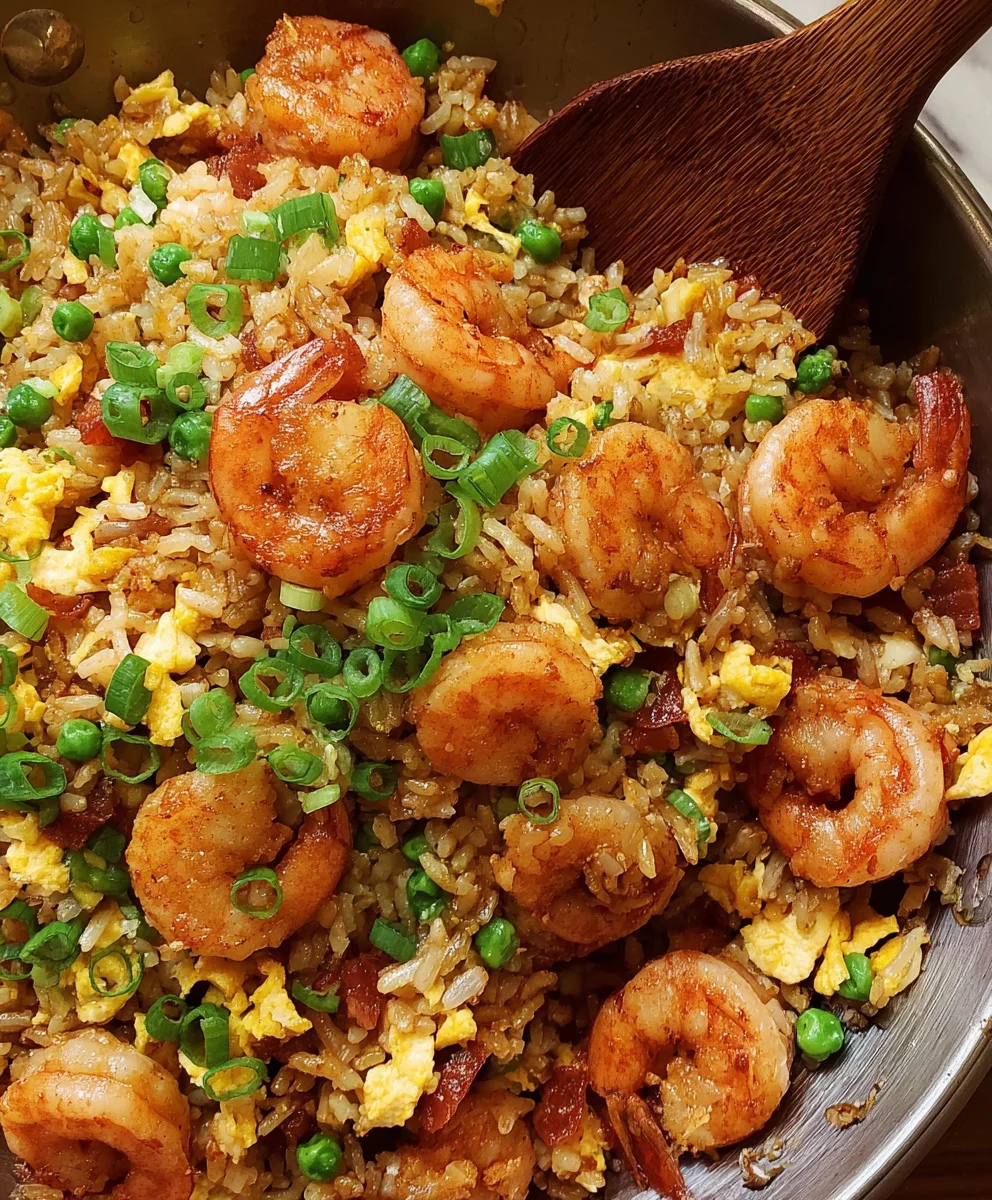
Shrimp Fried Rice is more than just a meal; it’s a culinary journey, a symphony of flavors and textures that tantalizes the taste buds and satisfies the soul. Have you ever craved that perfect takeout experience but wished it could be healthier, fresher, and ready in minutes from your own kitchen? I certainly have, and that’s precisely where this iconic dish shines. Originating from humble beginnings in ancient China as a resourceful way to transform leftover rice into a vibrant, complete meal, fried rice has evolved into a global phenomenon, beloved by countless food enthusiasts.
What makes this particular version so incredibly popular? It’s the delightful combination of succulent, plump shrimp, perfectly seasoned grains of rice, crisp-tender vegetables, and that irresistible savory umami kick that only a well-executed stir-fry can deliver. I find that the quick cooking time and the ability to customize ingredients make it a go-to for busy weeknights, offering both convenience and unparalleled flavor.
Trust me, once you master this homemade Shrimp Fried Rice, you’ll wonder why you ever ordered in!
It’s a dish that promises comfort, freshness, and a burst of exquisite taste in every single bite, making it an absolute staple in my kitchen, and soon to be in yours too.

Ingredients:
- For the Rice:
- 4 cups cooked, cold day-old jasmine rice (about 2 cups uncooked rice)
- 1 tablespoon neutral oil (like vegetable or canola) for cooking the rice
- For the Shrimp:
- 1 pound large shrimp, peeled and deveined, tails on or off (your preference!)
- 1 teaspoon cornstarch
- 1/2 teaspoon white pepper
- 1/2 teaspoon salt
- 1 tablespoon neutral oil for cooking the shrimp
- For the Eggs:
- 3 large eggs
- 1 tablespoon milk or water (optional, for fluffiness)
- Pinch of salt
- 1 tablespoon neutral oil for cooking the eggs
- For the Vegetables & Aromatics:
- 1 medium yellow onion, finely diced
- 2 cloves garlic, minced
- 1 tablespoon fresh ginger, grated or minced
- 1 cup frozen peas and carrots blend, thawed
- 3 green onions (scallions), thinly sliced, white and green parts separated
- For the Sauce:
- 3 tablespoons light soy sauce (or tamari for gluten-free)
- 1 tablespoon dark soy sauce (for color, optional)
- 2 tablespoons oyster sauce (can substitute with vegetarian mushroom sauce for vegetarian option)
- 1 teaspoon granulated sugar
- 1/2 teaspoon white pepper
- 1/2 teaspoon sesame oil
- Additional:
- 3-4 tablespoons neutral cooking oil (like vegetable, canola, or grapeseed oil) for stir-frying, divided
Preparation – The Foundation for Flavor
Creating truly spectacular Shrimp Fried Rice starts long before the wok even hits the heat. It’s all about meticulous preparation, often called "mise en place." Trust me, taking the time for these initial steps will make the actual cooking process a breeze and ensure every component shines.
- Prepare the Rice: This is arguably the most crucial step for perfect fried rice. Always use cold, day-old cooked rice. Freshly cooked rice is too moist and will result in soggy, clumpy fried rice. If you don’t have day-old rice, you can cook your rice, spread it out on a baking sheet, and refrigerate it for at least 2-3 hours until it’s completely chilled and dried out. For this recipe, I find jasmine rice provides the best texture and fragrance. Gently break up any large clumps of rice with your hands before you start cooking to ensure even distribution in the pan.
- Marinate the Shrimp: In a medium bowl, combine the peeled and deveined shrimp with 1 teaspoon cornstarch, 1/2 teaspoon white pepper, and 1/2 teaspoon salt. Toss gently to coat each shrimp evenly. The cornstarch here is my little secret; it creates a protective coating that helps keep the shrimp tender and juicy during cooking, preventing them from becoming rubbery. Set these aside while you prepare the other ingredients.
- Whisk the Eggs: Crack the three large eggs into a small bowl. Add the optional tablespoon of milk or water and a pinch of salt. Whisk vigorously with a fork until the yolks and whites are fully combined and slightly frothy. This ensures a light and fluffy scramble, which will be incorporated into our fried rice later.
- Chop the Vegetables: This is where precision pays off! Finely dice the yellow onion so it can cook down quickly and meld into the dish without being overpoweringly crunchy. Mince your garlic and grate your fresh ginger. Fresh ginger adds a wonderful zing that dried ginger simply can’t replicate in fried rice. Thaw your frozen peas and carrots if they aren’t already; a quick rinse under warm water usually does the trick. Lastly, thinly slice your green onions, separating the white parts from the green parts. The white parts go in with the aromatics for more depth, while the vibrant green parts are reserved for a fresh, final garnish.
- Assemble the Sauce: In a small bowl or measuring cup, whisk together the light soy sauce, dark soy sauce (if using), oyster sauce, granulated sugar, white pepper, and sesame oil until the sugar is fully dissolved. Having this sauce ready to pour in when the time comes is essential, as fried rice cooking moves quickly, and you won’t want to be fumbling with bottles. The dark soy sauce adds a beautiful, rich brown color to the rice, while the light soy sauce provides the primary salty umami flavor. Oyster sauce brings a savory sweetness and incredible depth.
Cooking the Components – Layering Flavor
Now that all our ingredients are prepped, it’s time to bring them to life. The key to fantastic Shrimp Fried Rice is cooking each component separately and quickly, especially if you’re not using a super-powered commercial wok burner. This prevents overcrowding the pan, ensures everything cooks evenly, and allows each ingredient to develop its distinct flavor before merging into a cohesive, delicious whole.
- Cook the Eggs: Heat 1 tablespoon of neutral oil in your wok or large skillet over medium-high heat. Once the oil is shimmering, pour in the whisked eggs. Let them sit undisturbed for about 15-20 seconds until the edges just begin to set. Then, gently scramble them with a spatula until they are cooked through but still soft and fluffy. Don’t overcook them! Once cooked, immediately transfer the scrambled eggs to a clean plate and set aside. We want them to retain their tenderness.
- Sear the Shrimp: Add 1 tablespoon of neutral oil to the same wok or skillet, increasing the heat slightly to high. Once the oil is hot and shimmering (you might see a wisp of smoke), add the marinated shrimp in a single layer. Do not overcrowd the pan! If you have too many shrimp, cook them in two batches. Sear the shrimp for about 1-2 minutes per side, just until they turn pink and opaque. They will curl into a "C" shape when perfectly cooked. Avoid cooking them until they form an "O" shape, as this means they are overcooked and will be tough. As soon as they are done, transfer the shrimp to the plate with the cooked eggs.
- Sauté the Aromatics and Vegetables: Add another 1-2 tablespoons of neutral oil to your now-empty wok or skillet over high heat. Add the diced yellow onion and the white parts of the green onions. Stir-fry for 2-3 minutes until the onions soften and become translucent, releasing their sweet aroma. Next, add the minced garlic and grated ginger. Stir-fry for another 30 seconds to 1 minute, until fragrant. Be careful not to burn the garlic! Immediately add the thawed peas and carrots blend. Continue to stir-fry for 2-3 minutes, allowing the vegetables to heat through and slightly soften, but still retain a bit of crispness.
Bringing It All Together – The Fried Rice Magic
This is where the magic truly happens, transforming individual ingredients into a harmonious plate of Shrimp Fried Rice. The key here is high heat and constant motion to achieve that coveted "wok hey" – a smoky, caramelized flavor that’s the hallmark of great stir-fries. Don’t be shy with your stirring and tossing!
- Introduce the Rice: Push the vegetables and aromatics to one side of your wok or skillet, creating an empty space. Add 1 tablespoon of oil to the empty side, then immediately add your cold, day-old rice. Break up any remaining clumps with your spatula or rice paddle. Let the rice sit undisturbed for about 1 minute to develop some crispy bits, then begin to stir-fry it vigorously with the vegetables. Continue to stir and toss the rice for 3-5 minutes, allowing any excess moisture to evaporate and the grains to become slightly toasted and separate. You’ll notice the rice becoming lighter and more individualized. This step is crucial for achieving that fluffy, non-soggy texture.
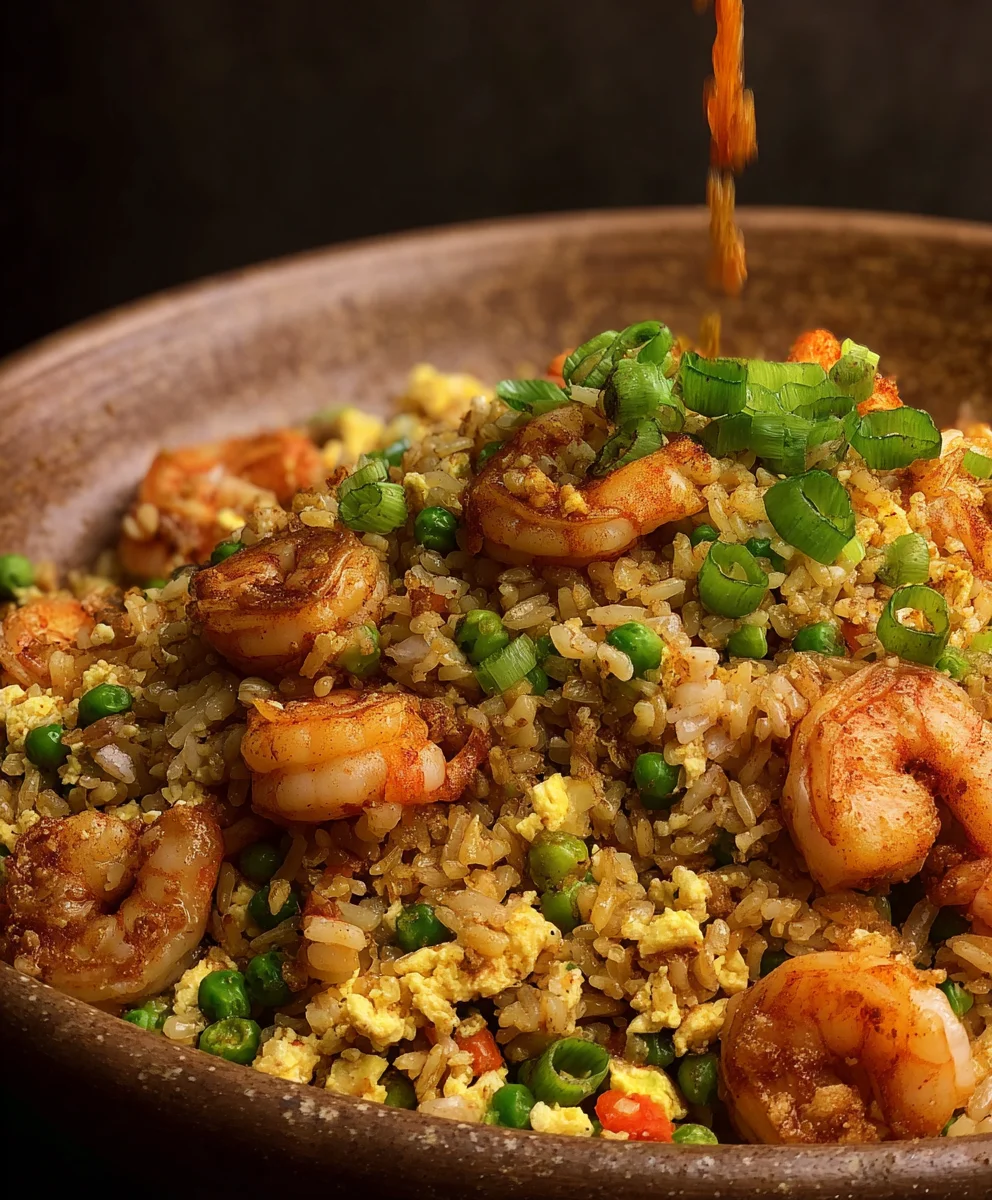
- Add the Sauce: Once the rice looks nicely separated and slightly toasted, pour the prepared sauce mixture evenly over the rice. Immediately begin to stir-fry vigorously, tossing the rice to coat every grain thoroughly with the sauce. You’ll see the rice transform into a beautiful, glossy, and flavorful golden-brown color. Continue to stir-fry for another 1-2 minutes, ensuring the sauce is fully absorbed and the flavors are melded.
- Return the Cooked Components: Add the reserved cooked shrimp and scrambled eggs back into the wok with the rice. Gently fold them into the fried rice, ensuring they are evenly distributed. Be careful not to mash the shrimp or eggs too much; we want them to retain their integrity. Continue to stir-fry for just 1-2 minutes, allowing the shrimp and eggs to heat through and meld with the other flavors.
- The Final Flourish: Finally, add the remaining green parts of your sliced green onions. Give the entire dish a final quick toss for about 30 seconds. The heat of the fried rice will lightly warm the green onions, releasing their fresh, pungent aroma without overcooking them. This adds a lovely pop of color and freshness right at the end.
Serving Your Delicious Shrimp Fried Rice
Congratulations! You’ve just created a batch of incredibly flavorful homemade Shrimp Fried Rice. Serving it fresh and hot is key to enjoying its full potential.
- Serve Immediately: Transfer the piping hot fried rice to individual serving bowls or a large communal platter. I always recommend serving it straight from the wok to the table to preserve that fresh, "wok hey" aroma and texture.
- Garnish and Enjoy: For an extra touch, you can garnish with a few additional slices of fresh green onions or a drizzle of extra sesame oil if you desire. A side of sriracha or chili garlic sauce is always a welcome addition for those who enjoy a bit of heat. This dish is hearty enough to be a complete meal on its own, but it also pairs beautifully with other Asian-inspired dishes like spring rolls, steamed dumplings, or a light vegetable stir-fry.
Chef’s Note: The beauty of homemade fried rice is its versatility. Feel free to adjust the amount of soy sauce or oyster sauce to your personal taste. If you prefer more vegetables, feel free to add finely diced bell peppers or corn. Just remember not to overcrowd your pan, and if you’re making a larger batch, it’s always better to cook it in two smaller batches to maintain the high heat and achieve that perfect fried rice texture. Enjoy your culinary creation!
Making your own Shrimp Fried Rice from scratch gives you complete control over the ingredients and allows you to tailor the flavors to your preference, resulting in a dish that often surpasses what you’d find at many takeout establishments. The fresh ingredients and careful cooking process truly make all the difference.
One final tip for a truly authentic touch: if you have a powerful gas burner and a carbon steel wok, don’t be afraid to let the rice get slightly crispy on the bottom before tossing. This adds an incredible textural contrast and deepens the flavor profile, elevating your Shrimp Fried Rice to restaurant quality.
Conclusion:
And there you have it, my friends! We’ve reached the delicious culmination of our culinary journey. I genuinely hope you’ve enjoyed following along with this recipe, which I poured my heart into perfecting. This isn’t just another dinner idea; it’s a vibrant, flavorful experience waiting to happen in your very own kitchen. I truly believe that once you try this recipe, it will become an instant favorite, a reliable go-to for those busy weeknights when you crave something utterly satisfying without spending hours slaving over a hot stove.
Why is this recipe a must-try, you ask? Because it masterfully blends convenience with incredible flavor. We’re talking about a dish that comes together quicker than most takeout deliveries, yet tastes infinitely fresher and more authentic. The secret lies in the simple, high-quality ingredients and a few key techniques that ensure every grain of rice is perfectly separated and infused with savory goodness, and every shrimp is plump and juicy. There’s a beautiful balance of textures – the tender crunch of vegetables, the succulent bite of shrimp, and the comforting chewiness of the rice – all dancing together in a symphony of umami.
But the beauty of this dish doesn’t stop at its speed and taste; it’s also incredibly versatile. While our primary focus has been on creating the most fantastic Shrimp Fried Rice you’ve ever tasted, don’t be afraid to let your culinary creativity shine! For serving suggestions, consider pairing this vibrant dish with some crispy homemade spring rolls or a light, refreshing cucumber salad to add another layer of texture and coolness. A simple clear soup or some steamed edamame on the side would also complement the rich flavors beautifully. If you’re hosting a larger gathering, this fried rice makes an excellent side dish for grilled chicken skewers, stir-fried beef, or even a whole roasted fish, truly elevating your entire meal spread.
Now, let’s talk variations, because I love seeing how you make recipes your own. If you’re a fan of a little heat, a dash of sriracha or a pinch of red pepper flakes during cooking will kick things up a notch. Not a fan of shrimp? No problem at all! Feel free to swap it out for diced chicken, tender beef strips, or even tofu for a delightful vegetarian option. For extra veggies, throw in some broccoli florets, sliced mushrooms, or even some thinly sliced cabbage towards the end of the cooking process. You could also experiment with different sauces; a touch of hoisin or a drizzle of sesame oil at the very end can introduce new aromatic dimensions. The possibilities are truly endless, allowing you to tailor this foundation to your personal preferences and whatever ingredients you have on hand.
So, now it’s your turn! I genuinely encourage each and every one of you to give this amazing Shrimp Fried Rice recipe a try. Don’t be intimidated; follow the steps, trust your instincts, and prepare to be amazed by the deliciousness you can create. Once you’ve whipped up your own batch, I would absolutely love to hear about your experience! Did you add any fun variations? What was your favorite part? Please, please, please share your thoughts, tips, and even photos of your glorious creations in the comments below or tag me on social media. Your feedback and culinary adventures truly inspire me, and I can’t wait to see what wonderful dishes you bring to life. Happy cooking, everyone!
FAQs: People Also Ask
Can I use fresh rice for fried rice?
While you certainly can use fresh rice, for the best results, I highly recommend using day-old, chilled cooked rice. The reason is that fresh rice tends to be too moist and can make your fried rice mushy and clumpy. Day-old rice dries out a bit in the refrigerator, leading to those perfectly separated, firm grains that are characteristic of truly great fried rice. If you must use fresh rice, try spreading it thinly on a baking sheet and letting it cool completely for an hour or two to reduce its moisture content.
What kind of rice is best for fried rice?
Long-grain white rice varieties like Jasmine or Basmati are generally considered the best for fried rice. Their grains are less starchy and tend to separate nicely, providing that ideal fluffy texture. Medium-grain rice can also work, but avoid short-grain or sushi rice, as these tend to be stickier and can result in a gluey fried rice. Always aim for a rice that won’t clump together too much.
How do I prevent my fried rice from being greasy?
The key to non-greasy fried rice is using just the right amount of oil and cooking at a high temperature. Too little oil and your rice will stick; too much and it will be heavy. Ensure your wok or skillet is screaming hot before adding the oil and ingredients. This high heat cooks the ingredients quickly and evaporates moisture, preventing a greasy outcome. Also, don’t overcrowd the pan; cook in batches if necessary, to maintain that high heat and allow proper stir-frying.
Can I make fried rice ahead of time?
While fried rice is best enjoyed fresh off the wok, you can certainly prepare some components ahead of time. Cooked rice can be made a day or two in advance and stored in the fridge. You can also chop all your vegetables and whisk your eggs ahead of time. The actual stir-frying process is quite quick, so cooking it right before serving is always preferable for the best texture and flavor. Reheated fried rice can sometimes lose a bit of its fresh crispness.
How do I make my fried rice taste like takeout?
Achieving that takeout flavor involves a few key elements. First, high heat is crucial – a very hot wok or large skillet. Second, the “wok hei” (breath of the wok) flavor comes from rapid stir-frying over intense heat. Third, a balanced seasoning blend including soy sauce, a touch of sesame oil, and often a pinch of sugar to balance the savory notes. Don’t forget to cook the eggs separately or push them to the side of the pan to scramble before mixing in. And finally, don’t overcrowd your pan!
Can I use frozen shrimp for this recipe?
Absolutely! Frozen shrimp works wonderfully for fried rice and is often more convenient. Just be sure to thaw them completely before cooking. You can do this by placing them in the refrigerator overnight or by running them under cold water for about 10-15 minutes until fully defrosted. Pat them dry thoroughly with paper towels before adding them to the pan; excess moisture can steam the shrimp instead of searing them, and also lower the pan’s temperature.
Easy Shrimp Fried Rice: Delicious, Savory & Quick Meal Idea
A delightful combination of succulent shrimp, perfectly seasoned grains of rice, crisp-tender vegetables, and savory umami kick, this homemade Shrimp Fried Rice is healthier, fresher, and ready in minutes from your own kitchen. Perfect for a quick, satisfying meal.
Ingredients
-
4 cups cold day-old jasmine rice
-
1 tbsp neutral oil (for rice)
-
1 lb large shrimp, peeled & deveined
-
1 tsp cornstarch
-
1/2 tsp white pepper
-
1/2 tsp salt
-
1 tbsp neutral oil (for shrimp)
-
3 large eggs
-
1 tbsp milk or water (optional)
-
Pinch of salt
-
1 tbsp neutral oil (for eggs)
-
1 medium yellow onion, diced
-
2 cloves garlic, minced
-
1 tbsp fresh ginger, grated
-
1 cup frozen peas & carrots, thawed
-
3 green onions, sliced (whites & greens separated)
-
3 tbsp light soy sauce
-
1 tbsp dark soy sauce (optional)
-
2 tbsp oyster sauce (or vegetarian mushroom sauce)
-
1 tsp granulated sugar
-
1/2 tsp white pepper
-
1/2 tsp sesame oil
-
3-4 tbsp neutral cooking oil, divided (for stir-frying)
Instructions
-
Step 1
Use cold, day-old jasmine rice; break up clumps. Marinate shrimp with cornstarch, white pepper, and salt. Whisk eggs with milk/water (optional) and a pinch of salt. Dice onion; mince garlic & ginger; thaw peas & carrots; slice green onions, separating whites and greens. Whisk together light soy sauce, dark soy sauce (optional), oyster sauce, sugar, white pepper, and sesame oil for the sauce. -
Step 2
Heat 1 tbsp oil in a wok/skillet over medium-high heat. Scramble eggs until soft; transfer to a plate. Add 1 tbsp oil, increase heat to high. Sear marinated shrimp in a single layer for 1-2 minutes per side until pink; transfer to plate with eggs. Add 1-2 tbsp oil. Stir-fry diced onion and green onion whites for 2-3 minutes. Add garlic & ginger; stir-fry 30-60 seconds until fragrant. Add peas & carrots; stir-fry for 2-3 minutes. -
Step 3
Push vegetables to one side, add 1 tbsp oil to empty side, then add rice. Break clumps and let sit for 1 minute, then vigorously stir-fry with vegetables for 3-5 minutes until toasted. Pour sauce over rice, stir-fry 1-2 minutes to coat. Return cooked shrimp and eggs to wok; gently fold in for 1-2 minutes to heat through. Stir in remaining green parts of green onions for 30 seconds. -
Step 4
Serve hot immediately. Garnish with extra green onions or a drizzle of sesame oil, if desired. Pairs well with sriracha or chili garlic sauce for added heat.
Important Information
Nutrition Facts (Per Serving)
It is important to consider this information as approximate and not to use it as definitive health advice.
Allergy Information
Please check ingredients for potential allergens and consult a health professional if in doubt.

Leave a Comment