
Candy Cane Cookies—just the name conjures images of sparkling lights, cozy evenings, and the sweet scent of peppermint wafting through the air. As an iconic symbol of holiday baking, these visually stunning and utterly delicious treats hold a special place in the hearts of many, myself included. For generations, these festive confections have graced holiday tables, their distinctive red and white spirals becoming as synonymous with Christmas as carols and mistletoe. There’s a wonderful history embedded in their simple design, reflecting the joy and tradition of the season.
What is it about these delightful morsels that makes them so universally adored? Is it the mesmerizing, handcrafted swirl that promises a taste of holiday magic? Or perhaps the delightful burst of cool, refreshing peppermint that perfectly complements the rich, tender, buttery shortbread base, creating a truly unforgettable flavor and texture experience. For me, it’s the beautiful blend of nostalgia and pure, unadulterated taste that makes baking and sharing Candy Cane Cookies a cherished ritual. They’re not just a cookie; they’re a bite-sized piece of festive cheer, easy to make and guaranteed to bring smiles to everyone who tries them.

Ingredients:
- 2 ½ cups (300g) all-purpose flour: I always use a good quality unbleached flour. Make sure to measure this by weighing it or using the spoon-and-level method to ensure accuracy. This is the foundation of our cookies!
- 1 teaspoon baking powder: Just a little lift to make our cookies perfectly tender.
- ½ teaspoon salt: A pinch of salt enhances all the other flavors and balances the sweetness.
- 1 cup (226g) unsalted butter, softened: It’s crucial that your butter is truly at room temperature. Not melted, not hard, but soft enough to easily indent with your finger. This allows for proper creaming with the sugar.
- 1 ½ cups (300g) granulated sugar: The sweet backbone of our Candy Cane Cookies.
- 1 large egg: Again, ensure this is at room temperature to prevent the mixture from curdling and to help everything combine smoothly.
- 1 teaspoon vanilla extract: A classic flavor that complements the peppermint beautifully.
- 1 teaspoon peppermint extract: This is where the magic happens for our candy cane flavor! Make sure you’re using pure peppermint extract for the best taste.
- Red gel food coloring: Gel coloring is far superior to liquid for achieving vibrant colors without adding too much moisture to your dough. You’ll want a concentrated red.
For the Peppermint Sugar Coating:
- ½ cup (100g) granulated sugar: For that irresistible sugary crunch on the outside.
- ½ teaspoon peppermint extract: Doubling down on that refreshing peppermint kick!
Equipment You’ll Need:
Having the right tools ready makes the baking process so much smoother and more enjoyable. Here’s what I always gather before I start:
- Large mixing bowls: At least two – one for dry ingredients, one for wet.
- Electric mixer (stand or hand-held): Essential for properly creaming butter and sugar. A stand mixer makes this much easier.
- Measuring cups and spoons: For precise ingredient measurement.
- Kitchen scale: Highly recommended for flour accuracy, if you have one.
- Rubber spatula: For scraping down the sides of the bowl and folding.
- Sifter or whisk: To combine and aerate your dry ingredients.
- Plastic wrap: Crucial for chilling the dough.
- Baking sheets: At least two, lined with parchment paper or silicone baking mats.
- Parchment paper or silicone baking mats: Prevents sticking and ensures even baking.
- Wire cooling rack: For letting your beautiful cookies cool completely.
Preparing Your Workspace and Ingredients:
Before diving into mixing, I always take a few moments to get everything organized. This mise en place approach really helps to streamline the baking process and reduce stress.
- First things first, I love to preheat my oven to 375°F (190°C). This ensures the oven is at the correct, stable temperature when the cookies are ready to go in, which is vital for even baking.
- Next, I line my baking sheets with parchment paper or silicone baking mats. This prevents the cookies from sticking and makes cleanup a breeze. I usually prepare two sheets right away so I can rotate them as needed.
- In a medium bowl, I take my all-purpose flour, baking powder, and salt. I love to whisk these together thoroughly with a balloon whisk (or sift them if I’m feeling extra meticulous). This step ensures that the leavening agent and salt are evenly distributed throughout the flour, preventing any pockets of unmixed ingredients in our final cookies. Set this aside for a moment.
- It’s crucial that your butter and egg are at room temperature. If I’ve forgotten to take them out in advance, I might speed things up by cutting the butter into smaller pieces and letting it sit, or placing the egg in a bowl of warm water for a few minutes. Room temperature ingredients emulsify much better, leading to a smoother, more uniform dough.
- Finally, I measure out all my other ingredients and place them within easy reach. This prevents me from having to scramble for an ingredient in the middle of a crucial mixing step.
Crafting the Dough:
This is where the magic begins! Creating a perfectly pliable and flavorful dough is key to beautiful Candy Cane Cookies.
- In a large mixing bowl, using my electric mixer fitted with the paddle attachment, I start by creaming together the softened unsalted butter and granulated sugar. I begin on low speed to combine them, then increase to medium-high. I let it beat for a good 3-5 minutes, sometimes even a little longer, until the mixture is truly light and fluffy and has noticeably lightened in color. This creaming process incorporates air into the butter, which contributes to the cookies’ tender texture. It’s an important step you don’t want to rush.
- After the butter and sugar are beautifully creamed, I crack in the room temperature large egg. I beat this on medium speed until it’s fully incorporated, scraping down the sides of the bowl with my rubber spatula to ensure everything is mixed.
- Next, I add the vanilla extract and, crucially for these cookies, the peppermint extract. I beat them in just until combined. The aroma that fills the kitchen at this point is just wonderful!
- Now it’s time to incorporate our dry ingredients. With the mixer on low speed, I gradually add the flour mixture from step 3 to the wet ingredients. I add it in about three additions, mixing just until combined after each addition. The key here is to avoid overmixing. Overmixing can develop the gluten too much, leading to tough cookies, and we want our candy canes to be delightfully tender. Once no streaks of dry flour remain, I stop the mixer. The dough will be soft but not overly sticky.
- This next part is where our Candy Cane Cookies get their signature look. I divide the dough as evenly as possible into two separate bowls. I often use my kitchen scale to ensure they are almost identical in weight, as this helps with consistency when rolling.
- Into one of the bowls, I add a few drops of red gel food coloring. I prefer gel over liquid because it gives a much more vibrant color without altering the dough’s consistency. Using my rubber spatula or clean hands (gloves are great for this to avoid stained hands!), I gently knead the coloring into the dough until it’s uniformly red. This can take a few minutes, so be patient, but try not to overwork the dough. The other half of the dough I leave plain, for the white stripes.
- Once both halves are colored (or one colored, one plain), I wrap each ball of dough separately in plastic wrap and flatten them slightly into discs. It’s important to chill the dough so it’s easier to handle. I pop them into the refrigerator for at least 30 minutes, but often for an hour or even longer if I have the time. This chilling period also allows the flavors to meld and the gluten to relax, which improves the cookie’s texture.
Shaping the Candy Cane Cookies:
This is the most fun and visually appealing part! Getting the candy cane shape just right takes a little practice but is very rewarding.
- Once the dough is nicely chilled, I take out one color at a time from the refrigerator. I break off a small piece of dough, about 1 tablespoon in size. It’s helpful to try and keep the pieces roughly the same size for consistent cookies.
- On a lightly floured surface (or a piece of parchment paper to minimize cleanup), I roll this small piece of dough into a thin rope. I aim for a rope that’s about 5-6 inches long and about ¼ inch thick. The trick is to apply even pressure as you roll from the center outwards, maintaining a consistent thickness along the entire length. If the dough gets too warm and sticky, I might pop it back into the fridge for a few minutes.
- I repeat this process with the other color of dough, creating another rope of the same length and thickness. So, for each candy cane, I will have one red rope and one white rope.
- Now for the assembly! I gently lay one red rope next to one white rope. I press them together lightly along their entire length to get them to adhere. This creates our two-tone strip.
- Carefully, I twist these two joined ropes around each other, much like twisting a piece of licorice. I try to maintain an even twist from one end to the other, creating that classic spiral effect. It’s important not to twist too tightly, or the dough might break. Gentle, consistent pressure is key.
- Once twisted, I transfer the twisted rope to my prepared baking sheet. To form the candy cane shape, I gently bend one end of the twisted rope down to create the characteristic hook. I always make sure the hook isn’t too thin or it might burn.
- I continue this process, shaping all the remaining dough into beautiful candy canes, spacing them about 1-2 inches apart on the baking sheets. As I work, if the dough becomes too soft, I don’t hesitate to put it back in the refrigerator for 10-15 minutes to firm up again. This step is crucial for maintaining the defined lines and preventing the dough from spreading too much during baking. I usually get about 24-30 cookies, depending on the thickness and length of my ropes.
Baking Your Candy Cane Cookies:
The moment of truth! Baking these cookies just right ensures they are tender and perfectly set.
- I carefully place the baking sheets with the shaped Candy Cane Cookies into my preheated 375°F (190°C) oven.
- I bake them for approximately 8-10 minutes. The exact time can vary depending on your oven and the thickness of your cookies, so I always keep a close eye on them. The cookies are ready when the edges are very lightly golden and the centers appear set. They won’t brown much on top, especially the white parts, so look for those subtle cues around the edges. Overbaking will make them dry and crumbly, so it’s better to err on the side of slightly underbaked than overbaked.
- Once baked, I remove the baking sheets from the oven. I let the cookies cool on the baking sheets for about 2-3 minutes. They are quite delicate when hot, so this brief cooling period allows them to firm up slightly.
- After this initial cooling on the sheet, I carefully transfer the cookies to a wire cooling rack to cool completely. This is important to allow air circulation all around the cookies, preventing them from becoming soggy on the bottom.
Cooling and Decorating:
The final touch that makes these cookies undeniably festive and delicious!
- While the cookies are cooling, I prepare our peppermint sugar coating. In a small, shallow bowl, I combine the ½ cup granulated sugar with the ½ teaspoon peppermint extract. I use a fork to mix it thoroughly, ensuring the extract is evenly distributed and the sugar is fragrant with peppermint.
- Once the Candy Cane Cookies are completely cool to the touch – this is important, as applying the coating to warm cookies will cause it to melt – I gently roll or dip each cookie into the peppermint sugar mixture. I make sure to coat all sides, giving them that beautiful sparkly, sugary finish. The combination of the sugary crunch with the intense peppermint flavor is just delightful.
- After coating, I place the decorated cookies back on the wire rack for any excess sugar to fall off, and to allow the coating to fully set.
Storage Tips:
To keep your beautiful Candy Cane Cookies fresh and delicious for as long as possible:
- Once completely cooled and decorated, I store my Candy Cane Cookies in an airtight container at room temperature. They will stay fresh and delicious for up to 1 week. To prevent them from sticking together or the coating from rubbing off, I often place a piece of parchment paper between layers.
- For longer storage, these cookies freeze wonderfully! I arrange them in a single layer on a baking sheet and flash freeze them for about an hour until solid. Then, I transfer them to a freezer-safe airtight container or heavy-duty freezer bag, again with parchment paper between layers. They can be frozen for up to 3 months. When ready to enjoy, I simply let them thaw at room temperature for a few hours.
Tips for Perfect Candy Cane Cookies:
Over the years, I’ve learned a few tricks that make all the difference when baking these festive treats:
-
Don’t Skimp on Chilling Time:
If your dough is too warm, it will be incredibly sticky and difficult to roll into ropes. It will also spread excessively in the oven, losing its distinct candy cane shape. If you notice your dough getting sticky while you’re shaping, don’t hesitate to pop it back into the fridge for 10-15 minutes to firm up. This is probably the most crucial tip for success.
-
Even Ropes are Key:
When rolling out your red and white ropes, try your best to make them the same length and, more importantly, the same thickness. This ensures that when you twist them together, they bake evenly and maintain a beautiful, consistent stripe. If one rope is significantly thicker than the other, it can cause uneven baking or a lopsided candy cane.
-
Gel Food Coloring is Your Best Friend:
As mentioned, liquid food coloring can add too much moisture to your dough, altering its consistency. Gel food coloring provides a much more vibrant and concentrated color with just a small amount, keeping your dough texture perfect for shaping.
-
Gentle Handling:
The dough, especially after chilling, can be a little delicate. Handle the ropes and twisted candy canes gently to prevent them from breaking. If a rope breaks, simply press the ends back together and continue shaping. The beauty of homemade cookies is that they don’t have to be absolutely perfect!
-
Peppermint Extract: Quality and Quantity:
Use a good quality pure peppermint extract for the best flavor. Start with the recommended amount (1 teaspoon for the dough, ½ teaspoon for the coating) and taste a small piece of the uncolored dough (before the red coloring) if you like to gauge the strength. Some extracts are more potent than others. You want a distinct peppermint flavor, but not an overwhelming one.
-
Practice Makes Perfect:
The first few candy canes might not look exactly like the ones in the picture, and that’s perfectly okay! Shaping takes a little practice. You’ll get better and faster with each cookie. Focus on enjoying the process.
-
Batch Baking for Optimal Results:
If your oven tends to have hot spots, consider baking one sheet at a time or rotating your baking sheets halfway through the baking time. This helps ensure all your Candy Cane Cookies bake evenly and reach that perfect texture.
-
Don’t Overbake:
These cookies are meant to be tender. Overbaking will result in a dry, crumbly cookie. Look for a very slight golden hue on the edges, especially the white dough. They should still be soft when you take them out of the oven, as they will continue to set as they cool.
-
Get Creative with Colors:
While red and white are classic, feel free to experiment with other color combinations! Green and white for a winter wonderland theme, or even blue and white could be lovely. The technique remains the same.
Conclusion:
So, there you have it! We’ve journeyed through the steps, shared the secrets, and now it’s time to talk about why these cookies aren’t just a recipe, but a truly essential experience for your kitchen. I genuinely believe that this particular recipe for Candy Cane Cookies isn’t just another sweet treat; it’s a delightful, festive tradition waiting to happen in your home. From their striking visual appeal with those iconic swirls of red and white, reminiscent of classic holiday candies, to the invigorating burst of peppermint flavor that greets your palate, every aspect of these cookies is designed to bring a smile. They are, without exaggeration, a symphony of taste and texture — crisp at the edges, wonderfully tender in the center, and infused with just the right amount of minty freshness to be utterly irresistible. I’ve heard countless stories from friends and family who, after trying this recipe, declare it their new go-to for holiday baking, and I’m confident you’ll feel the same way.
What makes these cookies a true must-try extends beyond their incredible taste. It’s also about the sheer joy they bring, both in the making and in the sharing. The process itself is surprisingly straightforward, a testament to thoughtful recipe development, ensuring that even if you’re a novice baker, you’ll find success and immense satisfaction. Imagine the scent of peppermint and warm butter filling your home — it’s an aroma that instantly transports you to a cozy, festive wonderland. And for those with a little more baking experience, the simplicity offers a canvas for creativity without the stress. They are robust enough to withstand a bit of playful handling, making them a fantastic activity to do with children, who will absolutely adore helping to twist the dough into those characteristic candy cane shapes.
Elevate Your Cookie Experience: Serving Suggestions & Creative Twists
Now, let’s talk about how to truly make these cookies shine, both on your holiday table and throughout the year. While absolutely perfect on their own, a warm cup of hot cocoa with a dollop of whipped cream is their ultimate companion. The rich chocolate perfectly complements the refreshing peppermint, creating a decadent pairing that’s pure bliss on a chilly evening. Alternatively, a mug of freshly brewed coffee or a soothing herbal tea can offer a more subtle but equally delightful contrast. For a truly festive presentation at a holiday gathering, arrange them artfully on a tiered serving platter, perhaps alongside a scattering of fresh cranberries or sprigs of evergreen for a pop of natural color. They also make an incredibly thoughtful and cherished homemade gift, beautifully packaged in a festive tin or cello bag, tied with a ribbon. Trust me, receiving a tin of these homemade delights is far more memorable than any store-bought gift.
But why stop there? The beauty of a great recipe lies in its adaptability, and these cookies are no exception. While the classic red and white peppermint combination is undeniably charming, don’t hesitate to experiment! For a different flavor profile, consider swapping out the peppermint extract for almond or even a touch of orange zest — imagine orange-scented swirls of dough! You could also introduce mini chocolate chips into one half of the dough before twisting, creating a chocolate-peppermint marvel. For a less traditional but equally fun look, try using different food colorings — perhaps green and white for a Christmas tree vibe, or even pastel colors for a spring celebration. A sprinkle of edible glitter before baking can add an extra touch of sparkle, especially if you’re aiming for a truly show-stopping dessert. Or, after they’ve cooled, a quick drizzle of melted white chocolate and a sprinkle of crushed peppermints can elevate them to an even more gourmet level. The possibilities are truly endless, limited only by your imagination, allowing you to personalize them for any occasion or preference.
Your Turn: Bake, Share, & Inspire!
So, my dear fellow bakers, I’ve shared all my tips and tricks, and now the rolling pin is in your hands. I cannot emphasize enough how much joy and festive spirit these cookies bring. I truly hope you’ll set aside some time soon to embark on this delightful baking adventure. Don’t be intimidated; follow the steps, have fun with the process, and revel in the delicious results. Baking, for me, is an act of love and creativity, and these cookies are a wonderful way to express both. Imagine the smiles they’ll bring to your family’s faces, or the appreciative nods from friends when you present them with a platter of these homemade treasures.
Once you’ve experienced the magic of making and tasting these incredible cookies, I would absolutely love to hear about it! Please, don’t be shy. Share your baking triumphs, your creative variations, and even any little hiccups you encountered along the way. Did you add sprinkles? Did you try a different extract? Did your kids have a blast helping you twist them? We learn so much from each other’s experiences, and your insights could inspire someone else to take the plunge. Snap a picture of your finished masterpieces and share them with the world — let’s spread the joy of homemade goodness far and wide. Your feedback is invaluable, and I’m always eager to see how my recipes come to life in your kitchens. Thank you for joining me on this baking journey, and happy baking!

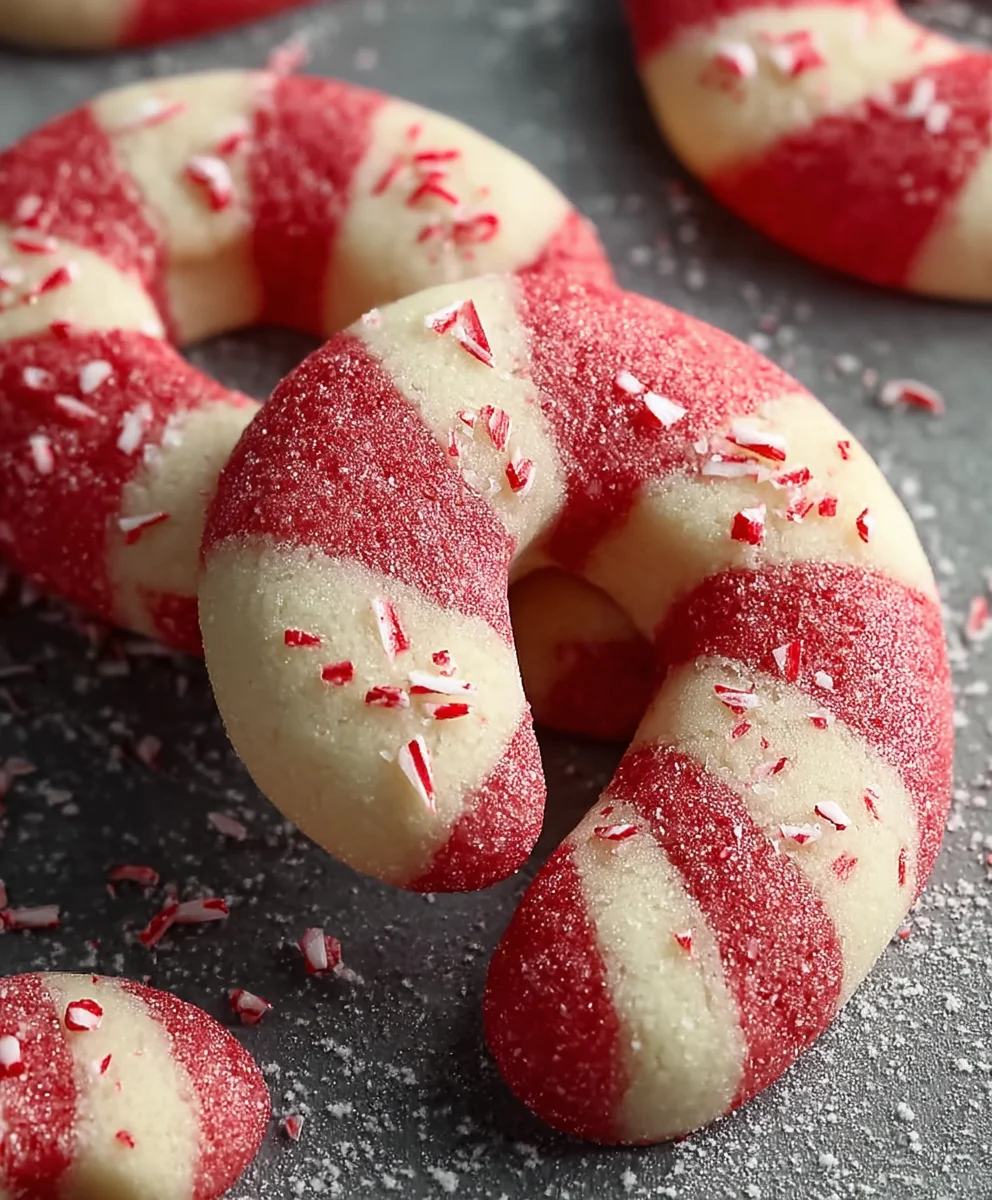
Festive Candy Cane Cookies
Classic red and white swirl peppermint shortbread cookies, perfect for holiday baking. These tender, buttery treats feature a refreshing peppermint flavor and a sparkling sugar coating.
Ingredients
-
2 ½ cups (300g) all-purpose flour
-
1 tsp baking powder
-
½ tsp salt
-
1 cup (226g) unsalted butter, softened
-
1 ½ cups (300g) granulated sugar
-
1 large egg
-
1 tsp vanilla extract
-
1 tsp peppermint extract
-
Red gel food coloring
-
½ cup (100g) granulated sugar (for coating)
-
½ tsp peppermint extract (for coating)
Instructions
-
Step 1
Preheat oven to 375°F (190°C). Line baking sheets with parchment paper. -
Step 2
In a medium bowl, whisk together flour, baking powder, and salt. Set aside. -
Step 3
In a large bowl, cream softened butter and 1 ½ cups granulated sugar until light and fluffy (3-5 minutes). Beat in the egg, then vanilla extract and 1 tsp peppermint extract. -
Step 4
Gradually add the flour mixture to the wet ingredients, mixing on low speed until just combined. Do not overmix. -
Step 5
Divide the dough in half. Knead red gel food coloring into one half until uniformly red. Leave the other half plain (white). -
Step 6
Wrap each dough half in plastic wrap and flatten into discs. Chill in the refrigerator for at least 30-60 minutes. -
Step 7
Take about 1 tablespoon of red dough and 1 tablespoon of white dough. Roll each into a 5-6 inch long, ¼ inch thick rope on a lightly floured surface. -
Step 8
Gently press a red rope and a white rope together along their length. Twist them around each other to form a spiral. Bend one end to create the characteristic candy cane hook. -
Step 9
Place shaped cookies 1-2 inches apart on prepared baking sheets. If dough becomes too soft, chill again briefly. -
Step 10
Bake for 8-10 minutes, until edges are very lightly golden and centers appear set. Do not overbake. Cool on baking sheets for 2-3 minutes, then transfer to a wire rack to cool completely. -
Step 11
For the peppermint sugar coating: In a small, shallow bowl, combine ½ cup granulated sugar and ½ tsp peppermint extract. Mix thoroughly. -
Step 12
Once cookies are completely cool, gently roll or dip each cookie into the peppermint sugar mixture to coat all sides. -
Step 13
Store finished cookies in an airtight container at room temperature for up to 1 week, or freeze for up to 3 months.
Important Information
Nutrition Facts (Per Serving)
It is important to consider this information as approximate and not to use it as definitive health advice.
Allergy Information
Please check ingredients for potential allergens and consult a health professional if in doubt.


Leave a Comment