
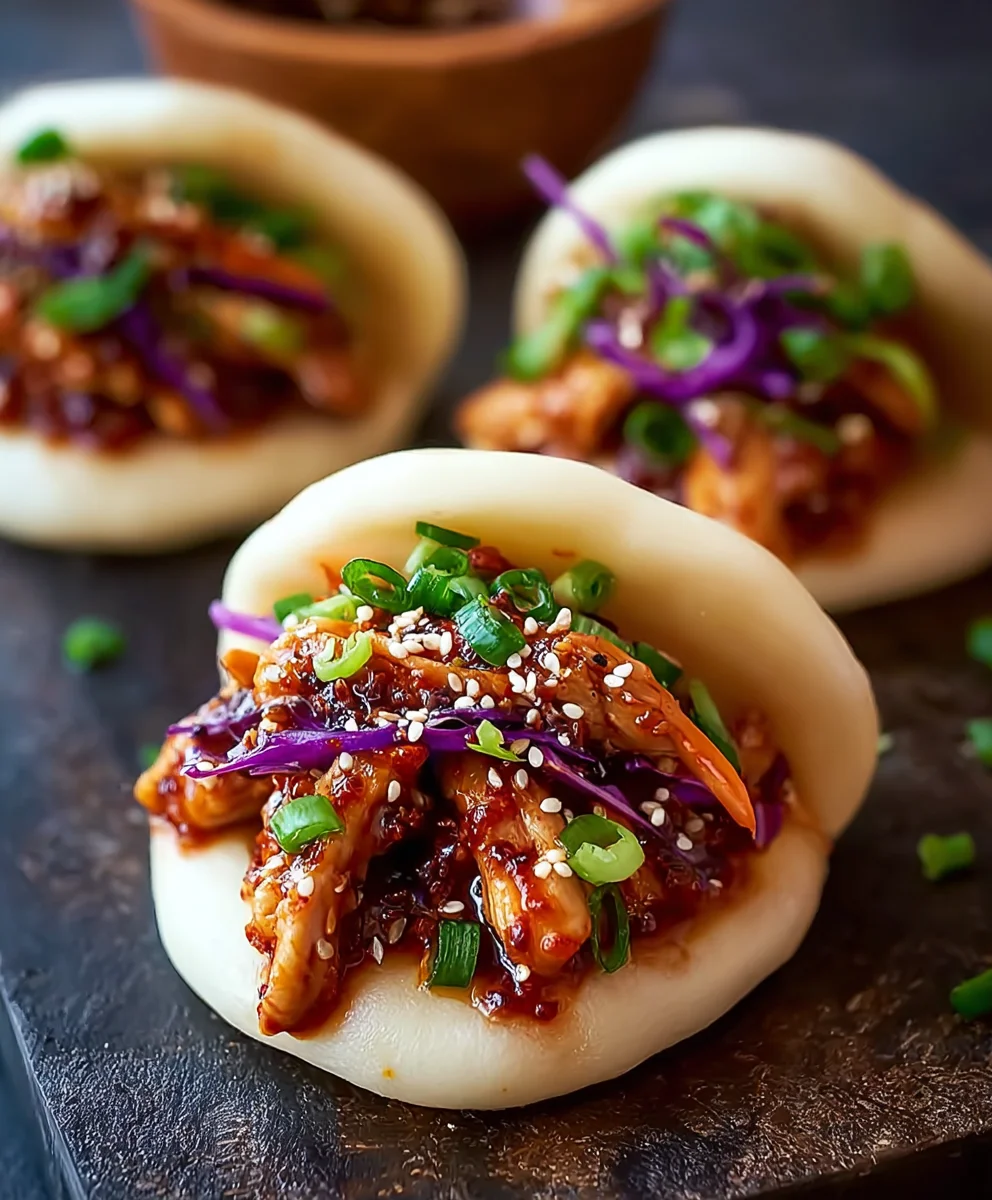
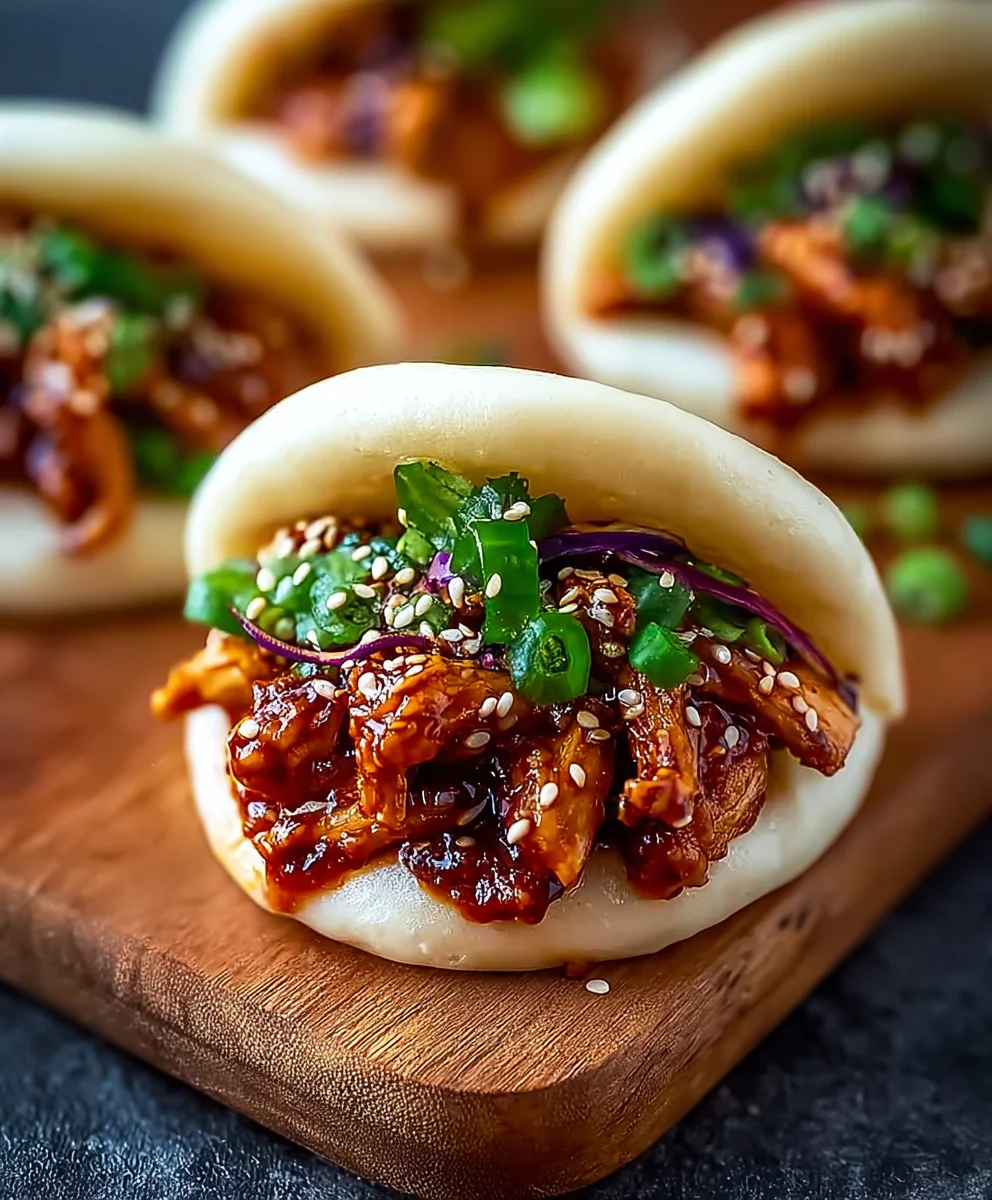
Korean Chicken Bao offers an unparalleled culinary adventure, taking the beloved textures and flavors of two distinct cultures and harmoniously blending them into one irresistible bite. If you’ve ever found yourself dreaming of fluffy, cloud-like bao buns embracing succulent, crispy-coated chicken glazed in a sticky, spicy-sweet Korean sauce, then you’ve arrived at the perfect destination. This dish isn’t just a meal; it’s an experience that tantalizes every single taste bud, promising a delightful contrast of soft and crunchy, sweet and savory, with just the right amount of kick.
The concept of bao, with its comforting, pillowy steam bun, originated centuries ago in China, becoming a staple across Asia. Meanwhile, Korean fried chicken has swept the globe with its distinctive double-frying method, ensuring an incredibly satisfying crunch and its signature bold, flavorful sauces. Combining these elements creates a truly modern classic. People adore this dish for its incredible versatility and the joyous symphony of textures it delivers – the yielding softness of the bun, the satisfying crunch of the chicken, and the luscious, vibrant sauce that ties everything together. Preparing your own Korean Chicken Bao at home is incredibly rewarding, allowing you to customize the spice level and truly savor the fresh, vibrant ingredients.

Ingredients:
-
For the Steamed Bao Buns:
- 300g (about 2 ½ cups) all-purpose flour, plus extra for dusting
- 3g (about 1 teaspoon) instant dry yeast
- 30g (about 2 tablespoons) granulated sugar
- 3g (about ½ teaspoon) fine sea salt
- 150ml (about ⅔ cup) warm water (around 105-115°F / 40-46°C)
- 15g (about 1 tablespoon) vegetable oil, plus extra for brushing
- 1 teaspoon baking powder
- Parchment paper, cut into 3×3 inch squares
-
For the Korean Fried Chicken:
- 600g (about 1.3 lbs) boneless, skinless chicken thighs, cut into 1-inch pieces
- For the Marinade:
- 1 tablespoon soy sauce
- 1 tablespoon mirin
- 1 teaspoon grated fresh ginger
- ½ teaspoon minced garlic
- Pinch of black pepper
- For the Breading:
- ½ cup all-purpose flour
- ½ cup cornstarch
- ½ teaspoon baking powder
- ½ teaspoon salt
- ½ teaspoon black pepper
- 1 large egg
- ½ cup cold water (approximately, adjust as needed)
- Vegetable oil for deep frying (about 4-6 cups)
-
For the Gochujang Glaze:
- ¼ cup gochujang (Korean chili paste)
- 2 tablespoons soy sauce
- 2 tablespoons rice vinegar
- 2 tablespoons brown sugar
- 1 tablespoon honey or maple syrup
- 1 tablespoon sesame oil
- 1 teaspoon grated fresh ginger
- 1 teaspoon minced garlic
- 1 tablespoon water
- ½ teaspoon cornstarch (mixed with 1 tablespoon water to form a slurry)
-
For the Quick Pickled Cucumbers:
- 1 English cucumber, thinly sliced (using a mandoline if possible)
- ¼ cup rice vinegar
- 2 tablespoons water
- 1 tablespoon granulated sugar
- ½ teaspoon salt
-
For Assembly & Garnish:
- Toasted sesame seeds
- Thinly sliced green onions (scallions)
- A drizzle of Kewpie mayonnaise (optional)
Preparing the Bao Dough: The Foundation of Your Korean Chicken Bao
-
Activate the Yeast: In a large mixing bowl, combine the warm water, instant dry yeast, and granulated sugar. Give it a gentle stir. Let this mixture sit for 5-10 minutes. You should see a foamy layer form on the surface, which indicates that your yeast is alive and ready to work its magic. If you don’t see foam, your yeast might be old, or your water temperature was off, and it’s best to start over.
-
Combine Dry Ingredients: In a separate medium bowl, whisk together the all-purpose flour, fine sea salt, and baking powder. The baking powder is a secret ingredient here; it helps create an incredibly fluffy and soft texture, contributing to the signature pillow-like quality of a perfect bao bun. This step ensures an even distribution of leavening agents and seasoning throughout the dough.
-
Form the Dough: Add the dry ingredients to the activated yeast mixture. Pour in the 1 tablespoon of vegetable oil. Using a wooden spoon or your hands, mix until a shaggy dough forms and most of the flour is incorporated. It will look a bit rough at this stage, but don’t worry, patience is key to a beautiful dough.
-
Knead the Dough: Turn the dough out onto a lightly floured surface. Knead the dough for 8-10 minutes. The kneading process is crucial for developing the gluten, which gives the bao its structure and chewiness. Initially, the dough will be sticky, but as you knead, it will become smoother, more elastic, and less sticky. A good test for readiness is the “windowpane test”: gently stretch a small piece of dough; if you can stretch it thin enough to see light through it without tearing, your gluten is well developed. If not, continue kneading for a few more minutes. The goal is a smooth, supple, and slightly elastic dough.
-
First Rise (Bulk Fermentation): Lightly grease a clean large bowl with a little vegetable oil. Place the kneaded dough into the bowl, turning it once to coat all sides with oil. Cover the bowl tightly with plastic wrap or a damp kitchen towel. Let the dough rise in a warm, draft-free place for 1 to 1.5 hours, or until it has doubled in size. The duration can vary depending on the ambient temperature. A warm spot, like a slightly warm oven (turned off!) or near a sunny window, is ideal for a good rise. This first rise allows the yeast to produce carbon dioxide, creating air pockets and contributing to the dough’s airy texture.
-
Punch Down and Divide: Once the dough has doubled, gently punch it down to release the trapped gases. Turn the dough out onto a lightly floured surface. Knead it lightly for about 1 minute to ensure any remaining large air bubbles are dispersed. Divide the dough into 12 equal pieces. For precision, you can weigh them – each piece should be roughly 45-50g. Roll each piece into a smooth ball. This ensures uniform bao sizes, leading to even steaming.
-
Shape the Bao Buns: Take one dough ball and flatten it slightly with your palm. Using a rolling pin, roll it into an oval shape, about 4-5 inches long and 2.5-3 inches wide. The edges should be slightly thinner than the center. Brush one half of the oval lightly with vegetable oil – this prevents the bao from sticking together when folded. Fold the dough in half lengthwise, creating the classic bao bun shape. Place each shaped bao onto a 3×3 inch square of parchment paper. The parchment paper will prevent them from sticking to the steamer basket.
-
Second Rise (Proofing): Arrange the shaped bao buns in your steamer baskets, ensuring there is enough space between each bun for expansion. You might need to use multiple steamer baskets or work in batches. Cover the steamer baskets loosely with a clean kitchen towel or plastic wrap. Let the bao buns rise again in a warm, draft-free place for another 30-45 minutes, or until they look visibly puffy and light. This second rise, known as proofing, is vital for achieving that incredibly light and airy texture in your final “Korean Chicken Bao” bun. Do not rush this step!
Making the Korean Fried Chicken: The Star of Your Korean Chicken Bao
-
Marinate the Chicken: In a medium bowl, combine the cut chicken thigh pieces with the soy sauce, mirin, grated ginger, minced garlic, and a pinch of black pepper. Toss well to ensure all the chicken is coated. Let it marinate for at least 30 minutes at room temperature, or up to 2 hours in the refrigerator. Marinating infuses the chicken with flavor, making it tender and incredibly juicy, which is essential for a delicious “Korean Chicken Bao.”
-
Prepare the Breading Batter: In a separate bowl, whisk together the all-purpose flour, cornstarch, baking powder, salt, and black pepper. In another small bowl, lightly beat the egg. Add the beaten egg to the dry ingredients, followed by the cold water, starting with ½ cup and adding more if needed, a tablespoon at a time, until you have a thick, pancake-like batter. It should be thick enough to cling to the chicken but still pourable. The cornstarch is key here for an extra crispy crust!
-
Coat the Chicken: Drain any excess marinade from the chicken. Add the marinated chicken pieces directly into the prepared batter. Toss thoroughly to ensure every piece of chicken is evenly coated. You want a good, thick layer of batter on each piece to achieve that signature craggy, super-crispy Korean fried chicken texture.
-
First Fry: Pour enough vegetable oil into a deep pot or Dutch oven to reach about 3-4 inches in depth. Heat the oil over medium-high heat until it reaches 325°F (160°C). Using tongs, carefully lower the battered chicken pieces into the hot oil, working in batches to avoid overcrowding the pot. Overcrowding will lower the oil temperature and result in soggy chicken. Fry for 5-7 minutes until the chicken is cooked through and lightly golden. Remove the chicken with a slotted spoon and place it on a wire rack set over a baking sheet to drain any excess oil. Repeat with the remaining chicken. This first fry cooks the chicken through.
-
Second Fry for Maximum Crispness: Increase the oil temperature to 350°F (175°C). Once the oil is hot, carefully return all the previously fried chicken to the pot for the second fry. Fry for another 3-5 minutes, or until the chicken is a deep golden brown and exceptionally crispy. This double-frying technique is crucial for achieving that characteristic shatteringly crisp exterior that Korean fried chicken is famous for, making it perfect for your “Korean Chicken Bao.” Remove the chicken and place it back on the wire rack. Let it rest for a few minutes while you prepare the glaze.
Crafting the Gochujang Glaze: The Flavor Bomb for Your Korean Chicken Bao
-
Combine Glaze Ingredients: In a small saucepan, whisk together the gochujang, soy sauce, rice vinegar, brown sugar, honey (or maple syrup), sesame oil, grated ginger, minced garlic, and 1 tablespoon of water. Stir until the sugar is dissolved and all ingredients are well combined. This combination creates a beautiful balance of spicy, savory, sweet, and tangy flavors.
-
Simmer and Thicken: Place the saucepan over medium heat. Bring the mixture to a gentle simmer, stirring occasionally. Once simmering, add the cornstarch slurry (1/2 teaspoon cornstarch mixed with 1 tablespoon water). Continue to simmer and stir for 2-3 minutes, or until the glaze thickens to a consistency that coats the back of a spoon. It should be thick enough to cling to the chicken without being overly gloopy. Remove the glaze from the heat immediately. This glaze is what truly brings the “Korean” in your “Korean Chicken Bao” to life!
-
Toss the Chicken in Glaze: In a large bowl, add the freshly double-fried chicken pieces. Pour the warm gochujang glaze over the chicken. Toss gently but thoroughly, using tongs, to ensure every piece of crispy chicken is beautifully coated in the sticky, flavorful sauce. Serve immediately with the steamed bao buns.
Whipping Up Quick Pickled Cucumbers: A Refreshing Counterpoint
-
Prepare Cucumbers: Wash and thinly slice the English cucumber. A mandoline slicer works wonders for achieving uniformly thin slices, which are ideal for quick pickling. Place the sliced cucumbers in a medium heatproof bowl or jar.
-
Make Pickling Brine: In a small saucepan, combine the rice vinegar, water, granulated sugar, and salt. Heat over medium heat, stirring occasionally, until the sugar and salt have completely dissolved. You don’t need to bring it to a rolling boil, just warm enough to dissolve the solids.
-
Pickle the Cucumbers: Pour the warm pickling brine over the sliced cucumbers. Ensure all the cucumber slices are submerged. Let them sit at room temperature for at least 15-20 minutes, or you can refrigerate them for longer to allow the flavors to deepen. These quick pickles offer a delightful tangy, crisp contrast to the rich and spicy Korean fried chicken in your “Korean Chicken Bao.”
Steaming the Bao Buns: Achieving Pillowy Perfection
-
Prepare Steamer: Fill a steamer pot or wok with about 1-2 inches of water, ensuring the water level is below the bottom of your steamer basket. Bring the water to a rolling boil over high heat.
-
Steam the Bao: Once the water is boiling, carefully place the steamer basket containing the proofed bao buns over the boiling water. Make sure not to overcrowd the basket; steam in batches if necessary, leaving space between each bun for expansion. Cover the steamer with a lid. It’s a good idea to wrap the lid in a clean kitchen towel to prevent condensation from dripping onto the bao, which can make them soggy. Steam the bao buns for 8-10 minutes. The exact time can vary slightly depending on the size of your bao and the strength of your steamer.
-
Check for Doneness: After 8 minutes, gently lift the lid (careful of the steam!). A properly steamed bao bun will be visibly puffed up, incredibly soft, and slightly glossy. If they still feel dense or look slightly deflated, steam for another minute or two. Once done, turn off the heat and let the bao rest in the covered steamer for 2-3 minutes before removing them. This resting period prevents them from deflating due to a sudden temperature change. Carefully transfer the steamed bao buns to a plate.
Assembling Your Delicious Korean Chicken Bao: The Grand Finale
-
Gather Components: Ensure all your components are ready: the fluffy steamed bao buns, the glistening gochujang-glazed Korean fried chicken, the tangy quick-pickled cucumbers, and your chosen garnishes like green onions and toasted sesame seeds.
-
Open the Bao: Gently peel the bao bun off its parchment paper. Carefully open each steamed bao bun along its fold. The bun should be warm, soft, and inviting.
-
Layer the Flavors: Place one or two pieces of the saucy Korean fried chicken inside each open bao bun. The quantity will depend on the size of your chicken pieces and your preference. You want a good amount without overfilling.
-
Add the Refreshment: Top the chicken with a generous helping of the quick-pickled cucumber slices. These will cut through the richness of the chicken and add a wonderful crisp texture and tangy flavor, balancing the entire “Korean Chicken Bao” experience beautifully.
-
Garnish and Serve: Finish your Korean Chicken Bao with a sprinkle of toasted sesame seeds for a nutty crunch and a scattering of thinly sliced green onions for freshness and a mild oniony bite. If you like, a drizzle of Kewpie mayonnaise can add an extra layer of creamy richness. Serve your freshly assembled Korean Chicken Bao immediately while the buns are warm and the chicken is at its crispiest. This dish is a true explosion of textures and flavors, making every bite an absolute delight!
Conclusion:
I truly believe this Korean Chicken Bao recipe isn’t just a meal; it’s an event, a culinary adventure that will captivate your senses and leave a lasting impression. From the moment you taste the first bite, you’ll understand why it’s destined to become a firm favorite in your kitchen. The symphony of flavors – the savory, slightly sweet, and perfectly spicy gochujang-glazed chicken – nestled within a cloud-like, perfectly steamed bao bun, is simply unparalleled. Every element of this dish is crafted to create a delightful contrast: the tender, succulent chicken bursting with umami goodness against the soft, pillowy wrapper. It’s a texture party in your mouth, an experience far beyond your typical weeknight dinner. What I love most is how achievable these impressive results are right in your home kitchen, promising a gourmet experience that tastes like it came straight from a bustling Korean eatery or a trendy food truck. Trust me, the sheer joy of creating and savoring this dish is immense; it’s the kind of recipe that will have your family and friends not just asking for seconds, but eagerly requesting the recipe itself. It’s about more than just satisfying hunger; it’s about embarking on a flavorful journey that excites the palate and warms the soul, promising a memorable meal every single time. Prepare to be utterly captivated by the vibrant tastes and irresistible textures you’re about to bring to life.
Once you’ve mastered the main event, the fun truly begins with how you present and customize your creations. Traditionally, I love serving these delectable buns with a sprinkle of fresh cilantro and some thinly sliced green onions for a pop of color and freshness. For an extra kick and creamy texture, a quick drizzle of a tangy, spicy mayo – easily made by mixing mayonnaise with sriracha and perhaps a touch of lime juice – elevates the flavor profile beautifully. To cut through the richness and add a delightful crunch, a side of quick-pickled cucumbers or daikon radish is an absolute must; their crisp, cool tanginess enhances every warm, spicy bite of chicken. If you’re hosting a gathering, consider setting up an interactive “bao bar” where everyone can customize their own. Offer an array of vibrant toppings like shredded cabbage, julienned carrots, extra gochujang sauce for those who crave more heat, and perhaps even a bowl of crushed peanuts or toasted sesame seeds for an unexpected textural layer and nutty aroma. The visual appeal of such a spread is just as enticing as the flavors!
But don’t stop there; the versatility of this recipe lends itself to countless exciting variations. Don’t be afraid to experiment with the chicken marinade itself. While our gochujang base is fantastic, you could introduce a smoky element with a dash of liquid smoke, or amp up the ginger and garlic for an even more aromatic profile. If you prefer a leaner protein, chicken breast works wonderfully, though I personally find chicken thighs offer a juicier, more forgiving result that holds up better to the intense flavors. For the bao buns, while high-quality store-bought frozen options are incredibly convenient and still yield a delicious outcome, trying your hand at making them from scratch can be a truly rewarding experience, offering an even softer, fresher texture that’s hard to beat. You could even play with adding a touch of beet juice to your bao dough for a beautiful pink hue, or activated charcoal for a dramatic black bun, adding a unique visual flair that impresses. Another fantastic twist is to serve the flavorful chicken filling not just in bao, but perhaps wrapped in crisp lettuce cups for a lighter, gluten-friendly option, or even piled over a bed of fluffy steamed rice as a delicious, deconstructed bowl meal. The possibilities for adapting this incredible chicken filling are truly endless, allowing you to tailor this dish perfectly to your taste preferences, dietary needs, and those of your guests. A dash of sesame oil can add deep nuttiness, a spoonful of honey can balance the spice with extra sweetness, or a squeeze of fresh lime juice can introduce a bright, zesty finish that truly lifts the entire dish. I often sprinkle some roasted sesame seeds over the finished buns, not just for an appealing garnish but for an extra layer of toasted flavor that makes a big difference.
So, what are you waiting for? I wholeheartedly urge you to roll up your sleeves and give this incredible recipe a try this week. You won’t regret the burst of flavors, the delightful textures, and the immense satisfaction of creating something truly special and utterly delicious in your own kitchen. Once you’ve made your glorious batch, please don’t keep your triumph a secret! I’d absolutely love to hear about your culinary journey. Share your photos, your triumphs, and any clever twists or serving suggestions you’ve discovered in the comments below. Your experiences not only inspire me but also the rest of our vibrant cooking community. Happy cooking, my friends, and prepare for some serious, unforgettable deliciousness!
Flavorful Korean Chicken Bao: Easy Steamed Bun Recipe
Korean Chicken Bao blends the beloved textures and flavors of two distinct cultures into an irresistible bite. Fluffy bao buns embrace succulent, crispy-coated chicken glazed in a sticky, spicy-sweet Korean sauce. This dish offers a delightful contrast of soft and crunchy, sweet and savory, with just the right amount of kick, combining the comforting Chinese bao bun with the global sensation of Korean fried chicken.
Ingredients
-
300g all-purpose flour, plus extra for dusting
-
3g instant dry yeast
-
30g granulated sugar
-
3g fine sea salt
-
150ml warm water
-
15g vegetable oil, plus extra for brushing
-
1 teaspoon baking powder
-
Parchment paper, cut into 3×3 inch squares
-
600g boneless, skinless chicken thighs, cut into 1-inch pieces
-
1 tablespoon soy sauce (for marinade)
-
1 tablespoon non-alcoholic mirin substitute
-
1 teaspoon grated fresh ginger (for marinade)
-
½ teaspoon minced garlic (for marinade)
-
Pinch of black pepper (for marinade)
-
½ cup all-purpose flour (for breading)
-
½ cup cornstarch (for breading)
-
½ teaspoon baking powder (for breading)
-
½ teaspoon salt (for breading)
-
½ teaspoon black pepper (for breading)
-
1 large egg (for breading)
-
½ cup cold water (for breading)
-
4-6 cups vegetable oil (for deep frying)
-
¼ cup gochujang
-
2 tablespoons soy sauce (for glaze)
-
2 tablespoons rice vinegar (for glaze)
-
2 tablespoons brown sugar
-
1 tablespoon honey or maple syrup
-
1 tablespoon sesame oil
-
1 teaspoon grated fresh ginger (for glaze)
-
1 teaspoon minced garlic (for glaze)
-
1 tablespoon water (for glaze)
-
½ teaspoon cornstarch (for slurry)
-
1 tablespoon water (for slurry)
-
1 English cucumber, thinly sliced
-
¼ cup rice vinegar (for pickling)
-
2 tablespoons water (for pickling)
-
1 tablespoon granulated sugar (for pickling)
-
½ teaspoon salt (for pickling)
-
Toasted sesame seeds
-
Thinly sliced green onions
-
Kewpie mayonnaise (optional)
Instructions
-
Step 1
Activate yeast: Combine warm water, yeast, and sugar; let sit 5-10 minutes until foamy. -
Step 2
Mix dry ingredients: Whisk flour, salt, and baking powder. Add to yeast mixture with oil, mix until shaggy dough forms. -
Step 3
Knead: Turn dough onto a floured surface, knead 8-10 minutes until smooth and elastic. -
Step 4
First rise: Lightly grease a bowl, place dough, cover, and let rise in a warm place for 1-1.5 hours until doubled. -
Step 5
Shape bao: Punch down dough, divide into 12 equal pieces (45-50g each), roll into balls. Roll each ball into a 4-5 inch oval, brush half with oil, then fold in half. Place each bao on a 3×3 inch parchment square. -
Step 6
Second rise: Arrange shaped bao in steamer baskets, cover, and let rise 30-45 minutes until puffy. -
Step 7
Marinate chicken: Combine chicken pieces with soy sauce, non-alcoholic mirin substitute, ginger, garlic, and pepper. Marinate 30 min at room temp or up to 2 hours refrigerated. -
Step 8
Prepare batter: Whisk flour, cornstarch, baking powder, salt, pepper. Add egg and cold water to form a thick, pancake-like batter. -
Step 9
Coat and fry: Drain excess marinade from chicken. Add chicken to batter, toss to coat. -
Step 10
Double fry: Heat oil to 325°F (160°C). Fry chicken in batches for 5-7 minutes until lightly golden. Remove and drain. Increase oil to 350°F (175°C). Return all chicken and fry for another 3-5 minutes until deep golden and crispy. Drain. -
Step 11
Prepare glaze: In a saucepan, whisk gochujang, soy sauce, rice vinegar, brown sugar, honey/maple syrup, sesame oil, ginger, garlic, and 1 tablespoon water. -
Step 12
Thicken: Bring to a simmer over medium heat. Add cornstarch slurry, simmer 2-3 minutes until thickened. Remove from heat. -
Step 13
Coat chicken: In a large bowl, toss fried chicken with warm gochujang glaze until evenly coated. -
Step 14
Pickle cucumbers: Thinly slice cucumber. In a saucepan, combine rice vinegar, water, sugar, and salt; heat until dissolved. Pour warm brine over cucumbers, let sit 15-20 minutes at room temperature. -
Step 15
Steam bao: Fill steamer pot with 1-2 inches of water, bring to a boil. Place proofed bao (on parchment) in steamer, ensuring space. Cover and steam for 8-10 minutes until puffed and soft. Let rest 2-3 minutes in covered steamer before removing. -
Step 16
Assemble bao: Gently open a steamed bao bun. Place 1-2 pieces of glazed Korean fried chicken inside. -
Step 17
Garnish: Top with pickled cucumber slices, toasted sesame seeds, green onions, and optional Kewpie mayonnaise. Serve immediately.
Important Information
Nutrition Facts (Per Serving)
It is important to consider this information as approximate and not to use it as definitive health advice.
Allergy Information
Please check ingredients for potential allergens and consult a health professional if in doubt.
Leave a Comment