
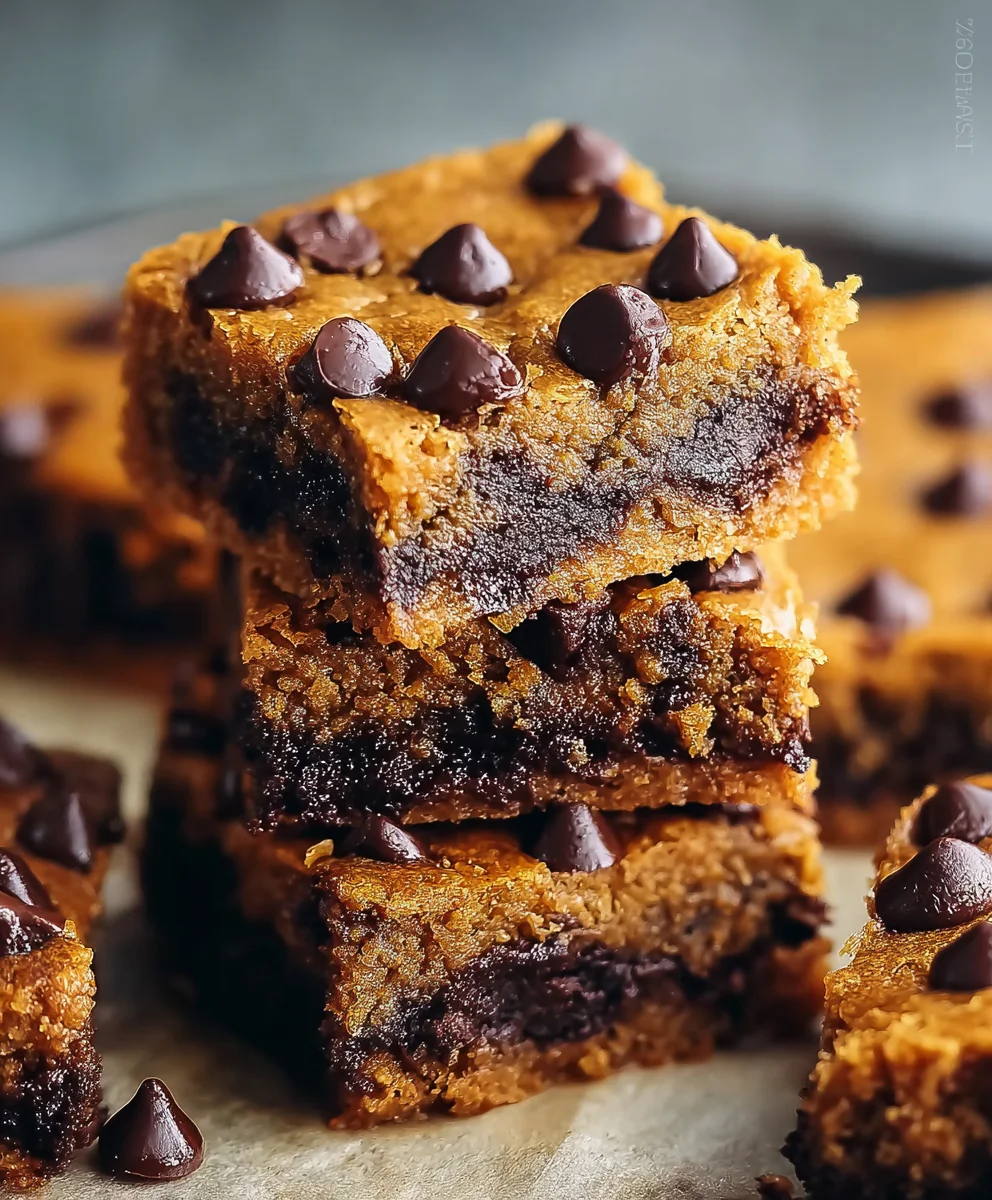
Fudgy Pumpkin Chocolate Chip Bars are more than just a seasonal treat; they are a delightful invitation to embrace the comforting flavors of autumn. Imagine a dessert that perfectly captures the essence of a crisp fall day, where the warmth of pumpkin spice meets the indulgent sweetness of rich chocolate chips, all nestled in a wonderfully moist and tender bar. These aren’t just any pumpkin bars; the “fudgy” element is key, elevating them from a simple snack to a truly luxurious experience that melts in your mouth with every bite.
Why We Love These Seasonal Delights
The tradition of baking with pumpkin dates back centuries, especially in North American harvest celebrations, symbolizing abundance and home comfort. While pumpkin pie is a classic, these bars offer a modern, convenient twist that doesn’t sacrifice any of that beloved autumnal charm. People adore them for their irresistible combination of earthy pumpkin, aromatic spices like cinnamon and nutmeg, and the joyful bursts of semi-sweet chocolate. The texture is what truly sets these Fudgy Pumpkin Chocolate Chip Bars apart – soft, dense, and incredibly moist, they are easy to make, transport, and share, making them perfect for potlucks, lunchboxes, or a cozy evening at home. I find that this particular recipe strikes an impeccable balance, creating a dessert that feels both nostalgic and excitingly new.

Ingredients:
-
For the Dry Ingredients:
- 2 ½ cups (300g) all-purpose flour
- 2 teaspoons baking powder
- 1 teaspoon baking soda
- 1 teaspoon ground cinnamon
- ½ teaspoon ground ginger
- ¼ teaspoon ground nutmeg
- ⅛ teaspoon ground cloves (optional, but highly recommended for depth)
- ½ teaspoon salt
-
For the Wet Ingredients:
- 1 (15-ounce) can (about 425g) pure pumpkin puree (not pumpkin pie filling)
- ¾ cup (180ml) vegetable oil, or melted unsalted butter (cooled slightly) for a richer flavor
- 1 ½ cups (300g) granulated sugar
- ½ cup (100g) packed light brown sugar
- 2 large eggs, at room temperature
- 2 teaspoons pure vanilla extract
-
For the Add-ins:
- 2 cups (340g) semi-sweet chocolate chips (or a mix of milk, dark, or even white chocolate chips)
- ½ cup (about 60g) chopped pecans or walnuts (optional, for added crunch)
Preparation and Preheating
- Preheat your oven and prepare your baking pan: My first step is always to get the oven ready! Set your oven temperature to 350°F (175°C). While it’s warming up, take a 9×13 inch baking pan and grease it thoroughly with butter or non-stick cooking spray. For an easier lift-out and cleanup, I like to line the pan with parchment paper, leaving an overhang on the longer sides to create “handles.” This makes removing the finished Fudgy Pumpkin Chocolate Chip Bars a breeze! Trust me, this little extra step saves so much hassle later.
- Measure and whisk the dry ingredients: In a medium-sized mixing bowl, combine all your dry ingredients. That’s 2 ½ cups of all-purpose flour, 2 teaspoons of baking powder, 1 teaspoon of baking soda, 1 teaspoon of ground cinnamon, ½ teaspoon of ground ginger, ¼ teaspoon of ground nutmeg, ⅛ teaspoon of ground cloves (if you’re using them – I find they add a wonderful warmth!), and ½ teaspoon of salt. Give them a good whisk for at least 30 seconds to a minute. This isn’t just about mixing; it’s about ensuring all those leavening agents and spices are perfectly distributed throughout the flour. This uniform distribution is key to achieving a consistent rise and flavor in every single bite of your Fudgy Pumpkin Chocolate Chip Bars. You don’t want a bite that’s bland and another that’s overwhelmingly spicy!
Mixing the Wet Ingredients
- Combine pumpkin, oil, and sugars: Now for the heart of the pumpkin flavor! In a large mixing bowl, measure out your pure pumpkin puree. Remember, we’re using the pure stuff, not pumpkin pie filling, which often has added sugars and spices that would throw off our recipe. To the pumpkin, add ¾ cup of vegetable oil (or melted and slightly cooled butter if you prefer that richness), 1 ½ cups of granulated sugar, and ½ cup of packed light brown sugar.
- Whisk until smooth and creamy: Using a sturdy whisk or an electric mixer on medium-low speed, beat these ingredients together until they are completely smooth and well combined. This usually takes about 2-3 minutes. You want to make sure there are absolutely no lumps of brown sugar left and that the mixture has a uniform, creamy consistency. This forms the base for our incredibly moist and fudgy pumpkin chocolate chip bars. Taking your time here ensures a beautifully consistent texture in the final product.
- Incorporate eggs and vanilla: Once the pumpkin and sugar mixture is smooth, crack in your two large eggs, making sure they’re at room temperature. Room temperature eggs emulsify better with the other ingredients, leading to a smoother batter. Add 2 teaspoons of pure vanilla extract. Continue to whisk or beat on medium-low speed for another 1-2 minutes, until the eggs are fully incorporated and the mixture is lightened slightly and airy. Scrape down the sides of the bowl with a rubber spatula to ensure everything is mixed in evenly. The aroma should already be starting to get you excited!
Combining Wet and Dry Ingredients
- Add dry ingredients to wet mixture: Now it’s time to bring our two main components together. Gradually add your whisked dry ingredients to the wet pumpkin mixture. I like to do this in two or three additions, mixing just until combined after each.
- Mix gently to avoid overmixing: Switch to a rubber spatula or a wooden spoon for this step. Gently fold the dry ingredients into the wet until just combined. The key here is to not overmix! Overmixing can develop the gluten in the flour too much, leading to tough or dense bars. We’re aiming for that wonderfully fudgy, tender texture in our Fudgy Pumpkin Chocolate Chip Bars, so stop mixing as soon as you no longer see streaks of dry flour. A few small lumps are perfectly fine and often preferred over an overmixed batter.
Adding the Chocolate Chips
- Fold in the chocolate chips and optional nuts: This is where the chocolatey goodness comes in! Add 2 cups of your chosen chocolate chips to the batter. I often use semi-sweet, but feel free to experiment with milk chocolate, dark chocolate, or even a blend! If you’re adding chopped pecans or walnuts for an extra layer of texture and flavor, now is the time to fold them in as well.
- Distribute evenly: Gently fold the chocolate chips and nuts into the batter until they are evenly distributed. Again, be careful not to overmix. You want every bite of your Fudgy Pumpkin Chocolate Chip Bars to have a delightful burst of chocolate! Sometimes, to ensure even distribution without overmixing, I reserve a handful of chocolate chips to sprinkle on top of the batter once it’s in the pan – it also makes them look extra appealing.
Baking the Fudgy Pumpkin Chocolate Chip Bars
- Transfer batter to the prepared pan: Carefully scrape all of the delicious batter into your parchment-lined and greased 9×13 inch baking pan.
- Spread evenly: Using your rubber spatula, gently spread the batter evenly across the pan. Make sure it reaches all corners and has a relatively flat top. This ensures even baking. If you reserved some chocolate chips, sprinkle them on top now.
- Bake until done: Place the pan in your preheated 350°F (175°C) oven. The baking time will typically be between 25 and 35 minutes. However, oven temperatures can vary, so it’s essential to keep an eye on them. The bars are ready when a wooden skewer or toothpick inserted into the center comes out with moist crumbs attached, but not wet batter. If it comes out completely clean, they might be slightly overbaked, but still delicious! We’re aiming for a slightly underbaked center for that truly fudgy pumpkin chocolate chip bars texture. The edges should be set and lightly golden, and the center should no longer look wet or jiggly.
- Rotate if necessary: If you notice your oven bakes unevenly, you might want to rotate the pan halfway through the baking time (after about 15 minutes). This helps ensure all parts of the bars bake uniformly.
Cooling and Finishing Touches
- Cool in the pan: Once baked, remove the pan from the oven and place it on a wire cooling rack. This is a crucial step for achieving that ultimate fudgy texture. Let the bars cool completely in the pan before attempting to cut them. This can take anywhere from 1 to 2 hours, or even longer if your kitchen is warm. Resist the temptation to cut into them too early! Warm bars will be very soft and prone to crumbling, and you won’t get those nice, clean squares that scream “perfect Fudgy Pumpkin Chocolate Chip Bars.”
- Lift and cut: Once fully cooled, use the parchment paper overhangs as handles to carefully lift the entire slab of bars out of the baking pan and transfer it to a cutting board.
- Slice and serve: Now comes the satisfying part! Using a sharp knife, cut the bars into your desired size squares or rectangles. I usually aim for 24 servings (4×6 cuts) from a 9×13 inch pan, but you can go larger for truly generous treats. Clean the knife periodically between cuts for the neatest results, especially if the chocolate chips are still a bit gooey.
- Storage: These Fudgy Pumpkin Chocolate Chip Bars are best stored in an airtight container at room temperature for up to 3-4 days. For longer storage, you can refrigerate them for up to a week. They also freeze wonderfully for up to 2-3 months; just thaw them at room temperature before serving. Enjoy every incredibly moist, chocolatey, and perfectly spiced bite!

Conclusion:
Okay, so we’ve reached the end of our culinary journey, and I genuinely hope you’re as excited as I am about what we’ve just created together. This isn’t just another dessert recipe; it’s truly a labor of love that promises to become a staple in your autumn baking repertoire, and honestly, even beyond. What makes these bars an absolute must-try, you ask? Well, for starters, it’s the unparalleled combination of that incredibly moist, subtly spiced pumpkin base intertwined with pockets of rich, melting chocolate chips. We’re talking about a texture that defies expectations – supremely fudgy, never dry or crumbly, a common pitfall in many pumpkin-based baked goods. This recipe delivers a consistency that is truly a dream, making it stand out from so many others.
I’ve meticulously crafted this recipe to ensure every single bite delivers a harmonious blend of autumnal warmth and decadent sweetness. The natural earthiness of pumpkin, enhanced by just the right amount of cinnamon, nutmeg, and a hint of ginger, creates a comforting backdrop. Then, those glorious chocolate chips burst through, adding a layer of pure indulgence that elevates the entire experience. It’s a treat that feels both familiar and extraordinary at the same time. Trust me when I say, once you taste the delightful chewiness and the sheer melt-in-your-mouth quality, you’ll understand why these are not just good, but exceptional. They perfectly capture the essence of fall while offering a year-round permissible indulgence, making them far superior to many other similar recipes out there that often miss the mark on moisture and flavor balance. This unique profile is what sets our Fudgy Pumpkin Chocolate Chip Bars apart from the crowd; they’re truly in a league of their own, providing a burst of seasonal flavor that is perfectly balanced and utterly satisfying.
Serving Suggestions: Elevate Your Experience
Now, let’s talk about the absolute best ways to enjoy these culinary masterpieces. While they are undeniably divine straight from the pan, still slightly warm with the chocolate chips gooey and inviting, there are so many wonderful ways to enhance their magic even further. For a truly classic and comforting experience, I love serving a warm square with a generous scoop of good quality vanilla bean ice cream. The cold, creamy ice cream melting into the warm, fudgy bar creates a delightful temperature and texture contrast that is simply irresistible, a symphony of sensations on your palate. Alternatively, a dollop of freshly whipped cream, perhaps lightly sweetened with a touch of maple syrup or a dash of cinnamon, adds an elegant lightness that complements the richness of the bars beautifully, offering a cloud-like counterpoint to their density.
Consider a simple dusting of powdered sugar, which not only looks incredibly lovely but adds a delicate kiss of sweetness without overwhelming the existing flavors. For those who appreciate a bit more decadence, a generous drizzle of warm caramel sauce or a rich chocolate ganache over the top takes these bars to an entirely new level of gourmet delight. Imagine serving these alongside a steaming mug of spiced apple cider on a crisp autumn evening, or with a robust cup of coffee for an afternoon pick-me-up that feels incredibly special. They’re also absolutely perfect with a tall, frosty glass of cold milk, bringing back those nostalgic childhood snack vibes with a sophisticated twist. These bars are incredibly versatile, fitting seamlessly into any occasion – from a casual family dessert to a show-stopping contribution at a potluck, or even a cozy treat to enjoy by yourself after a long day. Their inviting aroma alone is often enough to draw everyone to the kitchen, promising pure comfort.
Get Creative: Exciting Variations to Try
One of the things I adore most about baking is the opportunity for creativity and personal expression, and these bars offer a fantastic canvas for your own culinary experiments. While the core recipe is perfect as is, please don’t hesitate to play around with variations to make them uniquely yours. If you’re a fan of nuts, a sprinkle of finely chopped pecans or walnuts folded into the batter, or even toasted and scattered on top before baking, adds a wonderful crunch and an extra layer of nutty flavor that pairs exquisitely with the pumpkin and chocolate. You could also experiment with different types of chocolate chips – milk chocolate for a sweeter profile, dark chocolate for a more intense cocoa hit, or even white chocolate chips for a creamier, contrasting sweetness and visual appeal. A thoughtful mix of several types can also create an intriguing flavor mosaic that keeps every bite interesting.
For those who love a bit more spice, feel free to slightly increase the amounts of cinnamon, nutmeg, or ginger, or even introduce a pinch of allspice or cloves for an even deeper, more complex autumnal flavor that truly sings. Another fantastic variation is to top the cooled bars with a tangy cream cheese frosting – the slight tartness of the frosting beautifully balances the sweetness and richness of the bar, creating an iconic duo. Or, for something simpler, a brown sugar glaze can add a beautiful sheen and an extra depth of caramelized flavor. If you’re catering to specific dietary needs, consider using a high-quality gluten-free all-purpose flour blend (ensure it contains xanthan gum) for a gluten-free version, or plant-based butter and milk alternatives for a dairy-free rendition without compromising on taste or texture. The versatility truly knows no bounds, allowing you to tailor this incredible recipe to suit any preference or occasion. You could even try baking them in a muffin tin for individual pumpkin chocolate chip bites, adjusting the baking time accordingly for a grab-and-go treat.
Your Turn: Bake, Share, and Enjoy!
So, there you have it. My heartfelt plea and confident assurance that these bars are not just a recipe, but an unforgettable experience waiting to happen in your kitchen. I’ve shared all my tips and tricks, and now it’s your turn to bring this magic to life. Seriously, go preheat that oven! Gather your ingredients, put on your favorite baking playlist, and prepare to fill your home with the most incredible, comforting aromas. You will be so incredibly proud of the delicious, moist, and utterly irresistible treats you pull out of the oven. These are the kind of bars that will have friends and family begging for the recipe, making you the undisputed star of any gathering, and rightfully so.
I am genuinely excited for you to experience the joy of biting into one of these perfectly balanced, wonderfully comforting Fudgy Pumpkin Chocolate Chip Bars. Don’t just read about it; make them! And when you do, please, please, please come back and share your experience. Did you add nuts? Did you drizzle caramel? What was your favorite serving suggestion? Your feedback and personal touches are what truly make this culinary community thrive, inspiring others and making our shared passion for baking even richer. Whether you leave a comment here, or simply share your masterpiece with your loved ones, I truly hope you find as much delight in baking and eating these bars as I do in sharing them with you. Happy baking, my friends! I can’t wait to hear all about your delicious creations and how these bars bring warmth and joy to your home.
Fudgy Pumpkin Chocolate Chip Bars
Incredibly fudgy bars infused with delightful pumpkin and studded with lush chocolate chips. These moist bars capture the comforting flavors of autumn, perfect for cozy days, festive gatherings, or a snack with coffee or tea. They are easy to make, transport, and share.
Ingredients
-
2 ½ cups (300g) all-purpose flour
-
2 teaspoons baking powder
-
1 teaspoon baking soda
-
1 teaspoon ground cinnamon
-
½ teaspoon ground ginger
-
¼ teaspoon ground nutmeg
-
⅛ teaspoon ground cloves (optional)
-
½ teaspoon salt
-
1 (15-ounce / 425g) can pure pumpkin puree (not pumpkin pie filling)
-
¾ cup (180ml) vegetable oil, or melted unsalted butter (cooled)
-
1 ½ cups (300g) granulated sugar
-
½ cup (100g) packed light brown sugar
-
2 large eggs, at room temperature
-
2 teaspoons pure vanilla extract
-
2 cups (340g) semi-sweet chocolate chips (or a mix)
-
½ cup (60g) chopped pecans or walnuts (optional)
Instructions
-
Step 1
Preheat oven to 350°F (175°C). Grease a 9×13 inch baking pan, then line with parchment paper, leaving an overhang to create handles. -
Step 2
In a medium bowl, whisk together flour, baking powder, baking soda, cinnamon, ginger, nutmeg, cloves (if using), and salt for 30-60 seconds to ensure even distribution. -
Step 3
In a large bowl, combine pure pumpkin puree, vegetable oil (or cooled melted butter), granulated sugar, and light brown sugar. Whisk thoroughly for 2-3 minutes until smooth and all sugar lumps are dissolved. -
Step 4
Add room temperature eggs and vanilla extract to the pumpkin mixture. Whisk or beat on medium-low speed for 1-2 minutes until fully incorporated and slightly lightened. Scrape down the bowl sides. -
Step 5
Gradually add the whisked dry ingredients to the wet pumpkin mixture in 2-3 additions. Gently fold with a rubber spatula until just combined. Do not overmix; a few small lumps are fine. -
Step 6
Gently fold in chocolate chips and optional chopped pecans or walnuts until evenly distributed throughout the batter. Avoid overmixing. -
Step 7
Scrape the batter into the prepared 9×13 inch pan and spread evenly. Bake in the preheated oven for 25-35 minutes. The bars are done when a wooden skewer or toothpick inserted into the center comes out with moist crumbs attached (not wet batter). Edges should be set and lightly golden. -
Step 8
Remove from oven and cool completely in the pan on a wire rack for 1-2 hours. Once cooled, use the parchment overhangs to lift the bars to a cutting board. Slice into desired squares or rectangles (approx. 24 servings). -
Step 9
Store in an airtight container at room temperature for up to 3-4 days, or refrigerate for up to a week. For longer storage, freeze for 2-3 months and thaw at room temperature before serving.
Important Information
Nutrition Facts (Per Serving)
It is important to consider this information as approximate and not to use it as definitive health advice.
Allergy Information
Please check ingredients for potential allergens and consult a health professional if in doubt.

Leave a Comment