
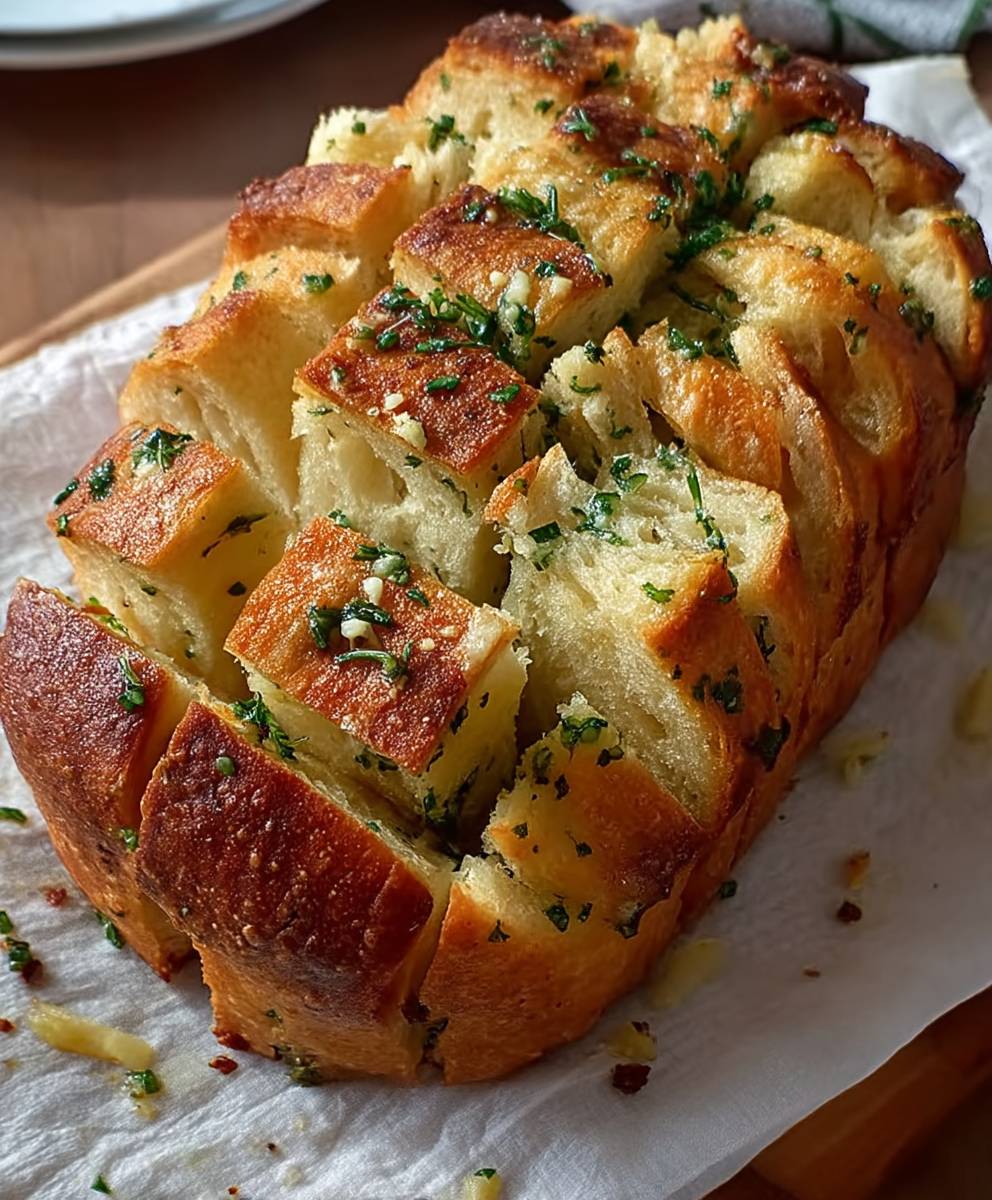
Garlic Herb Sourdough Bread, oh, where do I even begin? Imagine sinking your teeth into a slice of perfectly crusty sourdough, the tangy flavor dancing on your tongue, followed by an explosion of savory garlic and fragrant herbs. It’s not just bread; it’s an experience! This isn’t your average loaf; it’s a culinary masterpiece that elevates any meal, from a simple weeknight dinner to a sophisticated weekend brunch.
Sourdough itself boasts a rich history, dating back thousands of years to ancient Egypt. Its unique fermentation process, relying on wild yeasts and bacteria, gives it that characteristic tang and chewy texture. Adding garlic and herbs is a more modern twist, but one that perfectly complements the sourdough’s inherent qualities. Think of it as a delicious fusion of old-world tradition and contemporary flavor.
People adore Garlic Herb Sourdough Bread for so many reasons. The combination of the tangy sourdough, pungent garlic, and aromatic herbs is simply irresistible. The crust provides a satisfying crunch, while the interior is soft and airy. Plus, the aroma that fills your kitchen as it bakes is pure heaven! It’s incredibly versatile, too. Enjoy it warm with a pat of butter, use it for sandwiches, or serve it alongside your favorite pasta dish. Trust me, once you try this recipe, you’ll be hooked!

Ingredients:
- For the Sourdough Starter:
- 1/2 cup (120g) active sourdough starter, bubbly and doubled in size
- 1 cup (240g) unbleached all-purpose flour
- 1/2 cup (120g) warm water (about 85-90°F)
- For the Dough:
- All of the active sourdough starter (from above)
- 500g (approximately 4 cups) unbleached bread flour, plus extra for dusting
- 350g (approximately 1 1/2 cups) warm water (about 85-90°F)
- 10g (approximately 2 teaspoons) fine sea salt
- 2 tablespoons olive oil
- For the Garlic Herb Infusion:
- 4 cloves garlic, minced
- 2 tablespoons fresh rosemary, finely chopped
- 2 tablespoons fresh thyme, finely chopped
- 1 tablespoon fresh oregano, finely chopped
- 1/4 cup olive oil
- 1/4 teaspoon red pepper flakes (optional, for a little heat)
- For Finishing:
- Olive oil, for brushing
- Coarse sea salt, for sprinkling
Preparing the Sourdough Starter (Levain)
Before we even think about the dough, we need a happy and active sourdough starter. This is the heart and soul of our bread, giving it that wonderful tangy flavor and airy texture. If your starter isn’t bubbly and doubled in size, your bread won’t rise properly. So, let’s get this right!
- Feed Your Starter: Take your sourdough starter out of the refrigerator (if it’s stored there). In a clean bowl, combine 1/2 cup (120g) of your starter with 1 cup (240g) of unbleached all-purpose flour and 1/2 cup (120g) of warm water. Mix well until there are no dry clumps of flour.
- Let it Rise: Cover the bowl loosely with plastic wrap or a damp towel and let it sit at room temperature (ideally around 70-75°F) for 4-8 hours, or until it has doubled in size and is bubbly. The time will vary depending on the strength of your starter and the temperature of your environment. You’ll know it’s ready when it passes the “float test” a small spoonful should float in a glass of water.
Making the Dough
Now that our starter is active and ready to go, we can move on to the main event: the dough! This is where the magic really happens. Don’t be intimidated; sourdough baking is a process, and with a little patience, you’ll be rewarded with a beautiful loaf.
- Combine Starter and Water: In a large bowl (or the bowl of your stand mixer), combine all of the active sourdough starter with 350g (approximately 1 1/2 cups) of warm water. Mix well until the starter is mostly dissolved in the water.
- Add Flour: Add 500g (approximately 4 cups) of unbleached bread flour to the bowl. Mix with your hands or a dough whisk until a shaggy dough forms. Don’t overmix at this stage; we just want the flour to be incorporated.
- Autolyse (Rest): Cover the bowl with plastic wrap or a damp towel and let the dough rest for 30-60 minutes. This process, called autolysing, allows the flour to fully hydrate, which will result in a more extensible and easier-to-handle dough.
- Add Salt and Olive Oil: After the autolyse, add 10g (approximately 2 teaspoons) of fine sea salt and 2 tablespoons of olive oil to the dough.
- Mix the Dough: Now, it’s time to really develop the gluten. If you’re using a stand mixer, mix on low speed for 8-10 minutes. If you’re mixing by hand, use the stretch and fold method (described below) for about 10-15 minutes. The dough should become smoother and more elastic.
Stretch and Fold Method (for Hand Mixing)
The stretch and fold method is a gentle way to develop gluten in sourdough bread without overworking the dough. It involves stretching a portion of the dough upwards and folding it over onto itself, then rotating the bowl and repeating the process. This is done several times during the bulk fermentation.
- First Stretch and Fold: With wet hands, reach under one side of the dough, stretch it upwards as far as it will go without tearing, and fold it over onto itself. Rotate the bowl 90 degrees and repeat. Do this until you’ve stretched and folded all four sides of the dough.
- Repeat: Cover the bowl and let the dough rest for 30 minutes. Then, repeat the stretch and fold process. Do this a total of 3-4 times during the first 2 hours of bulk fermentation.
Bulk Fermentation (First Rise)
Bulk fermentation is the period where the dough rises as a whole. This is a crucial step for developing flavor and texture. The length of bulk fermentation depends on the temperature of your environment and the activity of your starter. We’re aiming for a dough that has increased in volume by about 50-75%.
- Place in a Bulk Fermentation Container: Transfer the dough to a lightly oiled container. This will help prevent sticking and make it easier to monitor the rise.
- Monitor the Rise: Cover the container and let the dough rise at room temperature (ideally around 70-75°F) for 4-6 hours, or until it has increased in volume by about 50-75%. Perform stretch and folds (as described above) during the first 2 hours of bulk fermentation.
Preparing the Garlic Herb Infusion
While the dough is undergoing bulk fermentation, let’s prepare the garlic herb infusion. This will add a burst of flavor to our bread.
- Combine Ingredients: In a small bowl, combine the minced garlic, chopped rosemary, chopped thyme, chopped oregano, olive oil, and red pepper flakes (if using). Mix well.
- Let it Infuse: Let the mixture sit for at least 30 minutes to allow the flavors to meld together.
Incorporating the Garlic Herb Infusion
Now, we’ll gently incorporate the garlic herb infusion into the dough. This is best done during the later stages of bulk fermentation, after you’ve completed the initial stretch and folds.
- Gently Spread the Infusion: After the second or third set of stretch and folds, gently spread the garlic herb infusion evenly over the surface of the dough.
- Fold it In: Gently fold the dough over itself to incorporate the infusion. Be careful not to deflate the dough too much.
- Continue Bulk Fermentation: Continue the bulk fermentation process as described above, allowing the dough to rise until it has increased in volume by about 50-75%.
Shaping the Dough
Once the dough has finished bulk fermenting, it’s time to shape it. This step is important for creating the final structure of the loaf.
- Gently Turn Out the Dough: Lightly flour your work surface. Gently turn the dough out onto the floured surface.
- Shape into a Round or Oval: Gently shape the dough into a round or oval loaf. Be careful not to degas the dough too much. You can use a bench scraper to help you shape the dough.
- Place in a Banneton Basket: Generously flour a banneton basket (or a bowl lined with a floured kitchen towel). Place the shaped dough seam-side up in the basket.
Proofing (Second Rise)
Proofing is the final rise before baking. This allows the dough to relax and develop even more flavor.
- Refrigerate Overnight: Cover the banneton basket with plastic wrap or a damp towel and refrigerate for 12-24 hours. This slow, cold proofing develops a deeper flavor and makes the dough easier to score.
Baking the Bread
Finally, the moment we
Conclusion:
And there you have it! I truly believe this Garlic Herb Sourdough Bread recipe is a must-try for anyone who loves the satisfying crunch of a perfectly baked loaf, the tangy depth of sourdough, and the irresistible aroma of garlic and herbs wafting through their kitchen. It’s more than just bread; it’s an experience, a labor of love that rewards you with a culinary masterpiece.
Why is it a must-try? Because it’s surprisingly simple to make, even if you’re a sourdough newbie. I’ve broken down the process into manageable steps, ensuring success even if you’ve never baked with sourdough before. The combination of garlic and herbs elevates the classic sourdough flavor profile, creating a bread that’s both comforting and sophisticated. Plus, the sheer joy of pulling a warm, crusty loaf from the oven is an unparalleled feeling!
But the best part? The versatility! This Garlic Herb Sourdough Bread is fantastic on its own, slathered with butter or a drizzle of olive oil. But don’t stop there! Imagine slicing it thinly and using it for bruschetta, topped with fresh tomatoes, basil, and balsamic glaze. Or how about using it to make grilled cheese sandwiches that are bursting with flavor? It’s also incredible as a side to hearty soups and stews, perfect for soaking up every last drop.
Serving Suggestions and Variations:
* Garlic Herb Butter: For an extra layer of flavor, mix softened butter with minced garlic, chopped herbs (like parsley, rosemary, and thyme), and a pinch of salt. Spread this on slices of warm bread for an unforgettable treat.
* Cheese, Please!: Add shredded Parmesan or Asiago cheese to the dough during the final proofing stage for a cheesy, garlicky delight.
* Spicy Kick: Incorporate a pinch of red pepper flakes into the dough for a subtle heat that complements the garlic and herbs.
* Sun-Dried Tomato Twist: Add chopped sun-dried tomatoes to the dough for a burst of tangy sweetness.
* Sandwich Superstar: Use this bread to create gourmet sandwiches with your favorite fillings. Think roasted vegetables, grilled chicken, or Italian meats.
* Crouton Creation: Cube leftover bread and bake it with olive oil, garlic powder, and herbs to make homemade croutons for salads and soups.
I’m confident that once you try this recipe, it will become a staple in your kitchen. The aroma alone is enough to make your mouth water, and the taste is simply divine. It’s perfect for sharing with friends and family, or for enjoying a quiet moment of culinary bliss all to yourself.
So, what are you waiting for? Gather your ingredients, preheat your oven, and get ready to embark on a sourdough adventure! I can’t wait to hear about your experience. Please, try this Garlic Herb Sourdough Bread recipe and share your photos and stories with me. Let me know what variations you try and how you enjoy it. Happy baking! I’m eager to see your beautiful loaves!
Garlic Herb Sourdough Bread: The Ultimate Guide to Baking Delicious Bread
Artisan sourdough bread with garlic and herbs. Features a bubbly starter, slow fermentation, and crispy crust.
Ingredients
- 1/2 cup (120g) active sourdough starter, bubbly and doubled in size
- 1 cup (240g) unbleached all-purpose flour
- 1/2 cup (120g) warm water (about 85-90°F)
- All of the active sourdough starter (from above)
- 500g (approximately 4 cups) unbleached bread flour, plus extra for dusting
- 350g (approximately 1 1/2 cups) warm water (about 85-90°F)
- 10g (approximately 2 teaspoons) fine sea salt
- 2 tablespoons olive oil
- 4 cloves garlic, minced
- 2 tablespoons fresh rosemary, finely chopped
- 2 tablespoons fresh thyme, finely chopped
- 1 tablespoon fresh oregano, finely chopped
- 1/4 cup olive oil
- 1/4 teaspoon red pepper flakes (optional, for a little heat)
- Olive oil, for brushing
- Coarse sea salt, for sprinkling
Instructions
- Feed Your Starter: In a clean bowl, combine 1/2 cup (120g) of your starter with 1 cup (240g) of unbleached all-purpose flour and 1/2 cup (120g) of warm water. Mix well until there are no dry clumps of flour.
- Let it Rise: Cover the bowl loosely with plastic wrap or a damp towel and let it sit at room temperature (ideally around 70-75°F) for 4-8 hours, or until it has doubled in size and is bubbly.
- Combine Starter and Water: In a large bowl, combine all of the active sourdough starter with 350g (approximately 1 1/2 cups) of warm water. Mix well until the starter is mostly dissolved in the water.
- Add Flour: Add 500g (approximately 4 cups) of unbleached bread flour to the bowl. Mix until a shaggy dough forms.
- Autolyse (Rest): Cover the bowl and let the dough rest for 30-60 minutes.
- Add Salt and Olive Oil: Add 10g (approximately 2 teaspoons) of fine sea salt and 2 tablespoons of olive oil to the dough.
- Mix the Dough: Mix on low speed for 8-10 minutes or use the stretch and fold method for 10-15 minutes.
- First Stretch and Fold: With wet hands, stretch one side of the dough upwards and fold it over onto itself. Rotate the bowl 90 degrees and repeat.
- Repeat: Cover the bowl and let the dough rest for 30 minutes. Then, repeat the stretch and fold process. Do this a total of 3-4 times during the first 2 hours of bulk fermentation.
- Place in a Bulk Fermentation Container: Transfer the dough to a lightly oiled container.
- Monitor the Rise: Cover the container and let the dough rise at room temperature for 4-6 hours, or until it has increased in volume by about 50-75%. Perform stretch and folds during the first 2 hours.
- Combine Ingredients: In a small bowl, combine the minced garlic, chopped rosemary, chopped thyme, chopped oregano, olive oil, and red pepper flakes (if using). Mix well.
- Let it Infuse: Let the mixture sit for at least 30 minutes to allow the flavors to meld together.
- Gently Spread the Infusion: After the second or third set of stretch and folds, gently spread the garlic herb infusion evenly over the surface of the dough.
- Fold it In: Gently fold the dough over itself to incorporate the infusion.
- Continue Bulk Fermentation: Continue the bulk fermentation process, allowing the dough to rise until it has increased in volume by about 50-75%.
- Gently Turn Out the Dough: Lightly flour your work surface. Gently turn the dough out onto the floured surface.
- Shape into a Round or Oval: Gently shape the dough into a round or oval loaf.
- Place in a Banneton Basket: Generously flour a banneton basket. Place the shaped dough seam-side up in the basket.
- Refrigerate Overnight: Cover the banneton basket with plastic wrap or a damp towel and refrigerate for 12-24 hours.
- Preheat Oven: Preheat your oven to 450°F (232°C) with a Dutch oven inside for at least 30 minutes.
- Score the Dough: Carefully remove the hot Dutch oven from the oven. Gently turn the dough out of the banneton basket into the Dutch oven. Score the top of the dough with a sharp knife or lame.
- Bake: Cover the Dutch oven and bake for 20 minutes. Then, remove the lid and bake for another 25-30 minutes, or until the crust is deeply golden brown and the internal temperature reaches 205-210°F (96-99°C).
- Cool: Carefully remove the bread from the Dutch oven and let it cool completely on a wire rack before slicing and serving.
Notes
- The strength of your starter and the temperature of your environment will affect the rise times. Adjust accordingly.
- The float test is a good indicator of starter activity. A small spoonful of active starter should float in a glass of water.
- Autolysing the dough allows the flour to fully hydrate, resulting in a more extensible dough.
- The stretch and fold method is a gentle way to develop gluten without overworking the dough.
- Bulk fermentation is a crucial step for developing flavor and texture.
- Cold proofing develops a deeper flavor and makes the dough easier to score.
- Baking in a Dutch oven creates a steamy environment, resulting in a crispy crust.


Leave a Comment