
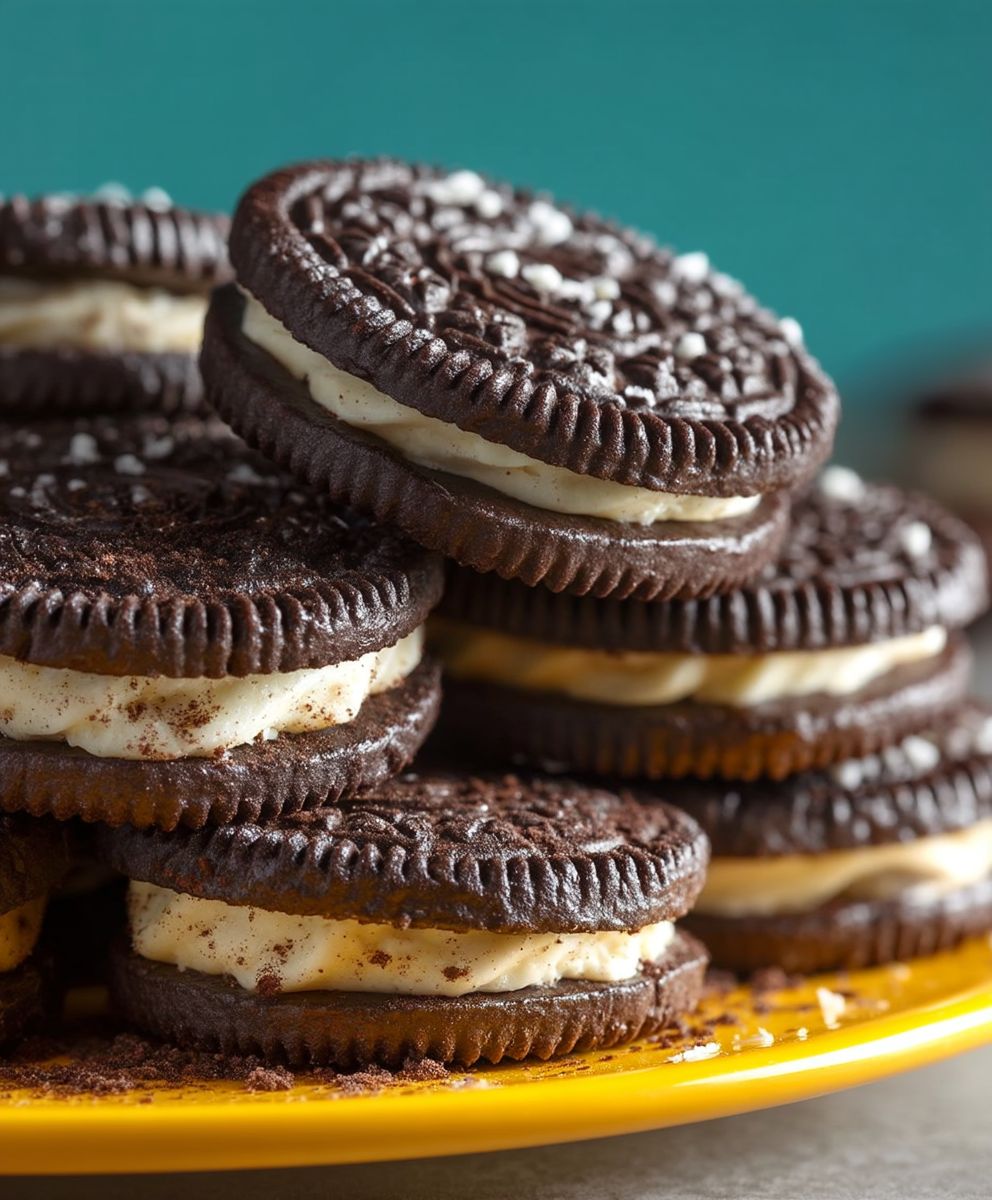
Homemade Oreo Cookies: Prepare to embark on a delightful baking adventure that will redefine your perception of this classic treat! Forget the store-bought variety; we’re about to unlock the secrets to creating irresistibly delicious Oreo cookies right in your own kitchen. Imagine biting into a perfectly crisp, dark chocolate wafer sandwiching a creamy, melt-in-your-mouth vanilla filling. Sounds heavenly, doesn’t it?
While the Oreo cookie, a creation of Nabisco, might not have a centuries-old history steeped in tradition, its cultural impact is undeniable. Since its debut in 1912, it has become a global phenomenon, a symbol of simple pleasures and childhood nostalgia. From elaborate stacking challenges to the age-old “twist, lick, and dunk” ritual, the Oreo has woven its way into our collective consciousness.
But what is it about these cookies that makes them so universally adored? It’s the perfect balance of textures the satisfying snap of the chocolate wafers against the smooth, sweet cream. It’s the convenience of a grab-and-go treat that satisfies any sweet craving. And now, with this recipe for homemade Oreo cookies, you can elevate that experience to a whole new level. You control the ingredients, ensuring the highest quality and freshest flavors. Get ready to impress your friends and family with these delectable, from-scratch versions of a beloved classic!

Ingredients:
- For the Cookies:
- 1 ½ cups (192g) all-purpose flour
- ¾ cup (75g) unsweetened Dutch-process cocoa powder
- 1 ½ teaspoons baking soda
- ¾ teaspoon salt
- 1 cup (2 sticks or 226g) unsalted butter, softened
- 1 ½ cups (300g) granulated sugar
- ½ cup (100g) packed light brown sugar
- 2 large eggs
- 2 teaspoons vanilla extract
- For the Cream Filling:
- ½ cup (1 stick or 113g) unsalted butter, softened
- ½ cup (57g) vegetable shortening
- 4 cups (480g) powdered sugar
- 2 teaspoons vanilla extract
- 2-4 tablespoons milk or heavy cream, as needed
Preparing the Cookie Dough:
- Whisk the Dry Ingredients: In a medium bowl, whisk together the flour, cocoa powder, baking soda, and salt. Make sure everything is evenly distributed; this ensures a consistent flavor and texture in your cookies. I like to whisk for at least 30 seconds to really get it all combined.
- Cream the Butter and Sugars: In a large bowl (or the bowl of your stand mixer), cream together the softened butter, granulated sugar, and brown sugar until light and fluffy. This usually takes about 3-5 minutes on medium speed. Don’t rush this step! Properly creaming the butter and sugar incorporates air, which helps create a tender cookie. You should see a noticeable change in color and texture.
- Add the Eggs and Vanilla: Beat in the eggs one at a time, mixing well after each addition. Then, stir in the vanilla extract. The mixture might look a little curdled at this point, but don’t worry, it will come together when you add the dry ingredients.
- Gradually Add the Dry Ingredients: Gradually add the dry ingredients to the wet ingredients, mixing on low speed until just combined. Be careful not to overmix! Overmixing develops the gluten in the flour, which can result in tough cookies. I usually add the dry ingredients in three additions, mixing until *just* incorporated after each. A few streaks of flour are okay at this stage.
- Shape the Dough into Disks: Divide the dough in half and flatten each half into a disk. Wrap each disk tightly in plastic wrap. This helps prevent the dough from drying out and makes it easier to roll out later.
- Chill the Dough: Refrigerate the dough for at least 1 hour, or preferably 2-3 hours. Chilling the dough is crucial! It allows the gluten to relax, which prevents the cookies from spreading too much in the oven. It also makes the dough easier to handle and roll out. You can even chill the dough overnight if you want to bake the cookies the next day.
Rolling, Cutting, and Baking the Cookies:
- Preheat the Oven: Preheat your oven to 350°F (175°C). Line two baking sheets with parchment paper or silicone baking mats. Parchment paper is my go-to because it prevents sticking and makes cleanup a breeze.
- Roll Out the Dough: On a lightly floured surface, roll out one disk of dough to about ?-inch thickness. Keep the other disk of dough refrigerated while you work. The thinner you roll the dough, the crispier your cookies will be.
- Cut Out the Cookies: Use a 2-inch round cookie cutter (or any shape you prefer) to cut out cookies. Re-roll the scraps and cut out more cookies until all the dough is used. I find it helpful to use a bench scraper to lift the cut-out cookies from the surface without distorting their shape.
- Arrange on Baking Sheets: Place the cookies on the prepared baking sheets, leaving about 1 inch of space between each cookie. This allows for even baking and prevents the cookies from sticking together.
- Bake the Cookies: Bake for 9-11 minutes, or until the edges are set. The cookies will still look slightly soft in the center, but they will firm up as they cool. Keep a close eye on them, as they can burn easily.
- Cool the Cookies: Let the cookies cool on the baking sheets for a few minutes before transferring them to a wire rack to cool completely. Make sure they are completely cool before adding the filling.
Making the Cream Filling:
- Cream the Butter and Shortening: In a large bowl (or the bowl of your stand mixer), cream together the softened butter and vegetable shortening until smooth and creamy. The shortening helps to stabilize the filling and gives it that classic Oreo texture.
- Gradually Add the Powdered Sugar: Gradually add the powdered sugar, one cup at a time, mixing on low speed until combined. Be careful not to add the powdered sugar too quickly, or it will create a cloud of dust!
- Add the Vanilla and Milk: Stir in the vanilla extract. Then, add milk or heavy cream, one tablespoon at a time, until the filling reaches your desired consistency. You want it to be thick and spreadable, but not too stiff.
- Whip Until Fluffy: Beat the filling on medium-high speed for 2-3 minutes, or until light and fluffy. This helps to incorporate air and makes the filling even more delicious.
Assembling the Oreo Cookies:
- Pair Up the Cookies: Find cookies that are similar in size and shape. This will make your finished Oreos look more uniform.
- Spread the Filling: Spread a generous amount of cream filling on the flat side of one cookie. I usually use about 1-2 tablespoons of filling per cookie, but you can adjust the amount to your liking.
- Top with Another Cookie: Gently top with another cookie, flat side down. Press lightly to sandwich the filling between the cookies.
- Repeat: Repeat with the remaining cookies and filling.
- Chill (Optional): For best results, chill the assembled cookies in the refrigerator for at least 30 minutes before serving. This helps the filling to firm up and makes the cookies easier to handle.
Tips for Perfect Homemade Oreos:
- Use Dutch-process cocoa powder: Dutch-process cocoa powder has a smoother, less acidic flavor than natural cocoa powder, which is what gives Oreos their signature taste.
- Don’t overmix the dough: Overmixing develops the gluten in the flour, which can result in tough cookies. Mix until just combined.
- Chill the dough: Chilling the dough is crucial for preventing the cookies from spreading too much in the oven.
- Roll the dough thinly: The thinner you roll the dough, the crispier your cookies will be.
- Use a cookie cutter: Using a cookie cutter ensures that all of your cookies are the same size and shape.
- Don’t overbake the cookies: Overbaked cookies will be dry and crumbly. Bake until the edges are set.
- Let the cookies cool completely before adding the filling: If the cookies are still warm, the filling will melt.
- Use softened butter and shortening for the filling: This will make the filling easier to cream and whip.
- Adjust the amount of milk or cream in the filling to your liking: You want the filling to be thick and spreadable, but not too stiff.
- Chill the assembled cookies before serving: This helps the filling to firm up and makes the cookies easier to handle.
Conclusion:
And there you have it! These Homemade Oreo Cookies are so much more than just a copycat recipe; they’re an experience. From the satisfying snap of the perfectly crisp chocolate wafers to the creamy, dreamy filling that melts in your mouth, every bite is pure bliss. If you’ve ever felt a pang of disappointment biting into a store-bought Oreo that just wasn’t quite *right*, then this is the recipe for you. Trust me, once you taste the difference that fresh, homemade ingredients make, you’ll never go back to the packaged version.
But why are these cookies a must-try? It’s simple: they’re incredibly delicious, surprisingly easy to make, and completely customizable. You control the quality of the ingredients, ensuring that every cookie is made with love and the best possible flavors. Plus, the process itself is incredibly rewarding. There’s something truly special about creating something so delicious from scratch, and sharing it with the people you love.
Looking for serving suggestions? These cookies are perfect on their own, of course, but they also shine in other applications. Crumble them over ice cream for an extra-special sundae, use them as a base for a decadent pie crust, or even blend them into a milkshake for a chocolatey treat. For a grown-up twist, try dipping them in melted dark chocolate and sprinkling them with sea salt. The possibilities are endless!
And speaking of endless possibilities, let’s talk variations! Feel free to experiment with different extracts in the filling. A touch of peppermint extract would be amazing for the holidays, or a hint of almond extract would add a sophisticated touch. You could also try using different types of chocolate for the wafers. Dark chocolate, milk chocolate, or even white chocolate would all be delicious. For a fun and festive twist, add sprinkles to the filling or the wafers before baking. Get creative and make these cookies your own!
I truly believe that everyone should experience the joy of baking these Homemade Oreo Cookies at least once. It’s a recipe that’s sure to become a family favorite, and one that you’ll be proud to share with friends and loved ones. The satisfaction of creating something so delicious from scratch is unparalleled, and the smiles on the faces of those who taste them will be worth every minute of effort.
So, what are you waiting for? Gather your ingredients, preheat your oven, and get ready to embark on a delicious adventure. I’m confident that you’ll be amazed at how easy and rewarding it is to make these cookies.
I’m so excited for you to try this recipe! Once you do, I would absolutely love to hear about your experience. Did you make any variations? What did your family and friends think? Share your photos and stories in the comments below. I can’t wait to see what you create! Happy baking!
Homemade Oreo Cookies: The Ultimate Recipe Guide
Rich, homemade Oreo cookies with dark chocolate wafers and a sweet vanilla cream filling.
Ingredients
- 1 ½ cups (192g) all-purpose flour
- ¾ cup (75g) unsweetened Dutch-process cocoa powder
- 1 ½ teaspoons baking soda
- ¾ teaspoon salt
- 1 cup (2 sticks or 226g) unsalted butter, softened
- 1 ½ cups (300g) granulated sugar
- ½ cup (100g) packed light brown sugar
- 2 large eggs
- 2 teaspoons vanilla extract
- ½ cup (1 stick or 113g) unsalted butter, softened
- ½ cup (57g) vegetable shortening
- 4 cups (480g) powdered sugar
- 2 teaspoons vanilla extract
- 2-4 tablespoons milk or heavy cream, as needed
Instructions
- In a medium bowl, whisk together the flour, cocoa powder, baking soda, and salt. Whisk for at least 30 seconds to really get it all combined.
- In a large bowl (or the bowl of your stand mixer), cream together the softened butter, granulated sugar, and brown sugar until light and fluffy (3-5 minutes on medium speed).
- Beat in the eggs one at a time, mixing well after each addition. Then, stir in the vanilla extract.
- Gradually add the dry ingredients to the wet ingredients, mixing on low speed until just combined. Add the dry ingredients in three additions, mixing until just incorporated after each. A few streaks of flour are okay at this stage.
- Divide the dough in half and flatten each half into a disk. Wrap each disk tightly in plastic wrap.
- Refrigerate the dough for at least 1 hour, or preferably 2-3 hours.
- Preheat your oven to 350°F (175°C). Line two baking sheets with parchment paper or silicone baking mats.
- On a lightly floured surface, roll out one disk of dough to about ?-inch thickness. Keep the other disk of dough refrigerated while you work.
- Use a 2-inch round cookie cutter (or any shape you prefer) to cut out cookies. Re-roll the scraps and cut out more cookies until all the dough is used.
- Place the cookies on the prepared baking sheets, leaving about 1 inch of space between each cookie.
- Bake for 9-11 minutes, or until the edges are set. The cookies will still look slightly soft in the center, but they will firm up as they cool.
- Let the cookies cool on the baking sheets for a few minutes before transferring them to a wire rack to cool completely. Make sure they are completely cool before adding the filling.
- In a large bowl (or the bowl of your stand mixer), cream together the softened butter and vegetable shortening until smooth and creamy.
- Gradually add the powdered sugar, one cup at a time, mixing on low speed until combined.
- Stir in the vanilla extract. Then, add milk or heavy cream, one tablespoon at a time, until the filling reaches your desired consistency.
- Beat the filling on medium-high speed for 2-3 minutes, or until light and fluffy.
- Find cookies that are similar in size and shape.
- Spread a generous amount of cream filling on the flat side of one cookie (about 1-2 tablespoons).
- Gently top with another cookie, flat side down. Press lightly to sandwich the filling between the cookies.
- Repeat with the remaining cookies and filling.
- For best results, chill the assembled cookies in the refrigerator for at least 30 minutes before serving.
Notes
- Use Dutch-process cocoa powder for the signature Oreo taste.
- Don’t overmix the dough.
- Chilling the dough is crucial.
- Roll the dough thinly for crispier cookies.
- Use a cookie cutter for uniform cookies.
- Don’t overbake the cookies.
- Let the cookies cool completely before adding the filling.
- Use softened butter and shortening for the filling.
- Adjust the amount of milk or cream in the filling to your liking.
- Chill the assembled cookies before serving for best results.

Leave a Comment