
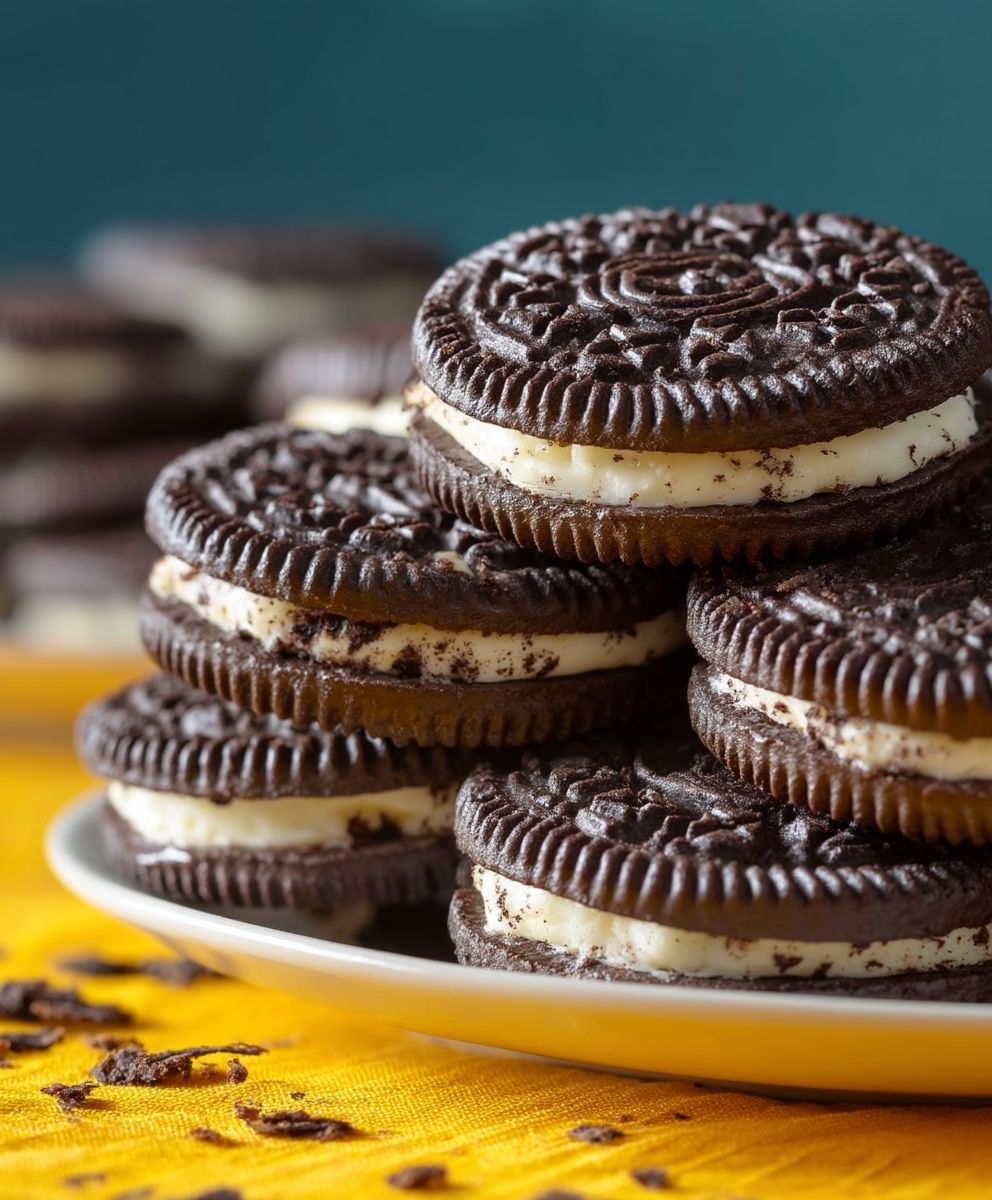
Homemade Oreo Cookies: Prepare to embark on a delightful baking adventure that will transport you back to childhood, one delectable bite at a time! Forget store-bought imitations; we’re diving headfirst into creating the real deal, right in your own kitchen. Imagine sinking your teeth into a perfectly crisp, dark chocolate cookie, giving way to a creamy, sweet vanilla filling. Sounds divine, doesn’t it?
While the Oreo’s history is shrouded in a bit of friendly rivalry (it debuted shortly after Sunshine Biscuits’ similar “Hydrox” cookie), its impact on the American palate is undeniable. Since 1912, this iconic sandwich cookie has captured hearts and taste buds worldwide. It’s more than just a cookie; it’s a symbol of simple pleasures, shared moments, and that irresistible twist-lick-dunk ritual.
What makes the Oreo so universally loved? It’s the perfect balance of textures and flavors. The slightly bitter, intensely chocolatey cookie provides a satisfying snap, while the smooth, melt-in-your-mouth filling offers a sweet counterpoint. Plus, let’s be honest, they’re incredibly convenient! But these Homemade Oreo Cookies take that love to a whole new level. You control the ingredients, ensuring the highest quality and freshest taste. And the satisfaction of creating this classic treat from scratch? Simply unmatched. So, gather your ingredients, preheat your oven, and let’s bake some magic!

Ingredients:
- For the Cookies:
- 1 ½ cups (192g) all-purpose flour
- ¾ cup (75g) unsweetened cocoa powder
- 1 ½ teaspoons baking soda
- ¾ teaspoon baking powder
- ½ teaspoon salt
- 1 cup (2 sticks or 226g) unsalted butter, softened
- 1 ½ cups (300g) granulated sugar
- 2 large eggs
- 2 teaspoons vanilla extract
- For the Cream Filling:
- ½ cup (1 stick or 113g) unsalted butter, softened
- ½ cup (57g) vegetable shortening
- 4 cups (480g) powdered sugar
- 2 teaspoons vanilla extract
- 2-4 tablespoons milk or heavy cream, as needed
Preparing the Cookie Dough:
- Whisk the Dry Ingredients: In a medium bowl, whisk together the flour, cocoa powder, baking soda, baking powder, and salt. Make sure everything is evenly distributed. This step is crucial for ensuring the cookies rise properly and have a consistent flavor. I like to whisk for at least 30 seconds to really get everything combined.
- Cream Butter and Sugar: In a large bowl (or the bowl of a stand mixer), cream together the softened butter and granulated sugar until light and fluffy. This usually takes about 3-5 minutes on medium speed. Scrape down the sides of the bowl occasionally to ensure everything is incorporated. The mixture should be noticeably lighter in color and texture. Don’t rush this step; it’s important for creating a tender cookie.
- Add Eggs and Vanilla: Beat in the eggs one at a time, mixing well after each addition. Then, stir in the vanilla extract. Again, scrape down the sides of the bowl to make sure everything is evenly mixed. The vanilla extract really enhances the chocolate flavor, so don’t skip it!
- Gradually Add Dry Ingredients: Gradually add the dry ingredients to the wet ingredients, mixing on low speed until just combined. Be careful not to overmix! Overmixing can develop the gluten in the flour, resulting in tough cookies. I usually add the dry ingredients in three additions, mixing until just incorporated after each addition. A few streaks of flour are okay at this point.
- Chill the Dough: Divide the dough in half, flatten each half into a disc, and wrap each disc tightly in plastic wrap. Refrigerate for at least 1 hour, or preferably 2-3 hours. Chilling the dough is essential for preventing the cookies from spreading too much during baking. It also allows the flavors to meld together. You can even chill the dough overnight for an even better flavor.
Baking the Cookies:
- Preheat Oven and Prepare Baking Sheets: Preheat your oven to 350°F (175°C). Line baking sheets with parchment paper or silicone baking mats. Parchment paper helps prevent the cookies from sticking and makes cleanup easier. Silicone mats provide even heat distribution.
- Roll Out the Dough: On a lightly floured surface, roll out one disc of dough to about ¼ inch thickness. Keep the other disc of dough refrigerated while you work. If the dough is sticking, add a little more flour to your work surface. Try to roll the dough out evenly so the cookies bake at the same rate.
- Cut Out Cookies: Use a 2-inch round cookie cutter (or any shape you prefer) to cut out cookies. Reroll the scraps and cut out more cookies until all the dough is used. I like to use a fluted cookie cutter for a more decorative look.
- Bake the Cookies: Place the cookies on the prepared baking sheets, leaving about 1 inch of space between each cookie. Bake for 8-10 minutes, or until the edges are set. The cookies will still look slightly soft in the center, but they will firm up as they cool. Don’t overbake them, or they will be dry.
- Cool the Cookies: Let the cookies cool on the baking sheets for a few minutes before transferring them to a wire rack to cool completely. Cooling them on the baking sheet allows them to firm up a bit before you move them, preventing them from breaking.
Making the Cream Filling:
- Cream Butter and Shortening: In a large bowl (or the bowl of a stand mixer), cream together the softened butter and vegetable shortening until smooth and creamy. The shortening helps to stabilize the filling and prevent it from melting too quickly. Beat for about 3-5 minutes on medium speed until light and fluffy.
- Gradually Add Powdered Sugar: Gradually add the powdered sugar, one cup at a time, mixing on low speed until combined. Be careful not to add the powdered sugar too quickly, or it will create a cloud of dust! Scrape down the sides of the bowl frequently.
- Add Vanilla and Milk: Stir in the vanilla extract. Then, add the milk or heavy cream, one tablespoon at a time, until the filling reaches your desired consistency. You want the filling to be thick and creamy, but not too stiff. I usually end up using about 3 tablespoons of milk.
- Whip the Filling: Increase the mixer speed to medium-high and whip the filling for 1-2 minutes until light and fluffy. This will help to incorporate air into the filling and make it even creamier.
Assembling the Oreo Cookies:
- Pipe or Spread the Filling: Transfer the cream filling to a piping bag fitted with a round tip (optional). You can also use a spoon or knife to spread the filling onto the flat side of half of the cookies. I find that piping the filling gives the cookies a more professional look.
- Sandwich the Cookies: Top each filled cookie with another cookie, flat side down, to create a sandwich. Gently press the cookies together to distribute the filling evenly.
- Chill (Optional): For best results, chill the assembled cookies in the refrigerator for at least 30 minutes before serving. This will help the filling to firm up and prevent it from squeezing out when you bite into the cookies.
- Enjoy! Store the cookies in an airtight container at room temperature for up to 3 days, or in the refrigerator for up to 1 week. They are best enjoyed within the first few days, when the cookies are still soft and the filling is creamy.
Tips for Perfect Homemade Oreos:
- Use High-Quality Cocoa Powder: The quality of your cocoa powder will greatly impact the flavor of the cookies. I recommend using a Dutch-processed cocoa powder for a richer, smoother flavor.
- Don’t Overbake: Overbaked cookies will be dry and crumbly. Bake them just until the edges are set and the centers are still slightly soft.
- Chill the Dough: Chilling the dough is essential for preventing the cookies from spreading too much during baking.
- Adjust the Filling Consistency: Add more or less milk to the filling to achieve your desired consistency.
- Get Creative with Flavors: Experiment with different extracts in the filling, such as peppermint, almond, or lemon. You can also add a pinch of espresso powder to the cookie dough for a mocha flavor.
Troubleshooting:
- Cookies Spreading Too Much: Make sure you are chilling the dough for long enough. You can also try adding a tablespoon or two of flour to the dough.
- Cookies Too Dry: Don’t overbake the cookies. Also, make sure you are using enough butter in the dough.
- Filling Too Soft: Add more powdered sugar to the filling to thicken it up. You can also chill the filling in the refrigerator for a few minutes before assembling the cookies.
- Filling Too Stiff: Add more milk or heavy cream to the filling to thin it out.
Conclusion:
And there you have it! These Homemade Oreo Cookies are so much more than just a copycat recipe; they’re a journey back to childhood, a fun baking project, and a guaranteed crowd-pleaser all rolled into one delicious bite. I truly believe that once you taste the rich, dark chocolate cookies paired with that creamy, dreamy filling, you’ll understand why I’m so passionate about this recipe. It’s not just about recreating a classic; it’s about elevating it with fresh ingredients and a whole lot of love.
Why is this a must-try? Well, for starters, the taste is simply incredible. The deep, intense chocolate flavor of the cookies is perfectly balanced by the sweet, vanilla-infused cream. But beyond the taste, it’s the experience of making them that makes this recipe so special. There’s something incredibly satisfying about creating something from scratch, especially when that something is as iconic as an Oreo. Plus, you get to control the ingredients, ensuring that you’re using the best quality chocolate and the purest vanilla extract. No more wondering what’s *really* in those store-bought cookies!
But the fun doesn’t stop there! These Homemade Oreo Cookies are incredibly versatile. Looking for serving suggestions? Serve them with a tall glass of cold milk, of course! Or, crumble them over ice cream for an extra-special sundae. They’re also fantastic additions to milkshakes and other desserts. Imagine a rich, decadent Oreo milkshake pure bliss!
And speaking of versatility, let’s talk variations. Feeling adventurous? Try adding a pinch of espresso powder to the cookie dough for a mocha twist. Or, infuse the cream filling with a hint of peppermint extract for a festive holiday treat. You could even experiment with different extracts, like almond or lemon, to create your own unique flavor combinations. For a truly decadent experience, dip the finished cookies in melted chocolate and sprinkle with sea salt. The possibilities are endless!
Serving and Variation Ideas:
- Classic: Serve with a glass of cold milk.
- Sundae Topping: Crumble over ice cream.
- Milkshake Addition: Blend into a rich milkshake.
- Mocha Twist: Add espresso powder to the cookie dough.
- Peppermint Holiday Treat: Infuse the cream with peppermint extract.
- Chocolate Dipped: Dip in melted chocolate and sprinkle with sea salt.
I’m so excited for you to try this recipe and experience the joy of making your own Homemade Oreo Cookies. It’s a project that’s perfect for bakers of all skill levels, from beginners to seasoned pros. Don’t be intimidated by the multiple steps; each one is simple and straightforward. And trust me, the end result is well worth the effort.
So, what are you waiting for? Gather your ingredients, preheat your oven, and get ready to embark on a delicious baking adventure. Once you’ve made these cookies, I’d absolutely love to hear about your experience. Did you try any of the variations? Did you make any tweaks to the recipe? What did your friends and family think? Share your photos and stories in the comments below! I can’t wait to see what you create. Happy baking!
Homemade Oreo Cookies: The Ultimate Recipe Guide
Homemade Oreo cookies with rich chocolate cookies and a creamy vanilla filling. A delicious homemade version of the classic sandwich cookie!
Ingredients
- 1 ½ cups (192g) all-purpose flour
- ¾ cup (75g) unsweetened cocoa powder
- 1 ½ teaspoons baking soda
- ¾ teaspoon baking powder
- ½ teaspoon salt
- 1 cup (2 sticks or 226g) unsalted butter, softened
- 1 ½ cups (300g) granulated sugar
- 2 large eggs
- 2 teaspoons vanilla extract
- ½ cup (1 stick or 113g) unsalted butter, softened
- ½ cup (57g) vegetable shortening
- 4 cups (480g) powdered sugar
- 2 teaspoons vanilla extract
- 2-4 tablespoons milk or heavy cream, as needed
“`
Instructions
- Whisk the Dry Ingredients: In a medium bowl, whisk together the flour, cocoa powder, baking soda, baking powder, and salt. Make sure everything is evenly distributed. Whisk for at least 30 seconds to really get everything combined.
- Cream Butter and Sugar: In a large bowl (or the bowl of a stand mixer), cream together the softened butter and granulated sugar until light and fluffy. This usually takes about 3-5 minutes on medium speed. Scrape down the sides of the bowl occasionally to ensure everything is incorporated. The mixture should be noticeably lighter in color and texture.
- Add Eggs and Vanilla: Beat in the eggs one at a time, mixing well after each addition. Then, stir in the vanilla extract. Again, scrape down the sides of the bowl to make sure everything is evenly mixed.
- Gradually Add Dry Ingredients: Gradually add the dry ingredients to the wet ingredients, mixing on low speed until just combined. Be careful not to overmix! Add the dry ingredients in three additions, mixing until just incorporated after each addition. A few streaks of flour are okay at this point.
- Chill the Dough: Divide the dough in half, flatten each half into a disc, and wrap each disc tightly in plastic wrap. Refrigerate for at least 1 hour, or preferably 2-3 hours. You can even chill the dough overnight for an even better flavor.
- Preheat Oven and Prepare Baking Sheets: Preheat your oven to 350°F (175°C). Line baking sheets with parchment paper or silicone baking mats.
- Roll Out the Dough: On a lightly floured surface, roll out one disc of dough to about ¼ inch thickness. Keep the other disc of dough refrigerated while you work.
- Cut Out Cookies: Use a 2-inch round cookie cutter (or any shape you prefer) to cut out cookies. Reroll the scraps and cut out more cookies until all the dough is used.
- Bake the Cookies: Place the cookies on the prepared baking sheets, leaving about 1 inch of space between each cookie. Bake for 8-10 minutes, or until the edges are set. The cookies will still look slightly soft in the center, but they will firm up as they cool. Don’t overbake them, or they will be dry.
- Cool the Cookies: Let the cookies cool on the baking sheets for a few minutes before transferring them to a wire rack to cool completely.
- Cream Butter and Shortening: In a large bowl (or the bowl of a stand mixer), cream together the softened butter and vegetable shortening until smooth and creamy. Beat for about 3-5 minutes on medium speed until light and fluffy.
- Gradually Add Powdered Sugar: Gradually add the powdered sugar, one cup at a time, mixing on low speed until combined. Be careful not to add the powdered sugar too quickly, or it will create a cloud of dust! Scrape down the sides of the bowl frequently.
- Add Vanilla and Milk: Stir in the vanilla extract. Then, add the milk or heavy cream, one tablespoon at a time, until the filling reaches your desired consistency. You want the filling to be thick and creamy, but not too stiff.
- Whip the Filling: Increase the mixer speed to medium-high and whip the filling for 1-2 minutes until light and fluffy.
- Pipe or Spread the Filling: Transfer the cream filling to a piping bag fitted with a round tip (optional). You can also use a spoon or knife to spread the filling onto the flat side of half of the cookies.
- Sandwich the Cookies: Top each filled cookie with another cookie, flat side down, to create a sandwich. Gently press the cookies together to distribute the filling evenly.
- Chill (Optional): For best results, chill the assembled cookies in the refrigerator for at least 30 minutes before serving.
- Enjoy! Store the cookies in an airtight container at room temperature for up to 3 days, or in the refrigerator for up to 1 week. They are best enjoyed within the first few days, when the cookies are still soft and the filling is creamy.
Notes
- Use high-quality cocoa powder for the best flavor. Dutch-processed cocoa powder is recommended.
- Don’t overbake the cookies. Bake them just until the edges are set and the centers are still slightly soft.
- Chilling the dough is essential for preventing the cookies from spreading too much during baking.
- Adjust the filling consistency by adding more or less milk to achieve your desired consistency.
- Experiment with different extracts in the filling, such as peppermint, almond, or lemon. You can also add a pinch of espresso powder to the cookie dough for a mocha flavor.
- Cookies Spreading Too Much: Make sure you are chilling the dough for long enough. You can also try adding a tablespoon or two of flour to the dough.
- Cookies Too Dry: Don’t overbake the cookies. Also, make sure you are using enough butter in the dough.
- Filling Too Soft: Add more powdered sugar to the filling to thicken it up. You can also chill the filling in the refrigerator for a few minutes before assembling the cookies.
- Filling Too Stiff: Add more milk or heavy cream to the filling to thin it out.


Leave a Comment