
Homemade PayDay Bars are a delightful treat that brings a taste of nostalgia to your kitchen. As a fan of sweet and salty combinations, I cant resist the satisfying crunch of peanuts enveloped in creamy caramel, all coated in a layer of rich chocolate. This recipe not only captures the essence of the classic candy bar but also allows you to customize it to your liking. The history of PayDay Bars dates back to the 1930s, and they have since become a beloved snack for many, celebrated for their unique flavor profile and satisfying texture.
People love Homemade PayDay Bars for their perfect balance of sweetness and saltiness, making them an ideal indulgence for any occasion. Whether youre looking for a quick snack or a special dessert to share with friends and family, these bars are incredibly convenient to make and can be prepared in just a few simple steps. Join me as we dive into this delicious recipe that will surely become a favorite in your household!

Ingredients:
- 1 cup unsalted butter
- 1 cup light brown sugar, packed
- 1 cup granulated sugar
- 1 cup corn syrup
- 1 teaspoon vanilla extract
- 4 cups salted peanuts
- 1 cup sweetened shredded coconut (optional)
- 1 cup semi-sweet chocolate chips
- 1 tablespoon vegetable oil (for melting chocolate)
Preparing the Mixture
1. **Melt the Butter**: In a large saucepan over medium heat, melt the 1 cup of unsalted butter. Stir it occasionally to ensure it doesnt burn. This should take about 3-5 minutes. 2. **Add Sugars and Corn Syrup**: Once the butter is melted, add the 1 cup of light brown sugar, 1 cup of granulated sugar, and 1 cup of corn syrup to the saucepan. Stir the mixture continuously until the sugars are completely dissolved. This will take about 5-7 minutes. 3. **Incorporate Vanilla**: After the sugars have dissolved, remove the saucepan from the heat and stir in the 1 teaspoon of vanilla extract. This adds a lovely flavor to the mixture. 4. **Mix in Peanuts and Coconut**: In a large mixing bowl, combine the 4 cups of salted peanuts and the 1 cup of sweetened shredded coconut (if using). Pour the warm sugar mixture over the peanuts and coconut. Stir well until all the peanuts and coconut are evenly coated with the sugary mixture.Setting the Mixture
5. **Prepare the Baking Pan**: Line a 9×13 inch baking pan with parchment paper, leaving some overhang on the sides for easy removal later. This will help prevent sticking and make cleanup a breeze. 6. **Spread the Mixture**: Pour the peanut mixture into the prepared baking pan. Using a spatula or your hands (lightly greased to prevent sticking), press the mixture down firmly and evenly into the pan. Make sure its compact, as this will help the bars hold together once they cool. 7. **Cool the Mixture**: Allow the mixture to cool at room temperature for about 30 minutes. If youre in a hurry, you can place it in the refrigerator to speed up the cooling process.Melting the Chocolate
8. **Prepare the Chocolate**: While the peanut mixture is cooling, its time to melt the chocolate. In a microwave-safe bowl, combine the 1 cup of semi-sweet chocolate chips and 1 tablespoon of vegetable oil. The oil helps the chocolate melt smoothly and gives it a nice sheen. 9. **Melt the Chocolate**: Microwave the chocolate in 30-second intervals, stirring in between, until its completely melted and smooth. This usually takes about 1-2 minutes total, depending on your microwave.Assembling the Bars
10. **Pour Chocolate Over Peanut Mixture**: Once the peanut mixture has cooled and set, pour the melted chocolate over the top. Use a spatula to spread it evenly across the surface, ensuring that all the peanuts are covered. 11. **Chill to Set**: Place the baking pan back in the refrigerator for about 1 hour, or until the chocolate has completely set. This step is crucial for achieving that perfect PayDay bar texture.Cutting and Serving
12. **Remove from Pan**: Once the chocolate is set, lift the bars out of the pan using the parchment paper overhang. Place them on a cutting board. 13. **Cut into Bars**: Using a sharp knife, cut the mixture into bars of your desired size. I usually go for about 1-inch wide bars, but you can make them larger or smaller depending on your preference. 14. **Store the Bars**: If you have any leftovers (which is rare!), store the bars in an airtight container at room temperature for up to a week. You can also refrigerate them for longer freshness, but they taste best at room temperature.Enjoying Your Homemade PayDay Bars
15. **Serve and Enjoy**: Now that your homemade PayDay bars are ready, its time to enjoy them! These bars are perfect for sharing with friends and family or keeping as a sweet treat for yourself. They have that delightful combination of sweet and salty, crunchy and chewy that makes them irresistible. 16. **Experiment with Variations**: Feel free to get creative! You can add other ingredients like dried fruits, different types of nuts, or even a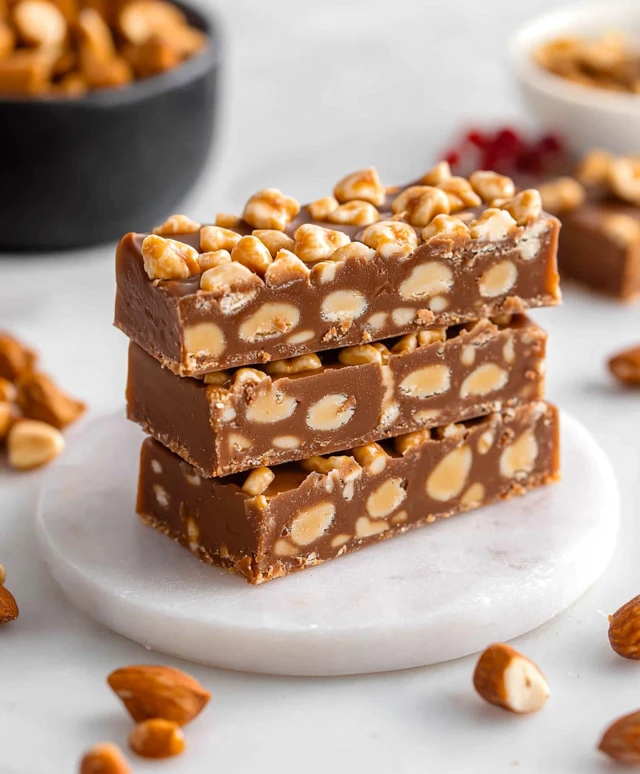
Conclusion:
In conclusion, these Homemade PayDay Bars are an absolute must-try for anyone who loves a sweet and salty treat! The combination of creamy peanut butter, crunchy peanuts, and a touch of caramel creates a delightful flavor explosion that is sure to satisfy your cravings. Plus, making them at home means you can control the ingredients and customize them to your liking. For serving suggestions, I recommend cutting the bars into bite-sized pieces for a perfect snack or dessert option. You can also drizzle some melted chocolate on top for an extra indulgent twist, or even experiment with different nut varieties for a unique flavor profile. If you’re feeling adventurous, try adding a sprinkle of sea salt to enhance the sweet and salty balance. I encourage you to give this recipe a try and share your experience with friends and family. Whether you enjoy them as a midday snack or a sweet treat after dinner, I promise these Homemade PayDay Bars will become a favorite in your household. Dont forget to let me know how they turn out for you! Happy cooking! PrintHomemade PayDay Bars: Easy Recipe for a Delicious Treat
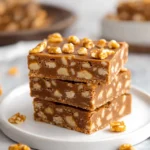
Enjoy the perfect blend of sweet and salty with homemade PayDay bars! These treats feature crunchy salted peanuts, a buttery caramel base, and a smooth chocolate topping, making them an irresistible snack for any occasion.
- Prep Time: 15 minutes
- Cook Time: 15 minutes
- Total Time: 90 minutes
- Yield: 24 bars 1x
Ingredients
- 1 cup unsalted butter
- 1 cup light brown sugar, packed
- 1 cup granulated sugar
- 1 cup corn syrup
- 1 teaspoon vanilla extract
- 4 cups salted peanuts
- 1 cup sweetened shredded coconut (optional)
- 1 cup semi-sweet chocolate chips
- 1 tablespoon vegetable oil (for melting chocolate)
Instructions
- Melt the Butter: In a large saucepan over medium heat, melt the unsalted butter, stirring occasionally for about 3-5 minutes.
- Add Sugars and Corn Syrup: Once melted, add the light brown sugar, granulated sugar, and corn syrup. Stir continuously until the sugars dissolve, about 5-7 minutes.
- Incorporate Vanilla: Remove from heat and stir in the vanilla extract.
- Mix in Peanuts and Coconut: In a large bowl, combine salted peanuts and shredded coconut (if using). Pour the warm sugar mixture over and stir until evenly coated.
- Prepare the Baking Pan: Line a 9×13 inch baking pan with parchment paper, leaving overhang for easy removal.
- Spread the Mixture: Pour the peanut mixture into the pan and press down firmly with a spatula or greased hands to compact it.
- Cool the Mixture: Allow to cool at room temperature for about 30 minutes or refrigerate to speed up the process.
- Prepare the Chocolate: In a microwave-safe bowl, combine chocolate chips and vegetable oil.
- Melt the Chocolate: Microwave in 30-second intervals, stirring until smooth, about 1-2 minutes total.
- Pour Chocolate Over Peanut Mixture: Once cooled, pour the melted chocolate over the peanut mixture and spread evenly.
- Chill to Set: Refrigerate for about 1 hour until the chocolate is set.
- Remove from Pan: Lift the bars out using the parchment paper overhang.
- Cut into Bars: Cut into desired sizes, typically 1-inch wide.
- Store the Bars: Store in an airtight container at room temperature for up to a week or refrigerate for longer freshness.
- Serve and Enjoy: Enjoy your homemade PayDay bars as a sweet treat or share with friends and family.
- Experiment with Variations: Feel free to add dried fruits, different nuts, or other ingredients to customize your bars.
Notes
- For a richer flavor, consider using dark chocolate instead of semi-sweet.
- You can substitute the salted peanuts with other nuts or seeds if desired.
- The shredded coconut is optional but adds a nice texture and flavor.

Leave a Comment