
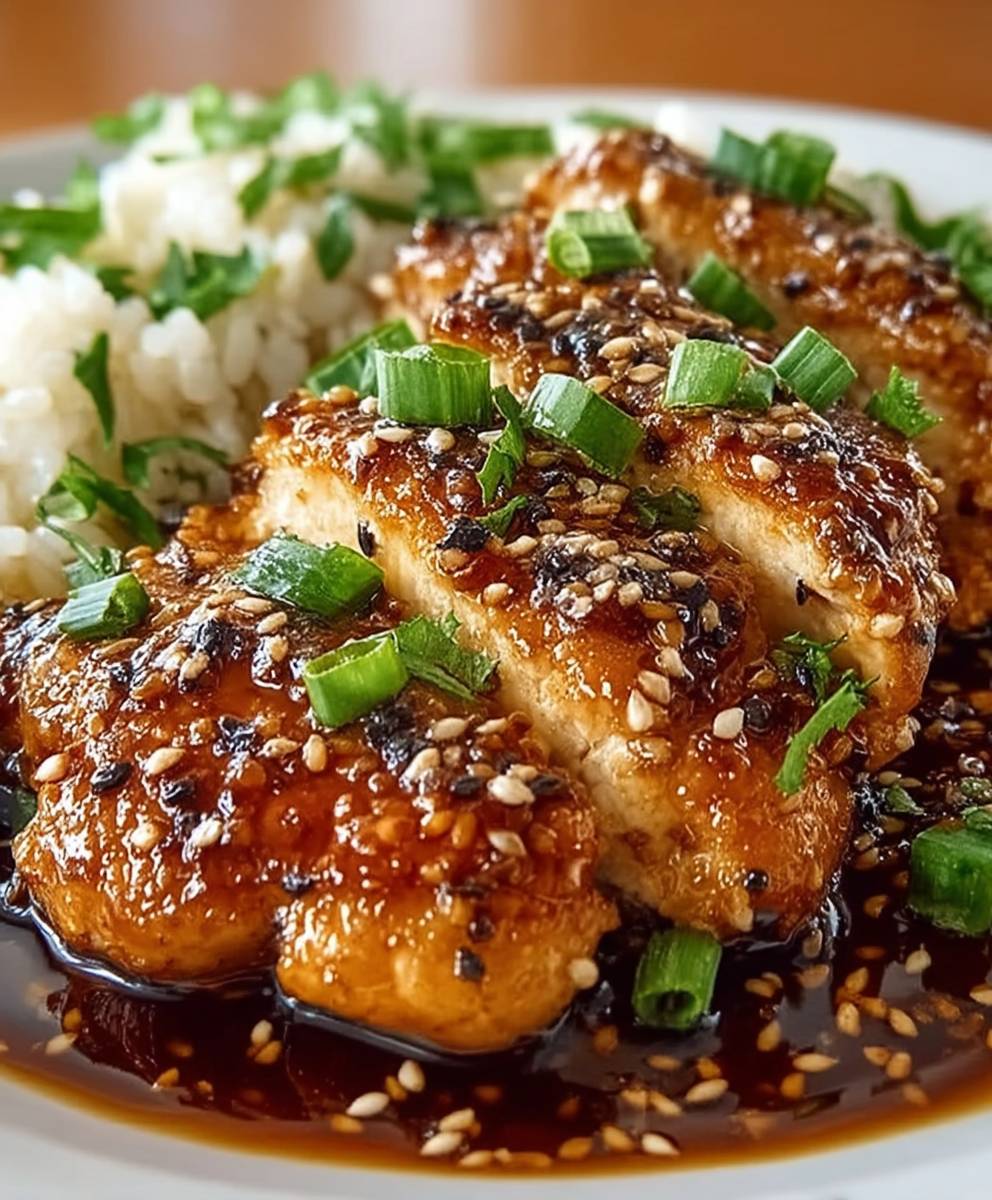
Honey Garlic Chicken, oh, where do I even begin? Imagine sinking your teeth into succulent, perfectly cooked chicken, glazed with a shimmering, sticky sauce that’s both sweet and savory. It’s a flavor explosion that will have you licking your fingers and craving more! This isn’t just dinner; it’s an experience.
While the exact origins of Honey Garlic Chicken are a bit murky, its popularity has exploded across cultures, likely due to its universally appealing flavor profile. The combination of honey and garlic is a classic pairing found in various cuisines, from Asian-inspired dishes to comforting American meals. It’s a testament to how simple ingredients, when combined thoughtfully, can create something truly extraordinary.
What makes this dish so irresistible? Well, for starters, it’s incredibly easy to make! Forget spending hours in the kitchen; this recipe comes together quickly, making it perfect for busy weeknights. But beyond the convenience, it’s the taste and texture that truly win people over. The sweetness of the honey perfectly balances the pungent garlic, creating a harmonious blend that tantalizes the taste buds. The chicken itself is tender and juicy, coated in a glaze that’s both sticky and satisfying. Whether you serve it with rice, noodles, or roasted vegetables, Honey Garlic Chicken is guaranteed to be a crowd-pleaser. I know my family requests it at least once a week!

Ingredients:
- For the Chicken:
- 1.5 lbs boneless, skinless chicken thighs, cut into 1-inch pieces
- 1/4 cup cornstarch
- 1/4 teaspoon salt
- 1/4 teaspoon black pepper
- 1 tablespoon olive oil
- For the Honey Garlic Sauce:
- 1/4 cup honey
- 1/4 cup soy sauce (low sodium preferred)
- 2 tablespoons rice vinegar
- 4 cloves garlic, minced
- 1 tablespoon sesame oil
- 1 teaspoon ginger, grated
- 1/2 teaspoon red pepper flakes (optional, for heat)
- 1 tablespoon water
- 1 tablespoon cornstarch (for slurry)
- For Garnish (optional):
- Sesame seeds
- Chopped green onions
- Serving Suggestions:
- Cooked rice (white or brown)
- Steamed broccoli
- Stir-fried vegetables
Preparing the Chicken:
- Prepare the Chicken Pieces: First, make sure your chicken thighs are cut into roughly 1-inch pieces. This ensures even cooking and a nice bite-sized portion. Pat the chicken dry with paper towels. This is a crucial step! Removing excess moisture helps the cornstarch adhere better and promotes browning.
- Coat the Chicken: In a large bowl, combine the chicken pieces with the cornstarch, salt, and pepper. Toss everything together until the chicken is evenly coated. The cornstarch will create a light, crispy coating when cooked. Make sure every piece is covered!
Cooking the Chicken:
- Heat the Oil: Heat the olive oil in a large skillet or wok over medium-high heat. You want the oil to be hot enough to sizzle when you add the chicken, but not so hot that it burns.
- Cook the Chicken: Add the chicken to the skillet in a single layer. Avoid overcrowding the pan, as this will lower the temperature and cause the chicken to steam instead of brown. If necessary, cook the chicken in batches. Cook for about 5-7 minutes per side, or until the chicken is cooked through and golden brown. The internal temperature should reach 165°F (74°C). Use a meat thermometer to be sure!
- Remove and Set Aside: Once the chicken is cooked, remove it from the skillet and set it aside on a plate.
Making the Honey Garlic Sauce:
- Prepare the Sauce Base: In a medium bowl, whisk together the honey, soy sauce, rice vinegar, minced garlic, sesame oil, grated ginger, and red pepper flakes (if using). This is the flavor powerhouse of the dish! Make sure the honey is well combined with the other ingredients.
- Create the Cornstarch Slurry: In a small bowl, whisk together the water and cornstarch until smooth. This slurry will help thicken the sauce.
- Cook the Sauce: Pour the honey garlic sauce into the same skillet you used to cook the chicken (no need to clean it!). Bring the sauce to a simmer over medium heat.
- Thicken the Sauce: Slowly pour the cornstarch slurry into the simmering sauce, whisking constantly. Continue to cook and whisk until the sauce thickens to your desired consistency, about 1-2 minutes. Be careful not to overcook the sauce, as it can become too thick.
Combining and Serving:
- Add the Chicken to the Sauce: Add the cooked chicken back to the skillet with the honey garlic sauce. Toss to coat the chicken evenly in the sauce.
- Simmer and Glaze: Let the chicken simmer in the sauce for a few minutes, allowing the sauce to glaze the chicken and further enhance the flavors.
- Garnish (Optional): Garnish with sesame seeds and chopped green onions, if desired. These add a nice visual appeal and a touch of flavor.
- Serve: Serve the honey garlic chicken immediately over cooked rice (white or brown), steamed broccoli, or stir-fried vegetables. Enjoy!
Tips and Variations:
Chicken Variations:
- Chicken Breast: You can substitute chicken thighs with chicken breasts. Just be sure not to overcook them, as they can become dry. Cut the chicken breasts into 1-inch pieces as well.
- Chicken Wings: This sauce is also fantastic with chicken wings! Adjust the cooking time accordingly.
Sauce Variations:
- Spice Level: Adjust the amount of red pepper flakes to your liking. If you prefer a milder flavor, omit them altogether. You can also add a dash of sriracha for extra heat.
- Sweetness: If you prefer a less sweet sauce, reduce the amount of honey.
- Savory Flavor: For a more savory flavor, add a splash of Worcestershire sauce to the sauce.
- Garlic Lovers: If you’re a garlic enthusiast, feel free to add more minced garlic to the sauce.
Vegetable Additions:
- Broccoli: Add steamed or roasted broccoli to the skillet with the chicken and sauce for a complete meal.
- Bell Peppers: Sauté sliced bell peppers in the skillet before adding the chicken for added flavor and color.
- Snap Peas: Add snap peas to the skillet during the last few minutes of cooking for a fresh, crunchy element.
- Onions: Sauté sliced onions in the skillet before adding the chicken for a deeper flavor.
- Carrots: Add sliced carrots to the skillet along with the onions and bell peppers for a colorful and nutritious addition.
Serving Suggestions in Detail:
- Rice: Serve over white rice, brown rice, or even quinoa for a healthy and satisfying meal. Consider adding a sprinkle of sesame seeds and chopped green onions to the rice as well.
- Noodles: Toss the honey garlic chicken with cooked noodles, such as ramen, udon, or soba noodles, for a delicious and easy noodle bowl.
- Vegetables: Serve with a side of steamed or stir-fried vegetables, such as broccoli, carrots, bell peppers, and snap peas.
- Salad: Serve with a side salad for a lighter meal. A simple green salad with a vinaigrette dressing would be a great complement.
- Lettuce Wraps: Serve the honey garlic chicken in lettuce wraps for a low-carb option. Use large lettuce leaves, such as butter lettuce or romaine lettuce, as the wraps.
Make-Ahead Tips:
- Prepare the Chicken: You can cut the chicken into pieces and coat it with cornstarch, salt, and pepper ahead of time. Store it in an airtight container in the refrigerator for up to 24 hours.
- Prepare the Sauce: You can also prepare the honey garlic sauce ahead of time. Store it in an airtight container in the refrigerator for up to 3 days.
- Cook the Rice: Cook the rice ahead of time and store it in the refrigerator. Reheat it when you’re ready to serve the chicken.
Storage and Reheating:
- Storage: Store leftover honey garlic chicken in an airtight container in the refrigerator for up to 3 days.
- Reheating: Reheat the chicken in a skillet over medium heat, or in the microwave. Add a splash of water or broth to the skillet to prevent the chicken from drying out.
Troubleshooting:
- Sauce Too Thick: If the sauce becomes too thick, add a little water or broth to thin it out.
- Sauce Too Thin: If the sauce is too thin, whisk together a little more cornstarch and water and add it to the sauce.
- Chicken Not Browning: Make sure the skillet is hot enough before adding the chicken. Avoid overcrowding the pan, as this will lower the temperature and prevent the chicken from browning.
- Chicken Overcooked: Be careful not to overcook the chicken, as it can become dry. Use a meat thermometer to ensure that the chicken is cooked to an internal temperature of 165°F (74°C).
Equipment You’ll Need:
- Large skillet or wok
- Medium bowl
- Small bowl
- Whisk
- Measuring cups and spoons
- Cutting board
- Knife
- 1.5 lbs boneless, skinless chicken thighs, cut into 1-inch pieces
- 1/4 cup cornstarch
- 1/4 teaspoon salt
- 1/4 teaspoon black pepper
- 1 tablespoon olive oil
- 1/4 cup honey
- 1/4 cup soy sauce (low sodium preferred)
- 2 tablespoons rice vinegar
- 4 cloves garlic, minced
- 1 tablespoon sesame oil
- 1 teaspoon ginger, grated
- 1/2 teaspoon red pepper flakes (optional, for heat)
- 1 tablespoon water
- 1 tablespoon cornstarch (for slurry)
- Sesame seeds
- Chopped green onions
- Cooked rice (white or brown)
- Steamed broccoli
- Stir-fried vegetables
- Prepare the Chicken Pieces: Cut chicken thighs into roughly 1-inch pieces. Pat the chicken dry with paper towels.
- Coat the Chicken: In a large bowl, combine the chicken pieces with the cornstarch, salt, and pepper. Toss until evenly coated.
- Heat the Oil: Heat the olive oil in a large skillet or wok over medium-high heat.
- Cook the Chicken: Add the chicken to the skillet in a single layer. Cook for about 5-7 minutes per side, or until the chicken is cooked through and golden brown (internal temperature should reach 165°F (74°C)). Cook in batches if necessary to avoid overcrowding.
- Remove and Set Aside: Remove the chicken from the skillet and set it aside on a plate.
- Prepare the Sauce Base: In a medium bowl, whisk together the honey, soy sauce, rice vinegar, minced garlic, sesame oil, grated ginger, and red pepper flakes (if using).
- Create the Cornstarch Slurry: In a small bowl, whisk together the water and cornstarch until smooth.
- Cook the Sauce: Pour the honey garlic sauce into the same skillet you used to cook the chicken. Bring the sauce to a simmer over medium heat.
- Thicken the Sauce: Slowly pour the cornstarch slurry into the simmering sauce, whisking constantly. Continue to cook and whisk until the sauce thickens to your desired consistency, about 1-2 minutes.
- Add the Chicken to the Sauce: Add the cooked chicken back to the skillet with the honey garlic sauce. Toss to coat the chicken evenly in the sauce.
- Simmer and Glaze: Let the chicken simmer in the sauce for a few minutes, allowing the sauce to glaze the chicken.
- Garnish (Optional): Garnish with sesame seeds and chopped green onions, if desired.
- Serve: Serve the honey garlic chicken immediately over cooked rice (white or brown), steamed broccoli, or stir-fried vegetables.
- Chicken Variations: You can substitute chicken thighs with chicken breasts (cut into 1-inch pieces) or use chicken wings (adjust cooking time accordingly).
- Spice Level: Adjust the amount of red pepper flakes to your liking. Add a dash of sriracha for extra heat.
- Sweetness: Reduce the amount of honey for a less sweet sauce.
- Savory Flavor: Add a splash of Worcestershire sauce to the sauce for a more savory flavor.
- Garlic Lovers: Add more minced garlic to the sauce.
- Vegetable Additions: Add steamed or roasted broccoli, sautéed bell peppers, snap peas, onions, or carrots to the skillet with the chicken and sauce.
- Serving Suggestions: Serve over white rice, brown rice, quinoa, or noodles. Serve with a side of steamed or stir-fried vegetables or a side salad. Serve in lettuce wraps for a low-carb option.
- Make-Ahead Tips: Cut the chicken and coat it with cornstarch, salt, and pepper ahead of time (store in the refrigerator for up to 24 hours). Prepare the honey garlic sauce ahead of time (store in the refrigerator for up to 3 days). Cook the rice ahead of time and store it in the refrigerator.
- Storage: Store leftover honey garlic chicken in an airtight container in the refrigerator for up to 3 days.
- Reheating: Reheat the chicken in a skillet over medium heat, or in the microwave. Add a splash of water or broth to the skillet to prevent the chicken from drying out.
- Sauce Too Thick: Add a little water or broth to thin it out.
- Sauce Too Thin: Whisk together a little more cornstarch and water and add it to the sauce.
- Chicken Not Browning: Make sure the skillet is hot enough before adding the chicken. Avoid overcrowding the pan.
- Chicken Overcooked: Use a meat thermometer to ensure that the chicken is cooked to an internal temperature of 165°F (74°C).
- Equipment You’ll Need: Large skillet or wok, medium bowl, small bowl, whisk, measuring cups and spoons, cutting board, knife.
Conclusion:
This Honey Garlic Chicken recipe isn’t just another weeknight dinner; it’s a flavor explosion waiting to happen! The perfect balance of sweet honey, savory garlic, and a hint of soy sauce creates a glaze that’s utterly irresistible. Trust me, the aroma alone will have your family gathering around the table before you even call them. But beyond the incredible taste, what makes this recipe a must-try is its simplicity. It requires minimal ingredients, comes together quickly, and is virtually foolproof, even for beginner cooks. I know I’ve made it countless times, and it’s always a hit!
Think of it: juicy, tender chicken pieces coated in a glistening, sticky sauce that’s both comforting and exciting. It’s a dish that satisfies every craving, from the desire for something sweet to the need for a hearty, protein-packed meal. And the best part? It’s incredibly versatile.
Serving Suggestions and Variations
I love serving this Honey Garlic Chicken over a bed of fluffy rice to soak up all that delicious sauce. Steamed broccoli or green beans make a perfect, healthy side dish. For a more complete meal, consider adding a side of quinoa or couscous.
But don’t stop there! Feel free to experiment with variations to suit your own taste. If you like a little heat, add a pinch of red pepper flakes or a dash of sriracha to the glaze. For a richer flavor, use dark soy sauce instead of light. You can also add a squeeze of lemon or lime juice for a touch of acidity that cuts through the sweetness.
Another great variation is to use chicken thighs instead of breasts. They tend to be more flavorful and stay moister during cooking. You could even use this glaze on chicken wings for a crowd-pleasing appetizer. Imagine serving a platter of sticky, sweet, and savory Honey Garlic Chicken wings at your next party!
And if you’re looking for a healthier option, try baking the chicken instead of pan-frying it. Simply toss the chicken with the glaze and bake in a preheated oven until cooked through. It’s just as delicious and a little bit lighter.
Don’t be afraid to get creative and make this recipe your own. That’s the beauty of cooking it’s all about experimenting and finding what you love. I’ve even tried adding a touch of ginger to the glaze for an extra layer of flavor, and it was amazing!
Your Turn to Cook!
I truly believe that this Honey Garlic Chicken will become a staple in your kitchen. It’s a recipe that you’ll turn to again and again, whether you’re looking for a quick and easy weeknight dinner or a crowd-pleasing dish for a special occasion.
So, what are you waiting for? Gather your ingredients, put on your apron, and get cooking! I’m confident that you’ll love this recipe as much as I do. And more importantly, I’m excited to hear about your experience.
Once you’ve tried it, please come back and share your thoughts in the comments below. Did you make any variations? What did you serve it with? What did your family think? I’m always eager to learn from your experiences and see how you’ve made this recipe your own. Happy cooking, and enjoy your delicious Honey Garlic Chicken! I can’t wait to hear all about it!
Honey Garlic Chicken: The Ultimate Recipe for Deliciousness
Tender chicken pieces coated in a sweet and savory honey garlic sauce. This easy recipe is perfect served over rice with your favorite vegetables for a quick and delicious weeknight meal.

Leave a Comment