
Creme Brulee Cookies are not just a treat; they are an experience, a delightful reinterpretation of a beloved classic that promises to enchant your taste buds from the very first bite. Have you ever dreamed of savoring the iconic crisp, caramelized sugar crust and the silky, rich vanilla custard of a crème brûlée, but in a more convenient, hand-held form? Well, your culinary dreams are about to come true!
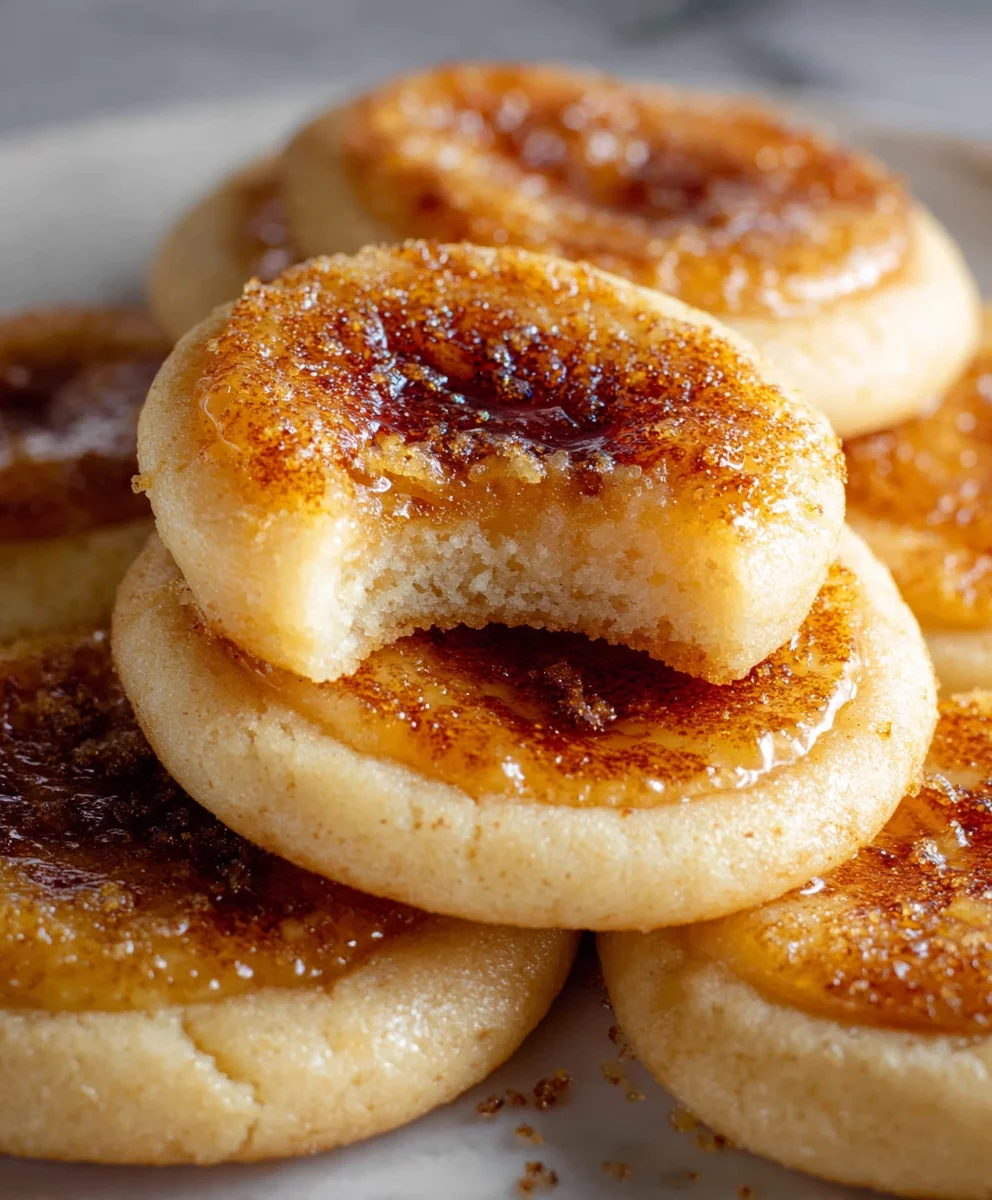
Inspired by the elegant French dessert that has graced tables for centuries, these remarkable Creme Brulee Cookies capture all the sophisticated charm and complex textures of their namesake. We’ve meticulously crafted a recipe that delivers a chewy, tender cookie base, a creamy, subtly sweet center reminiscent of custard, and, of course, that signature crackle of burnt sugar on top. It’s truly a symphony of flavors and textures – the comforting chewiness, the delicate creaminess, and the irresistible crunch – all working in harmony to create an unforgettable dessert. This isn’t just a cookie; it’s a celebration of innovation in baking, offering all the indulgence with delightful portability. I am so excited for you to try them!

I’m so excited to share this incredible recipe for Creme Brulee Cookies with you! These aren’t just any cookies; they’re a delightful fusion of two beloved desserts, combining the rich, buttery chewiness of a perfect cookie with the creamy, delicate custard and crisp caramelized sugar topping of a classic creme brulee. Get ready to impress everyone, including yourself!
Ingredients:
-
For the Cookie Dough:
- 2 ½ cups (300g) all-purpose flour
- 1 teaspoon baking powder
- ½ teaspoon baking soda
- ½ teaspoon salt
- 1 cup (226g) unsalted butter, softened to room temperature
- ¾ cup (150g) granulated sugar
- ¾ cup (165g) packed light brown sugar
- 2 large eggs, at room temperature
- 2 teaspoons pure vanilla extract (or 1 teaspoon vanilla bean paste for richer flavor)
-
For the Creme Brulee Custard Filling:
- 4 large egg yolks
- ½ cup (100g) granulated sugar
- 1 ½ cups (360ml) heavy cream
- 1 teaspoon pure vanilla extract (or ½ teaspoon vanilla bean paste)
- Pinch of salt
-
For the Caramelized Topping:
- ½ cup (100g) granulated sugar, extra for sprinkling
Preparing the Cookie Dough
- Begin by whisking together your dry ingredients: In a medium bowl, combine the all-purpose flour, baking powder, baking soda, and salt. Whisk these ingredients thoroughly to ensure they are evenly distributed. This step is crucial for consistent rise and flavor in your Creme Brulee Cookies. Set this mixture aside. You’ll notice that the baking powder and soda work in tandem to give these cookies a perfect rise and a soft, chewy texture that complements the creamy filling beautifully.
- Cream the butter and sugars: In the bowl of a stand mixer fitted with the paddle attachment (or using a large bowl and a handheld electric mixer), add the softened unsalted butter, granulated sugar, and light brown sugar. Beat on medium speed for 2-3 minutes, or until the mixture is light, fluffy, and pale in color. This creaming process incorporates air, which is vital for creating soft and tender cookies. It also fully dissolves the sugar crystals into the butter, contributing to that desirable smooth texture. Scrape down the sides of the bowl as needed to ensure everything is well combined and no pockets of uncreamed butter remain.
- Incorporate the eggs and vanilla: Add the two large eggs, one at a time, beating well after each addition until fully incorporated. It’s important to add them one at a time to allow each egg to emulsify properly into the butter mixture, preventing the dough from separating or looking curdled. Then, stir in the pure vanilla extract (or vanilla bean paste if you’re using it for that extra luxurious touch). Continue to beat until the mixture is smooth and cohesive. The vanilla is absolutely key to the flavor profile of our Creme Brulee Cookies, providing a warm, inviting base that will marry perfectly with the custard.
- Combine wet and dry ingredients: Gradually add the dry ingredient mixture to the wet ingredients, mixing on low speed until just combined. Be careful not to overmix the dough at this stage, as overmixing can lead to tougher cookies due to excessive gluten development. Stop mixing as soon as you no longer see streaks of dry flour. A few visible specks of flour are fine; they will disappear during the chilling process. The dough will be soft and slightly sticky, which is perfectly normal and a sign of a rich, buttery cookie.
- Chill the cookie dough: Cover the bowl with plastic wrap and refrigerate the cookie dough for at least 1 hour. Chilling the dough is an incredibly important step for several reasons: it firms up the butter, which prevents the cookies from spreading too much during baking and helps them hold their shape. It also allows the flour to fully hydrate, resulting in a more tender and flavorful cookie. Furthermore, chilling allows the flavors to meld and deepen. This is especially important for our Creme Brulee Cookies, as we need a stable dough for creating the well for the custard. If you’re not in a rush, an overnight chill is even better for developing a richer flavor and making the dough even easier to handle.
Crafting the Custard Filling
While the cookie dough is chilling, let’s prepare the luscious custard filling that will bring the “creme brulee” magic to these cookies. This is a mini creme brulee in itself, so pay attention to the details for a silky-smooth result!
- Prepare the egg yolk mixture: In a medium heatproof bowl, whisk together the four large egg yolks and ½ cup of granulated sugar until the mixture is pale yellow and slightly thickened. The sugar helps to break down the proteins in the egg yolks and creates a smoother final custard. Whisk vigorously for about 1-2 minutes until you see the color lighten and the mixture become airy. Set this aside.
- Heat the heavy cream: In a small saucepan, combine the heavy cream, 1 teaspoon of vanilla extract (or ½ teaspoon vanilla bean paste), and a tiny pinch of salt. Heat the mixture over medium-low heat until it just begins to simmer around the edges – you’ll see tiny bubbles forming and a wisp of steam. Do not let it come to a rolling boil, as this can scald the cream and impact its flavor. Heating the cream gently ensures the vanilla infuses beautifully, creating a fragrant base for our custard, and helps to temper the eggs more effectively in the next step.
- Temper the egg yolks: This is a crucial step to prevent the eggs from scrambling when combined with the hot cream. Slowly and gradually, ladle about half of the hot cream mixture into the egg yolk mixture, whisking constantly and vigorously. The goal is to slowly raise the temperature of the egg yolks without cooking them. This gradual introduction of heat is essential. Once half the cream is incorporated and the egg mixture is warm, pour the tempered egg yolk mixture back into the saucepan with the remaining hot cream. Continue to whisk constantly to ensure everything is evenly combined.
- Cook the custard: Place the saucepan back over medium-low heat. Cook, stirring constantly with a whisk or a heatproof spatula, for 5-8 minutes, or until the custard thickens enough to coat the back of a spoon. If you run your finger across the coated spoon, the line should hold without the custard running back together. Be patient and keep stirring to prevent curdling or sticking to the bottom of the pan. Cooking at a low temperature and continuous stirring are key for a smooth custard. An instant-read thermometer should read between 170°F and 175°F (77°C-80°C). Do not allow it to exceed 180°F (82°C), as this is when eggs can begin to scramble.
- Chill the custard: Remove the custard from the heat immediately. Pour it through a fine-mesh sieve into a clean bowl. This step ensures a perfectly smooth and silky custard, removing any small bits of cooked egg or vanilla bean specks that might have formed. Cover the surface of the custard directly with plastic wrap to prevent a skin from forming as it cools. Refrigerate the custard for at least 2 hours, or until completely chilled and firm enough to scoop. A well-chilled custard is essential for easy handling and proper structure within your Creme Brulee Cookies. It needs to be firm enough to hold its shape inside the cookie dough without spreading too much during baking.
Assembling and Baking the Creme Brulee Cookies
- Preheat your oven and prepare baking sheets: Preheat your oven to 350°F (175°C). Line two large baking sheets with parchment paper or silicone baking mats. This will prevent sticking and ensure even baking for your beautiful Creme Brulee Cookies. Having your oven at the correct temperature before placing the cookies in is vital for proper spread and browning.
- Shape the cookie dough: Remove the chilled cookie dough from the refrigerator. Scoop about 2 tablespoons of dough per cookie. I like to use a cookie scoop for consistent sizing. Roll each portion into a smooth ball between your palms. Using your thumb or the back of a small measuring spoon (a ½ teaspoon works perfectly), create a deep indentation in the center of each cookie dough ball, forming a small well. Make sure the well is deep enough to hold a good amount of custard but not so deep that it goes all the way through the bottom or makes the edges too thin. Place the shaped cookie dough balls about 2 inches apart on the prepared baking sheets to allow for proper air circulation and expansion during baking.
- Fill with custard: Carefully spoon about 1-1 ½ teaspoons of the chilled custard filling into the well of each cookie dough ball. The custard will be thick and easy to work with once properly chilled, making this step surprisingly straightforward. Don’t overfill, as the custard will expand slightly during baking, and you want it to remain neatly within the cookie’s border. A small offset spatula or the back of a spoon can help you gently level the custard in the well.
- Bake the cookies: Bake one sheet at a time in the preheated oven for 12-15 minutes, or until the edges of the cookies are lightly golden and the custard filling is set and slightly puffed. The exact baking time may vary depending on your oven, so keep a close eye on them, especially towards the end. The cookies should still be slightly soft in the center when you remove them from the oven, as they will continue to set as they cool on the hot baking sheet. A little under-baked is better than over-baked for a chewy cookie.
- Cool the Creme Brulee Cookies: Allow the cookies to cool on the baking sheets for 5 minutes before carefully transferring them to a wire rack to cool completely. Handling them too soon can cause them to break or the custard to spill. It is absolutely crucial that the cookies are fully cooled before proceeding to the caramelization step. If they are warm, the caramelized sugar topping will melt into the custard rather than forming a crisp shell, which would defeat the purpose of our amazing Creme Brulee Cookies! Patience here is key to achieving that signature creme brulee crack!
The Caramelized Topping: The Grand Finale
This is where the magic truly happens, transforming your already delicious cookies into authentic Creme Brulee Cookies with that irresistible crunchy top. This step adds not only texture but a profound depth of flavor through the caramelized sugar.
- Prepare for caramelization: Once the cookies are completely cool, arrange them on a heatproof surface, such as a large baking sheet or a clean cutting board. This surface should be stable and able to withstand heat. Ensure you have good ventilation in your kitchen, as caramelizing sugar can produce some smoke and a distinct aroma, so open a window or turn on your range hood.
- Apply the sugar: Sprinkle a generous amount (about ½ to 1 teaspoon, depending on the size of the well) of granulated sugar evenly over the custard filling in the center of each cooled cookie. You want a consistent, thin layer that completely covers the custard. Don’t be shy with the sugar, as this is what will form your signature crackly topping. Using a fine sieve to dust the sugar can help create an even layer.
- Caramelize with a kitchen torch: Carefully, using a kitchen torch, wave the flame evenly over the sugar-coated custard. Keep the flame moving constantly to prevent burning in one spot, which can result in a bitter taste. Watch as the sugar melts, bubbles, and then turns a beautiful amber-brown color, creating a hard, shiny, crackly shell. This process usually takes about 15-30 seconds per cookie, but it’s important to keep your eye on it constantly. Safety first: always follow the manufacturer’s instructions for your kitchen torch, keep flammable materials away from the flame, and avoid touching the caramelized sugar until it has cooled. The smell of toasting sugar is absolutely heavenly and part of the experience of making these Creme Brulee Cookies!
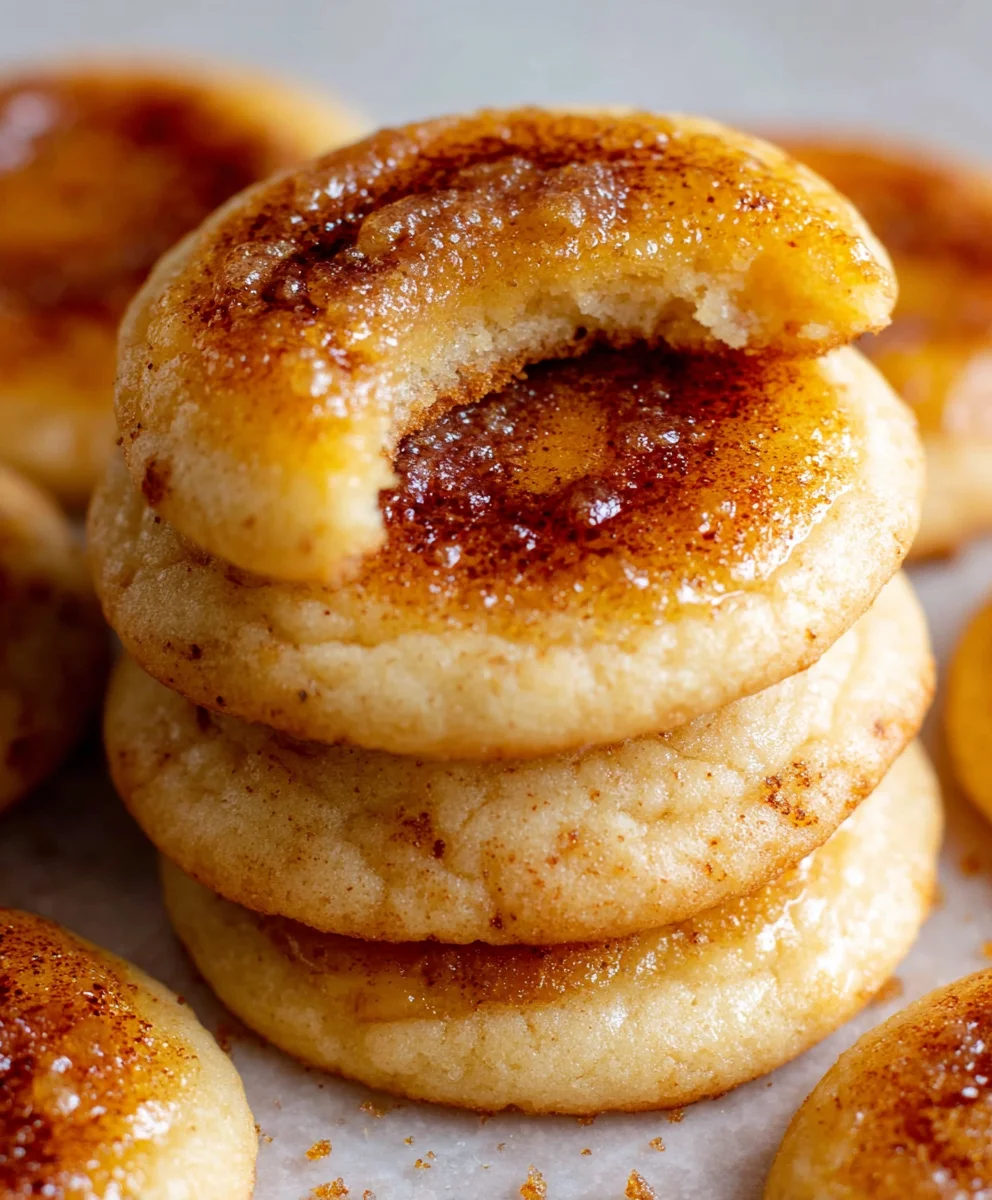
- Allow to set: Let the caramelized sugar cool for a minute or two until it hardens completely. You’ll know it’s ready when you can gently tap it with a spoon and hear that satisfying “crack” sound. This crunchy layer is what makes these Creme Brulee Cookies so extraordinary and truly mimics the classic dessert, providing a delightful textural contrast to the soft cookie and creamy custard.
- Serve immediately: For the best experience, serve these magnificent Creme Brulee Cookies shortly after caramelizing the sugar. The contrast between the warm, crisp topping and the cool, creamy custard with the soft cookie base is simply divine and truly unforgettable. The caramelized sugar is at its peak crunchiness when freshly torched. If you must store them, do so at room temperature in an airtight container for up to 2-3 days, but be aware the caramelized topping will absorb moisture and soften over time. Re-torching the topping just before serving is always an option if you want to restore that crispness! Enjoy every single bite of these truly special cookies, they are worth every moment of effort!
Conclusion:
Well, my friends, we’ve reached the sweet finale of our culinary journey, and I genuinely hope you’re feeling as excited as I am about the prospect of bringing these incredible treats into your kitchen. If there’s one recipe I could implore you to try this year, it truly is this one. What makes these cookies so utterly irresistible, so undeniably ‘must-try’? It’s the harmonious dance of textures and flavors, isn’t it? That satisfying crunch of caramelized sugar giving way to a soft, chewy, vanilla-infused cookie base is nothing short of magical. We’re not just baking a cookie here; we’re crafting an experience, a delightful little morsel that captures the essence of a sophisticated dessert and makes it accessible for any occasion. Imagine the surprised delight on the faces of your loved ones as they bite into what they expect to be a simple cookie, only to discover the complex, elegant profile of crème brûlée. That’s the ‘wow’ factor we’re chasing, and trust me, this recipe delivers it in spades. I’ve poured a lot of love and experimentation into perfecting this balance, ensuring that every bite is a journey from crisp to tender, from sweet to subtly aromatic vanilla. This isn’t just another cookie; it’s a statement, a testament to how creative and innovative home baking can be. It’s about taking a classic, beloved dessert and reinventing it in a way that’s both nostalgic and excitingly new.
Embrace the Versatility: Serving and Variation Inspirations
Now that you’re armed with the knowledge to create these beauties, let’s talk about how to truly make them shine. While they are absolutely divine enjoyed simply on their own – perhaps with a quiet cup of coffee or a comforting mug of tea – their potential extends far beyond that. For your next dinner party, why not arrange them artfully on a dessert platter? They make for an elegant, portion-controlled sweet ending that’s sure to spark conversation. Consider serving them alongside a scoop of high-quality vanilla bean ice cream, allowing the contrasting temperatures and textures to create an even richer dessert experience. Or, for a truly memorable moment, offer them with a small shot of espresso or a glass of dessert wine, enhancing their sophisticated profile. They also make incredibly thoughtful homemade gifts; imagine wrapping a small box of these up for a friend or neighbor – it’s a gesture that speaks volumes about your care and culinary prowess.
But don’t stop there! The beauty of baking is in the experimentation. While the original recipe for these Creme Brulee Cookies is perfect as is, feel free to unleash your inner pastry chef and play around with variations. How about adding a hint of almond extract alongside the vanilla for a slightly different aromatic note? Or perhaps a tiny pinch of sea salt to the cookie dough itself, which can wonderfully balance the sweetness of the caramelized topping and add a subtle depth. For the adventurous, you could even try incorporating a finely grated orange zest into the dough for a bright, citrusy counterpoint, or even a dash of cinnamon for a warmer, spicier twist. And what about the caramelization process? While a kitchen torch is my preferred method for that perfect crisp crust, a broiler can also work wonders – just be sure to watch them like a hawk to prevent burning! You could even experiment with different types of sugar for the topping; a demerara sugar often gives a slightly coarser, chewier caramel, while regular granulated sugar yields a very crisp, thin layer. The possibilities are truly endless, and each tweak offers a chance to personalize this already incredible recipe, making it uniquely yours.
Your Turn to Create and Share!
My biggest hope is that you feel inspired, empowered, and perhaps a little bit hungry after reading through this recipe. I’ve shared my secrets, my tips, and my enthusiasm, and now it’s your turn to step into the kitchen and make these culinary dreams a reality. Don’t be intimidated by the torch – it’s easier than you think and incredibly satisfying! The moment you crack through that golden, glassy sugar crust, you’ll understand exactly why these are more than just cookies. They are an experience, a celebration of flavor and texture that truly stands out from the crowd.
I am genuinely so excited for you to try making these Creme Brulee Cookies. Please, when you do, don’t keep the deliciousness to yourself! I absolutely adore seeing your creations. Snap some photos, tell me about your baking journey, what you loved most, or any fun variations you experimented with. Did you share them with family? Were they a hit at your latest gathering, or did they simply disappear straight from the cooling rack? Your feedback and shared experiences are what truly fuel my passion for cooking and baking, and I can’t wait to hear all about your triumphs in the kitchen. Remember, baking is an act of love, a way to connect and create joy, and these cookies are a perfect embodiment of that sentiment. So go ahead, preheat your oven, grab your ingredients, and prepare to impress yourself and everyone lucky enough to taste your magnificent creations. Happy baking!
Irresistible Creme Brulee Cookies
Creme Brulee Cookies are an exquisite reinterpretation of the classic French dessert, offering a delightful fusion of a chewy cookie base, a creamy, subtly sweet custard center, and a signature crisp, caramelized sugar topping. This recipe captures all the sophisticated charm and complex textures of crème brûlée in a portable, irresistible cookie form.
Ingredients
-
2 1/4 cups (540 ml) whole milk
-
6 egg yolks
-
1 cup + 2 tbsp (225 g) granulated white sugar (for custard)
-
1/8 tsp salt (for custard)
-
1 1/2 tbsp vanilla bean paste (for custard)
-
3 1/2 tbsp (28 g) cornstarch
-
3 tbsp (42 g) unsalted butter, cut in cubes
-
2 1/2 cups (313 g) all-purpose flour, spooned and leveled
-
1/2 tsp baking powder
-
1/2 tsp salt (for cookie dough)
-
1 1/4 cup (250 g) granulated white sugar (for cookie dough)
-
1 cup (224 g) unsalted butter, softened
-
1 egg
-
1 tbsp vanilla bean paste (for cookie dough)
-
1/2 cup (100 g) granulated white sugar (for topping)
Instructions
-
Step 1
In a medium bowl, whisk together 2 1/2 cups all-purpose flour, 1/2 tsp baking powder, and 1/2 tsp salt. Set aside. -
Step 2
In a stand mixer, cream 1 cup softened unsalted butter with 1 1/4 cup granulated white sugar for 2-3 minutes until light and fluffy. Beat in 1 egg, then 1 tbsp vanilla bean paste until smooth. -
Step 3
Gradually add dry ingredients to wet, mixing on low speed until just combined. Do not overmix. Cover and refrigerate dough for at least 1 hour, or overnight. -
Step 4
In a heatproof bowl, whisk 6 egg yolks with 1 cup + 2 tbsp granulated white sugar until pale and slightly thickened. Set aside. -
Step 5
In a small saucepan, combine 2 1/4 cups whole milk, 1 1/2 tbsp vanilla bean paste, and 1/8 tsp salt. Heat over medium-low until it just simmers around the edges. Do not boil. -
Step 6
Slowly ladle half of the hot milk mixture into the egg yolk mixture, whisking constantly. Pour the tempered egg mixture back into the saucepan with the remaining hot milk. Cook over medium-low heat, stirring constantly, for 5-8 minutes until thickened to coat the back of a spoon (170°F-175°F). (Note: The provided ingredients include cornstarch and butter for the custard, which are not explicitly used in these instructions from the article’s method. For a standard custard with cornstarch, it would typically be whisked with the yolks or a small amount of cold liquid, then added to the hot milk. The butter would usually be stirred in off-heat at the end for richness.) -
Step 7
Remove custard from heat, pour through a fine-mesh sieve into a clean bowl. Cover surface directly with plastic wrap and refrigerate for at least 2 hours until completely chilled and firm. -
Step 8
Preheat oven to 350°F (175°C). Line baking sheets with parchment. Scoop 2 tbsp of chilled cookie dough, roll into a ball, and create a deep indentation in the center. Spoon 1-1 1/2 tsp of chilled custard filling into each well. Place on prepared baking sheets. -
Step 9
Bake for 12-15 minutes, or until edges are lightly golden and custard is set. Cool on baking sheets for 5 minutes, then transfer to a wire rack to cool completely. Cookies MUST be fully cooled before caramelizing. -
Step 10
Once cookies are completely cool, sprinkle a generous amount (1/2 to 1 tsp) of granulated white sugar evenly over the custard filling of each cookie. Using a kitchen torch, wave the flame evenly over the sugar until it melts, bubbles, and turns an amber-brown, forming a hard, crackly shell. Keep flame moving to prevent burning. -
Step 11
Allow caramelized sugar to harden for a minute or two. Serve immediately for best crispness. Store at room temperature in an airtight container for up to 2-3 days; re-torch if needed to restore crispness.
Important Information
Nutrition Facts (Per Serving)
It is important to consider this information as approximate and not to use it as definitive health advice.
Allergy Information
Please check ingredients for potential allergens and consult a health professional if in doubt.


Leave a Comment